The Uncomplicated Firewall (UFW) provides a user-friendly interface for managing iptables firewall rules on Ubuntu 26.04. This comprehensive guide covers everything you need to ufw configure ubuntu 26.04 systems effectively, from basic setup to advanced rule management. Whether you’re securing a server or desktop installation, UFW simplifies firewall administration without sacrificing flexibility.
Table of Contents
In this tutorial you will learn:
- How to enable and configure UFW on Ubuntu 26.04
- How to set default firewall policies
- How to allow and deny specific ports and services
- How to use application profiles for common services
- How to create IP-based and subnet rules
- How to manage, delete, and reset firewall rules
- How to configure UFW logging
Software Requirements
| Category | Requirements, Conventions or Software Version Used |
|---|---|
| System | Ubuntu 26.04 Resolute Raccoon |
| Software | UFW (pre-installed on Ubuntu 26.04) |
| Other | Privileged access to your Linux system as root or via the sudo command. |
| Conventions | # – requires given linux commands to be executed with root privileges either directly as a root user or by use of sudo command$ – requires given linux commands to be executed as a regular non-privileged user |
sudo ufw enable, set default policies, and add rules for your services.
| Step | Command/Action |
|---|---|
| 1. Enable UFW | sudo ufw enable |
| 2. Set default deny incoming | sudo ufw default deny incoming |
| 3. Allow SSH access | sudo ufw allow ssh |
| 4. Check status | sudo ufw status verbose |
Understanding UFW Basics
UFW serves as a frontend for iptables, the powerful but complex Linux kernel firewall. Rather than writing intricate iptables rules manually, UFW provides straightforward commands that translate into proper firewall configurations. Ubuntu 26.04 includes UFW by default, though it remains disabled after installation to avoid blocking network access during initial setup.
The firewall operates on the concept of rules and policies. Default policies determine what happens to traffic that doesn’t match any specific rule, while individual rules define exceptions for particular ports, services, or IP addresses. Understanding this hierarchy is essential when you configure firewall settings on your system.
UFW maintains two primary rule chains: incoming traffic (packets destined for your system) and outgoing traffic (packets originating from your system). Most configurations focus on incoming rules since servers typically need to restrict inbound access while permitting outbound connections. For comprehensive details, consult the official Ubuntu UFW documentation.
Enabling and Checking UFW Status on Ubuntu 26.04
Before enabling UFW on a remote server, ensure you have an SSH rule in place to avoid locking yourself out. The following steps demonstrate how to safely activate the firewall and verify its status.
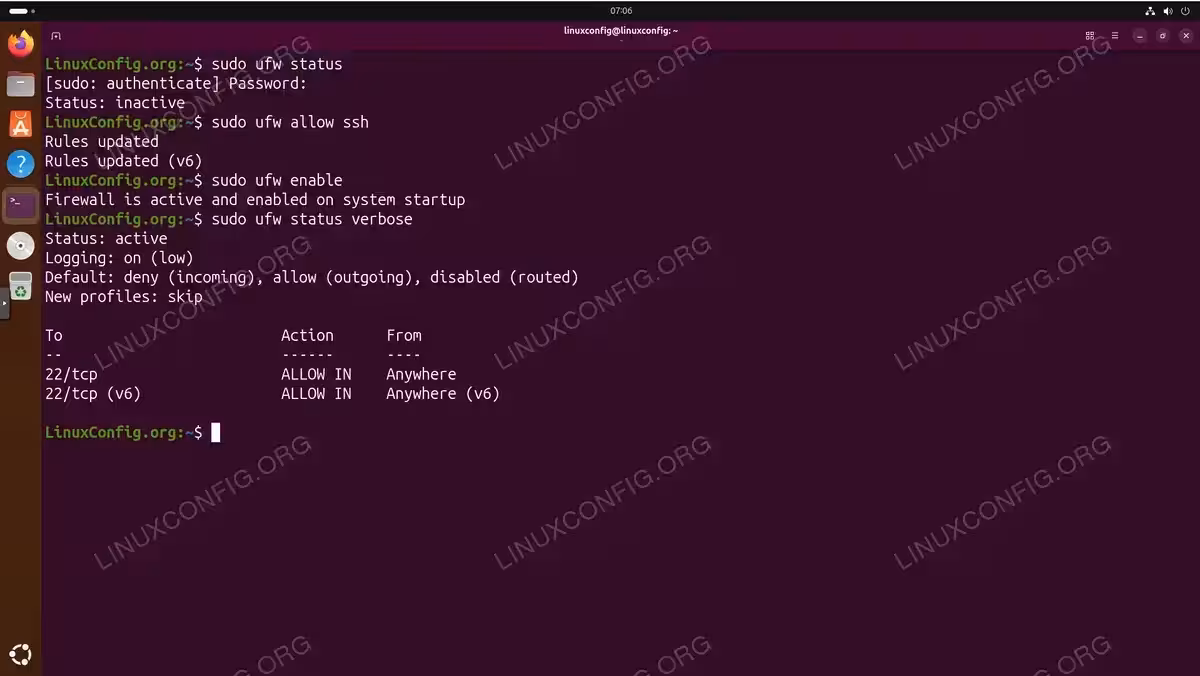
- Check current UFW status: First, verify whether UFW is currently active or inactive on your system.
$ sudo ufw status
On a fresh Ubuntu 26.04 installation, the output shows
Status: inactive. - Allow SSH before enabling: If you’re connected remotely, add an SSH rule first to maintain access.
$ sudo ufw allow ssh
This creates rules permitting traffic on port 22 for both IPv4 and IPv6.
- Enable UFW: Activate the firewall with the enable command.
$ sudo ufw enable
The system warns that enabling UFW may disrupt existing SSH connections. Type
yto confirm. - Verify active status: Confirm the firewall is running with verbose output.
$ sudo ufw status verbose
The output displays the current default policies and all active rules.
To check firewall status at any time, use the status command. Adding verbose provides additional details including logging level and default policies. If you encounter issues where the command isn’t recognized, you may need to troubleshoot ufw command not found errors.
IMPORTANT
Never enable UFW on a remote server without first allowing SSH access. Doing so will immediately terminate your connection with no way to regain access except through console or physical access.
Configuring Default Policies
Default policies define how UFW handles traffic that doesn’t match any explicit rule. The recommended security posture denies all incoming connections while allowing outgoing traffic, then creates specific exceptions for services you want to expose.
- Set default deny for incoming traffic: Block all inbound connections by default.
$ sudo ufw default deny incoming
This ensures only explicitly allowed services are accessible.
- Set default allow for outgoing traffic: Permit all outbound connections.
$ sudo ufw default allow outgoing
Your system can initiate connections to external services without restriction.
- Verify policy configuration: Confirm the default policies are set correctly.
$ sudo ufw status verbose
The output shows
Default: deny (incoming), allow (outgoing), disabled (routed).
This configuration follows the principle of least privilege—denying everything by default and allowing only what’s necessary. For stricter environments, you can also deny outgoing traffic with sudo ufw default deny outgoing, though this requires creating outbound rules for every service your system needs to reach.

Managing Port Rules on Ubuntu 26.04
Port rules form the core of UFW configuration. You can allow ports with ufw using either numeric port numbers or service names from /etc/services.
Allowing Ports by Number
- Allow a single port: Open port 80 for HTTP traffic.
$ sudo ufw allow 80
This permits TCP and UDP traffic on port 80 from any source.
- Specify protocol: Allow only TCP traffic on port 443.
$ sudo ufw allow 443/tcp
HTTPS typically uses TCP, so restricting to this protocol is appropriate.
- Allow port range: Open ports 6000-6007 for X11.
$ sudo ufw allow 6000:6007/tcp
Use a colon to specify inclusive port ranges.
Allowing Ports by Service Name
UFW recognizes service names defined in /etc/services, providing more readable rules.
- Allow SSH by service name: The service name maps to port 22.
$ sudo ufw allow ssh
- Allow HTTP and HTTPS: Web server ports using service names.
$ sudo ufw allow http
$ sudo ufw allow https
Denying Ports
While default deny policies block unlisted ports, explicit deny rules take precedence and can block specific traffic even when broader allow rules exist.
$ sudo ufw deny 23
This explicitly blocks Telnet regardless of other rules. Deny rules prove useful when you need to check firewall rules and ensure specific ports remain closed.
Application Profiles
Application profiles provide predefined rule sets for common services. These profiles live in /etc/ufw/applications.d/ and simplify configuration for complex applications requiring multiple ports.
- List available profiles: View all installed application profiles.
$ sudo ufw app list
A default Ubuntu 26.04 installation includes three profiles: CUPS, OpenSSH, and Wsdd.
- View profile details: Examine what ports a profile opens.
$ sudo ufw app info "Apache Full"
The output shows the profile title, description, and ports.
- Allow an application profile: Enable the Apache Full profile.
$ sudo ufw allow "Apache Full"
This opens both port 80 (HTTP) and port 443 (HTTPS).
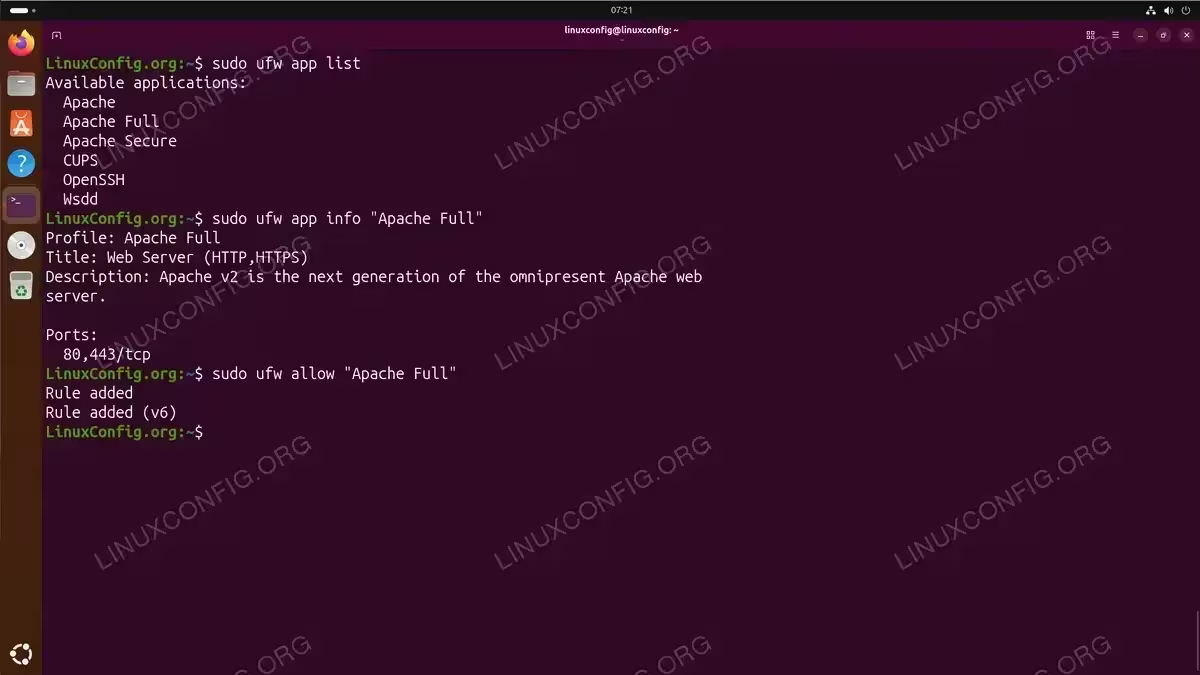
NOTE
Additional profiles are installed automatically when you install their associated packages. For example, installing Apache adds “Apache”, “Apache Full”, and “Apache Secure” profiles. Installing Nginx adds similar profiles. Profile definitions are stored in /etc/ufw/applications.d/ and you can create custom profiles following the INI-style format.
Advanced Rules Configuration
Beyond basic port rules, UFW supports IP-based filtering, subnet restrictions, and interface-specific rules for granular traffic control.
IP-Based Rules
- Allow from specific IP: Permit all traffic from a trusted address.
$ sudo ufw allow from 192.168.1.100
- Allow from IP to specific port: Restrict database access to an application server.
$ sudo ufw allow from 192.168.1.100 to any port 3306
- Allow from subnet: Permit traffic from an entire network range.
$ sudo ufw allow from 192.168.1.0/24
The /24 CIDR notation covers addresses 192.168.1.0 through 192.168.1.255.
- Allow subnet to specific port: Limit SSH access to internal network.
$ sudo ufw allow from 10.0.0.0/8 to any port 22 proto tcp
Interface-Specific Rules
On systems with multiple network interfaces, you can apply rules to specific interfaces.
$ sudo ufw allow in on eth0 to any port 80
This allows HTTP traffic only on the eth0 interface, useful for systems with separate public and private network connections.
Deny Rules with Specificity
- Block specific IP: Deny all traffic from a problematic address.
$ sudo ufw deny from 203.0.113.100
- Block subnet from specific port: Prevent external network from accessing SSH.
$ sudo ufw deny from 203.0.113.0/24 to any port 22
Deleting and Managing Rules
As your firewall configuration evolves, you’ll need to remove outdated rules or reset the entire configuration. UFW provides multiple methods for rule management.
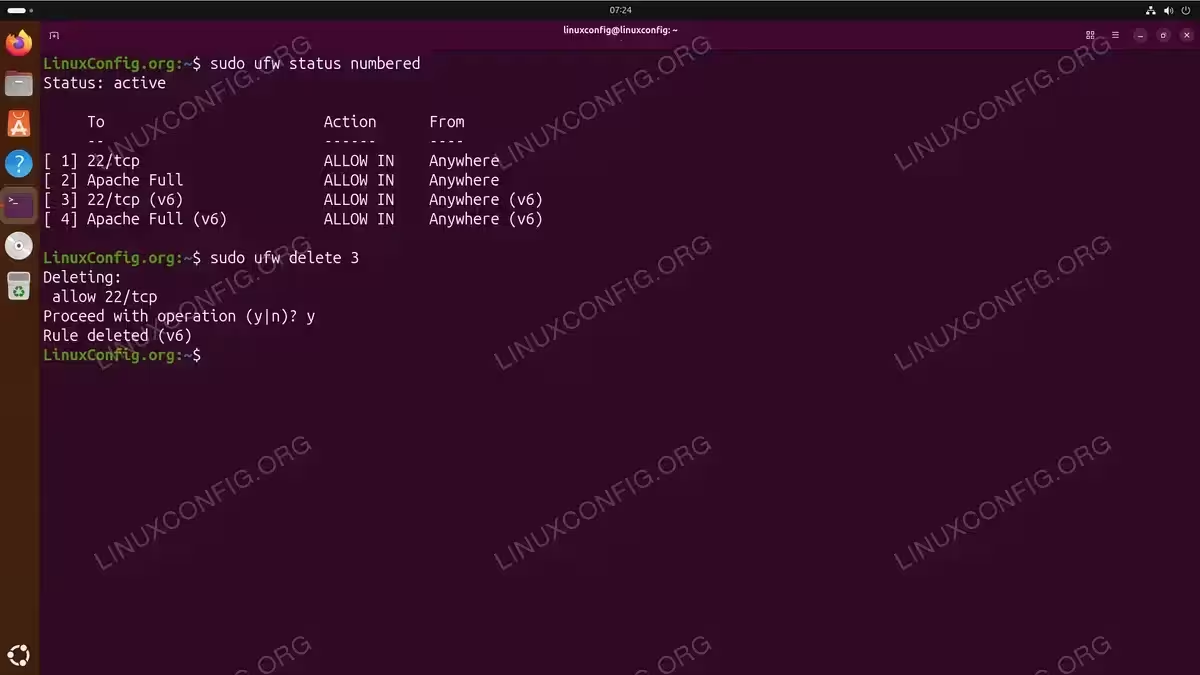
Viewing Rules with Numbers
$ sudo ufw status numbered
This displays all rules with index numbers, making deletion straightforward.
Deleting Rules
- Delete by rule number: Remove rule number 3 from the list.
$ sudo ufw delete 3
UFW prompts for confirmation before deletion. Note that remaining rules renumber after deletion.
- Delete by rule specification: Remove a rule by repeating its original syntax.
$ sudo ufw delete allow 80/tcp
This method doesn’t require checking rule numbers first.

Viewing numbered UFW rules and deleting a specific rule by index
Resetting UFW
To completely reset UFW to its default state, removing all rules:
$ sudo ufw reset
This command disables UFW and deletes all rules, creating backups in /etc/ufw/ before removal. After reset, you must reconfigure default policies and re-add necessary rules.
Disabling UFW
To temporarily disable the firewall without removing rules:
$ sudo ufw disable
Rules remain configured but inactive until you re-enable UFW.
Logging Configuration
UFW logging helps monitor blocked connections and troubleshoot firewall issues. Logs write to /var/log/ufw.log by default.
- Enable logging: Activate UFW logging with default level.
$ sudo ufw logging on
- Set logging level: Choose from off, low, medium, high, or full.
$ sudo ufw logging medium
Higher levels generate more detailed logs but increase disk usage.
- View recent log entries: Check the UFW log file.
$ sudo tail -f /var/log/ufw.log
Log levels determine what gets recorded:
- low: Logs blocked packets not matching default policy
- medium: Adds invalid packets and new connections
- high: Adds all packets with rate limiting
- full: Logs all packets without rate limiting
TIP
For production servers, the medium logging level provides sufficient detail for security monitoring without generating excessive log volume.
Conclusion
You have learned how to ufw configure ubuntu 26.04 systems comprehensively, from enabling the firewall to creating advanced IP-based rules. UFW provides an accessible interface for iptables management while maintaining the flexibility needed for complex network configurations. Remember to always allow SSH access before enabling UFW on remote systems, and test rule changes carefully to avoid lockouts. Regular review of your firewall rules ensures your security posture remains appropriate as your system’s requirements evolve.
Frequently Asked Questions
- How do I allow multiple ports with a single UFW command? UFW doesn’t support comma-separated ports in a single command. However, you can allow a port range using colon notation, such as
sudo ufw allow 8000:8010/tcp. For non-contiguous ports, create separate rules for each port or use application profiles that bundle multiple ports together. - Will UFW rules persist after a system reboot? Yes, UFW rules are persistent by default. When you add rules with
sudo ufw allowor similar commands, they’re saved to configuration files in/etc/ufw/and automatically restored when the system boots. The firewall status (enabled or disabled) also persists across reboots. - How can I allow traffic only from my local network? Use CIDR notation to specify your local subnet. For example,
sudo ufw allow from 192.168.1.0/24permits traffic from any address in the 192.168.1.x range. For more restrictive access, combine subnet rules with specific ports:sudo ufw allow from 192.168.1.0/24 to any port 22. - What’s the difference between reject and deny in UFW? Both block traffic, but they respond differently. Deny silently drops packets without sending any response to the sender. Reject drops packets but sends an ICMP destination-unreachable message back. Deny is preferred for security as it doesn’t reveal firewall presence, while reject provides faster feedback for legitimate connection attempts.
- Can UFW work alongside Docker containers? Docker modifies iptables directly, which can bypass UFW rules. By default, Docker’s port mappings are accessible regardless of UFW settings. To make UFW manage Docker traffic, you need to modify Docker’s iptables behavior by adding
"iptables": falseto/etc/docker/daemon.jsonor using the DOCKER-USER chain for custom rules.