Managing file permissions chmod chown ubuntu 26.04 is a fundamental skill for any Linux administrator or user. Every file and directory on your Ubuntu 26.04 system has an associated set of permissions that determines who can read, write, or execute it. Understanding and correctly configuring these permissions is essential for system security, application functionality, and multi-user collaboration. In this guide, you will learn how to interpret permission strings, modify access rights with chmod, change ownership with chown and chgrp, work with special permission bits, and apply fine-grained Access Control Lists (ACLs).
Table of Contents
- → Understanding Linux File Permissions on Ubuntu 26.04
- → Setting Up a Practice Environment
- → Changing File Permissions with chmod
- → Changing File Ownership with chown and chgrp
- → Managing File Permissions via GUI
- → Special Permission Bits on Ubuntu 26.04
- → Access Control Lists (ACLs) for Fine-Grained Permissions
- → Frequently Asked Questions
In this tutorial you will learn:
- How to read and interpret Linux file permissions
- How to change permissions using symbolic and numeric chmod modes
- How to change file and directory ownership with chown and chgrp
- How to manage basic permissions via the GNOME Files GUI
- How SUID, SGID, and the sticky bit work
- How to set up Access Control Lists (ACLs) for per-user access
Software Requirements
| Category | Requirements, Conventions or Software Version Used |
|---|---|
| System | Ubuntu 26.04 Resolute Raccoon – Download |
| Software | coreutils (chmod, chown, chgrp), acl (getfacl, setfacl) |
| Other | Privileged access to your Linux system as root or via the sudo command. |
| Conventions | # – requires given linux commands to be executed with root privileges either directly as a root user or by use of sudo command$ – requires given linux commands to be executed as a regular non-privileged user |
chmod to change file permissions and chown to change ownership on Ubuntu 26.04. Permissions are expressed as read (r/4), write (w/2), and execute (x/1) for the owner, group, and others.
| Step | Command/Action |
|---|---|
| 1. View permissions | ls -l filename |
| 2. Set permissions (numeric) | chmod 755 filename |
| 3. Change ownership | sudo chown user:group filename |
| 4. Set ACL for another user | setfacl -m u:username:rwx filename |
Understanding Linux File Permissions on Ubuntu 26.04
Every file and directory on your Ubuntu 26.04 system is associated with three types of ownership and three types of permissions. Before modifying anything, it is important to understand how these work together.
Ownership: User, Group, and Others
Linux assigns three levels of ownership to every file:
- User (u): The owner of the file, typically the user who created it.
- Group (g): A group of users assigned to the file. All members of the group share the group permissions.
- Others (o): Everyone else on the system who is neither the owner nor a member of the group.
Permission Types: Read, Write, Execute
Each ownership level can have three permission types:
- Read (r): View the contents of a file, or list the contents of a directory.
- Write (w): Modify a file, or add/remove files within a directory.
- Execute (x): Run a file as a program, or enter (cd into) a directory.
Reading the ls -l Output
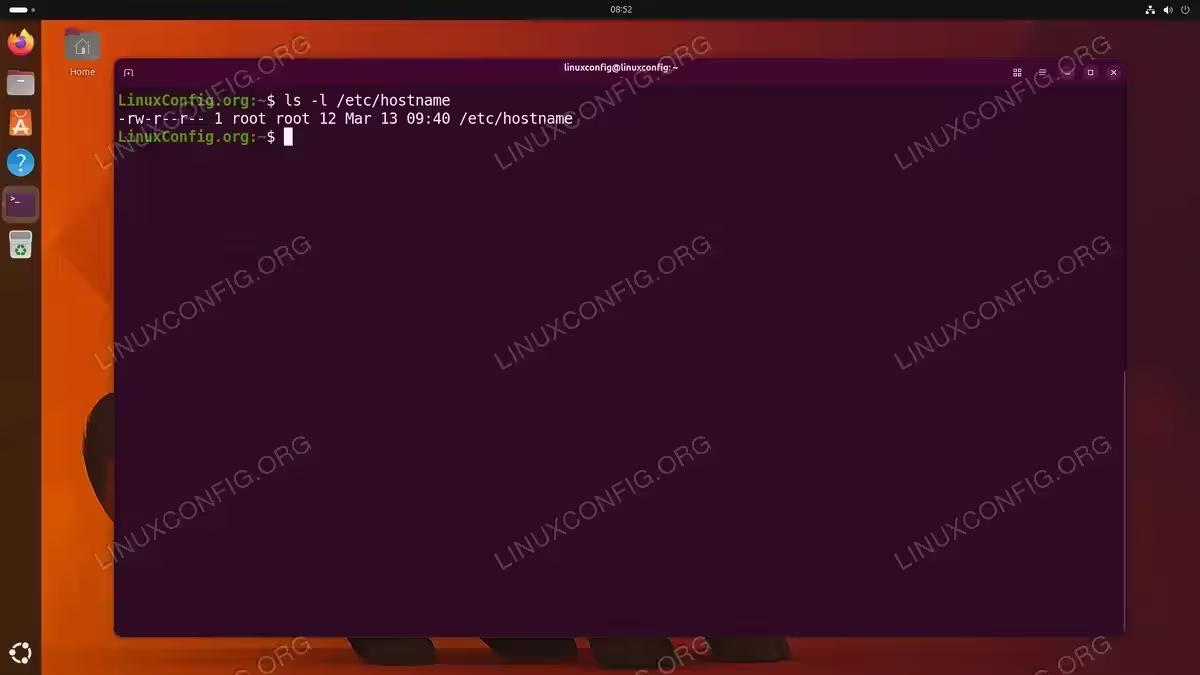
The ls -l command displays permissions in a 10-character string. To examine a file’s permissions, run:
$ ls -l /etc/hostname
A typical output looks like this:
-rw-r--r-- 1 root root 12 Apr 10 08:30 /etc/hostname
The first character indicates the file type: - for a regular file, d for a directory, and l for a symbolic link. The remaining nine characters are divided into three groups of three, representing the user, group, and others permissions respectively. In this example, the owner (root) has read and write access, while the group and others have read-only access.
Numeric (Octal) Representation
Permissions can also be expressed as numbers. Each permission type has a numeric value: read = 4, write = 2, and execute = 1. These values are summed for each ownership level. Consequently, rwxr-xr-x translates to 755 (owner: 4+2+1=7, group: 4+0+1=5, others: 4+0+1=5). The following table summarizes the most common permission patterns:
| Numeric | Symbolic | Typical Use |
|---|---|---|
| 755 | rwxr-xr-x | Executable scripts, directories |
| 644 | rw-r–r– | Regular files, configuration files |
| 700 | rwx—— | Private scripts, SSH keys directory |
| 600 | rw——- | Private files, SSH private keys |
| 775 | rwxrwxr-x | Shared group directories |
| 666 | rw-rw-rw- | World-writable files (use with caution) |
Setting Up a Practice Environment
Before diving into the commands, create a set of sandbox files and directories to experiment with safely. This way you can practice chmod, chown, ACLs, and special bits without risking any system files.
$ mkdir -p ~/linuxconfig_project/{scripts,configs,shared}
$ echo "Hello from LinuxConfig.org" > ~/linuxconfig_project/readme.txt
$ echo '#!/bin/bash' > ~/linuxconfig_project/scripts/linuxconfig_backup.sh
$ echo 'echo "Backup complete"' >> ~/linuxconfig_project/scripts/linuxconfig_backup.sh
$ echo "db_host=localhost" > ~/linuxconfig_project/configs/database.conf
$ touch ~/linuxconfig_project/shared/report.txt
Verify the structure with:
$ find ~/linuxconfig_project -type f
You should see the following files:
/home/linuxconfig/linuxconfig_project/readme.txt
/home/linuxconfig/linuxconfig_project/scripts/linuxconfig_backup.sh
/home/linuxconfig/linuxconfig_project/configs/database.conf
/home/linuxconfig/linuxconfig_project/shared/report.txt
All examples in this tutorial use these sandbox files or existing system files such as /etc/hostname and /usr/bin/passwd.

Changing File Permissions with chmod on Ubuntu 26.04
The chmod (change mode) command modifies file permissions. It supports two notations: symbolic and numeric. Both achieve the same result, so you can use whichever feels more intuitive.
Symbolic Mode
Symbolic mode uses letters to specify who gets what access. The general syntax is:
$ chmod [who][operator][permissions] filename
Where who is u (user), g (group), o (others), or a (all). The operator is + (add), - (remove), or = (set exactly).
- Add execute permission for the owner:
$ chmod u+x ~/linuxconfig_project/scripts/linuxconfig_backup.sh
This grants the file owner permission to run the script as a program. Verify the change:
$ ls -l ~/linuxconfig_project/scripts/linuxconfig_backup.sh
- Remove write permission for group and others:
$ chmod go-w ~/linuxconfig_project/configs/database.conf
This prevents group members and other users from modifying the configuration file.
- Set exact permissions for all:
$ chmod a=r ~/linuxconfig_project/readme.txt
This sets read-only access for everyone, removing any write or execute permissions.
- Combine multiple changes:
$ chmod u+rwx,g=rx,o= ~/linuxconfig_project/scripts/linuxconfig_backup.sh
This gives the owner full access, the group read and execute, and removes all permissions for others.
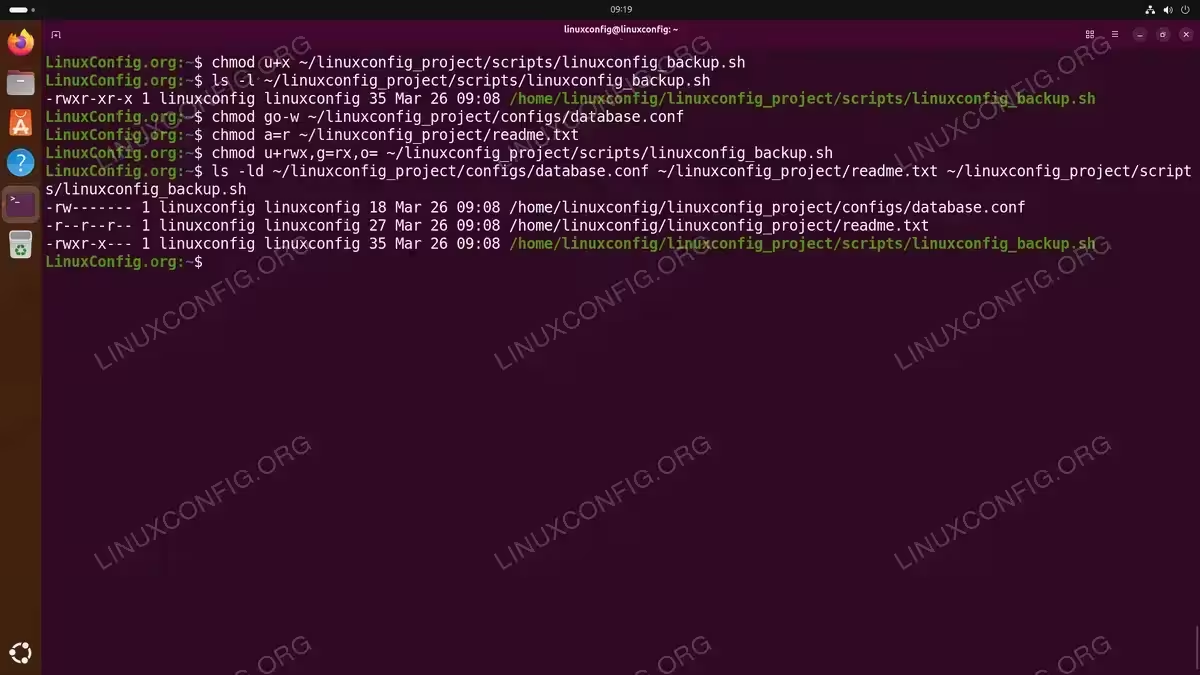
Using chmod symbolic notation to modify permissions on sandbox files
Numeric Mode
Numeric mode sets all permissions at once using a three-digit octal number. This is often faster when you know the exact permissions you need:
- Standard executable script:
$ chmod 755 ~/linuxconfig_project/scripts/linuxconfig_backup.sh
Owner gets full access (7), group and others get read and execute (5).
- Private configuration file:
$ chmod 600 ~/linuxconfig_project/configs/database.conf
Only the owner can read and write the file. This is ideal for files containing sensitive data such as database credentials or SSH private keys.
- Shared project directory:
$ chmod 775 ~/linuxconfig_project/shared
Owner and group get full access, others can read and enter the directory.
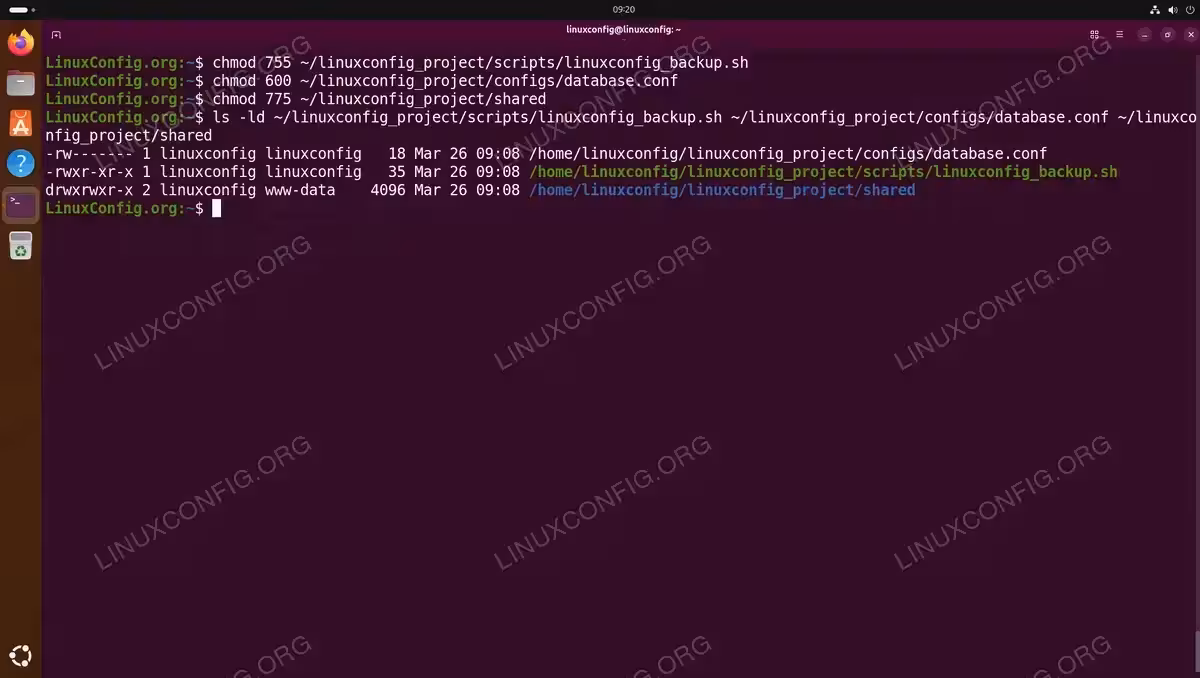
Using chmod numeric notation: 755 for executable scripts, 600 for private config files, and 775 for shared directories
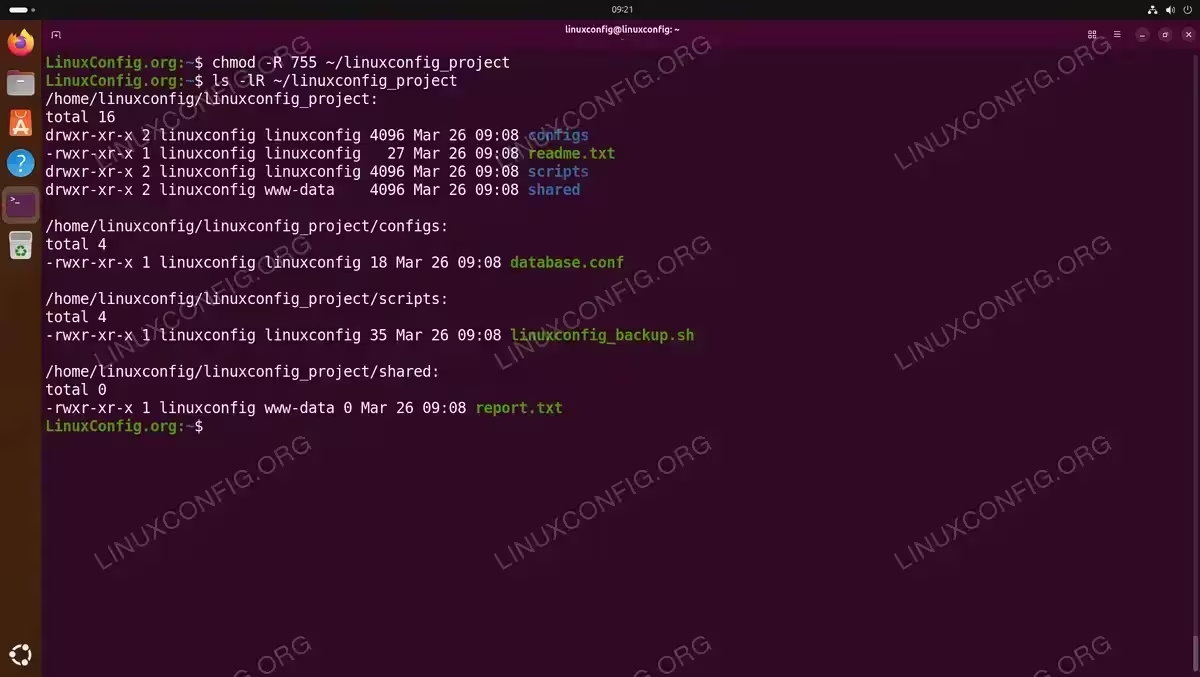
Recursive Permission Changes
To apply permissions to a directory and all its contents, use the -R flag:
$ chmod -R 755 ~/linuxconfig_project
Verify the recursive change:
$ ls -lR ~/linuxconfig_project
IMPORTANT
Be cautious with recursive chmod. Applying the same permissions to both files and directories can cause issues. Directories need the execute bit to be traversable, while regular files typically should not be executable. A safer approach is to use find to target files and directories separately:
$ find ~/linuxconfig_project -type d -exec chmod 755 {} \;
$ find ~/linuxconfig_project -type f -exec chmod 644 {} \;
Changing File Ownership with chown and chgrp
While chmod controls what actions are allowed, chown and chgrp control who the permissions apply to. Only the root user (or sudo) can change file ownership.
Using chown
The chown command changes both the user and group ownership of a file. The syntax is:
$ sudo chown user:group filename
- Change owner and group:
$ sudo chown linuxconfig:www-data ~/linuxconfig_project/shared/report.txt
This sets the owner to
linuxconfigand the group towww-data. - Change owner only:
$ sudo chown linuxconfig ~/linuxconfig_project/readme.txt
This changes just the owner, leaving the group unchanged.
- Change group only:
$ sudo chown :www-data ~/linuxconfig_project/shared
The colon before the group name with no user tells
chownto change only the group. - Recursive ownership change:
$ sudo chown -R linuxconfig:linuxconfig ~/linuxconfig_project
This recursively applies the ownership change to the directory and all its contents.
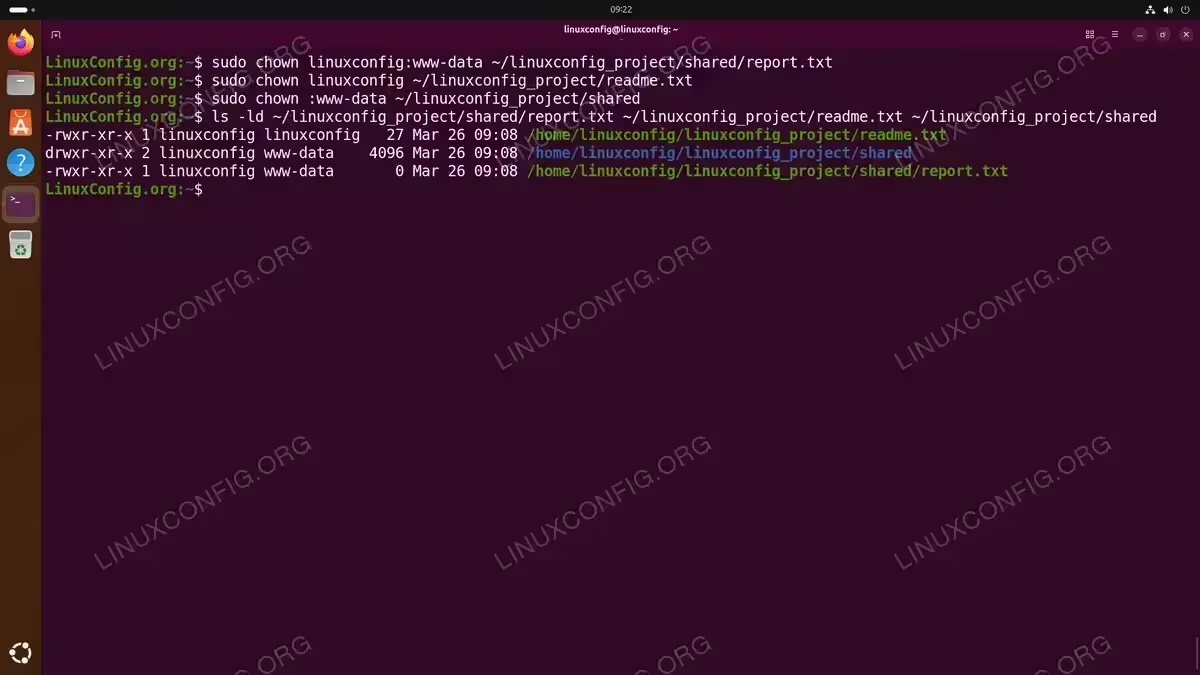
Using chown to change owner and group (linuxconfig:www-data), owner only (linuxconfig), and group only (:www-data)
Using chgrp
The chgrp command is a simpler alternative when you only need to change the group:
$ sudo chgrp www-data ~/linuxconfig_project/shared
This is functionally equivalent to sudo chown :www-data ~/linuxconfig_project/shared. Use whichever you find more readable.
Verifying Changes
After modifying ownership, verify the result with ls -l:
$ ls -l ~/linuxconfig_project/shared/report.txt
The output should reflect the new owner and group you specified.
Managing File Permissions via GUI
If you prefer a graphical approach, the GNOME Files file manager (Nautilus) on Ubuntu 26.04 allows you to view and modify basic file permissions without touching the terminal.
Accessing the Permissions Dialog
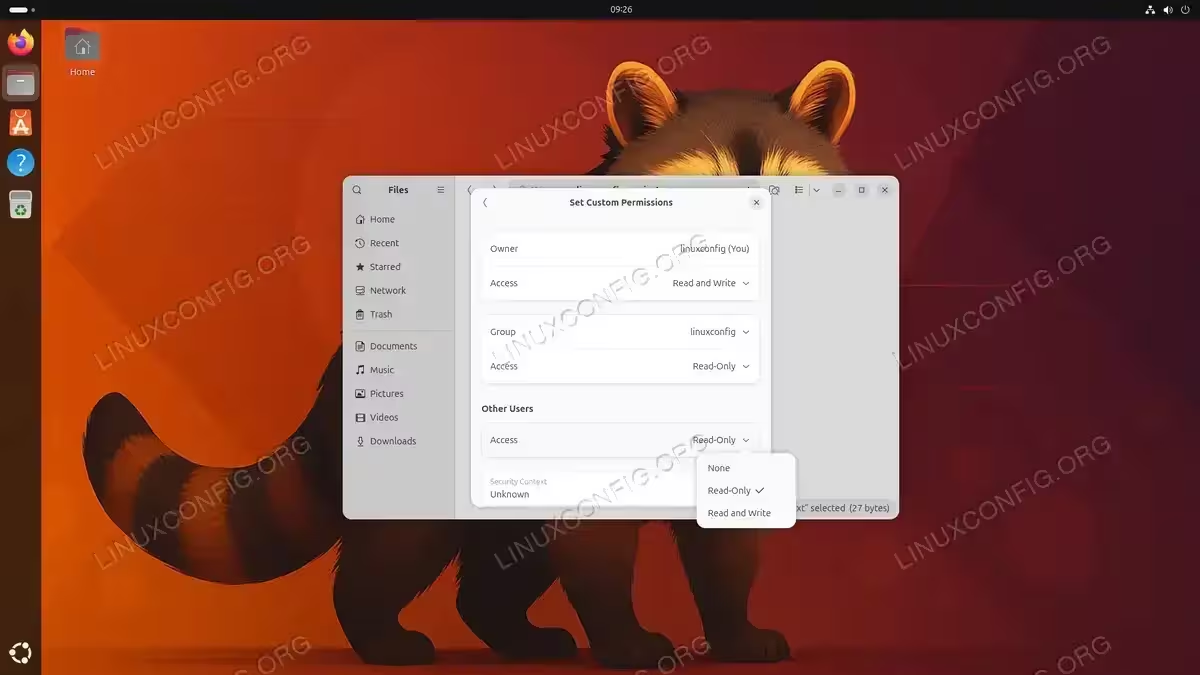
To change permissions on a file or directory you own, right-click it in Nautilus and select Properties. The properties dialog displays the file’s parent folder, timestamps, and a Permissions entry showing the current access level (e.g., “Read and Write”). Additionally, there is an Executable as Program toggle that lets you add or remove the execute bit.

Click the Permissions chevron to open the Set Custom Permissions dialog. Here you can change access levels for the Owner, Group, and Other Users using dropdown menus with options such as “Read and Write”, “Read-Only”, and “None”. You can also change the group assignment using the Group dropdown.
Limitations of the GUI Approach
While the Nautilus permissions dialog is convenient for quick changes, it has several limitations compared to the command line:
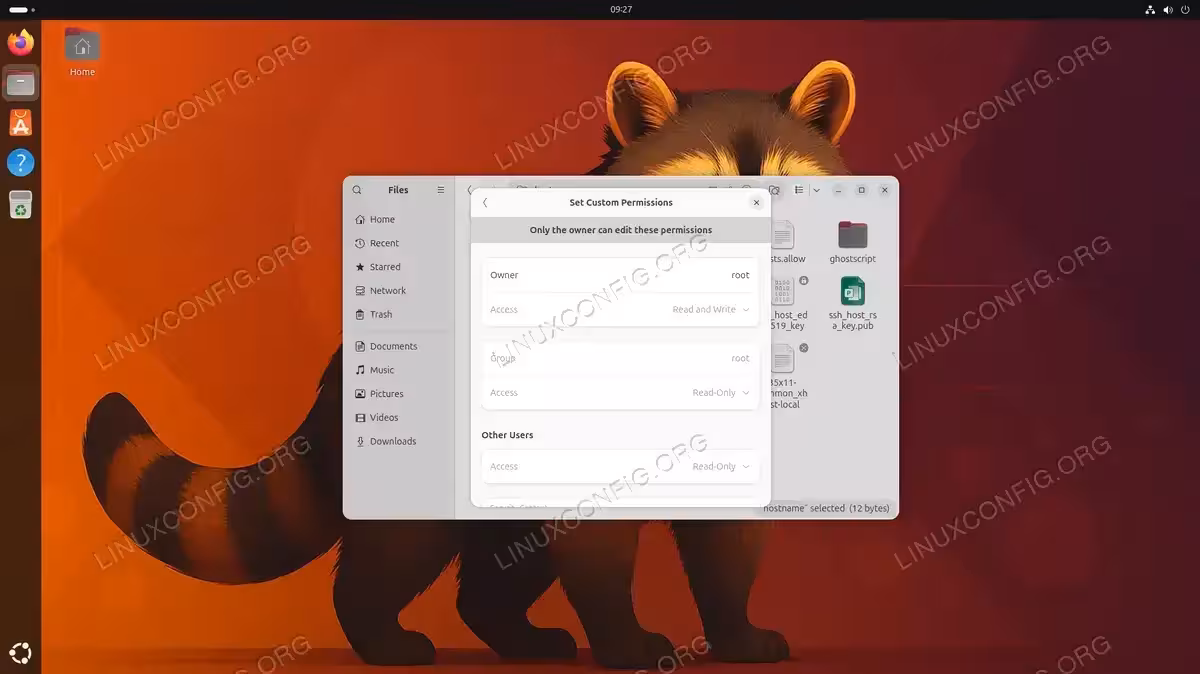
- No privilege elevation: You can only modify permissions on files you own. For root-owned or system files, all controls are greyed out with the message “Only the owner can edit these permissions.” Nautilus does not offer a password prompt to elevate privileges.
- No special bits: There is no way to set SUID, SGID, or the sticky bit through the GUI.
- No ACL support: ACL entries cannot be viewed or modified in Nautilus.
- No recursive changes: You cannot apply permission changes to a directory and all its contents at once.
IMPORTANT
For anything beyond basic permission changes on files you own, the command line tools chmod, chown, and setfacl remain essential.
Special Permission Bits on Ubuntu 26.04
Beyond the standard read, write, and execute permissions, Linux supports three special bits that modify how files and directories behave. These are SUID, SGID, and the sticky bit.
SUID (Set User ID)
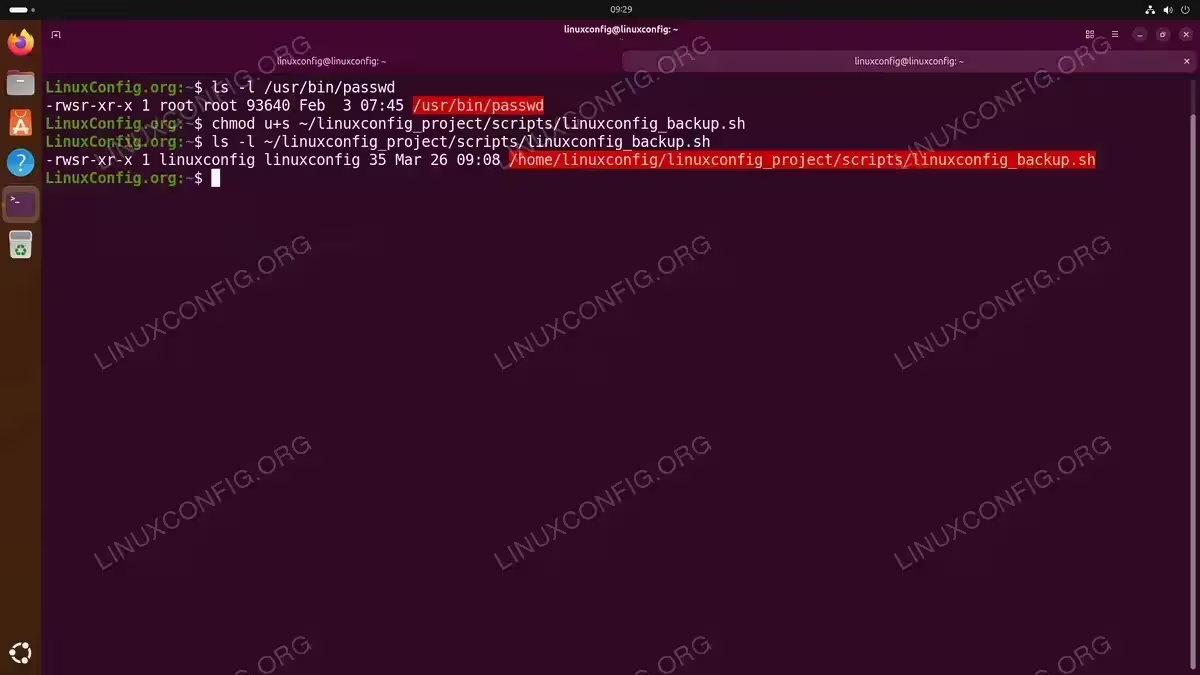
When the SUID bit is set on an executable file, the program runs with the permissions of the file’s owner rather than the user who launched it. This is how commands like passwd work: the binary is owned by root with SUID set, so any user can change their own password by temporarily gaining root privileges. You can verify this on your system:
$ ls -l /usr/bin/passwd
Notice the s in the owner’s execute position. To practice setting the SUID bit on your sandbox script:
$ chmod u+s ~/linuxconfig_project/scripts/linuxconfig_backup.sh
Or using numeric mode, prepend 4 to the permission digits:
$ chmod 4755 ~/linuxconfig_project/scripts/linuxconfig_backup.sh
Verify with:
$ ls -l ~/linuxconfig_project/scripts/linuxconfig_backup.sh
-rwsr-xr-x 1 linuxconfig linuxconfig 43 Mar 26 08:41 /home/linuxconfig/linuxconfig_project/scripts/linuxconfig_backup.sh
SECURITY ALERT
SUID executables run with elevated privileges and represent a potential security risk. Only set SUID on trusted binaries, and audit SUID files regularly with:
$ find / -perm -4000 -type f 2>/dev/null
SGID (Set Group ID)
The SGID bit behaves differently depending on whether it is applied to a file or a directory:
- On a file: The program runs with the group privileges of the file’s group, similar to how SUID works for the owner.
- On a directory: New files and subdirectories created inside inherit the directory’s group instead of the creator’s primary group. This is extremely useful for shared project directories.
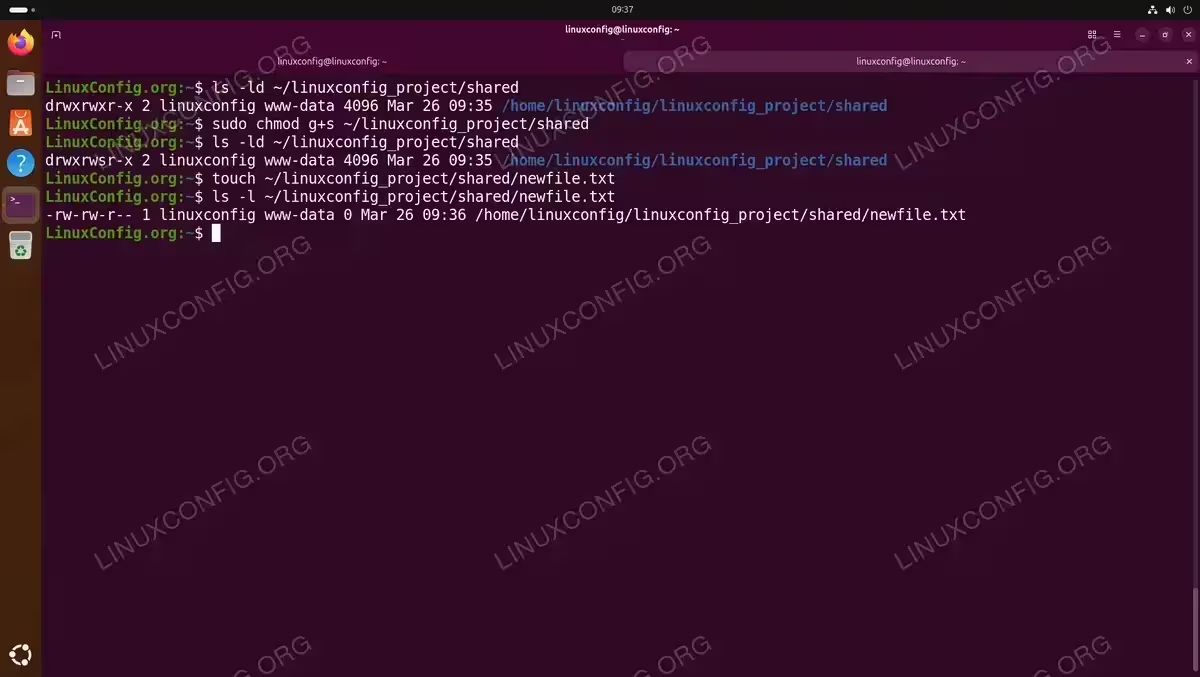
To set SGID on the sandbox shared directory:
$ sudo chmod g+s ~/linuxconfig_project/shared
Or numerically, prepend 2:
$ sudo chmod 2775 ~/linuxconfig_project/shared
IMPORTANT
Setting the SGID bit requires sudo if the directory’s group is one you do not belong to. Linux prevents non-root users from setting SGID on files or directories owned by a foreign group. If you own the directory and are a member of its group, you can set SGID without sudo.
Now every file created inside ~/linuxconfig_project/shared will automatically belong to the directory’s group, making collaboration seamless. Test it by creating a new file and checking its group:
$ touch ~/linuxconfig_project/shared/newfile.txt
$ ls -l ~/linuxconfig_project/shared/newfile.txt
-rw-rw-r-- 1 linuxconfig www-data 0 Mar 26 09:36 /home/linuxconfig/linuxconfig_project/shared/newfile.txt
Notice the file’s group is www-data (inherited from the directory) rather than the user’s primary group linuxconfig.
Sticky Bit
The sticky bit is most commonly used on shared directories like /tmp. When set, it prevents users from deleting or renaming files they do not own, even if they have write permission on the directory. You can verify the sticky bit on /tmp:
$ ls -ld /tmp
To set the sticky bit on the sandbox shared directory:
$ chmod +t ~/linuxconfig_project/shared
Or numerically, prepend 1:
$ chmod 1777 ~/linuxconfig_project/shared
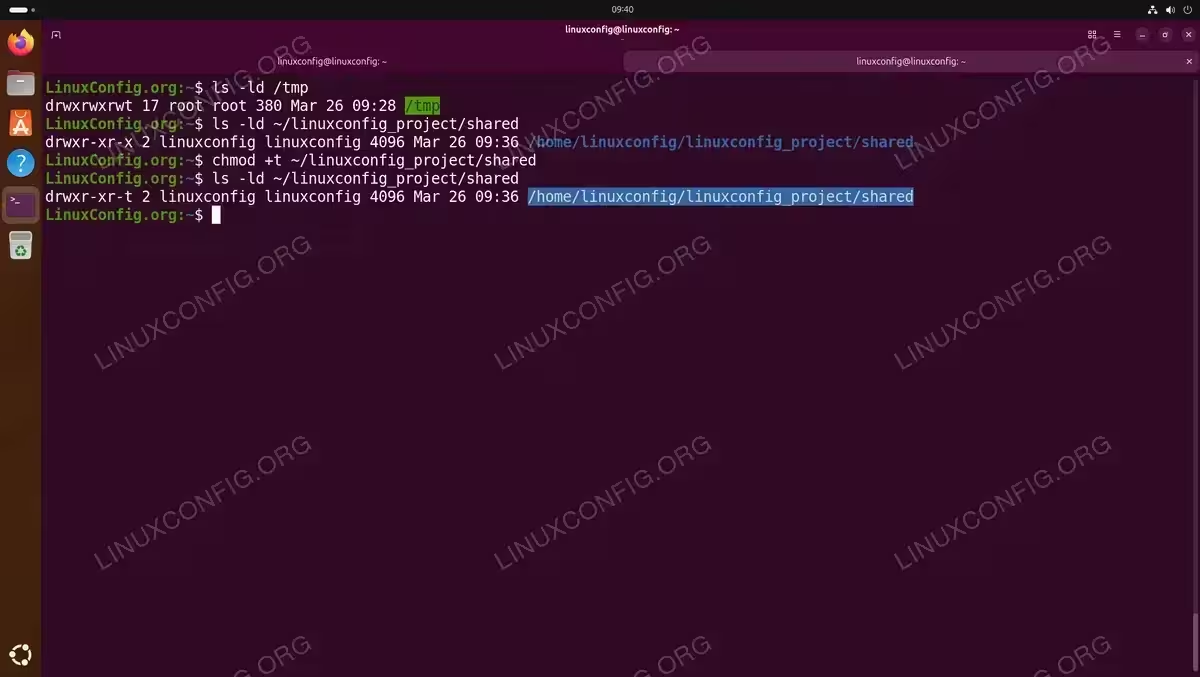
Verify the sticky bit appears as a t in the others’ execute position:
$ ls -ld ~/linuxconfig_project/shared
Combining Special Bits
You can combine special bits. For example, a shared project directory with both SGID and the sticky bit would use:
$ chmod 3775 ~/linuxconfig_project/shared
This ensures new files inherit the group (SGID) and prevents users from deleting each other’s work (sticky bit). Verify with:
$ ls -ld ~/linuxconfig_project/shared
drwxrwsr-t 2 linuxconfig linuxconfig 4096 Mar 26 08:41 /home/linuxconfig/linuxconfig_project/shared
Access Control Lists (ACLs) for Fine-Grained Permissions
Standard Linux file permissions chmod chown ubuntu 26.04 limit you to one owner, one group, and a blanket “others” category. When you need more granular control, such as granting a specific user access to a file without changing its group, Access Control Lists (ACLs) provide the solution.
Installing ACL Support
The acl package is typically installed by default on Ubuntu 26.04. If it is not present, install it with:
$ sudo apt install acl
Viewing ACLs with getfacl
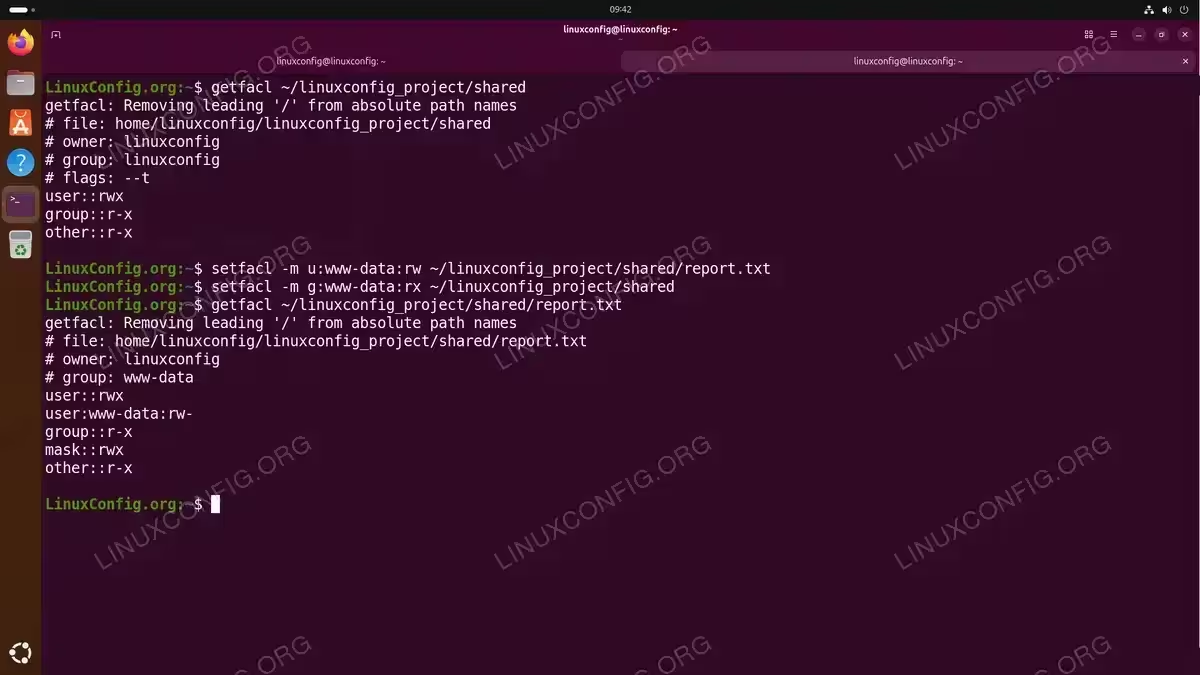
To view the current ACL entries on a file or directory:
$ getfacl ~/linuxconfig_project/shared
The output displays the standard permissions along with any additional ACL entries.
Setting ACLs with setfacl
- Grant a specific user read and write access:
$ setfacl -m u:www-data:rw ~/linuxconfig_project/shared/report.txt
The
-mflag modifies the ACL. This gives the userwww-dataread and write access regardless of the file’s group or others permissions. - Grant a specific group read and execute access:
$ setfacl -m g:www-data:rx ~/linuxconfig_project/shared
This allows the
www-datagroup to read and enter the directory. - Set a default ACL on a directory:
$ setfacl -d -m u:www-data:rwx ~/linuxconfig_project/shared
Default ACLs are inherited by new files and subdirectories created within this directory. This means
www-datawill automatically have full access to any new content. - Remove a specific ACL entry:
$ setfacl -x u:www-data ~/linuxconfig_project/shared/report.txt
The
-xflag removes the ACL entry for the specified user. - Remove all ACL entries:
$ setfacl -b ~/linuxconfig_project/shared/report.txt
The
-bflag strips all ACL entries, reverting to standard permissions only.
DID YOU KNOW
When a file has ACL entries, ls -l displays a + sign at the end of the permission string (e.g., -rw-rw-r--+). This is a quick indicator that additional access rules are in effect beyond the standard permissions.
ACL Mask
The ACL mask defines the maximum effective permissions for ACL entries and the group. If the mask is set to r--, then no ACL entry or group permission can exceed read access, regardless of what is explicitly set. To modify the mask:
$ setfacl -m m::rx ~/linuxconfig_project/shared
This sets the effective maximum to read and execute for all ACL and group entries.
Conclusion
File permissions are the backbone of Linux security. In this tutorial, you learned how to interpret permission strings, modify access with chmod using both symbolic and numeric modes, change ownership with chown and chgrp, leverage special bits like SUID, SGID, and the sticky bit, and apply Access Control Lists for granular per-user access. By combining these tools, you can precisely control who can read, modify, or execute any file on your Ubuntu 26.04 system.
If you encounter permission denied errors, start by checking the output of ls -l and getfacl to identify whether the issue is with ownership, permissions, or ACLs. For further reference, consult the GNU Coreutils documentation for chmod.
Frequently Asked Questions
- What is the difference between chmod and chown? The
chmodcommand changes what actions (read, write, execute) are permitted on a file, whilechownchanges who owns the file. In other words,chmodcontrols the “what” andchowncontrols the “who.” You often need to use both together to set up proper access. - Why does SSH refuse to connect when my key permissions are wrong? SSH requires strict permissions on private key files. If your private key (e.g.,
~/.ssh/id_rsa) is readable by others, SSH will reject it as a security precaution. Set the correct permissions withchmod 600 ~/.ssh/id_rsaandchmod 700 ~/.sshto resolve the issue. - How do I make a file executable on Ubuntu 26.04? Run
chmod +x filenameto add execute permission for all users, orchmod u+x filenameto add it for the owner only. After setting the execute bit, you can run the file directly with./filename. - What does the plus sign (+) mean at the end of ls -l permissions? The
+sign indicates that the file has additional Access Control List (ACL) entries beyond the standard user/group/others permissions. Usegetfacl filenameto see the full ACL details. - When should I use ACLs instead of standard permissions? Use ACLs when you need to grant access to specific users or groups that do not fit into the traditional owner/group/others model. For example, if a file belongs to the
www-datagroup but you also need one developer to have write access without adding them to that group, an ACL is the appropriate solution.