Running your own NTP server on Ubuntu 26.04 provides centralized time synchronization for all devices on your network. This approach is particularly valuable in enterprise environments, air-gapped networks, or any scenario where consistent timekeeping across multiple systems is critical. When you configure an NTP server on Ubuntu 26.04, client machines can synchronize their clocks without relying on external internet-based time sources, reducing latency and improving reliability.
Accurate time synchronization matters more than many administrators realize. Authentication protocols like Kerberos fail when clock drift exceeds a few minutes. Log correlation across multiple servers becomes impossible without synchronized timestamps. Consequently, learning to configure NTP properly is an essential skill for any Linux administrator managing Ubuntu 26.04 systems.
Table of Contents
In this tutorial you will learn:
- How NTP server architecture and stratum levels work
- How to install and configure Chrony as an NTP server
- How to configure firewall rules for NTP traffic
- How to verify NTP server operation and client synchronization
- Security best practices for NTP server deployment
Software Requirements
| Category | Requirements, Conventions or Software Version Used |
|---|---|
| System | Ubuntu 26.04 Resolute Raccoon |
| Software | Chrony 4.x (NTP implementation) |
| Other | Privileged access to your Linux system as root or via the sudo command. Network access to upstream NTP servers (for internet-connected deployments). |
| Conventions | # – requires given linux commands to be executed with root privileges either directly as a root user or by use of sudo command$ – requires given linux commands to be executed as a regular non-privileged user |
| Step | Command/Action |
|---|---|
| 1. Install Chrony | sudo apt install chrony |
| 2. Create server config | Add allow 192.168.1.0/24 to /etc/chrony/conf.d/local-ntp-server.conf |
| 3. Open firewall port | sudo ufw allow 123/udp |
| 4. Reload and restart | sudo systemctl daemon-reload && sudo systemctl restart chrony |
| 5. Verify status | chronyc tracking |
Understanding NTP Server Architecture
Before you configure an NTP server on Ubuntu 26.04, understanding the hierarchical nature of NTP helps you make better deployment decisions. The NTP protocol uses a concept called stratum levels to indicate the distance from the reference clock source.
Stratum 0 represents the actual time source: typically atomic clocks, GPS receivers, or radio clocks synchronized to national time standards. These devices cannot be accessed directly over a network. Stratum 1 servers connect directly to Stratum 0 devices and serve as the primary network time sources. Each subsequent stratum level indicates one more hop from the reference source.
When you set up an NTP server on Ubuntu 26.04, your server will typically operate at Stratum 2 or Stratum 3, depending on your upstream time sources. Your server synchronizes with internet-based Stratum 1 or Stratum 2 servers, then provides time to local clients. This architecture creates a reliable time distribution hierarchy while minimizing load on public NTP infrastructure.
For air-gapped networks without internet access, your NTP server can operate using its local hardware clock as a reference. While less accurate than GPS-synchronized sources, this approach still ensures all network devices maintain consistent time relative to each other, which is often the primary requirement.
Installing Chrony on Ubuntu 26.04
Ubuntu 26.04 uses Chrony as its default NTP implementation. Chrony offers several advantages over the older ntpd daemon: faster initial synchronization, better handling of intermittent network connections, and lower resource consumption. Additionally, Chrony performs well on virtual machines where hardware clock stability may be inconsistent.
- Update package lists: Before installing any packages, ensure your package lists are current.
sudo apt update
This command refreshes the package index from configured repositories.
- Install the Chrony package: Install Chrony using the apt package manager.
sudo apt install chrony
The installation includes the chronyd daemon and the chronyc command-line utility for monitoring and configuration.
- Verify the service is running: Chrony starts automatically after installation. Confirm the service status.
sudo systemctl status chrony
You should see “active (running)” in the output, indicating successful installation.
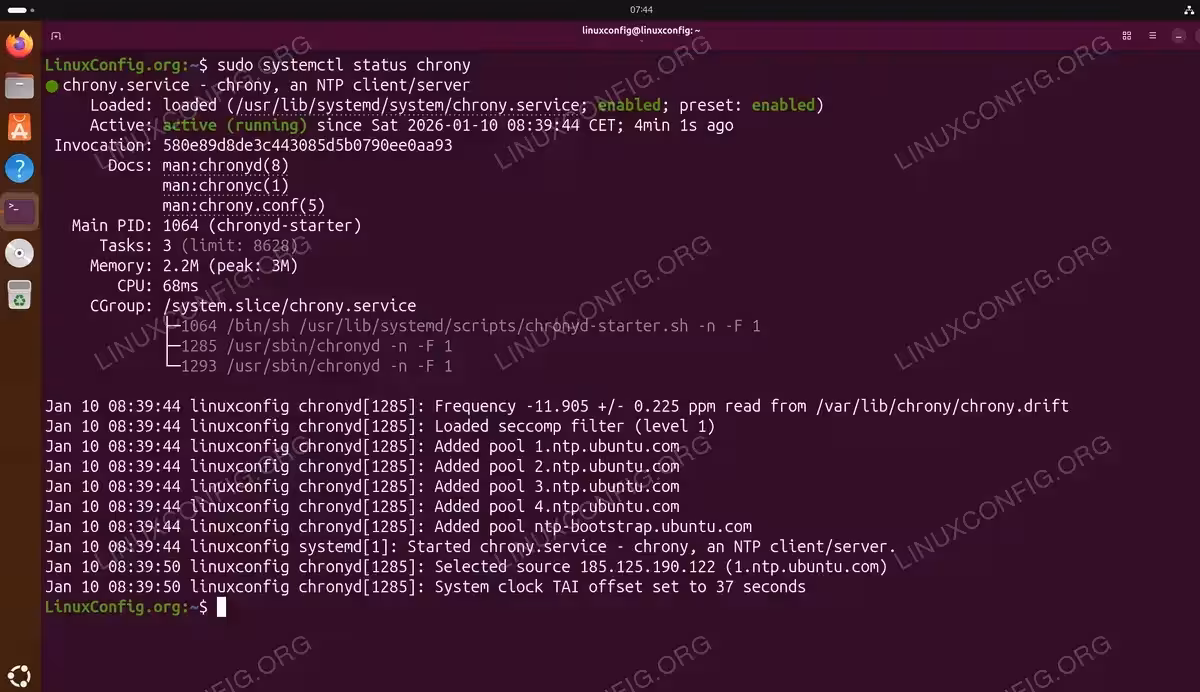
At this point, Chrony is running as an NTP client, synchronizing your server’s time with Ubuntu’s default NTP pool servers. The next step transforms this client into a server that other machines can query.
Configuring Chrony as NTP Server on Ubuntu 26.04
Ubuntu 26.04 uses a modular configuration structure for Chrony, with settings distributed across multiple directories. Understanding this layout is essential before making changes:
/etc/chrony/
├── chrony.conf                 # Main configuration file
├── chrony.keys                 # Authentication keys
├── conf.d/                     # Configuration fragments
│   ├── README
│   └── ubuntu-nts.conf         # NTS certificate configuration
├── nts-bootstrap-ubuntu.crt    # NTS bootstrap certificate
└── sources.d/                  # NTP source definitions
    ├── README
    └── ubuntu-ntp-pools.sources # Default Ubuntu NTP pools
Notably, Ubuntu 26.04 enables Network Time Security (NTS) by default, providing authenticated time synchronization out of the box. The default upstream sources in /etc/chrony/sources.d/ubuntu-ntp-pools.sources use NTS-enabled Ubuntu pools:
pool 1.ntp.ubuntu.com iburst maxsources 1 nts prefer
pool 2.ntp.ubuntu.com iburst maxsources 1 nts prefer
pool 3.ntp.ubuntu.com iburst maxsources 1 nts prefer
pool 4.ntp.ubuntu.com iburst maxsources 1 nts prefer
pool ntp-bootstrap.ubuntu.com iburst maxsources 1 nts certset 1
To configure an NTP server on Ubuntu 26.04, you need to create a configuration fragment that allows client connections.
IMPORTANT
By default, Chrony only acts as a client, synchronizing its own system time with upstream servers. It does not serve time to other machines on your network without explicit configuration using the allow directive.
- Create a server configuration file: Add a new configuration fragment in the conf.d directory.
sudo nano /etc/chrony/conf.d/local-ntp-server.conf
This approach keeps your customizations separate from default system files, making upgrades cleaner.
- Add client access rules: In the new file, add allow directives for your network subnets.
# Allow NTP client access from local networks
allow 192.168.1.0/24
This directive permits all hosts on the 192.168.1.0/24 subnet to synchronize with your NTP server. Add multiple
allowlines for different subnets as needed. - Configure local stratum for isolated networks: If your server might lose upstream connectivity, add a local directive to continue serving time based on the system clock.
local stratum 10
This setting enables the server to act as a Stratum 10 source when external synchronization is unavailable. Clients will still synchronize, though with reduced accuracy.
- Reload systemd and restart the service: When adding new configuration files to conf.d, systemd requires a daemon reload before restarting the service.
sudo systemctl daemon-reload
sudo systemctl restart chrony
If you need to restart your server for any reason, Chrony will automatically start and resume NTP service.
IMPORTANT
Your NTP server must synchronize with upstream time sources before it can serve time to clients. If clients receive “stratum 0” or “KOD packet” errors, verify the server is synchronized using chronyc tracking. The Stratum value should be greater than 0 and Leap status should show “Normal”. Initial synchronization typically takes 30-60 seconds after service start.
IMPORTANT
For servers with a static IP address, ensure the IP remains consistent so clients can reliably connect. Dynamic IP addresses complicate NTP server deployment significantly.
Example Server Configuration Fragment
Here is a complete example for /etc/chrony/conf.d/local-ntp-server.conf serving a typical enterprise network:
# Allow NTP client access from local networks
allow 192.168.1.0/24
allow 192.168.2.0/24
allow 10.0.0.0/8

# Serve time even if not synchronized to a time source
local stratum 10
The main /etc/chrony/chrony.conf file already contains essential settings including makestep 1 3 (allowing large time corrections during initial synchronization), rtcsync (keeping the hardware real-time clock synchronized), and leapseclist (handling leap seconds from the system timezone database). These defaults work well for most NTP server deployments.
Configuring Firewall for NTP Traffic
NTP uses UDP port 123 for both client queries and server responses. If your Ubuntu 26.04 server runs a firewall (which it should for security), you must explicitly allow this traffic.
- Check current firewall status: Verify whether UFW (Uncomplicated Firewall) is active on your system.
sudo ufw status
If the firewall is inactive, you may choose to enable it for improved security.
- Allow NTP traffic: Add a rule permitting incoming UDP connections on port 123.
sudo ufw allow 123/udp
This command creates a rule allowing NTP client connections from any source. For enhanced security, you can restrict this to specific networks.
- Restrict NTP access to specific networks: If you want to limit NTP access to your internal network only, use a more specific rule.
sudo ufw allow from 192.168.1.0/24 to any port 123 proto udp
This approach provides defense in depth, complementing the
allowdirectives in Chrony’s configuration. - Verify the firewall rules: Confirm the new rule appears in the firewall configuration.
sudo ufw status numbered
The output should display your NTP rule along with any other configured rules.
SECURITY ALERT
Exposing NTP services to the internet can make your server a target for amplification attacks. Always restrict NTP access to trusted networks unless you specifically intend to run a public NTP server.
If you manage your server remotely, ensure you have SSH server access configured before enabling firewall rules that might block your connection.
Verifying NTP Server Status on Ubuntu 26.04
After completing the configuration, verify that your NTP server is functioning correctly. Chrony provides the chronyc utility for monitoring and troubleshooting.
- Check synchronization status: The
trackingcommand displays detailed information about your server’s synchronization state.chronyc tracking
Key values to examine include “Reference ID” (your upstream source), “Stratum” (your server’s stratum level), and “System time” (offset from true time).
- View upstream sources: List all configured time sources and their status.
chronyc sources -v
The
-vflag provides verbose output explaining each column. Sources marked with*are currently selected as the synchronization source. - Monitor source statistics: For deeper analysis, examine the statistics for each source.
chronyc sourcestats
This command shows polling intervals, reach registers, and estimated error for each upstream server.
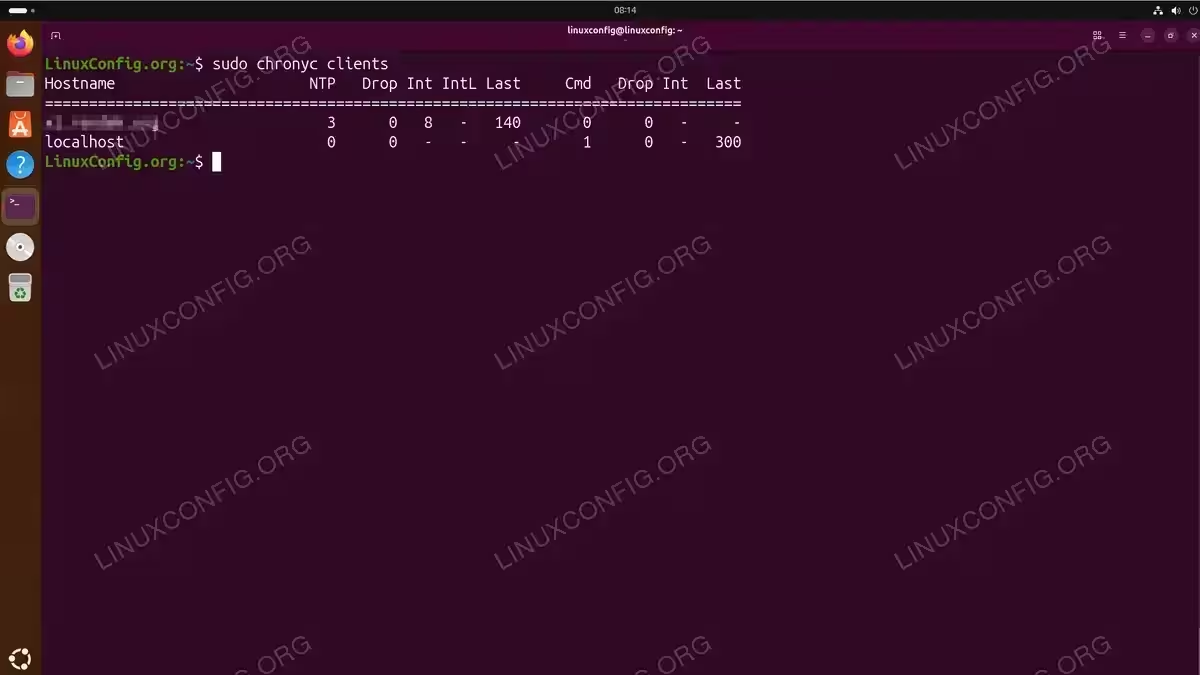
- Check client connections: Once clients begin synchronizing, you can view active client connections.
sudo chronyc clients
This command requires root privileges and displays a list of all clients that have queried your NTP server.
A properly functioning NTP server should show a stratum level one higher than its upstream sources. If your server synchronizes with Stratum 2 pool servers, it will operate as Stratum 3.
Understanding Chronyc Output
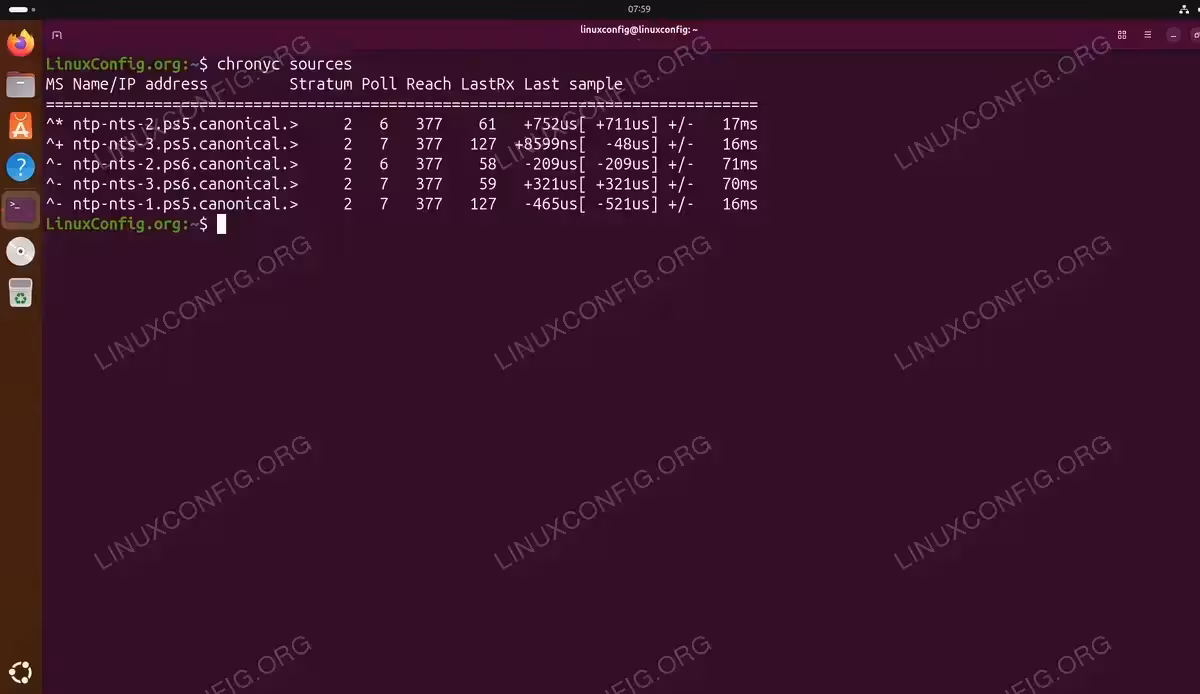
The chronyc sources output contains several important indicators. The first column shows the source mode, where ^ indicates a server. The second character indicates source state: * marks the currently selected source, + indicates acceptable backup sources, and - indicates sources excluded by the selection algorithm.
With Ubuntu 26.04’s default NTS configuration, you will see sources from Canonical’s NTS-enabled pools (ntp-nts-*.canonical.com) operating at Stratum 2. These authenticated sources provide secure time synchronization out of the box.
The “Reach” column displays an octal representation of the last eight connection attempts. A value of 377 (all ones in octal) indicates eight consecutive successful polls, a sign of reliable connectivity. The “Last sample” column shows the measured offset between your system clock and the source, with values in microseconds (us) indicating excellent synchronization.
Configuring NTP Clients
With your NTP server running, configure client machines to synchronize with it instead of public NTP pools. This section covers NTP client configuration for Ubuntu 26.04 systems.
- Create a custom sources file: On each client machine, create a new sources file pointing to your local NTP server.
sudo nano /etc/chrony/sources.d/local-ntp-server.sources
Using a separate file keeps your customizations independent from system defaults.
- Add your NTP server: Add a server directive pointing to your NTP server.
server 192.168.1.10 iburst
Replace 192.168.1.10 with your NTP server’s IP address. The
iburstoption ensures rapid initial synchronization. - Disable default pools (optional): If you want clients to use only your local server, rename the default sources file.
sudo mv /etc/chrony/sources.d/ubuntu-ntp-pools.sources /etc/chrony/sources.d/ubuntu-ntp-pools.sources.disabled
Alternatively, keep the default pools as backup sources.
- Restart Chrony on the client: Apply the configuration changes by restarting the service.
sudo systemctl restart chrony
The client will immediately begin synchronizing with your local NTP server.
- Verify client synchronization: Confirm the client is using your NTP server.
chronyc sources
Your server’s IP address should appear with a
*indicating it is the selected synchronization source.
For networks with multiple NTP servers providing redundancy, you can specify several servers in the client configuration. Chrony will automatically select the best source based on accuracy and reliability metrics.
Security Considerations for NTP Server
Running an NTP server introduces potential security considerations that deserve attention. Ubuntu 26.04 addresses many concerns by enabling Network Time Security (NTS) by default for upstream synchronization.
Network Time Security (NTS)
Ubuntu 26.04 enables NTS by default, providing authenticated and encrypted time synchronization with upstream servers. The default pools at 1-4.ntp.ubuntu.com all use NTS, preventing man-in-the-middle attacks where an attacker could feed your server incorrect time information.
The NTS configuration is managed through /etc/chrony/conf.d/ubuntu-nts.conf, which references the bootstrap certificate at /etc/chrony/nts-bootstrap-ubuntu.crt. This certificate has an extended validity range to accommodate systems with large initial clock drift.
For your local network clients, NTS adds complexity since you would need to deploy certificates. For most internal networks, the combination of firewall rules and Chrony’s access controls provides sufficient security.
Rate Limiting
Chrony includes built-in rate limiting to prevent abuse. The default configuration limits the rate of NTP packets from any single client. You can adjust these limits by adding a configuration fragment:
sudo nano /etc/chrony/conf.d/rate-limit.conf
Add the following content:
ratelimit interval 1 burst 16
This setting allows a burst of 16 packets, then limits responses to one per second per client. These defaults work well for most environments.
Access Control
Always use the allow directive to restrict which networks can query your NTP server. Avoid using allow all unless you intentionally operate a public NTP service. Combine Chrony’s access control with firewall rules for defense in depth.
Monitoring and Logging
Enable logging to track NTP server activity and detect potential issues. Edit the main configuration file:
sudo nano /etc/chrony/chrony.conf
Uncomment the logging line:
log tracking measurements statistics
Logs are written to /var/log/chrony/ by default. Regular review of these logs helps identify synchronization problems or suspicious activity. For detailed information on Chrony configuration options, consult the official Chrony documentation.
Conclusion
You have successfully learned how to configure an NTP server on Ubuntu 26.04 using Chrony. Your server now provides accurate time synchronization for all devices on your network, improving the reliability of time-sensitive services and simplifying log correlation across systems. The configuration covers essential aspects including upstream synchronization, client access control, firewall rules, and security best practices.
For ongoing maintenance, periodically verify synchronization status using chronyc tracking and monitor client connections with chronyc clients. If you expand your network or add new subnets, remember to update both the Chrony configuration and firewall rules to accommodate additional clients.
Frequently Asked Questions
- What is the difference between Chrony and ntpd? Chrony and ntpd are both NTP implementations, but Chrony offers several advantages for modern systems. Chrony synchronizes faster after boot, handles intermittent network connectivity better, and consumes fewer resources. Ubuntu 26.04 uses Chrony by default, and it is the recommended choice for most deployments.
- Can I run an NTP server on a virtual machine? Yes, you can run an NTP server on a virtual machine, though there are considerations. Virtual machines experience clock instability due to hypervisor scheduling. Chrony handles this well with its
makestepdirective. For critical time infrastructure, a physical server with a hardware clock or GPS receiver provides better accuracy. - How do I configure an NTP server without internet access? For air-gapped networks, configure the
local stratum 10directive in Chrony. This allows the server to provide time based on its hardware clock when no upstream sources are available. All clients will maintain synchronized time relative to the server, even without absolute accuracy. For better accuracy, consider a GPS-based time source. - Why are my clients not synchronizing with the NTP server? Common causes include firewall blocking UDP port 123, missing
allowdirective for the client’s network in the server configuration, or incorrect server IP address in the client configuration. Usechronyc sourceson the client andchronyc clientson the server to diagnose connectivity issues. - How many clients can a single NTP server support? A single Chrony NTP server can handle thousands of clients with minimal resource consumption. NTP queries are small UDP packets requiring negligible processing. For very large networks, consider deploying multiple NTP servers and using DNS round-robin or anycast for load distribution.