Accurate time synchronization is essential for system logging, security certificates, scheduled tasks, and distributed applications. This guide explains how to ntp configure ubuntu 26.04 systems as NTP clients, covering both graphical and command-line methods. Ubuntu 26.04 uses Chrony as the default NTP daemon with Network Time Security (NTS) enabled out of the box, providing authenticated and encrypted time synchronization. You will learn how to verify your configuration, add custom time servers, and use alternative synchronization methods when needed.
Table of Contents
In this tutorial you will learn:
- How Ubuntu 26.04 handles time synchronization by default
- How to enable automatic time sync via GNOME Settings
- How to configure Chrony with custom NTP servers
- How to verify NTS authentication status
- How to perform one-off manual time synchronization
Software Requirements
| Category | Requirements, Conventions or Software Version Used |
|---|---|
| System | Ubuntu 26.04 Resolute Raccoon |
| Software | Chrony 4.7 (pre-installed), systemd-timesyncd (optional) |
| Other | Privileged access to your Linux system as root or via the sudo command. |
| Conventions | # – requires given linux commands to be executed with root privileges either directly as a root user or by use of sudo command$ – requires given linux commands to be executed as a regular non-privileged user |
/etc/chrony/sources.d/ and reload the sources.
| Step | Command/Action |
|---|---|
| 1. Check current sync status | timedatectl status |
| 2. Create custom sources file | sudo nano /etc/chrony/sources.d/custom.sources |
| 3. Add your NTP server | server ntp.linuxconfig.local iburst |
| 4. Reload Chrony sources | sudo chronyc reload sources |
Understanding NTP on Ubuntu 26.04
Network Time Protocol (NTP) ensures your system clock stays accurate by synchronizing with remote time servers. Starting with Ubuntu 25.10, Chrony replaced systemd-timesyncd as the default time synchronization daemon. This change brings several improvements for Ubuntu 26.04 users.
Chrony offers faster initial synchronization, better handling of intermittent network connectivity, and support for Network Time Security (NTS). NTS is a modern extension to NTP that provides cryptographic authentication and encryption, preventing man-in-the-middle attacks on time synchronization. Ubuntu 26.04 enables NTS by default, connecting to Ubuntu’s secure NTP pools at 1.ntp.ubuntu.com through 4.ntp.ubuntu.com.
The default configuration is stored in /etc/chrony/sources.d/ubuntu-ntp-pools.sources and includes:
pool 1.ntp.ubuntu.com iburst maxsources 1 nts prefer
pool 2.ntp.ubuntu.com iburst maxsources 1 nts prefer
pool 3.ntp.ubuntu.com iburst maxsources 1 nts prefer
pool 4.ntp.ubuntu.com iburst maxsources 1 nts prefer
pool ntp-bootstrap.ubuntu.com iburst maxsources 1 nts certset 1
For most users, the default configuration works without any changes. Time synchronization begins automatically after installation and continues running in the background. You only need to configure Chrony manually if you want to use specific NTP servers, such as an internal corporate time server, or if your network blocks access to Ubuntu’s NTS servers.
Configure NTP via GUI (Ubuntu Desktop)
Ubuntu Desktop provides a straightforward graphical method to enable automatic time synchronization through GNOME Settings. This approach uses Chrony in the background and works with the default NTS-enabled servers.
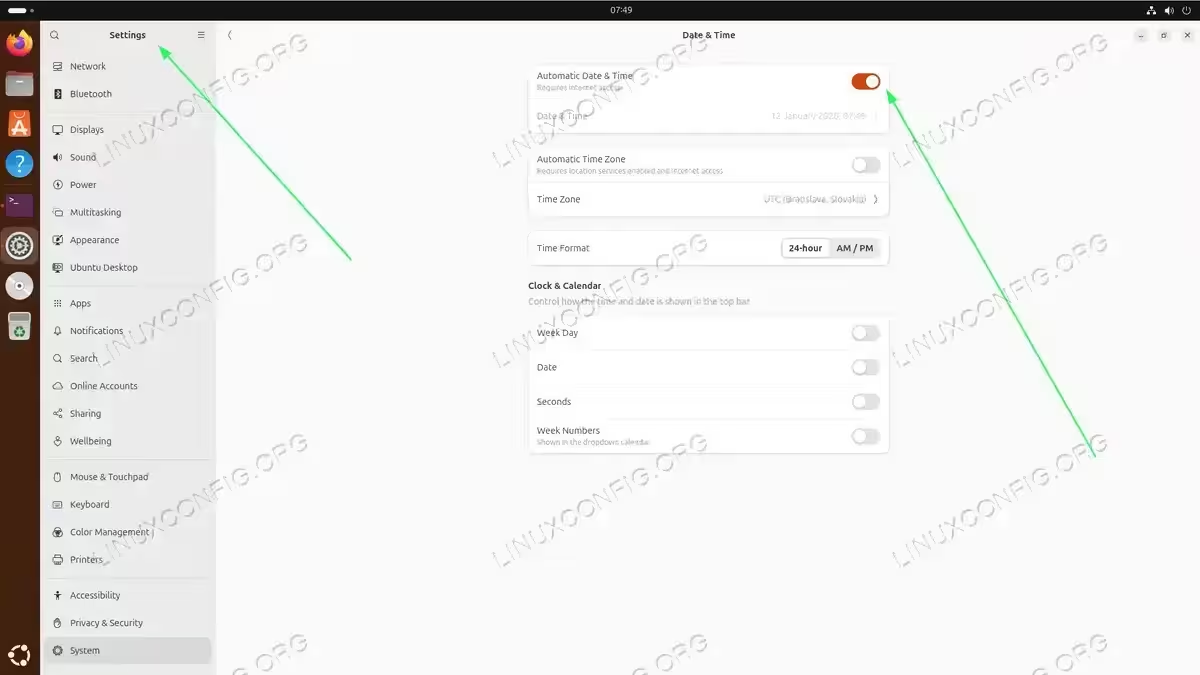
- Open Settings: Click the system menu in the top-right corner of your screen and select the gear icon, or search for “Settings” in the Activities overview.
- Navigate to Date & Time: In the Settings window, scroll down in the left sidebar and click on “Date & Time” under the System section.
- Enable Automatic Date & Time: Toggle the “Automatic Date & Time” switch to the ON position. This enables NTP synchronization using Ubuntu’s default NTS servers.

Navigate to Settings and enable Automatic Date & Time to activate NTP synchronization via Chrony - Set your timezone: Ensure “Automatic Time Zone” is enabled if you want location-based timezone detection, or manually select your timezone from the list.
IMPORTANT
The GUI method uses Ubuntu’s default NTS servers. To specify custom NTP servers such as your organization’s internal time server, you must use the command-line methods described below.
Configure NTP with Chrony (CLI)
Chrony is the default and recommended method to set NTP on Ubuntu 26.04. The service runs automatically after installation and requires no initial configuration for most use cases.
Check Current Synchronization Status
Before making changes, verify the current time synchronization status using timedatectl:
$ timedatectl status
This command displays your current time settings and confirms whether NTP synchronization is active:
               Local time: Mon 2026-01-12 14:30:45 CET
           Universal time: Mon 2026-01-12 13:30:45 UTC
                 RTC time: Mon 2026-01-12 13:30:45
                Time zone: Europe/Berlin (CET, +0100)
System clock synchronized: yes
              NTP service: active
          RTC in local TZ: no
For more detailed synchronization information, query Chrony directly:
$ chronyc tracking
This shows the current time source, synchronization accuracy, and clock drift information.
View Current Time Sources
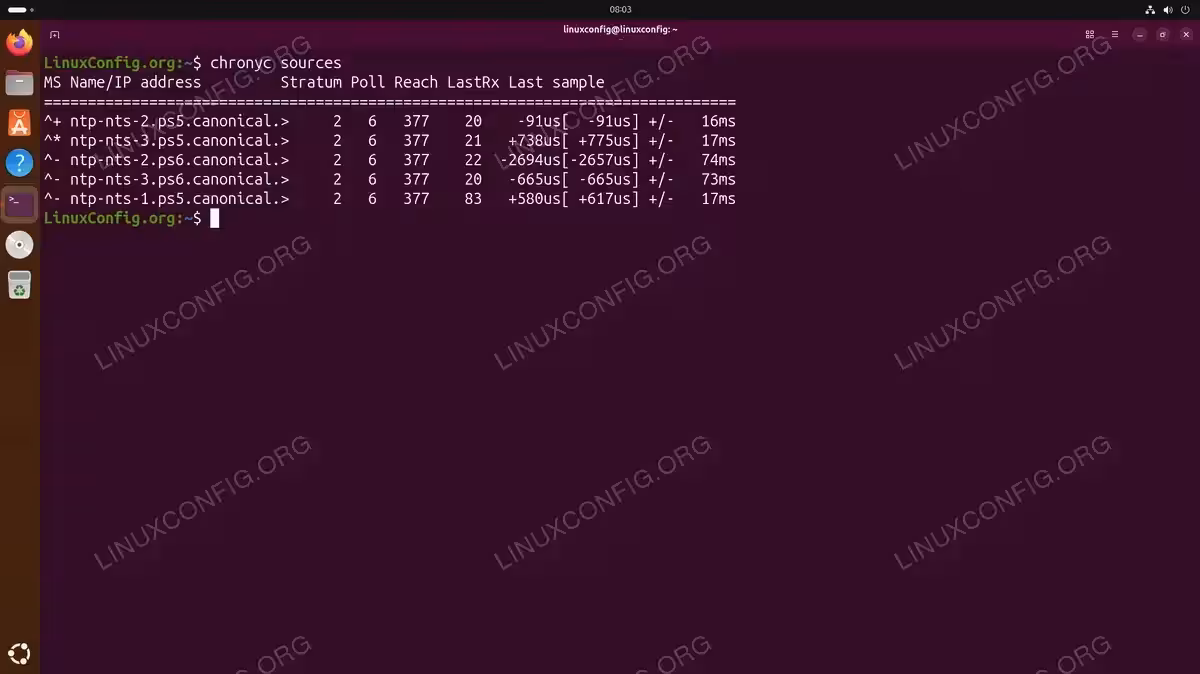
To check NTP sources and their status:
$ chronyc sources
The output displays all configured time sources with status indicators:
Verify NTS Authentication
To confirm that NTS authentication is working with your time sources:
$ sudo chronyc -N authdata
Successful NTS connections show NTS in the Mode column with non-zero KeyID values:
Name/IP address             Mode KeyID Type KLen Last Atmp  NAK Cook CLen
=========================================================================
1.ntp.ubuntu.com             NTS     6   30  128  14d    0    0    8   64
2.ntp.ubuntu.com             NTS     6   30  128  14d    0    0    8   64
Add Custom NTP Servers
To use specific NTP servers, such as your organization’s internal time server or a preferred public pool, create a new sources file:
$ sudo nano /etc/chrony/sources.d/custom.sources
Add your NTP server entries. For an internal server without NTS:
server ntp.linuxconfig.local iburst prefer
For public NTP pools or servers that support NTS:
server time.cloudflare.com iburst nts
pool pool.ntp.org iburst maxsources 4
The iburst option speeds up initial synchronization. The prefer option gives priority to that source. The nts option enables Network Time Security for servers that support it.
After saving the file, reload the sources:
$ sudo chronyc reload sources
Verify the new sources are active:
$ chronyc sources

IMPORTANT
If you want to completely replace the default Ubuntu NTS servers, you can remove or rename the default configuration file at /etc/chrony/sources.d/ubuntu-ntp-pools.sources. However, keeping the defaults as fallback is recommended.
Alternative: systemd-timesyncd
For systems that require a minimal footprint or do not need NTS support, systemd-timesyncd provides a lightweight alternative. This service is not installed by default on Ubuntu 26.04 but can be added when needed.
Install systemd-timesyncd
Installing timesyncd automatically disables Chrony to prevent conflicts:
$ sudo apt update
$ sudo apt install systemd-timesyncd
Configure timesyncd
Edit the configuration file to specify your preferred NTP servers:
$ sudo nano /etc/systemd/timesyncd.conf
Add your servers in the [Time] section:
[Time]
NTP=ntp.linuxconfig.local time.google.com
FallbackNTP=pool.ntp.org
Restart the service to apply changes:
$ sudo systemctl restart systemd-timesyncd
Verify synchronization status:
$ timedatectl timesync-status
INSTALLATION TIPS
If you later want to switch back to Chrony, install the chrony package and timesyncd will be automatically disabled. Only one NTP client should be active at a time.
One-Off Manual Time Sync
Sometimes you need to synchronize the system clock immediately without waiting for the regular polling interval. This is useful for initial system setup, testing, or correcting a significantly drifted clock.
Using chronyc makestep
Force Chrony to immediately step the clock to match the NTP source:
$ sudo chronyc makestep
200 OK
This command forces an immediate time correction regardless of the offset size. It uses the currently configured time sources, so no additional server specification is needed.
IMPORTANT
By default, Chrony only allows large time corrections during the first 3 updates after startup (configured as makestep 1 3 in /etc/chrony/chrony.conf). If your clock has drifted significantly and chronyc makestep does not correct it, restart the Chrony service first: sudo systemctl restart chrony && sudo chronyc makestep
Using ntpdate (Legacy)
The ntpdate utility provides a traditional one-off synchronization method for situations where Chrony is not running:
$ sudo apt install ntpdate
$ sudo ntpdate pool.ntp.org
INSTALLATION TIPS
ntpdate is considered deprecated. Use chronyc makestep for modern Ubuntu systems. ntpdate remains useful only for compatibility with legacy scripts or recovery scenarios where Chrony is unavailable.
Troubleshooting
NTS Connection Failures
If NTS authentication fails and Chrony cannot synchronize time, your network may be blocking the required ports. NTS uses two ports: UDP 123 for NTP traffic and TCP 4460 for the NTS key exchange.
Check if you can reach the NTS key exchange port:
$ nc -zv 1.ntp.ubuntu.com 4460
If the connection fails, you have two options. First, configure your firewall to allow outbound TCP 4460. Alternatively, disable NTS and use traditional NTP by creating a custom sources file without the nts option:
$ sudo nano /etc/chrony/sources.d/fallback.sources
Add non-NTS servers:
pool ntp.ubuntu.com iburst
pool pool.ntp.org iburst
Then remove or rename the default NTS configuration:
$ sudo mv /etc/chrony/sources.d/ubuntu-ntp-pools.sources /etc/chrony/sources.d/ubuntu-ntp-pools.sources.disabled
$ sudo chronyc reload sources
Clock Too Far Off for NTS
NTS relies on TLS, which requires a reasonably accurate clock for certificate validation. If your system clock is significantly wrong, NTS authentication may fail. Ubuntu includes a bootstrap server with special certificate handling to address this issue. If problems persist, you can temporarily add a non-NTS server to your configuration:
$ sudo nano /etc/chrony/sources.d/temp-fallback.sources
Add a non-NTS server:
server pool.ntp.org iburst prefer
Reload and force sync:
$ sudo chronyc reload sources
$ sudo chronyc makestep
Once the clock is corrected, you can remove the temporary fallback file.
Check Chrony Service Status
If synchronization is not working, check the Chrony service status:
$ systemctl status chrony
Review the logs for error messages:
$ journalctl -u chrony --since "1 hour ago"
Conclusion
You have learned multiple methods to ntp configure ubuntu 26.04 as an NTP client. Chrony with NTS provides the most secure and reliable time synchronization out of the box. For desktop users, the GNOME Settings interface offers a simple way to enable automatic time sync. Organizations requiring custom NTP servers can easily add them through Chrony’s modular configuration in /etc/chrony/sources.d/. If you need to set up an NTP server to serve time to other machines, Chrony can be configured for that purpose as well. For more information, consult the official Ubuntu Server documentation on time synchronization with Chrony.
Frequently Asked Questions
- What is Network Time Security (NTS) and why does Ubuntu 26.04 enable it by default? NTS is a security extension for NTP that provides cryptographic authentication and encryption of time synchronization traffic. It prevents attackers from manipulating your system clock through man-in-the-middle attacks. Ubuntu 26.04 enables NTS by default because accurate and trusted time is critical for security functions like TLS certificate validation, Kerberos authentication, and log correlation.
- Can I use my own internal NTP server instead of Ubuntu’s NTS pools? Yes, you can configure any NTP server as your time source. Create a file in
/etc/chrony/sources.d/with your server address and runsudo chronyc reload sources. Internal servers typically do not support NTS, so omit thentsoption from the server line. You can keep Ubuntu’s default servers as fallback or remove them entirely. - Why is systemd-timesyncd not installed by default anymore? Ubuntu switched to Chrony starting with version 25.10 because Chrony offers better performance, faster synchronization, NTS support, and the ability to serve time to other machines. systemd-timesyncd remains available for users who prefer a minimal installation or have specific requirements that favor the simpler SNTP client.
- My network blocks port 4460. Can I still use NTP? Yes. Port 4460 is only required for NTS key exchange. If your network blocks this port, you can disable NTS and use traditional NTP on port 123. Create a custom sources file with servers configured without the
ntsoption, then disable or remove the default NTS configuration file. - How do I force an immediate time synchronization? Run
sudo chronyc makestepto force Chrony to immediately correct the system clock. This uses your currently configured time sources and works while the Chrony service is running. This is useful when your clock has drifted significantly or during initial system setup.