This guide walks you through setting up a production-ready SSH server on Ubuntu 26.04. Rather than covering just the basics, we focus on creating a secure SSH configuration that you can confidently deploy. You’ll start with a fresh OpenSSH installation and finish with key-based authentication, disabled password login, and proper firewall rules. If you need a quick SSH server ubuntu 26.04 installation without the hardening steps, see our guide on installing and enabling SSH.
Table of Contents
In this tutorial you will learn:
- How to install and configure OpenSSH server
- How to set up passwordless key-based authentication
- How to create a hardening configuration file
- How to handle SSH socket activation for custom ports
- How to configure UFW firewall for SSH access
Software Requirements
| Category | Requirements, Conventions or Software Version Used |
|---|---|
| System | Ubuntu 26.04 Resolute Raccoon |
| Software | OpenSSH Server 9.x |
| Other | Privileged access to your Linux system as root or via the sudo command. A second machine (client) to test SSH connections. |
| Conventions | # – requires given linux commands to be executed with root privileges either directly as a root user or by use of sudo command$ – requires given linux commands to be executed as a regular non-privileged user |
| Step | Command/Action |
|---|---|
| 1. Install OpenSSH | sudo apt install openssh-server |
| 2. Generate SSH key (on client) | ssh-keygen -t ed25519 |
| 3. Copy key to server | ssh-copy-id linuxconfig@ssh-server |
| 4. Create hardening config | sudo nano /etc/ssh/sshd_config.d/00-hardening.conf |
Install OpenSSH Server
Begin by installing the OpenSSH server package. If you already have SSH installed, skip ahead to the hardening configuration section.
- Update package index and install OpenSSH:
$ sudo apt update
$ sudo apt install openssh-server
- Enable SSH to start at boot:
$ sudo systemctl enable ssh
- Verify the service is running:
$ sudo systemctl status ssh
You should see
active (running)in the output. If not, start it withsudo systemctl start ssh. - Check for socket activation:
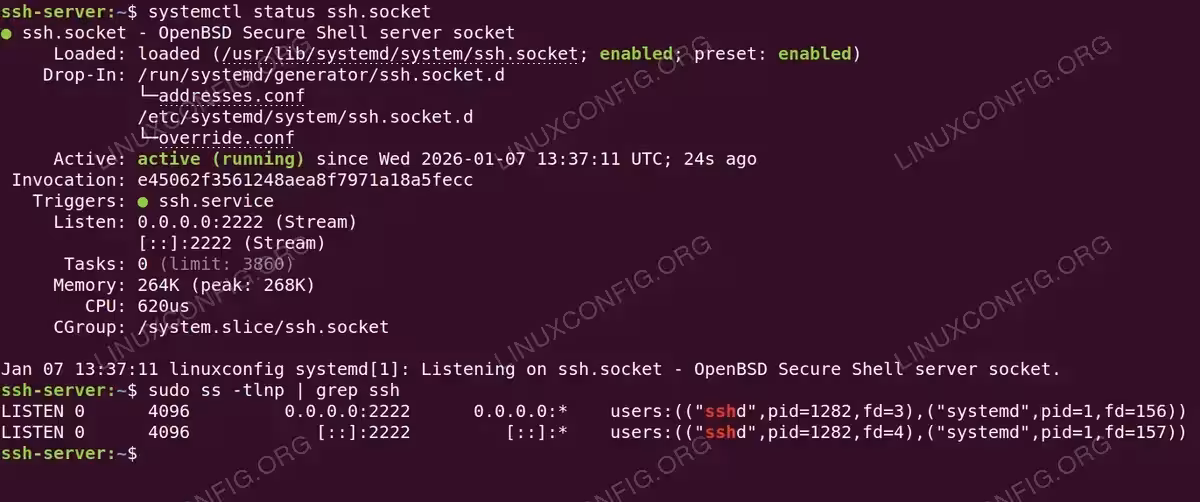
$ systemctl status ssh.socket
IMPORTANT
If you seeactive (listening), your system uses socket activation. This is the default in Ubuntu 26.04. Socket activation means thessh.socketunit controls which port SSH listens on, not the sshd_config file. When we configure a custom port later, you’ll need to override the socket configuration in addition to the SSH config.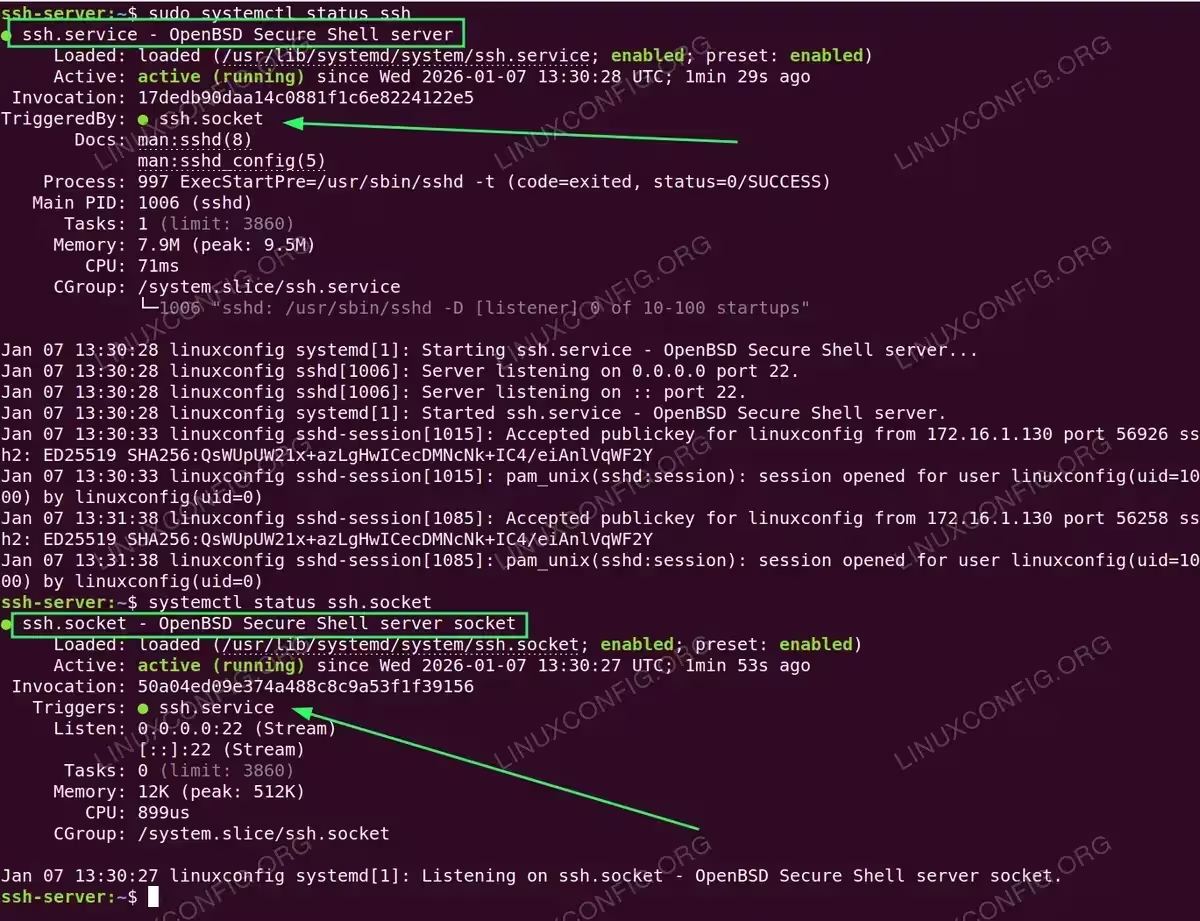
Checking SSH service status reveals socket activation is enabled (TriggeredBy: ssh.socket)
Set Up Key-Based Authentication
Key-based authentication is more secure than passwords and enables passwordless login. You’ll generate a key pair on your client machine, then copy the public key to the server. We configure this before applying the hardening configuration because the hardening disables password authentication.
- Generate an SSH key pair on your client machine:
$ ssh-keygen -t ed25519 -C "your_email@example.com"
When prompted, accept the default file location. Optionally set a passphrase for additional security. The Ed25519 algorithm offers strong security with excellent performance.
- Copy your public key to the server:
$ ssh-copy-id linuxconfig@ssh-server
Enter your password when prompted.
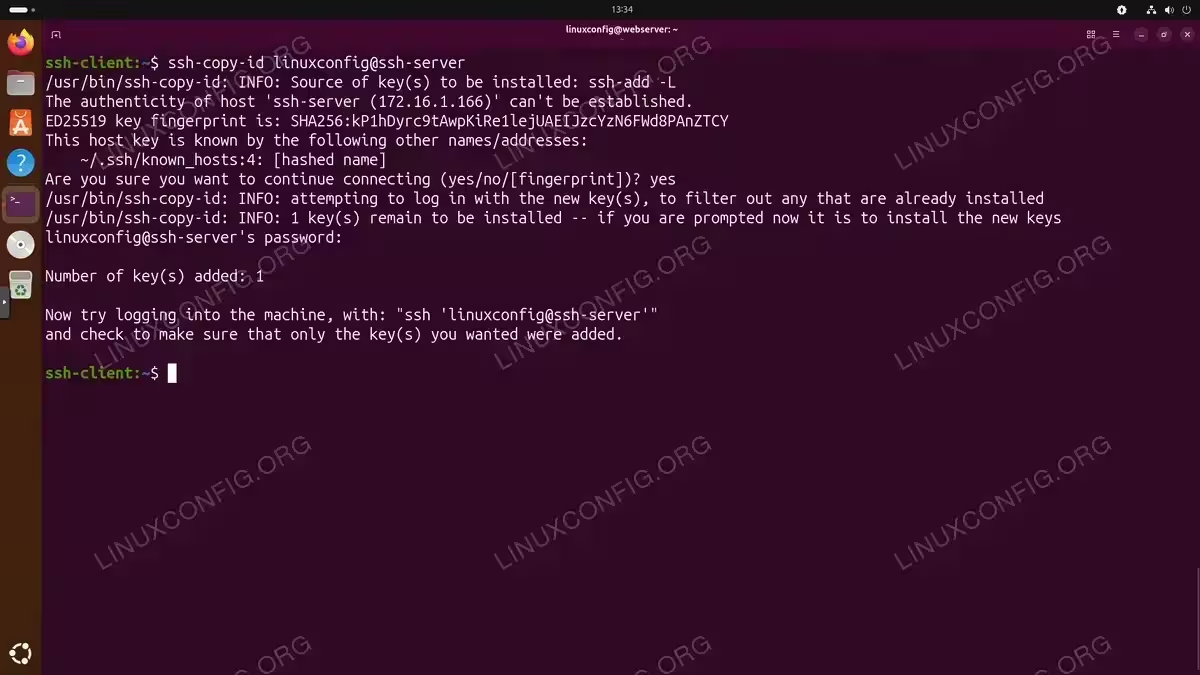
Using ssh-copy-id to install the public key on the remote server - Test passwordless key-based login:
$ ssh linuxconfig@ssh-server
You should connect without being asked for your server password (unless you set a passphrase on your key).
COMPLETED
If you connected successfully without entering your server password, key-based authentication is working correctly. You can now safely proceed with the hardening configuration.
Create SSH Hardening Configuration
Rather than modifying the default SSH configuration, we’ll create a dedicated hardening file. Ubuntu’s SSH server loads configuration from files in /etc/ssh/sshd_config.d/ directory before the main config, which allows us to keep our security settings separate and easy to manage.
Our hardening configuration transforms a default SSH installation into a production-ready server by implementing these security measures: restricting access to specific users only, disabling root login and password authentication entirely, enabling key-based authentication as the sole login method, setting connection limits and timeouts to prevent brute-force attacks, rate limiting unauthenticated connections, and moving SSH to a non-standard port.
Throughout this tutorial, we use the following example configuration. Adjust these values to match your environment. Substitute the hostname with an IP address if preferred.
| Setting | Value |
|---|---|
| Goal | Production-ready SSH server with key-based authentication only |
| Username | linuxconfig |
| Server hostname | ssh-server |
| SSH port | 2222 |
| Authentication | SSH keys only (passwords disabled) |
- Check for existing configuration overrides:
Cloud-provisioned servers often include configuration files that enable password authentication. Check what exists:$ ls -la /etc/ssh/sshd_config.d/
If you find files like
50-cloud-init.confthat setPasswordAuthentication yes, remove or rename them:$ sudo rm /etc/ssh/sshd_config.d/50-cloud-init.conf
- Create the hardening configuration file:
$ sudo nano /etc/ssh/sshd_config.d/00-hardening.conf
The
00-prefix ensures this file loads first. Add the following configuration:# /etc/ssh/sshd_config.d/00-hardening.conf # SSH Server Hardening Configuration for Ubuntu 26.04 #---------------------------- # Access Control #---------------------------- # Restrict SSH access to specific users (space-separated list) AllowUsers linuxconfig # Disable root login PermitRootLogin no #---------------------------- # Authentication #---------------------------- # Enable public key authentication PubkeyAuthentication yes # Disable password authentication (use keys only) PasswordAuthentication no # Disable empty passwords PermitEmptyPasswords no # Maximum authentication attempts per connection MaxAuthTries 3 # Time allowed to authenticate (seconds) LoginGraceTime 60 #---------------------------- # Session Limits #---------------------------- # Maximum sessions per network connection MaxSessions 3 # Rate limit unauthenticated connections # Format: start:rate:full (reject 30% after 10, reject all after 60) MaxStartups 10:30:60 #---------------------------- # Connection Timeout #---------------------------- # Check client every 300 seconds (5 min) ClientAliveInterval 300 # Disconnect after 2 missed checks (10 min idle) ClientAliveCountMax 2 #---------------------------- # Features #---------------------------- # Disable X11 forwarding (reduce attack surface) X11Forwarding no #---------------------------- # Network #---------------------------- # Custom SSH port Port 2222
- Validate configuration syntax:
$ sudo sshd -t
If there are no errors, the command returns silently. Any syntax errors will be displayed.
- Restart SSH to apply changes:
DANGER
Do not log out from the server until you verify SSH access works with the new configuration. Keep this session open as a backup in case you are unable to login via SSH.$ sudo systemctl restart ssh
- Verify the port change:
$ sudo ss -tlnp | grep ssh
If you see port 2222, the configuration is complete. If SSH is still listening on port 22, you have socket activation enabled. Continue to the next step.
Configuring Custom Port with Socket Activation
Ubuntu 26.04 uses systemd socket activation for SSH by default. When socket activation is enabled, the ssh.socket unit controls which port SSH listens on, and the Port directive in sshd_config is ignored. Socket activation improves security by spawning the SSH service on-demand rather than running continuously.
To use a custom port with socket activation:
- Check if socket activation is enabled:
$ systemctl status ssh.socket
If you see
active (listening), socket activation is controlling your SSH port. - Create a socket override:
$ sudo systemctl edit ssh.socket
This opens an editor. Add the following lines:
[Socket]
ListenStream=
ListenStream=0.0.0.0:2222
ListenStream=[::]:2222
The empty
ListenStream=clears the default port 22 setting. Save and exit.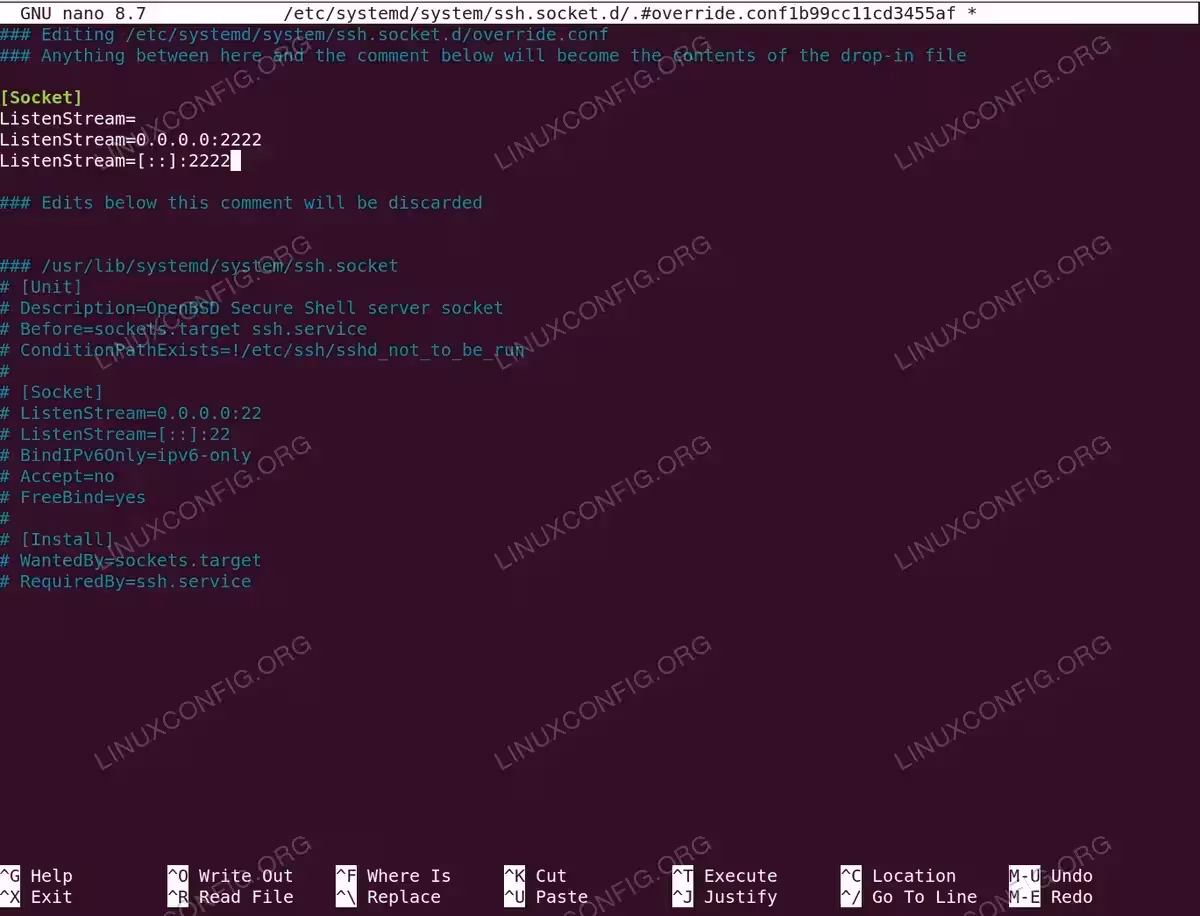
Creating systemd socket override to change SSH listening port to 2222 - Reload and restart the socket:
$ sudo systemctl daemon-reload
$ sudo systemctl restart ssh.socket
- Verify the new port:
$ sudo ss -tlnp | grep ssh
You should now see SSH listening on port 2222.
For a complete reference of all available SSH daemon options, consult the SSH configuration guide or the official sshd_config manual.
Configure Firewall for SSH Access
Ubuntu’s UFW (Uncomplicated Firewall) should allow SSH connections on your custom port.
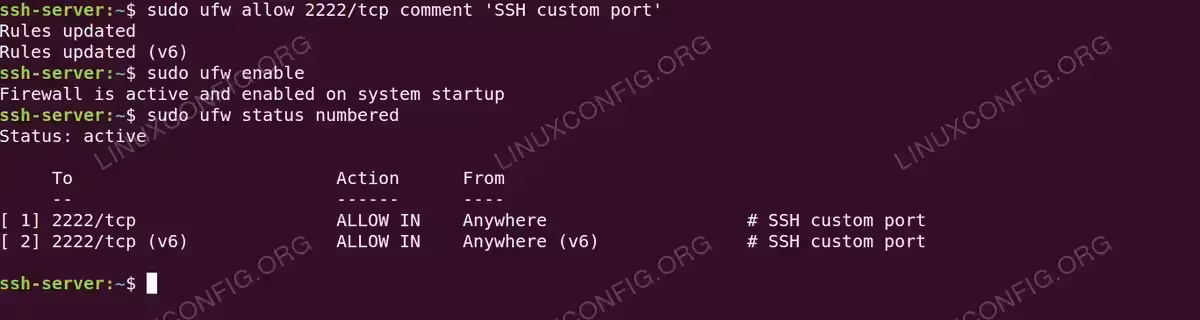
- Allow SSH through the firewall:
$ sudo ufw allow 2222/tcp comment 'SSH custom port'
- Enable UFW if not already active:
$ sudo ufw enable
- Verify firewall rules:
$ sudo ufw status numbered
If you previously allowed the default SSH port, remove the old rule:
$ sudo ufw delete allow 22/tcp
Verify Your Setup
Run through this checklist to confirm your SSH server is properly configured:
- Test connection from a remote client:
$ ssh -p 2222 linuxconfig@ssh-server
You should connect using your key without a password prompt.
- Verify password authentication is disabled:
$ ssh -p 2222 -o PubkeyAuthentication=no linuxconfig@ssh-server
This should fail with
Permission denied. - Confirm root login is blocked:
$ ssh -p 2222 root@ssh-server
This should also fail.
- Check SSH is listening on the correct port:
$ sudo ss -tlnp | grep ssh
Confirm the output shows port 2222.
- Review active configuration:
$ sudo sshd -T | grep -E "^(port|passwordauthentication|permitrootlogin|allowusers)"
Verify your hardening settings are active.
COMPLETED
Congratulations! Your SSH server ubuntu 26.04 setup is now production-ready with key-based authentication, disabled password login, and firewall protection.
Conclusion
You’ve successfully set up a secure SSH server on Ubuntu 26.04. Your configuration now includes key-based authentication, disabled password login, restricted root access, connection rate limiting, and proper firewall rules. By using a dedicated hardening configuration file in /etc/ssh/sshd_config.d/, your security settings remain separate from system defaults and are easy to audit or update. For additional security, consider implementing fail2ban to automatically block repeated failed login attempts, or explore advanced SSH configuration options. If you’re setting up other remote access services, see our guide on how to set up VNC server for graphical remote access.
Frequently Asked Questions
- What should I do if I get locked out after disabling password authentication? If you have physical or console access to the server, you can boot into recovery mode or use a live USB to mount the filesystem and edit
/etc/ssh/sshd_config.d/00-hardening.confto re-enable password authentication. For cloud servers, most providers offer a web console or recovery options. This is why testing key-based login before disabling passwords is critical. - Why does changing the Port in sshd_config not work? Ubuntu 26.04 uses systemd socket activation by default, where
ssh.socketcontrols which port SSH listens on. ThePortdirective in sshd_config only applies when SSH runs directly without socket activation. To change the port, create a systemd override for ssh.socket as shown in this guide. - Can I use RSA keys instead of Ed25519? Yes, RSA keys work fine. Use
ssh-keygen -t rsa -b 4096for RSA. However, Ed25519 keys are shorter, faster, and considered equally secure or better than 4096-bit RSA. Ed25519 is the recommended choice for new key generation unless you need compatibility with very old systems. - How do I allow multiple users to SSH into the server? Add all allowed usernames to the
AllowUsersdirective separated by spaces:AllowUsers user1 user2 user3. Each user needs their own public key copied to their respective~/.ssh/authorized_keysfile on the server. - What does the MaxStartups 10:30:60 setting mean? This rate limits unauthenticated connections to prevent brute-force attacks. It means: accept the first 10 connections normally, then randomly drop 30% of new connections, increasing to 100% rejection when 60 unauthenticated connections are pending.