This tutorial provides a concise guide to configuring a static IP with Netplan on Ubuntu 26.04 Server. If you need comprehensive coverage including desktop GUI methods, multiple IP addresses, or advanced scenarios, see our complete static IP configuration guide.
Table of Contents
In this tutorial you will learn:
- How to configure static IP using Netplan on Ubuntu Server
- How to identify your network interface and configuration file
- How to apply and verify Netplan configuration
- How to handle cloud-init managed systems
Software Requirements
| Category | Requirements, Conventions or Software Version Used |
|---|---|
| System | Ubuntu 26.04 Resolute Raccoon |
| Software | Netplan (installed by default) |
| Other | Privileged access to your Linux system as root or via the sudo command. |
| Conventions | # – requires given linux commands to be executed with root privileges either directly as a root user or by use of sudo command$ – requires given linux commands to be executed as a regular non-privileged user |
/etc/netplan/, setting dhcp4: false, and defining your IP address, gateway, and DNS servers.
| Step | Command/Action |
|---|---|
| 1. Find config file | ls /etc/netplan/ |
| 2. Edit netplan config | sudoedit /etc/netplan/00-installer-config.yaml |
| 3. Apply configuration | sudo netplan apply |
Configure Static IP with Netplan on Ubuntu 26.04 Server
Ubuntu Server uses Netplan for network configuration with YAML syntax. The following steps show how to configure a static IP on a typical Ubuntu 26.04 Server installation.
- Identify your network interface: Use the
ip acommand to find your network interface name:$ ip a
Look for the interface with an active connection (state UP). Common names include
ens18,enp0s3, oreth0. Note this name for the next steps. - Locate the Netplan configuration file: List files in the Netplan directory:
$ ls /etc/netplan/
On a standard Ubuntu Server installation, you will find
00-installer-config.yamlcreated by the subiquity installer. Other possible filenames include01-netcfg.yamlor50-cloud-init.yaml. - View current configuration: Check the existing settings before making changes:
$ cat /etc/netplan/00-installer-config.yaml
A default DHCP configuration looks like this:
# This is the network config written by 'subiquity' network: ethernets: ens18: dhcp4: true dhcp6: true match: macaddress: bc:24:11:5e:a0:5f set-name: ens18 version: 2 - Edit the configuration: Open the file for editing:
$ sudoedit /etc/netplan/00-installer-config.yaml
Replace the DHCP configuration with a static IP configuration. The following example sets the IP address to
172.16.1.170with gateway172.16.1.1:network: ethernets: ens18: dhcp4: false dhcp6: false addresses: - 172.16.1.170/24 routes: - to: default via: 172.16.1.1 nameservers: addresses: [1.1.1.1, 8.8.8.8] version: 2YAML INDENTATION
Netplan uses strict YAML formatting. Use spaces (not tabs) and maintain consistent indentation. Incorrect indentation will cause errors when applying the configuration.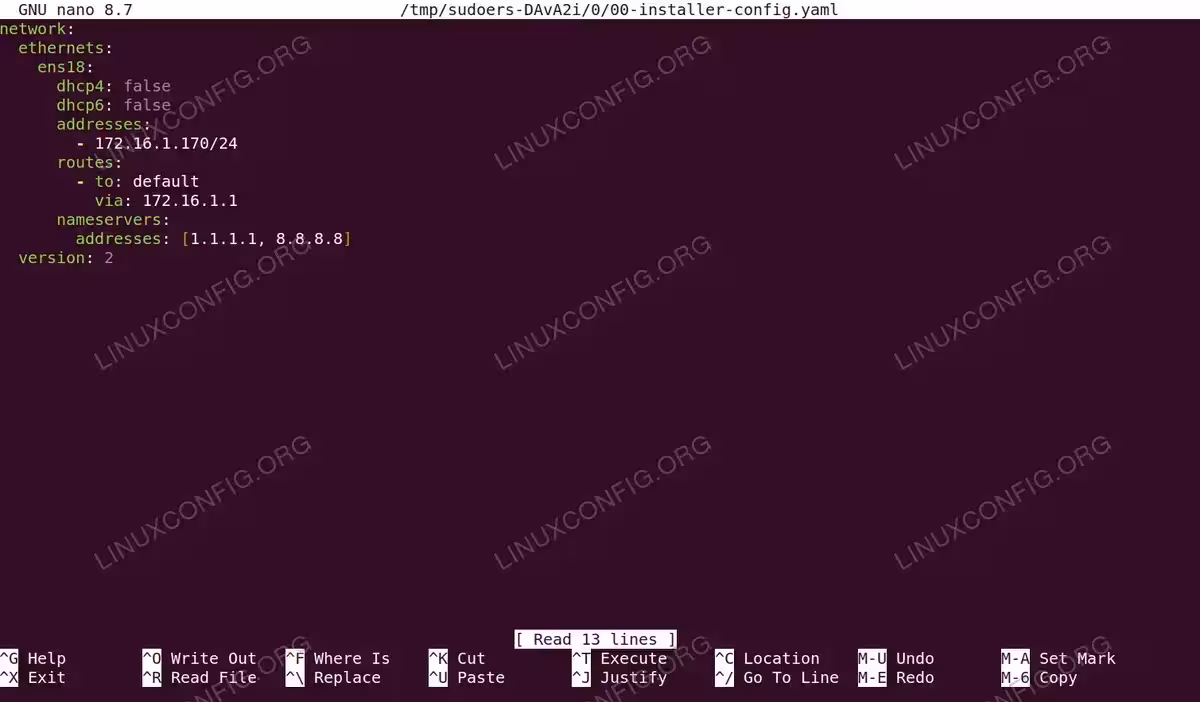
Editing the Netplan configuration file to set static IP address 172.16.1.170 with gateway 172.16.1.1 and DNS servers - Apply the configuration: Save the file and apply the Netplan changes:
$ sudo netplan apply
If you encounter errors, use debug mode to see detailed output:
$ sudo netplan --debug apply
- Verify the static IP: Confirm your new IP address is active:
$ ip a show ens18
Test connectivity to your gateway and external addresses:
$ ping -c 3 172.16.1.1
$ ping -c 3 8.8.8.8
$ ping -c 3 google.com
PING NOT FOUND?
Minimal Ubuntu Server installations may not includeping. Install it withsudo apt install iputils-ping.
Successful connectivity tests confirming static IP configuration: gateway (172.16.1.1), external IP (8.8.8.8), and DNS resolution (example.com)
Cloud-Init Considerations
If your Ubuntu Server was deployed in a cloud environment or uses cloud-init, your Netplan configuration file may be 50-cloud-init.yaml with a header stating changes will not persist. In this case, you must disable cloud-init network management before configuring a static IP.
Check for the cloud-init header:
$ head -2 /etc/netplan/50-cloud-init.yaml
If present, disable cloud-init network configuration:
$ sudo bash -c 'echo "network: {config: disabled}" > /etc/cloud/cloud.cfg.d/99-disable-network-config.cfg'
After disabling cloud-init, you can safely edit the Netplan configuration following the steps above. For more details on Netplan configuration options, see our comprehensive Netplan guide.
Conclusion
You have successfully configured a static IP netplan Ubuntu 26.04 Server. The configuration persists across reboots, providing a fixed IP address for your server. To revert to DHCP, simply change dhcp4: false back to dhcp4: true and remove the addresses, routes, and nameservers sections, then run sudo netplan apply.
Frequently Asked Questions
- Why is my static IP configuration not persisting after reboot? Your system likely uses cloud-init to manage network configuration. Check if your netplan file contains a cloud-init header comment and disable cloud-init network management as described in the Cloud-Init Considerations section above.
- What happened to the gateway4 option in Netplan? The
gateway4option has been deprecated. Use theroutesconfiguration withto: defaultandvia: your-gateway-ipinstead, as shown in the examples above. - How do I set a static IP without losing SSH connectivity? When configuring a static IP remotely via SSH, ensure your new IP address is on the same subnet as your current connection. Apply the configuration with
sudo netplan applyand immediately reconnect using the new IP address if it differs from the DHCP-assigned one.