In this tutorial, we will discuss a netplan static IP configuration on Ubuntu Linux. Netplan allows for straightforward network IP address configuration using human-readable data-serialization language YAML. The article will also discuss a default Netplan network settings and the location of the Netplan configuration file.
You have two options when configuring the IP address on your Ubuntu system, and that is either a static IP address or DHCP. A static IP address allows you to manually select your IP address by configuring it on the Linux system, whereas DHCP relies on the router or DHCP server to lease you an IP address – either a reserved one or the next available one that is currently free, depending on the setup.
Table of Contents
In this tutorial you will learn:
- Configure static IP using command line (netplan)
- Configure static IP using GUI (NetworkManager)
- Configure multiple static IP addresses on one interface
- Manage cloud-init network configuration
- Secure netplan configuration file permissions

Software Requirements and Conventions Used
| Category | Requirements, Conventions or Software Version Used |
|---|---|
| System | Any version of Ubuntu Linux system |
| Software | Netplan.io |
| Other | Privileged access to your Linux system as root or via the sudo command. |
| Conventions | # – requires given linux commands to be executed with root privileges either directly as a root user or by use of sudo command$ – requires given linux commands to be executed as a regular non-privileged user |
/etc/netplan/, disabling DHCP, and defining your IP address with routes and nameservers.
| Step | Command/Action |
|---|---|
| 1. Edit netplan config | sudo nano /etc/netplan/50-cloud-init.yaml |
| 2. Set static IP in YAML | Set dhcp4: false and add addresses, routes, nameservers |
| 3. Check for cloud-init header | sudo cat /etc/netplan/50-cloud-init.yaml |
| 4. Secure file permissions | sudo chmod 600 /etc/netplan/*.yaml |
| 5. Apply configuration | sudo netplan apply |
Configure static IP address using Netplan
Netplan network configuration had been first introduced starting from Ubuntu 18.04, hence Netplan is available to all new Ubuntu from this version and higher. Ubuntu uses Netplan to configure static IP addesses, which utilizes a YAML syntax. This makes it easy to configure a static IP and change minute details in the future if necessary. Let’s get started with some basic understating on how netplan works on Ubuntu.
Netplan allows network configuration via both: networkd daemon or NetworkManager. networkd daemon is mainly used for server configuration, whereas NetworkManager is used by GUI users. To switch between both you need to specify renderer explicitly via netplan configuration file.
If no
renderer is specified within the netplan’s configuration file, then the default handler for the network configuration on this particular device will be networkd daemon.The netplan configuration file location is set to /etc/netplan/ directory. Other possible locations are /lib/netplan/ and /run/netplan/. Depending on your Ubuntu installation the actual Netplan configuration file can take one of the following forms:
- 00-installer-config.yaml (Ubuntu Server – subiquity installer)
- 01-netcfg.yaml
- 01-network-manager-all.yaml (Ubuntu Desktop)
- 50-cloud-init.yaml (cloud deployments)
In case you cannot find your configuration file, you may attempt to generate the new netplan config by executing the below command:
$ sudo netplan generate
Most likely your current Ubuntu system uses DHCP server to configure its networking settings. Hence, the configuration of your IP address is dynamic. In many scenarios, simply configuring your router or local DHCP server is a preferred way to set a static address to any host regardless of the operating system in use. Check your router manual and assign the static IP address to your host based on its MAC address using the DHCP service.
Netplan static ip step by step instructions
Ubuntu Server
- To configure a static IP address on your Ubuntu server you need to find and modify a relevant netplan network configuration file. See the above section for all possible Netplan configuration file locations and forms.For example you might find there a default netplan configuration file called
50-cloud-init.yamlwith a following content instructing thenetworkddeamon to configure your network interface via DHCP:# This file describes the network interfaces available on your system # For more information, see netplan(5). network: version: 2 renderer: networkd ethernets: enp0s3: dhcp4: yes - To set for example interface
enp0s3to static IP address192.168.1.222with gateway192.168.1.1and DNS server as8.8.8.8and8.8.4.4replace the above configuration with the one below.FINDING YOUR NETWORK INTERFACE NAME
Before configuring a static IP, you need to identify your network interface name. Use theip acommand to list all network interfaces on your system:$ ip a
Look for your active network interface (commonly named
enp0s3,ens18,eth0, or similar). Replaceenp0s3in the examples below with your actual interface name.WARNING
You must adhere to a correct code indent for each line of the block. In other words, the number of spaces before each configuration stanza matters. Otherwise you may end up with an error message similar to:
Invalid YAML at //etc/netplan/01-netcfg.yaml line 7 column 6: did not find expected keynetwork: version: 2 renderer: networkd ethernets: enp0s3: dhcp4: false dhcp6: false addresses: - 192.168.1.122/24 routes: - to: default via: 192.168.1.1 nameservers: addresses: [8.8.8.8, 8.8.4.4]GATEWAY CONFIGURATION UPDATE
Thegateway4option has been deprecated. Use theroutesconfiguration instead as shown in the example above. This provides more flexible routing options and is the standard method for defining gateways in modern netplan configurations. - Check if cloud-init network management needs to be disabled: Before making changes, check if cloud-init is actively managing your network configuration. View your netplan configuration file:
$ sudo cat /etc/netplan/50-cloud-init.yaml
If the file contains a header comment like
# This file is generated from information provided by the datasource. Changes to it will not persist across an instance.then cloud-init is actively managing network configuration and you must disable it before making changes.IS HEADER PRESENT?
Header present: Run the disable command below to prevent cloud-init from overwriting your changes.
No header: Cloud-init is not managing networking. Skip the disable command and proceed to the next step.To disable cloud-init’s network configuration (only if the header is present):
$ sudo bash -c 'echo "network: {config: disabled}" > /etc/cloud/cloud.cfg.d/99-disable-network-config.cfg'This prevents cloud-init from overwriting your manual netplan configuration. For more information, see the cloud-init network configuration reference.
- Secure configuration file permissions: Ensure that only root can read and write the network configuration files:
$ sudo chmod 600 /etc/netplan/*.yaml
This security step prevents unauthorized access to your network configuration.
- Once ready apply the new Netplan configuration changes with the following commands:
$ sudo netplan apply
In case you run into some issues execute:
$ sudo netplan --debug apply
- (Optional) Configure multiple static IP addresses: If you need to assign multiple static IP addresses to the same network interface, you can add them to the addresses list:
MULTIPLE STATIC IP ADDRESSES EXAMPLE
To configure multiple static IP addresses on the same interface, simply add them to the addresses list:network: version: 2 renderer: networkd ethernets: enp0s3: dhcp4: false addresses: - 192.168.1.122/24 - 192.168.1.123/24 - 192.168.1.124/24 routes: - to: default via: 192.168.1.1 nameservers: addresses: [8.8.8.8, 8.8.4.4]After editing the configuration file, run
sudo netplan applyto activate all IP addresses.
Ubuntu Desktop
This is a preferred way of setting the static IP address on Ubuntu Desktop. It is important to note the if your Ubuntu system is using Netplan to configure network on your hosts you need to set the renderer within the Netplan’s configuraiton file to renderer:NetworkManager.
Having the Netplan’s renderer set to networkd daemon will result in the Wired Unmanaged error.
- Click on top right network icon and select settings corresponding to the network interface you wish to assign with the static IP address.
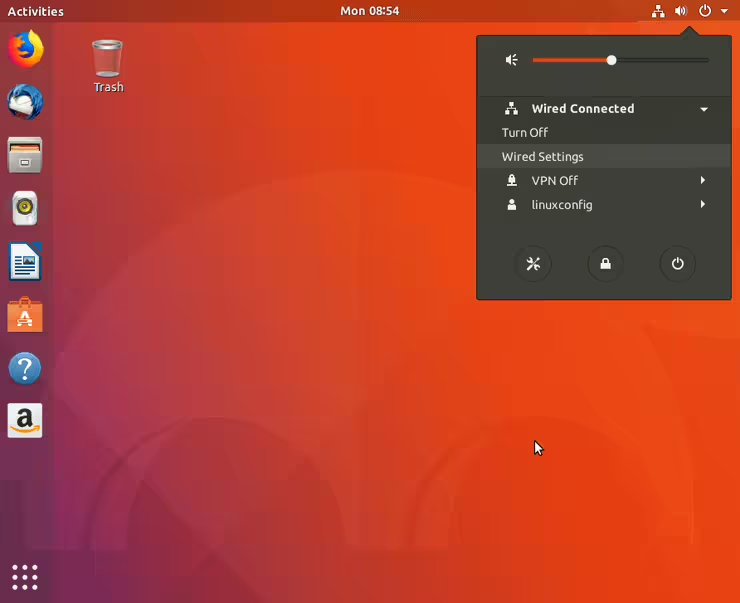
Select wired or Wifi network settings - Next, click on the gear box icon next to your network connection you wish to configure. This could be wired or wireless connection.
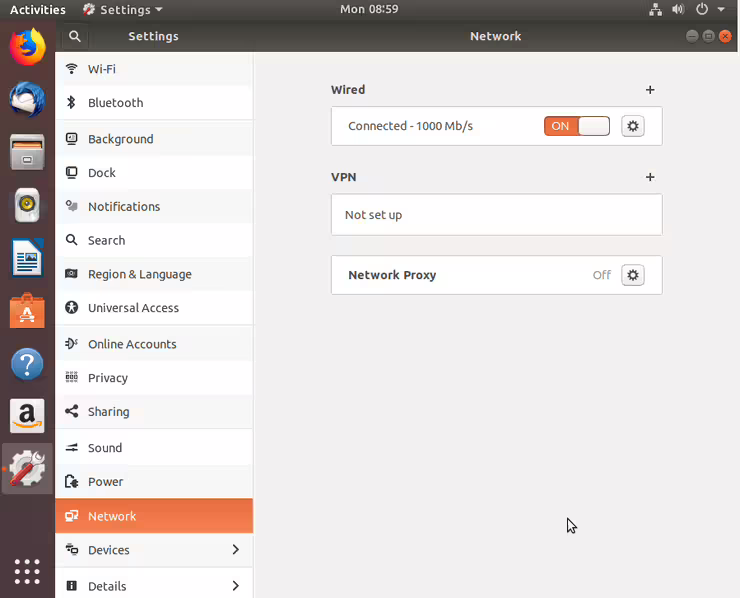
Click on the network you wish to configure - Select IPv4 from the top menu.
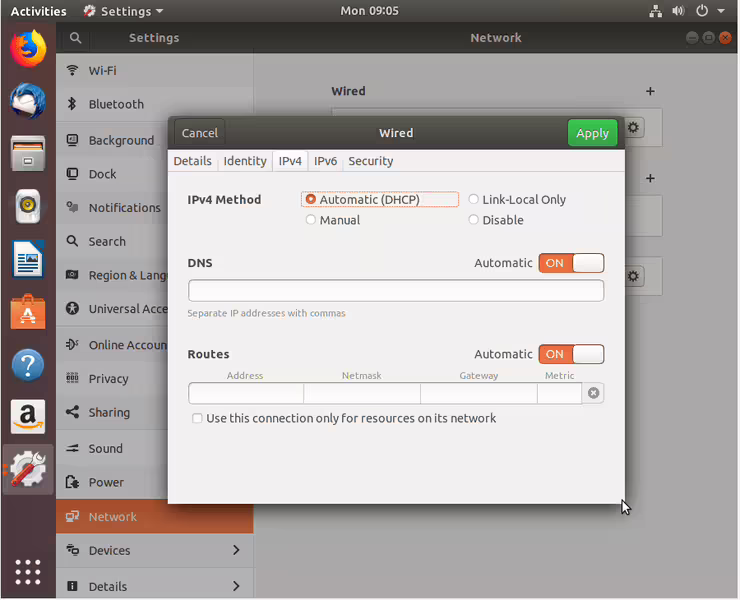
Select IPv4 to start configuring a new IP address - Choose Manual for the IPv4 settings, enter your desired configuration and hit Apply.

Set your desired static IP address - Restart your network by ON/OFF switch.
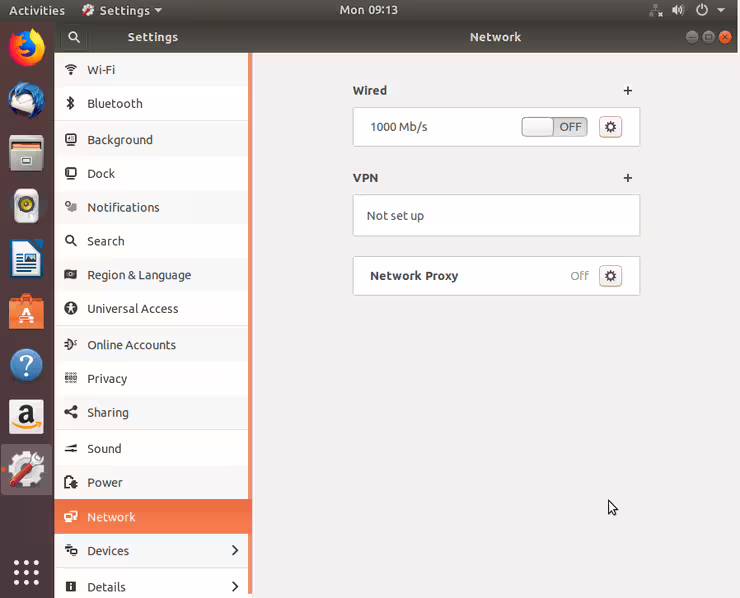
Restart to apply new network settings - Check your new static IP address configuration.
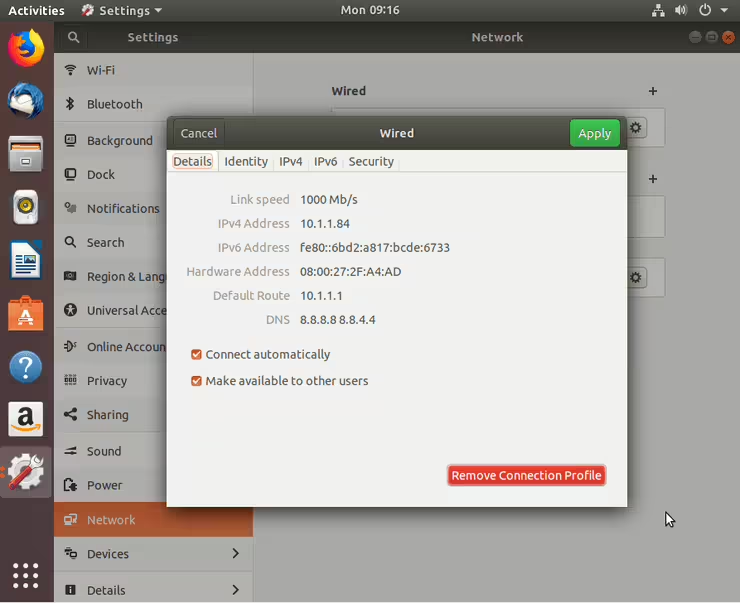
Check you new static IP configuration
Closing Thoughts
In this tutorial, you saw how to configure a static IP address on an Ubuntu Linux system. We have covered a GUI and command line method here, so that users with a desktop system or server (without GUI) will be able to follow along. Your static IP address settings will persist after reboots, and you will need to manually reconfigure the IP address or revert to DHCP in order to stop using it.
Frequently Asked Questions
- How do I configure multiple static IP addresses with netplan? Add multiple addresses to the
addresseslist in your netplan configuration as shown in the “Multiple Static IP Addresses Example” above. All IP addresses will be assigned to the same interface. Runsudo netplan applyto activate the changes. - What if my netplan static IP configuration reverts after reboot? Check if your
50-cloud-init.yamlfile contains a header comment about changes not persisting. If it does, disable cloud-init network management by creating/etc/cloud/cloud.cfg.d/99-disable-network-config.cfgwithnetwork: {config: disabled}as shown in step 3 above. - Why is gateway4 deprecated in netplan? Netplan has replaced
gateway4with the more flexibleroutesconfiguration. Instead ofgateway4: 192.168.1.1, use:routes: - to: default via: 192.168.1.1This new format supports more advanced routing scenarios beyond simple default gateways.
- How do I verify my netplan static IP is working? Use
ip ato check if your interface shows the configured static IP address. Test connectivity withping 8.8.8.8to verify internet access andpingyour gateway address to confirm local network connectivity.