Flashing a server BIOS from Linux is straightforward when the vendor provides a working Linux utility, but that is rarely the case on modern systems. Many server vendors, including Lenovo, Dell, HP, and Supermicro, ship DOS-based BIOS update packages as their most reliable flashing method. Their Linux flash utilities frequently rely on deprecated kernel interfaces that no longer compile against modern kernels, leaving the DOS method as the only practical option. This guide shows how to build a bootable DOS USB drive entirely from Linux, using GRUB and FreeDOS, and use it to run the vendor’s DOS flash utility directly.
We use a real-world example throughout: upgrading the BIOS on a Lenovo ThinkServer TS140 from version FBKT99A (September 2014) to FBKTC7A (June 2016) in preparation for a CPU upgrade. The specific server model, BIOS file URLs, and version strings are all specific to that machine and are used purely as a concrete reference. The underlying method is entirely vendor-independent and applies equally to Dell, HP, Supermicro, ASRock Rack, and any other server that ships a DOS-based BIOS update package.
IMPORTANT
This guide uses a Lenovo ThinkServer TS140 as a working example only. The bootable DOS USB method described here works with any server vendor that provides a DOS-based BIOS flash utility, which covers the vast majority of server hardware currently in use. Once the USB is prepared, it can be reused for future BIOS updates across different servers by simply replacing the vendor BIOS folder contents. The GRUB and FreeDOS boot infrastructure stays the same.
Table of Contents
In this tutorial you will learn:
- How to identify your current BIOS version from the Linux CLI
- How to find and verify the correct vendor BIOS package
- How to partition and format a bootable DOS USB drive from Linux
- How to set up GRUB and FreeDOS memdisk to boot a DOS environment
- How to run a vendor DOS flash utility and confirm the update
Software Requirements
| Category | Requirements, Conventions or Software Version Used |
|---|---|
| System | Any modern Linux distribution (Debian, Ubuntu, Arch, etc.) on the preparation machine |
| Software | syslinux, syslinux-common, grub-pc-bin, grub2-common, dosfstools, unzip, wget, dmidecode |
| Hardware | USB drive of at least 1GB (will be wiped), server with a DOS-based BIOS update package from the vendor |
| Other | Privileged access to your Linux system as root or via the sudo command. |
| Conventions | # – requires given linux commands to be executed with root privileges either directly as a root user or by use of sudo command$ – requires given linux commands to be executed as a regular non-privileged user |
memdisk, copy the vendor BIOS zip to the USB, then boot the server and run Flash.bat.
| Step | Command/Action |
|---|---|
| 1. Check current BIOS version | dmidecode -t bios | grep -E "Version|Release Date" |
| 2. Partition and format USB | parted /dev/sdX --script mklabel msdos mkpart primary fat32 1MiB 100% set 1 boot on |
| 3. Install GRUB + FreeDOS memdisk | grub-install --target=i386-pc --boot-directory=/mnt/usb/boot /dev/sdX |
| 4. Boot server, run flash utility | C: && cd BIOSDOS && Flash.bat |
When You Need This Approach
The most common trigger is a vendor-supplied Linux BIOS flash utility that no longer compiles. Lenovo’s Linux flasher for the TS140 series, for example, relies on a kernel module that uses deprecated ioctl interfaces removed from the Linux kernel years ago. Attempting to compile it on a modern distribution produces errors such as:
error: 'struct file_operations' has no member named 'ioctl'
This is a widespread problem. Server vendor tooling is often written for specific kernel versions and never updated to track upstream API changes. Consequently, rather than hunting for patched versions or downgrading your kernel, the DOS flash utility is the more robust alternative, it runs in a fully isolated environment below the operating system and is therefore unaffected by any Linux kernel version.
Additionally, you will want this approach when:
- Preparing for a CPU upgrade: A BIOS update is frequently required before installing a newer processor. In our case, upgrading from an Intel Core i3-4330 to a Xeon E3-1281 v3 required a BIOS version that included updated CPU microcode and explicit new CPU support.
- Applying security patches: CPU microcode updates addressing vulnerabilities such as Spectre and Meltdown are often delivered via BIOS updates on server hardware.
- Headless servers: Servers without a desktop environment where GUI-based tools are not an option.
- No Windows available: When the vendor’s only straightforward flash method requires a Windows executable.
Prerequisites
You will need a Linux workstation or laptop to prepare the USB drive, this does not need to be the target server itself. Install all required packages on the preparation machine before proceeding:
$ sudo apt install syslinux syslinux-common grub-pc-bin grub2-common dosfstools unzip wget
IMPORTANT
You also need dmidecode installed on the server to check BIOS versions. It is included by default on most distributions, but can be installed with sudo apt install dmidecode if missing.
Finding and Verifying the Correct BIOS File
Before downloading anything, check the current BIOS version on the server so you can confirm the update is actually newer:
# dmidecode -t bios | grep -E "Version|Release Date"
On our Lenovo ThinkServer TS140 this returned:
Version: FBKT99AUS
Release Date: 09/19/2014
Next, locate the DOS update package from your vendor’s support site. For Lenovo ThinkServer products, files are hosted directly at download.lenovo.com. Since vendor download pages sometimes change, it is worth probing the direct file URL before committing to a download:
$ wget --spider "https://download.lenovo.com/pccbbs/thinkservers/bios_me_ts140-240-440-540_fbktc7a_dos.zip" 2>&1 | grep "HTTP"
A 200 OK response confirms the file is accessible. Many vendors also publish a plain-text changelog alongside the zip. Reading it confirms the version date and whether your specific scenario, such as new CPU support, is addressed:
$ wget -qO- https://download.lenovo.com/pccbbs/thinkservers/bios_me_ts140-240-440-540_fbktc7a_dos.txt | grep -E "Version|Issue date"

Version    C7A
Issue date Jun 24, 2016
The changelog for C7A included the entry “Update to support new CPU”, confirming it was the correct version for our planned Xeon E3-1281 v3 upgrade. Once verified, download the file:
$ wget https://download.lenovo.com/pccbbs/thinkservers/bios_me_ts140-240-440-540_fbktc7a_dos.zip -O /tmp/ts140_bios_c7a.zip
SECURITY ALERT
Always download BIOS packages directly from the official vendor CDN. For Lenovo this is download.lenovo.com. Third-party driver sites frequently repackage firmware files and cannot be trusted for something as sensitive as a BIOS update.

lscpu and dmidecode to identify the current CPU and BIOS version before the updatePreparing the Bootable DOS USB Drive
This section covers partitioning the USB drive, installing GRUB as the bootloader, downloading a minimal FreeDOS image, and configuring GRUB to boot it via memdisk. The result is a USB that boots directly into a DOS environment with your vendor BIOS files accessible.
Step 1, Identify the USB Drive
Insert your USB drive and identify its device name:
$ lsblk -o NAME,SIZE,VENDOR,MODEL
Confirm the correct device before proceeding, all data on it will be erased.

lsblk -o NAME,SIZE,VENDOR,MODEL /dev/sda confirming the target USB drive before formattingStep 2, Partition and Format
- Unmount any existing partitions on the USB:
# umount /dev/sda1 2>/dev/null; umount /dev/sda2 2>/dev/null
- Wipe existing partition table and create a new MBR layout:
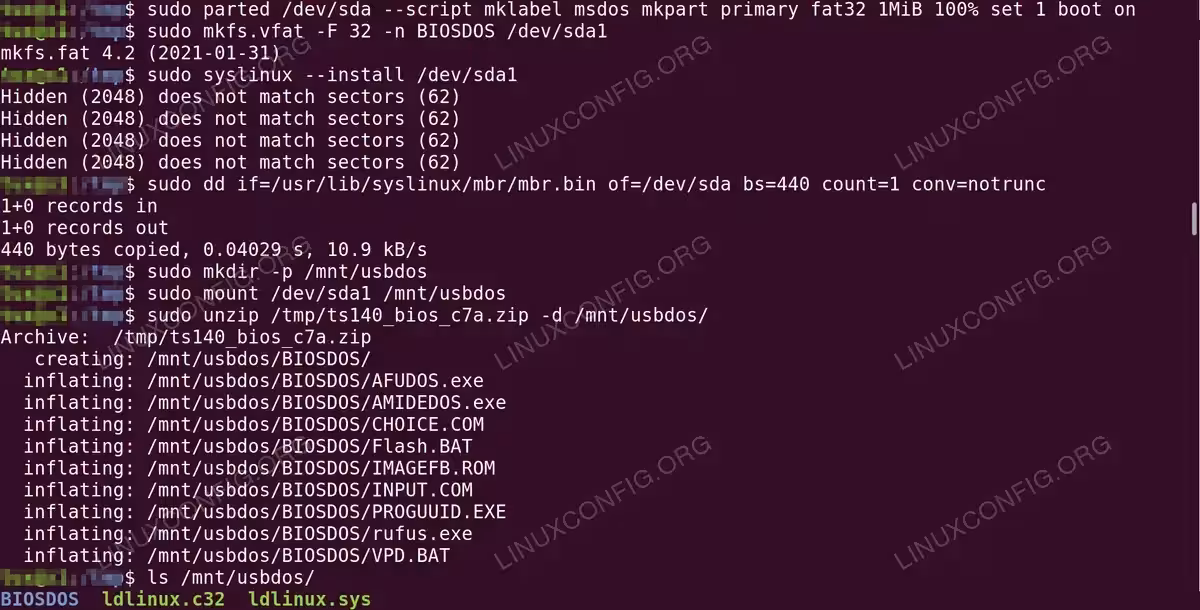
# wipefs -a /dev/sda
# parted /dev/sda --script mklabel msdos mkpart primary fat32 1MiB 100% set 1 boot on
- Format the partition as FAT32:
# mkfs.vfat -F 32 -n BIOSDOS /dev/sda1
Step 3, Install GRUB and syslinux MBR
# syslinux --install /dev/sda1
# dd if=/usr/lib/syslinux/mbr/mbr.bin of=/dev/sda bs=440 count=1 conv=notrunc
# mkdir -p /mnt/usbdos
# mount /dev/sda1 /mnt/usbdos
# grub-install --target=i386-pc --boot-directory=/mnt/usbdos/boot /dev/sda
IMPORTANT
The syslinux command may print warnings about hidden sectors. These are harmless, the install proceeds successfully regardless.
Step 4, Copy the BIOS Files to the USB
# unzip /tmp/ts140_bios_c7a.zip -d /mnt/usbdos/
This creates a BIOSDOS/ directory on the USB containing Flash.bat, IMAGEFB.ROM, and supporting utilities.
Step 5, Download FreeDOS and Configure GRUB
A minimal DOS kernel is required to boot into. FreeDOS 1.3 provides a floppy-edition image suitable for this purpose. Download it from the Internet Archive FreeDOS 1.3 mirror:
$ wget "https://archive.org/download/freedos-1.3/FD13-FloppyEdition.zip" -O /tmp/freedos.zip
$ unzip /tmp/freedos.zip -d /tmp/freedos/
Copy the 1.44MB boot image to the USB, then copy the syslinux memdisk binary. Memdisk is what allows GRUB to load a floppy disk image directly from USB into memory and boot it:
# cp /tmp/freedos/144m/x86BOOT.img /mnt/usbdos/
# mkdir -p /mnt/usbdos/boot/grub
# cp /usr/lib/syslinux/memdisk /mnt/usbdos/boot/grub/
Create the GRUB configuration file:
# cat <<'EOF' > /mnt/usbdos/boot/grub/grub.cfg
set default=0
set timeout=5

menuentry "FreeDOS - Flash BIOS" {
    linux16 /boot/grub/memdisk
    initrd16 /x86BOOT.img
}
EOF
Step 6, Unmount the USB
# umount /mnt/usbdos
The USB is now ready to use.
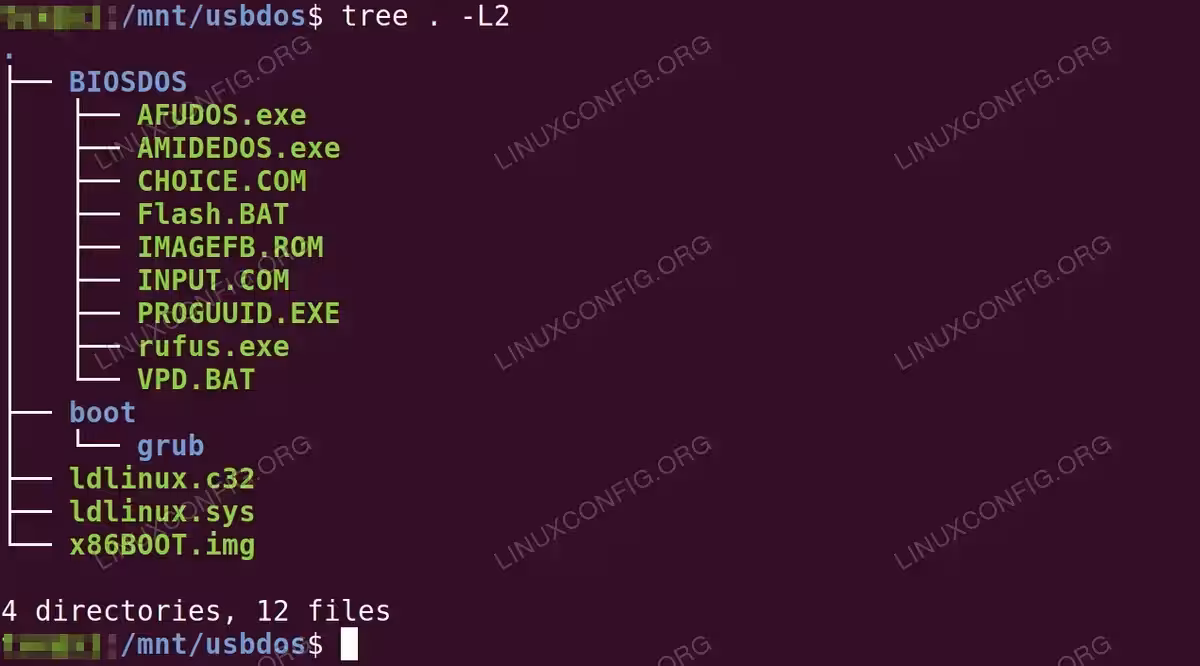
tree -L2 showing the complete USB layout — GRUB bootloader, FreeDOS floppy image, and the extracted Lenovo BIOS packageFlashing the BIOS
With the USB prepared, move to the server and follow these steps:
- Insert the USB drive into the server.
- Power on and press F12 at the vendor splash screen to open the boot menu. The key varies by vendor, common alternatives are F11, Esc, or Del.
- Select the USB device from the boot menu.
- At the GRUB menu, select “FreeDOS – Flash BIOS” and press Enter. FreeDOS will boot from the floppy image loaded into memory by memdisk.
CRITICAL WARNING
FreeDOS will boot and prompt you with a Y/N question asking whether to install FreeDOS. Type N and press Enter. FreeDOS will then drop you to the A:\> prompt where you can proceed with the BIOS flash. Do not type Y, proceeding with a FreeDOS installation will overwrite your server’s existing OS and data.
- At the FreeDOS C:\> prompt, navigate to the BIOS directory and run the flash utility:
C:
cd BIOSDOS
Flash.bat
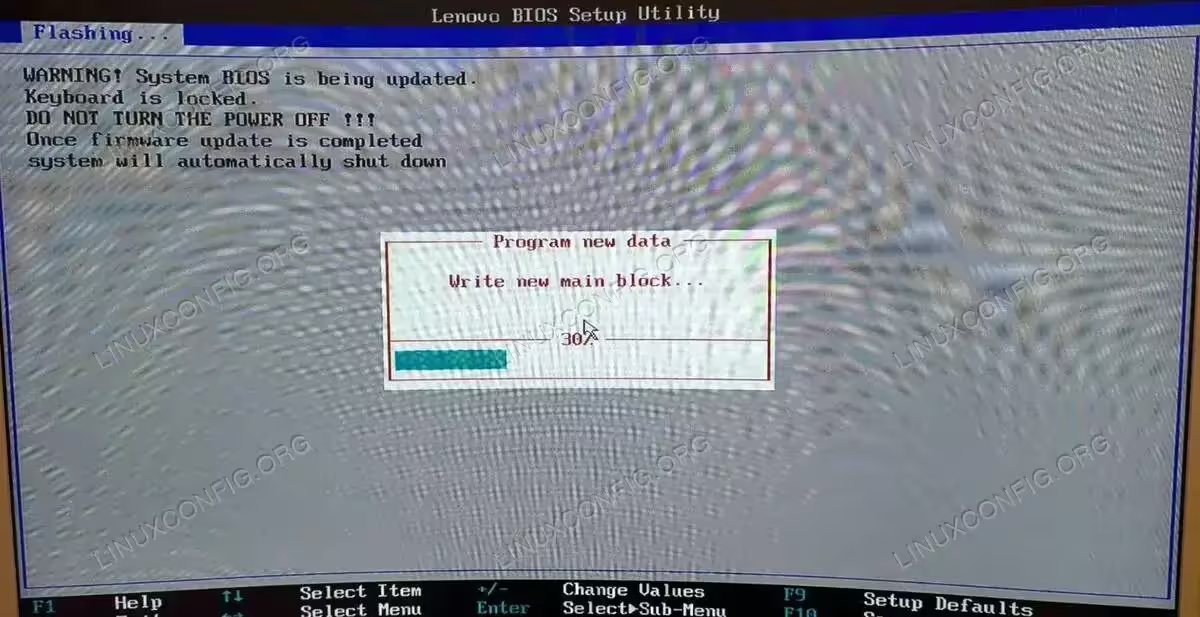
The flash utility will display progress and automatically reboot the server when complete.
CRITICAL WARNING
After the flash completes and the server reboots, it will likely enter the BIOS setup screen automatically. The keyboard may appear unresponsive at this point, this is normal behaviour after a BIOS update. Do not power off the server. Wait for the BIOS screen to fully load, then use the keyboard to navigate to the exit option and select “Save & Exit” or “Exit Without Saving” to allow the server to boot normally into the OS. Cutting power at this stage risks corrupting the newly flashed BIOS.
SECURITY ALERT
Do not power off or restart the server while the flash is in progress. The process takes approximately 2 minutes. The server will reboot automatically once complete. Interrupting power mid-flash may require a BIOS recovery procedure.
Verifying the Update
Once the server is back up and running your OS, confirm the updated BIOS version with dmidecode:
# dmidecode -t bios | grep -E "Version|Release Date"
Our output after the successful update:
Version: FBKTC7AUS
Release Date: 06/24/2016
The following table summarises the before and after state on the ThinkServer TS140 used in this guide:
| Before | After | |
|---|---|---|
| BIOS Version | FBKT99AUS | FBKTC7AUS |
| Release Date | September 19, 2014 | June 24, 2016 |
| CPU Microcode | M32306C3_00000016 | M32306C3_0000001c |
| New CPU Support | No | Yes (Xeon E3-1281 v3) |
| Security Fixes | No | Yes |
COMPLETED
BIOS update confirmed. The server is now ready for any hardware changes that required the updated firmware, such as a CPU swap.

dmidecode -t bios confirming the successful BIOS update to version FBKTC7AUS dated June 24, 2016Applicability to Other Hardware
The GRUB + memdisk + FreeDOS approach is vendor-independent. The only requirement is that your vendor provides a DOS-based flash package, which is true for the vast majority of server hardware currently in use:
| Vendor | DOS Flash Utility | Notes |
|---|---|---|
| Lenovo ThinkServer | Yes | Flash.bat included in zip package |
| Dell PowerEdge (older) | Yes | Also supports iDRAC-based updates on newer models |
| HP ProLiant (older) | Yes | SmartStart or standalone DOS .bin files |
| Supermicro | Yes | AMI-based, typically ami.bat or flash.bat |
| ASRock Rack | Yes | AMI-based, same approach applies |
IMPORTANT
Once the USB is prepared, it can be reused for future BIOS updates by simply replacing the contents of the vendor BIOS folder. The GRUB and FreeDOS boot infrastructure stays the same.
Conclusion
Flashing server BIOS from Linux does not require a working vendor Linux utility. The GRUB + FreeDOS memdisk approach provides a clean, kernel-independent path that works across vendors and Linux distributions. Moreover, by running the vendor’s DOS utility in a real DOS environment rather than a Linux compatibility shim, you get exactly the behaviour the vendor tested and supports.
In the example covered here, the update took a Lenovo ThinkServer TS140 from a 2014 BIOS to a 2016 version, adding CPU microcode updates, security fixes, and explicit support for newer Xeon E3-1200 v3 processors. The total time from downloading the BIOS file to confirming the update in dmidecode was under 20 minutes.
Frequently Asked Questions
- Can I brick the server with a failed BIOS flash? On most modern server boards, including the Lenovo ThinkServer TS140, the bootblock, the minimal code needed to boot and initiate recovery, is write-protected in hardware. A failed or interrupted flash therefore does not permanently brick the board. Instead, the server enters a recovery mode from which you can re-flash using a recovery USB. Power loss during the roughly 2 minute flash window is the main risk to avoid.
- Why not use the vendor’s Linux flash utility instead? Many vendor Linux flash utilities rely on kernel modules that use deprecated APIs removed from the Linux kernel in recent years. Attempting to compile them on distributions shipping kernel 5.x or later typically fails. The DOS method is unaffected by kernel version and is exactly what the vendor’s QA process tested.
- Does this work on UEFI-based servers? The method described here targets legacy BIOS / CSM boot mode, which most servers still support alongside UEFI. If your server has disabled legacy boot entirely, you will need to re-enable CSM (Compatibility Support Module) in the UEFI settings before the USB will boot.
- Can I reuse the USB drive for other servers? Yes. The GRUB and FreeDOS infrastructure on the USB is generic. To flash a different server, simply replace the vendor BIOS folder contents with the new vendor’s package. The boot chain remains identical.
- How do I find which BIOS version is the latest for my server? Check the vendor’s official support or download page for your specific model. You can also probe direct download URLs programmatically using
wget --spiderto test candidate version strings, as demonstrated in this guide.