Learning how to mount a USB drive on Ubuntu 26.04 is an essential skill for any Linux user. Whether you need to access files from a flash drive, back up data to an external disk, or work with different filesystem formats, Ubuntu 26.04 provides multiple methods to accomplish this task. This guide covers both graphical and command-line approaches, including temporary mounting for quick access and permanent configuration that survives system reboots.
Table of Contents
In this tutorial you will learn:
- How to identify USB drives and their filesystems
- How to mount USB drives using the GUI (Files and Disks)
- How to mount USB drives temporarily via command line
- How to configure permanent USB mounting via /etc/fstab
- How to work with FAT32, exFAT, NTFS, and ext4 filesystems
Software Requirements
| Category | Requirements, Conventions or Software Version Used |
|---|---|
| System | Ubuntu 26.04 Resolute Raccoon |
| Software | mount, umount, blkid, GNOME Files, GNOME Disks |
| Other | Privileged access to your Linux system as root or via the sudo command. |
| Conventions | # – requires given linux commands to be executed with root privileges either directly as a root user or by use of sudo command$ – requires given linux commands to be executed as a regular non-privileged user |
sudo mount /dev/sdX1 /mnt/usb. For permanent mounting, add an entry to /etc/fstab using the drive’s UUID.
| Step | Command/Action |
|---|---|
| 1. Identify drive | sudo blkid |
| 2. Create mount point | sudo mkdir -p /mnt/usb |
| 3. Mount the drive | sudo mount /dev/sdX1 /mnt/usb |
| 4. Unmount when done | sudo umount /mnt/usb |
Identify Your USB Drive on Ubuntu 26.04
Before mounting a USB drive, you need to identify its device name and filesystem type. Ubuntu assigns device names like /dev/sda, /dev/sdb, etc., to storage devices. Partitions on these devices are numbered, such as /dev/sdb1. The following commands help you identify your USB drive correctly, which is crucial to avoid accidentally mounting or modifying the wrong device.
IMPORTANT
Always verify the correct device name before mounting. Mounting or formatting the wrong device could result in data loss. Your system drive is typically /dev/sda, so USB drives are usually /dev/sdb or higher.
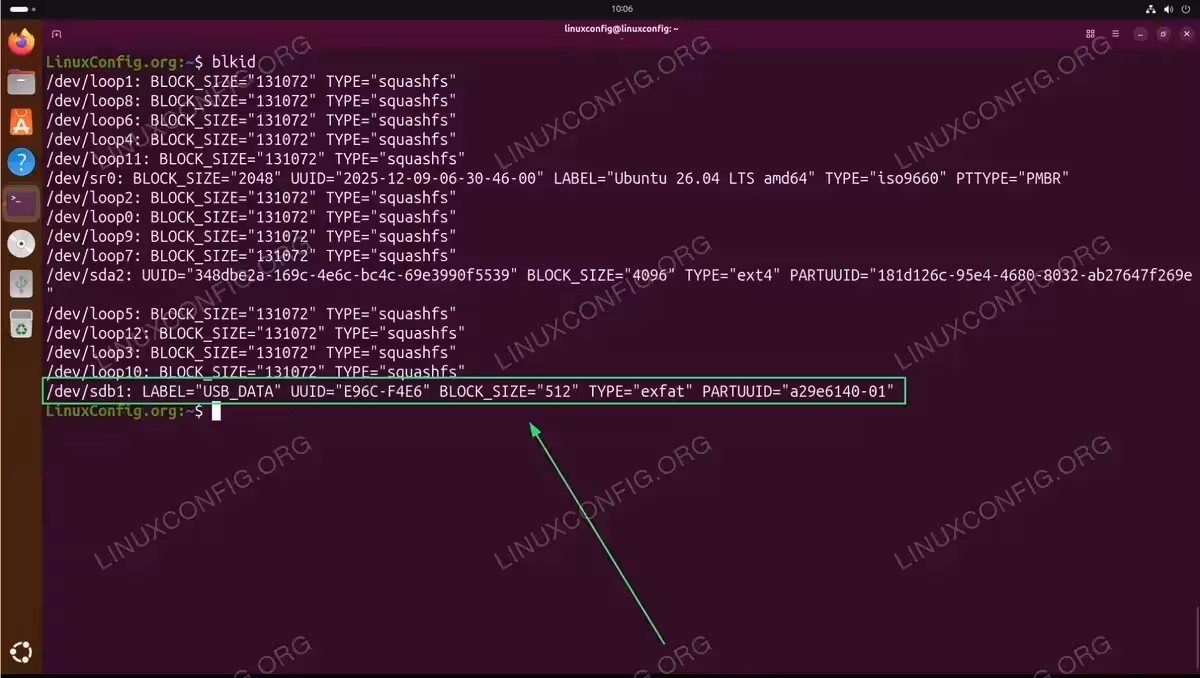
The blkid command displays detailed information about all block devices, including the UUID (Universal Unique Identifier), filesystem type, and partition label:
$ sudo blkid
Look for your USB drive in the output. A typical entry appears as:
/dev/sdb1: LABEL="USB_DATA" UUID="E96C-F4E6" BLOCK_SIZE="512" TYPE="exfat" PARTUUID="a29e6140-01"
Additionally, you can use lsblk to view the block device hierarchy and see where drives are currently mounted:
$ lsblk
To identify USB devices specifically, use the lsusb command which lists all connected USB devices:
$ lsusb
Check Supported Filesystems
Ubuntu 26.04 supports various filesystems out of the box. To check which filesystems your kernel currently supports, run:
$ cat /proc/filesystems | grep -v nodev
SUPPORTED FILESYSTEMS
Ubuntu 26.04 natively supports these common USB drive filesystems: vfat (FAT32) for universal compatibility with 4GB file size limit, exFAT for large files with cross-platform support (included by default), ntfs3 for Windows NTFS drives using the native kernel driver, ext4 for Linux native filesystem, and iso9660 for CD/DVD images.
Mount USB Drive via GUI (Ubuntu Desktop)
Ubuntu Desktop automatically mounts USB drives when you plug them in, making this the simplest method for most users. The system uses udisks2 to handle automatic mounting, and drives appear in the Files application sidebar.
Automatic Mounting
When you insert a USB drive, Ubuntu 26.04 automatically detects and mounts it. The drive appears in the Files (Nautilus) sidebar under “Other Locations” or directly in the sidebar with its label name. Click on the drive name to access its contents. The system mounts the drive to /run/media/username/LABEL where LABEL is the drive’s volume label.
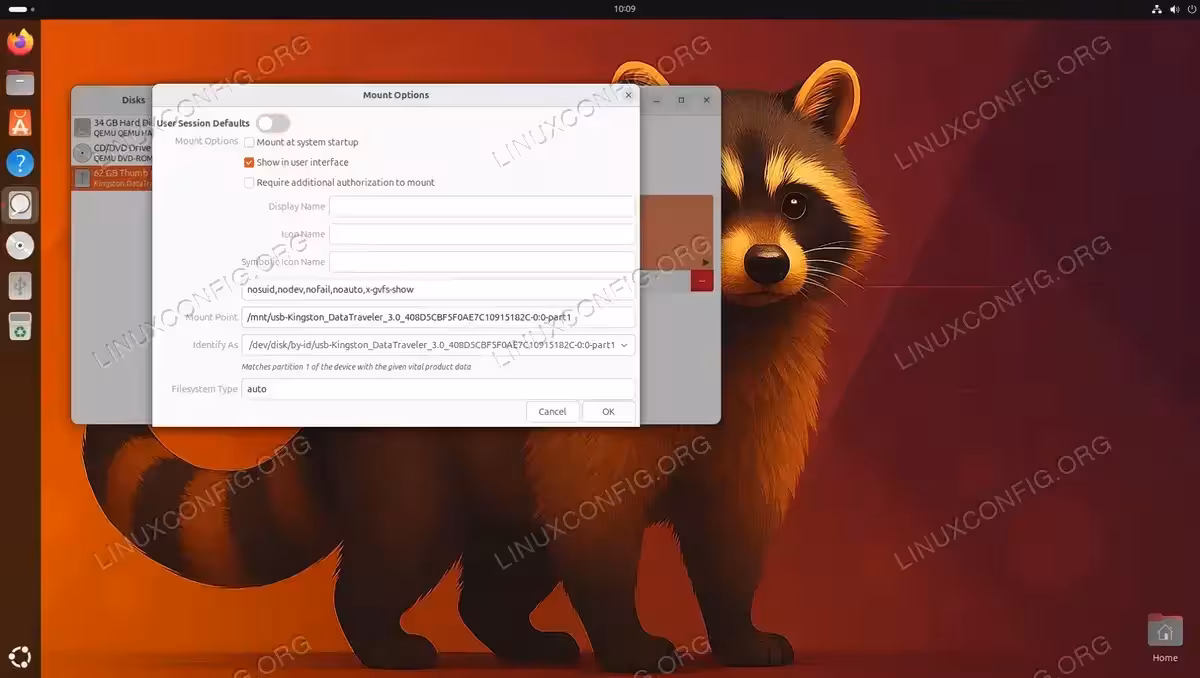
Using GNOME Disks
For more control over mounting options, use the GNOME Disks utility. This application allows you to view detailed drive information, mount and unmount partitions, and configure mount options.
- Open GNOME Disks: Search for “Disks” in the Activities menu or run
gnome-disksfrom the terminal. - Select your USB drive: Click on the USB drive in the left panel to view its partitions.
- Mount the partition: Select the partition and click the play button (triangle icon) below the volume diagram to mount it.
- Access mount options: Click the gear icon for additional options including setting a custom mount point.
Unmounting via GUI
Before physically removing a USB drive, always unmount it to prevent data corruption. In Files, click the eject icon next to the drive name in the sidebar. Alternatively, right-click the drive and select “Unmount” or “Eject”. In GNOME Disks, select the partition and click the stop button (square icon).
Mount USB Drive via Command Line (Temporary)
Command-line mounting provides more control and is essential for Ubuntu Server systems without a graphical interface. A temporary mount remains active until you unmount the drive or reboot the system. This method is ideal for one-time access to USB drives.
Create a Mount Point
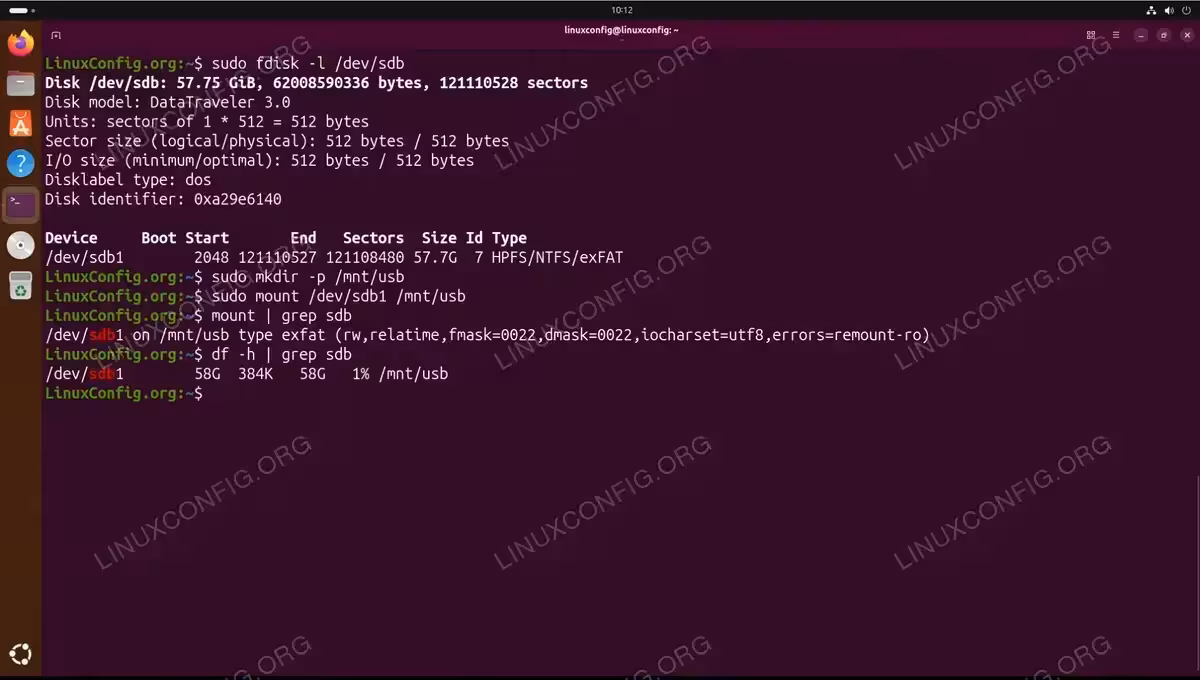
First, create a directory where the USB drive contents will be accessible:
$ sudo mkdir -p /mnt/usb
Mount the USB Drive
Use the mount command to attach the USB drive to the mount point. The basic syntax allows the system to auto-detect the filesystem type:
$ sudo mount /dev/sdb1 /mnt/usb
To explicitly specify the filesystem type, use the -t option. This is useful when auto-detection fails or you want to ensure a specific driver is used:
- FAT32 (vfat): The most compatible filesystem for USB drives.
$ sudo mount -t vfat /dev/sdb1 /mnt/usb
- exFAT: Supports files larger than 4GB with cross-platform compatibility.
$ sudo mount -t exfat /dev/sdb1 /mnt/usb
- NTFS: Windows filesystem, uses the native ntfs3 kernel driver.
$ sudo mount -t ntfs3 /dev/sdb1 /mnt/usb
- ext4: Linux native filesystem with full permission support.
$ sudo mount -t ext4 /dev/sdb1 /mnt/usb
Verify the Mount
Confirm the drive is mounted correctly using df or mount:
$ df -h | grep sdb
Or check the mount type and options:
$ mount | grep sdb
Unmount the USB Drive
Before removing the USB drive, always unmount it to ensure all data is written:
$ sudo umount /mnt/usb
Alternatively, you can unmount by specifying the device:
$ sudo umount /dev/sdb1
UNMOUNT TROUBLESHOOTING
If you receive “target is busy” error, ensure no terminal sessions or applications are using the mount point. Use cd ~ to leave the directory, then try unmounting again. Use lsof /mnt/usb to identify processes using the mount.
Mount USB Drive Permanently on Ubuntu 26.04
For USB drives that remain connected (such as external backup drives), you can configure automatic mounting at boot by adding an entry to /etc/fstab. This configuration survives reboots and ensures consistent access to the drive. Use either the UUID or LABEL to identify the drive, as device names like /dev/sdb1 can change between reboots.
Get the UUID or LABEL
Retrieve the drive’s UUID and LABEL using blkid:
$ sudo blkid /dev/sdb1
Note the UUID value (e.g., 27ECE6DB5D0D083B) or LABEL (e.g., Record) for use in fstab.
Create the Mount Point
Create a permanent mount point directory:
$ sudo mkdir -p /mnt/usb
Edit /etc/fstab
Open the fstab file in a text editor:
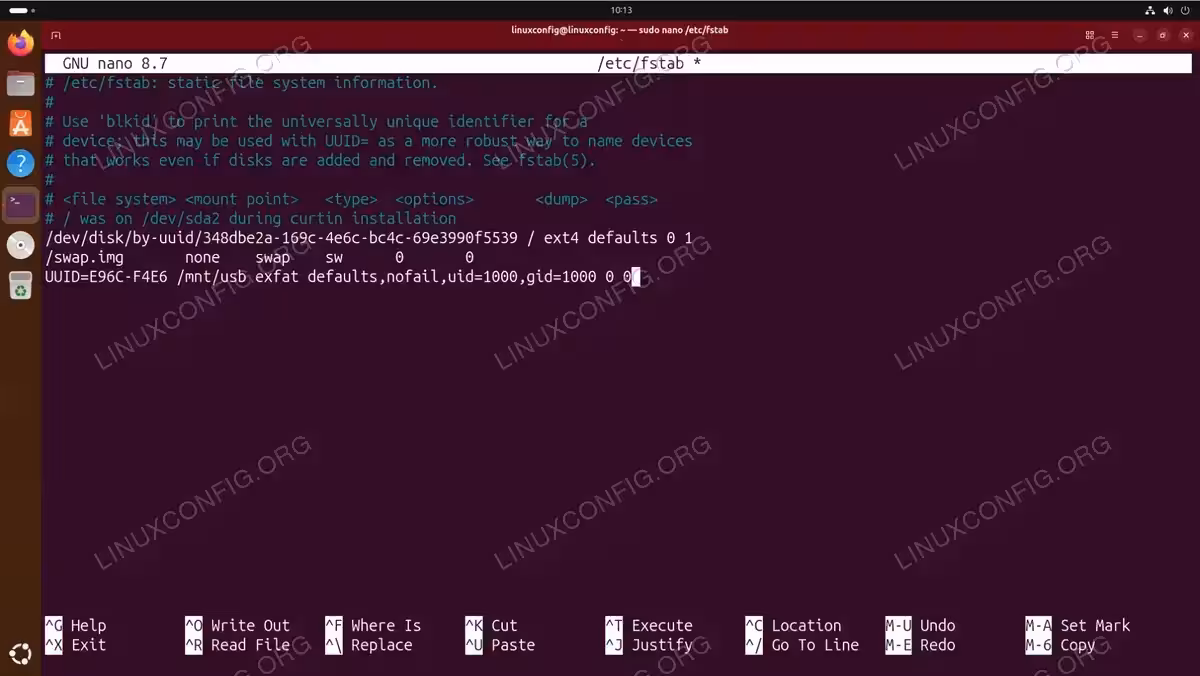
$ sudo nano /etc/fstab
Add one of the following entries at the end of the file, depending on your filesystem and preferred identification method:
- Using UUID (Recommended): Most reliable as UUIDs are unique and persistent.
# USB Drive - exFAT
UUID=E96C-F4E6 /mnt/usb exfat defaults,nofail,uid=1000,gid=1000 0 0
- Using LABEL: Easier to read but requires unique labels.
# USB Drive - exFAT
LABEL=USB_DATA /mnt/usb exfat defaults,nofail,uid=1000,gid=1000 0 0
Fstab options explained:
defaults– Standard mount options (rw, suid, dev, exec, auto, nouser, async)nofail– System boots normally even if the drive is not connecteduid=1000,gid=1000– Sets file ownership (use your user/group ID for FAT32/NTFS/exFAT)
Common fstab entries for different filesystems:
# FAT32
UUID=XXXX-XXXX /mnt/usb vfat defaults,nofail,uid=1000,gid=1000,umask=022 0 0

# exFAT
UUID=XXXX-XXXX /mnt/usb exfat defaults,nofail,uid=1000,gid=1000 0 0

# NTFS
UUID=XXXXXXXXXXXXXXXX /mnt/usb ntfs3 defaults,nofail,uid=1000,gid=1000 0 0

# ext4
UUID=xxxxxxxx-xxxx-xxxx-xxxx-xxxxxxxxxxxx /mnt/usb ext4 defaults,nofail 0 2
Test the Configuration
Before rebooting, test the fstab entry to ensure there are no errors:
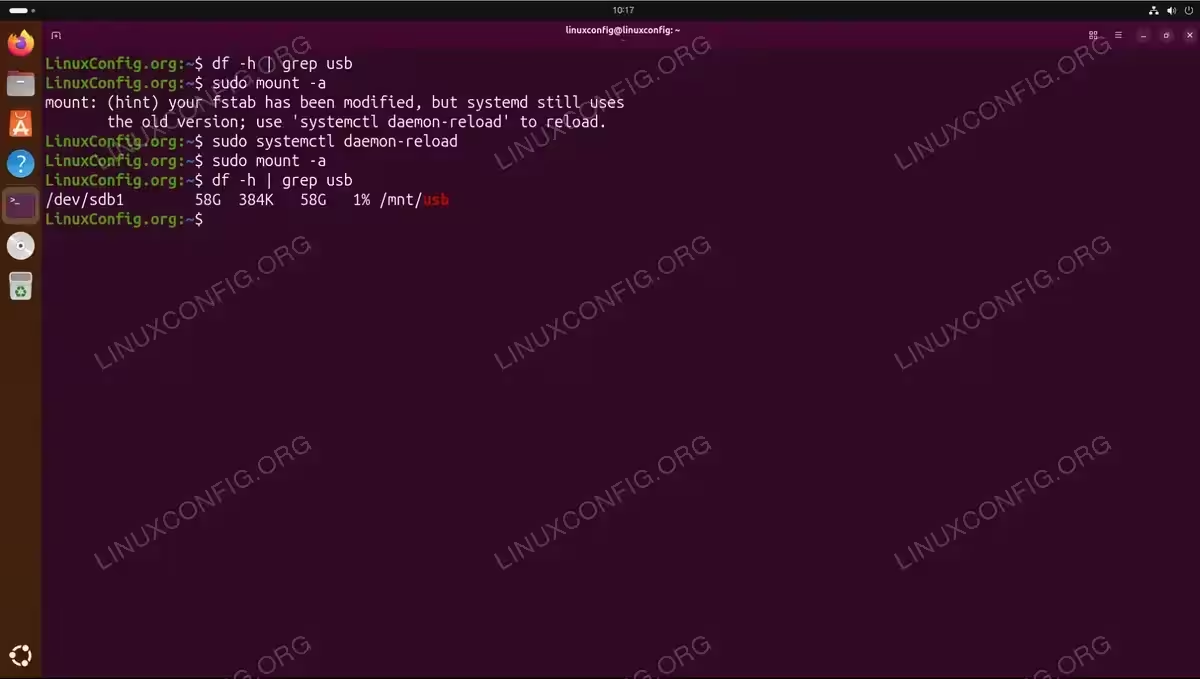
$ sudo mount -a
You may see a hint suggesting to reload systemd:
mount: (hint) your fstab has been modified, but systemd still uses
       the old version; use 'systemctl daemon-reload' to reload.
Run the following command to reload systemd and apply the changes:
$ sudo systemctl daemon-reload
If no errors appear, verify the drive is mounted:
$ df -h | grep usb
FSTAB ERRORS
Errors in /etc/fstab can prevent your system from booting. Always use the nofail option for removable drives and test with mount -a before rebooting. If you make a mistake, boot from a live USB to correct the fstab file.
Conclusion
You now have multiple methods to mount a USB drive on Ubuntu 26.04, from simple GUI auto-mounting to permanent command-line configuration. For occasional use, the automatic GUI mounting works well on Ubuntu Desktop. For servers or when you need specific mount options, the command-line approach offers greater flexibility. When a USB drive needs to be available consistently across reboots, configuring /etc/fstab with the UUID or LABEL ensures reliable automatic mounting.
Remember to always unmount USB drives before physically removing them to prevent data corruption. Ubuntu 26.04 includes full support for FAT32, exFAT, and NTFS filesystems out of the box. If you need to work specifically with NTFS drives, the native ntfs3 kernel driver provides full read-write support without additional software. For other storage devices, see our guides on how to mount a CD-ROM or mount USB disks.
Frequently Asked Questions
- Why does my USB drive not appear after plugging it in? First, check if the drive is detected using
lsblkorsudo blkid. If the drive appears but does not mount automatically, it may have a corrupted filesystem. Try runningsudo fsck /dev/sdb1to check for errors. If the drive does not appear at all, try a different USB port or checkdmesg | tailfor hardware errors. - How do I mount a USB drive as a regular user without sudo? On Ubuntu Desktop, the udisks2 service handles this automatically when you click on the drive in Files. For command-line mounting without sudo, you can use
udisksctl mount -b /dev/sdb1which mounts to/run/media/username/. This requires the udisks2 service running and appropriate polkit permissions. - What is the difference between UUID and LABEL in fstab? UUID is a unique identifier assigned to each filesystem that never changes unless you reformat the drive. LABEL is a human-readable name you assign to the drive. UUID is more reliable because it is guaranteed to be unique, while LABEL could potentially conflict if two drives have the same label. For permanent mounts, UUID is the recommended method.
- Can I mount a USB drive to a custom location other than /mnt? Yes, you can create any directory as a mount point. Common locations include
/mnt,/media, or even a directory in your home folder. Simply create the directory withmkdirand use it as the mount point. Ensure the directory exists before mounting and is empty to avoid hiding existing files. - How do I find my user ID (uid) and group ID (gid) for fstab? Run the
idcommand in the terminal. The output shows your uid and gid values. For the first regular user created during installation, these are typically both 1000. Use these values in fstab mount options for FAT32, exFAT, and NTFS filesystems to ensure you have proper read-write access to the mounted drive.
For additional information on mounting filesystems and fstab configuration, refer to the official Ubuntu Fstab documentation.