ZFS is a powerful, enterprise-grade file system that combines volume management with a robust file system, offering features like data integrity verification, snapshots, and built-in RAID capabilities. This comprehensive ZFS Ubuntu 26.04 guide covers everything from installation to advanced pool management, giving you the knowledge to leverage ZFS for reliable data storage on your Ubuntu system.
Table of Contents
In this tutorial you will learn:
- How to install and configure ZFS on Ubuntu 26.04
- ZFS terminology including pools, vdevs, and datasets
- How to create single disk, mirror, and RAID-Z pools
- How to manage datasets with properties and quotas
- How to create and manage snapshots and clones
- How to enable compression and monitor pool health
Software Requirements
| Category | Requirements, Conventions or Software Version Used |
|---|---|
| System | Ubuntu 26.04 Resolute Raccoon |
| Software | zfsutils-linux 2.3.5 |
| Other | Privileged access to your Linux system as root or via the sudo command. One or more dedicated storage devices for ZFS pools. |
| Conventions | # – requires given linux commands to be executed with root privileges either directly as a root user or by use of sudo command$ – requires given linux commands to be executed as a regular non-privileged user |
sudo apt install zfsutils-linux followed by sudo zpool create poolname /dev/sdX.
| Step | Command/Action |
|---|---|
| 1. Install ZFS packages | sudo apt install zfsutils-linux |
| 2. Create a storage pool | sudo zpool create linuxconfig /dev/sdb |
| 3. Create a dataset | sudo zfs create linuxconfig/data |
| 4. Verify pool status | zpool status |
Installing ZFS on Ubuntu 26.04
Ubuntu 26.04 includes ZFS support through the official repositories, making installation straightforward. The zfsutils-linux package provides all necessary userspace utilities and automatically loads the required kernel modules. To install ZFS on your system, run the following commands:
- Update package lists and install ZFS: This installs the ZFS utilities and kernel modules.
$ sudo apt update
$ sudo apt install zfsutils-linux
The installation process automatically loads the ZFS kernel modules (
spl.koandzfs.ko) and creates the necessary systemd service units for pool importing and mounting. - Verify the installation: Confirm ZFS is properly installed and the kernel modules are loaded.
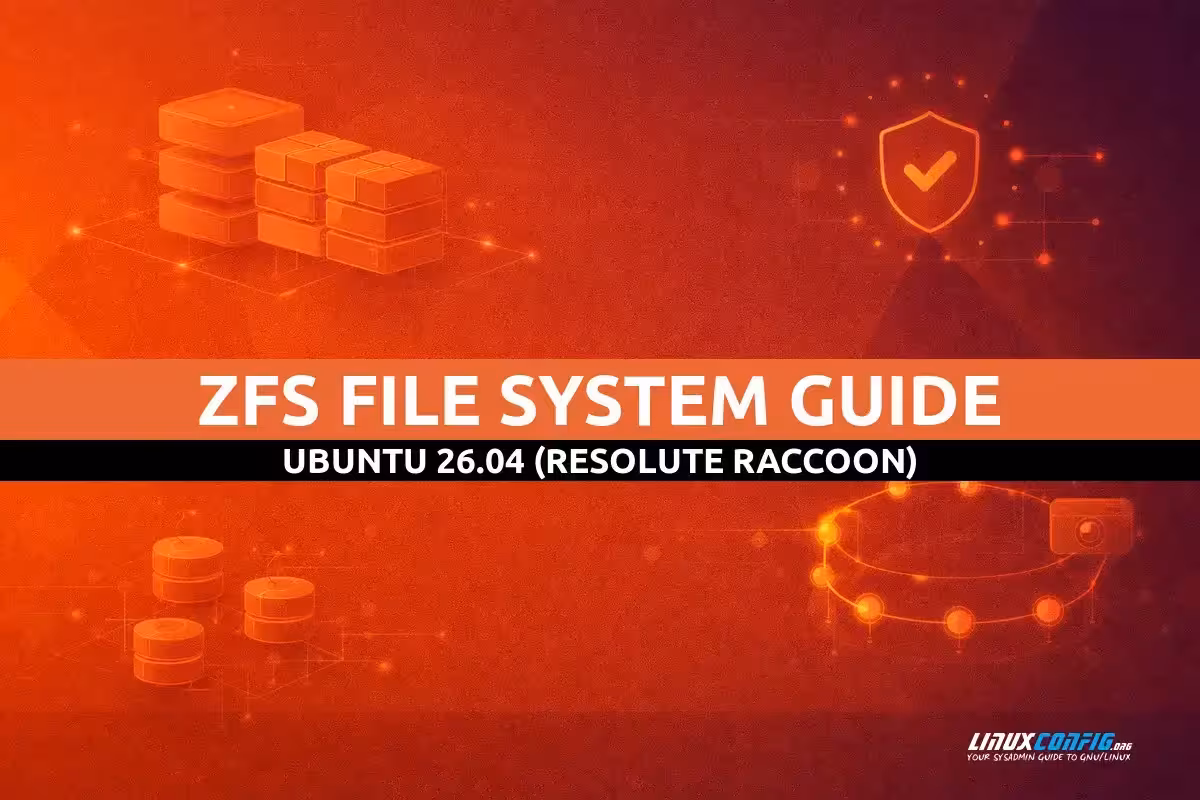
$ zfs --version
$ lsmod | grep zfs
The zfs –version and lsmod commands confirm ZFS 2.3.5 is installed with kernel modules loaded
Understanding ZFS Terminology
Before working with ZFS Ubuntu 26.04, understanding its core concepts is essential. ZFS uses a hierarchical structure that differs significantly from traditional file systems.
| Term | Description |
|---|---|
| Pool (zpool) | The top-level storage container that aggregates one or more physical devices. Pools provide the raw storage that datasets consume. |
| vdev | Virtual device – a building block of a pool. Can be a single disk, mirror, or RAID-Z group. |
| Dataset | A file system within a pool. Datasets are automatically mounted and can have individual properties like compression and quotas. |
| zvol | A block device within a pool, useful for swap space or providing storage to virtual machines. |
| Snapshot | A read-only, point-in-time copy of a dataset. Snapshots consume no additional space initially and grow only as data changes. |
| Clone | A writable copy of a snapshot that functions as an independent dataset. |
Creating ZFS Storage Pools on Ubuntu 26.04
ZFS pools form the foundation of your storage infrastructure. The zpool command manages pool creation and administration. This section demonstrates creating pools with different redundancy configurations using available disks.
IMPORTANT
Creating a ZFS pool will destroy all existing data on the specified disks. Ensure you have backups and are using the correct device paths before proceeding.
Single Disk Pool
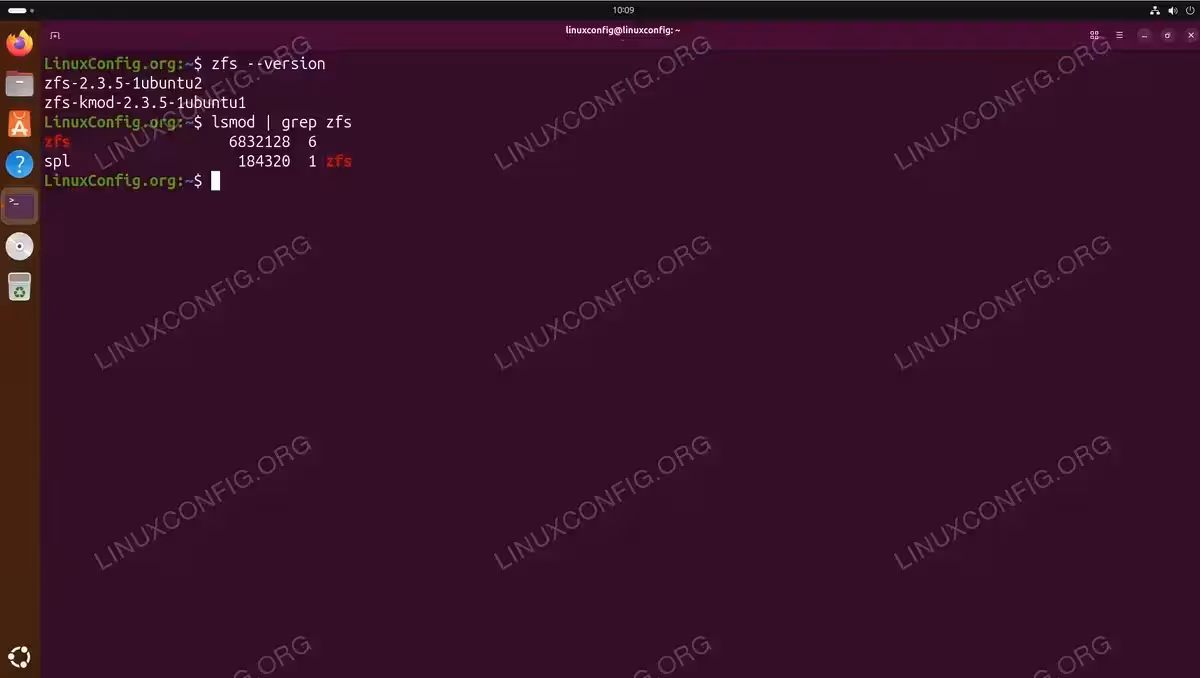
A single disk pool provides no redundancy but is suitable for non-critical data or testing. Create a basic pool named linuxconfig using a single disk:
$ sudo zpool create linuxconfig /dev/sdb
ZFS automatically mounts the pool at /linuxconfig. Verify the pool creation:
$ zpool status linuxconfig
$ zpool list linuxconfig
Mirror Pool
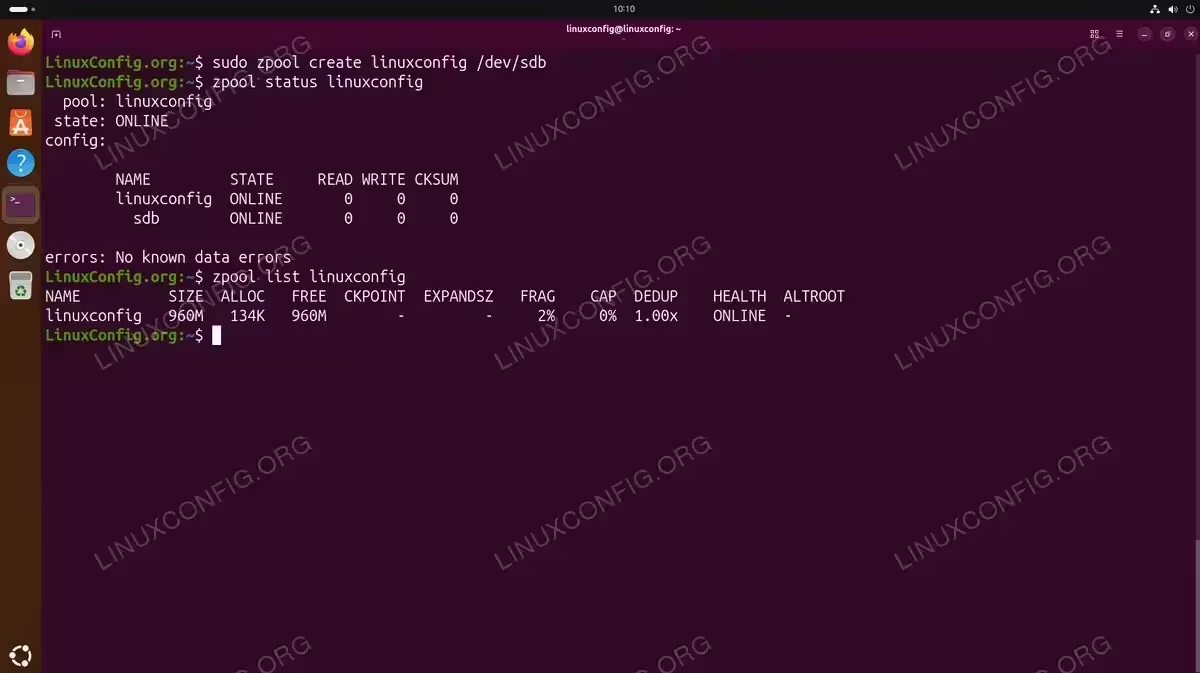
A mirror pool replicates data across two or more disks, providing redundancy similar to RAID1. If one disk fails, data remains accessible from the surviving disk:
$ sudo zpool create linuxconfig-mirror mirror /dev/sdc /dev/sdd
$ zpool status linuxconfig-mirror
RAID-Z Pool
RAID-Z provides single-disk parity redundancy across multiple disks, similar to RAID5. This configuration requires a minimum of three disks and can tolerate one disk failure:
$ sudo zpool create linuxconfig-raidz raidz /dev/sdb /dev/sdc /dev/sdd /dev/sde
$ zpool status linuxconfig-raidz
| Type | Parity | Minimum Disks | Disk Failures Tolerated |
|---|---|---|---|
| raidz (raidz1) | Single | 3 | 1 |
| raidz2 | Double | 4 | 2 |
| raidz3 | Triple | 5 | 3 |
Destroying a Pool
To remove a pool and free the underlying disks for other use:
$ sudo zpool destroy linuxconfig
Managing ZFS Datasets
Datasets are the primary way to organize data within a ZFS pool. Each dataset functions as an independent file system with its own mount point and properties. Unlike traditional partitions, datasets share pool space dynamically.
Creating Datasets
Create datasets using the zfs create command. Datasets are automatically mounted under the pool’s mount point:
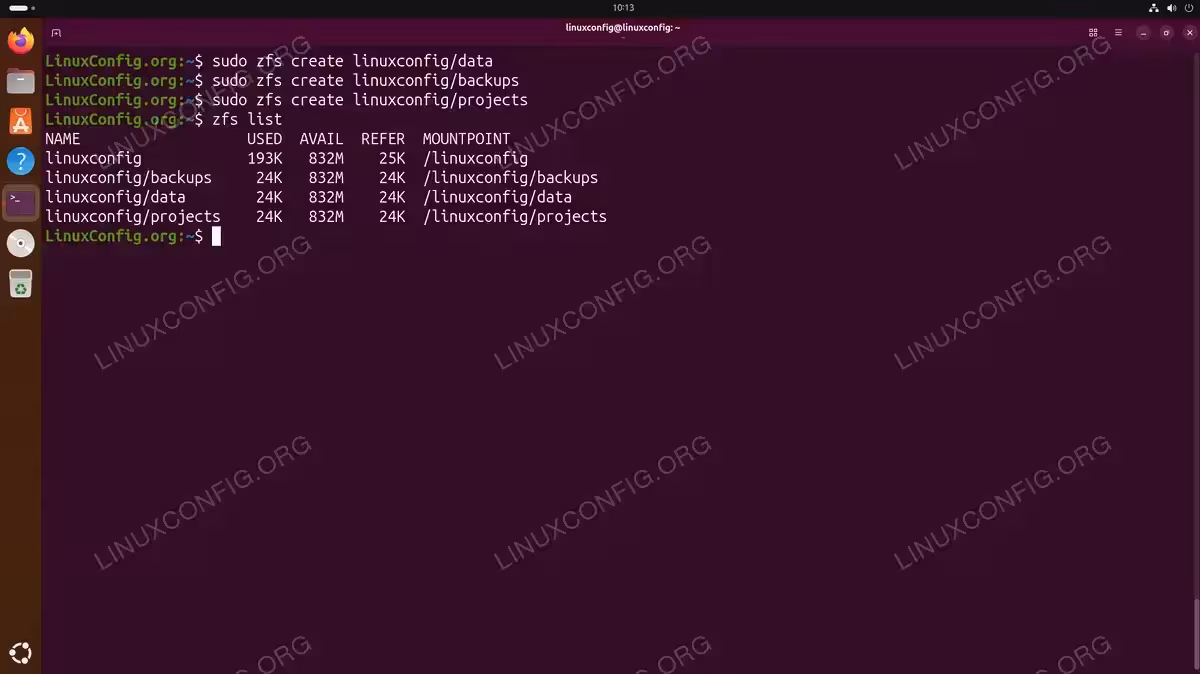
$ sudo zfs create linuxconfig/data
$ sudo zfs create linuxconfig/backups
$ sudo zfs create linuxconfig/projects
List all datasets:
$ zfs list
Dataset Properties
ZFS datasets have numerous configurable properties. View all properties for a dataset:
$ zfs get all linuxconfig/data
Set a quota to limit dataset size:
$ sudo zfs set quota=500M linuxconfig/data
Set a reservation to guarantee available space:
$ sudo zfs set reservation=100M linuxconfig/backups
View specific properties:
$ zfs get quota,reservation,used,available linuxconfig/data
Nested Datasets
Datasets can be nested to create a hierarchical structure. Child datasets inherit properties from parents unless explicitly overridden:
$ sudo zfs create linuxconfig/projects/website
$ sudo zfs create linuxconfig/projects/database
Destroying Datasets
Remove a dataset with the destroy command:
$ sudo zfs destroy linuxconfig/projects/website
To destroy a dataset with children, use the recursive flag:
$ sudo zfs destroy -r linuxconfig/projects
ZFS Snapshots and Clones
Snapshots are one of the most powerful ZFS features, providing instant, space-efficient point-in-time copies of datasets. Because ZFS uses copy-on-write, snapshots initially consume no additional space and grow only as the original data changes.
Creating Snapshots
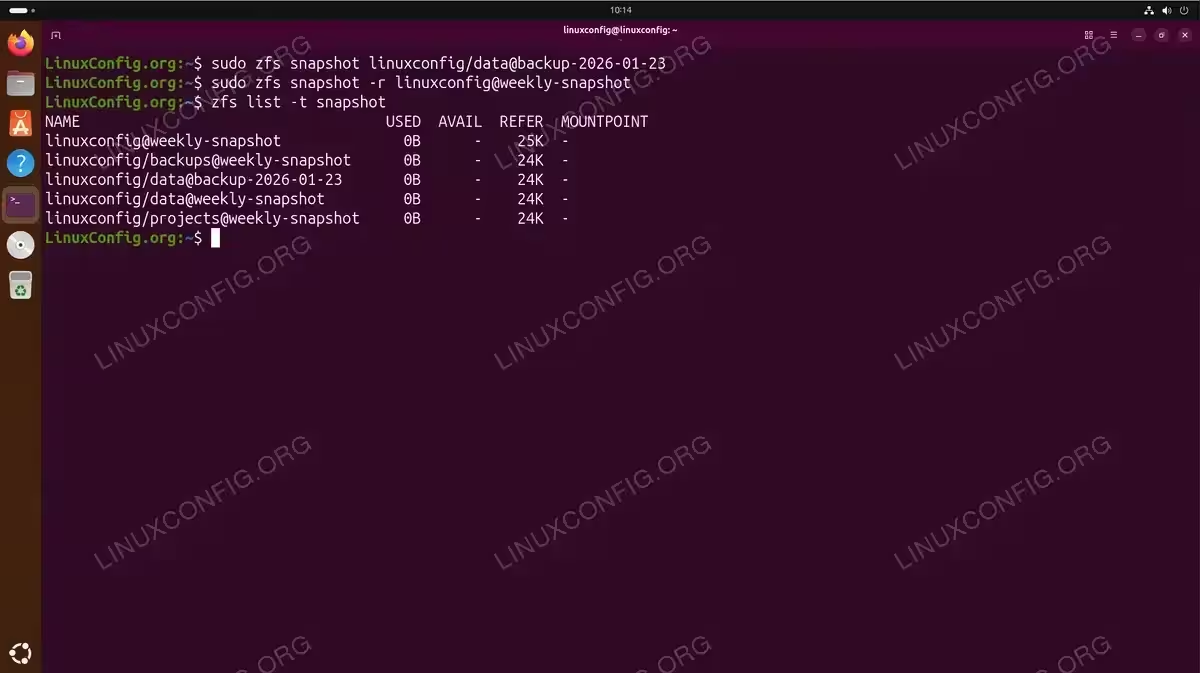
Create a snapshot using the @ notation to specify the snapshot name:
$ sudo zfs snapshot linuxconfig/data@backup-2026-01-23
Create recursive snapshots for a dataset and all its children:
$ sudo zfs snapshot -r linuxconfig@weekly-snapshot
List all snapshots:
$ zfs list -t snapshot
Accessing Snapshot Data
Snapshots are accessible through a hidden .zfs/snapshot directory within each dataset:
$ ls /linuxconfig/data/.zfs/snapshot/
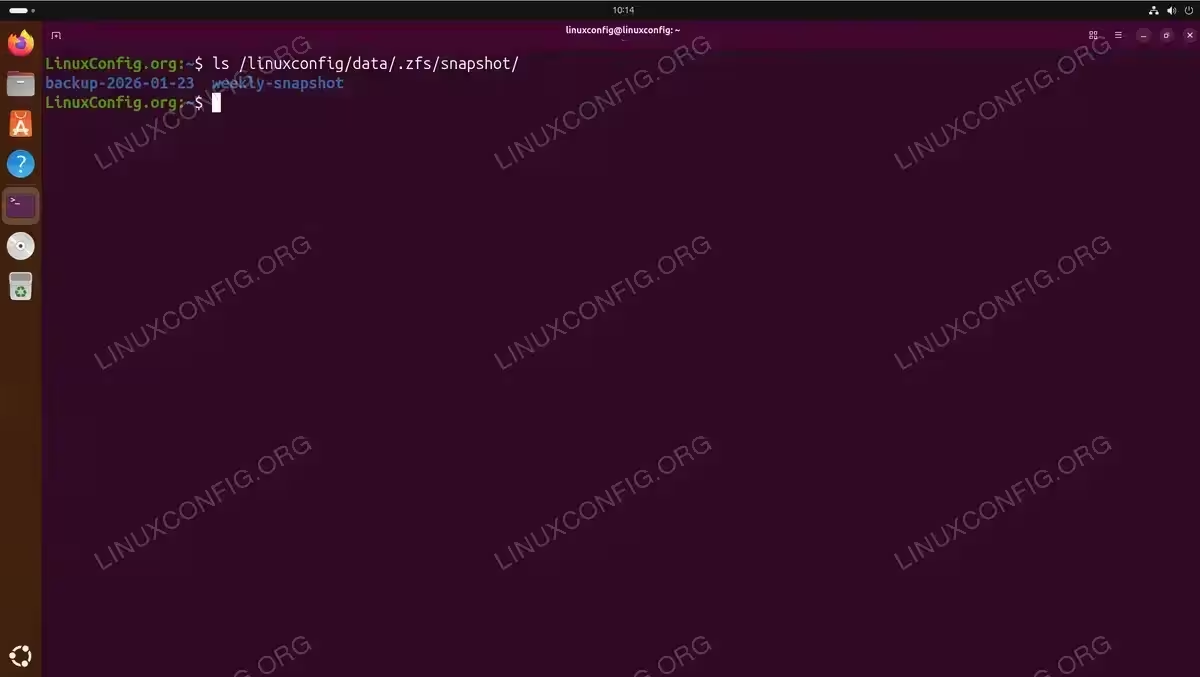
Files within snapshots are read-only and can be copied to restore individual files.
Rolling Back to a Snapshot
Rollback reverts a dataset to the exact state captured in a snapshot:
$ sudo zfs rollback linuxconfig/data@backup-2026-01-23
IMPORTANT
Rollback destroys all data created after the snapshot. If newer snapshots exist, ZFS will refuse the rollback unless you use the -r flag to force deletion of those newer snapshots.
Creating Clones
Clones create writable copies from snapshots, useful for testing or development environments:
$ sudo zfs clone linuxconfig/data@backup-2026-01-23 linuxconfig/data-test
The clone appears as an independent dataset. List datasets to verify:
$ zfs list
Destroying Snapshots
Remove individual snapshots:
$ sudo zfs destroy linuxconfig/data@backup-2026-01-23
IMPORTANT
If a snapshot has dependent clones, ZFS will refuse to destroy it. Use the -R flag to recursively destroy the snapshot and all dependent clones.
Remove all snapshots matching a pattern:
$ sudo zfs destroy linuxconfig@%
ZFS Compression and Deduplication
ZFS includes built-in compression that can significantly reduce storage usage with minimal performance impact. Compression is applied transparently at the dataset level. In Ubuntu 26.04 with ZFS 2.3.5, compression is enabled by default on new datasets.
Configuring Compression
Check the current compression setting on a dataset:
$ zfs get compression linuxconfig/data
Set a specific compression algorithm:
$ sudo zfs set compression=lz4 linuxconfig/data
LZ4 is the recommended algorithm for most workloads, offering an excellent balance of compression ratio and speed. Other available algorithms include gzip, zstd, and lzjb.
Set compression on the pool level to apply to all new datasets:
$ sudo zfs set compression=lz4 linuxconfig
Checking Compression Ratio
View compression statistics for a dataset:
$ zfs get compressratio,used,logicalused linuxconfig/data
A compressratio greater than 1.00x indicates data is being compressed. For example, 1.50x means the data occupies approximately 33% less space than it would uncompressed.
Deduplication
Deduplication eliminates redundant data blocks across the entire pool. While powerful, it requires significant memory (approximately 5GB RAM per 1TB of data).
$ sudo zfs set dedup=on linuxconfig/data
IMPORTANT
Deduplication is memory-intensive and best suited for specific workloads like virtual machine storage or backup repositories with high data redundancy. For most use cases, compression alone provides better performance.
Check deduplication ratio:
$ zpool list -o name,dedupratio
Monitoring ZFS Health
Regular monitoring ensures early detection of potential issues. ZFS provides comprehensive tools for checking pool and disk health.
Pool Status
The zpool status command displays detailed pool health information:
$ zpool status
The READ, WRITE, and CKSUM columns show error counts. Non-zero values indicate potential hardware issues.
Running Scrubs
Scrubs verify data integrity by reading all blocks and checking checksums. Run scrubs regularly (weekly or monthly) to detect silent data corruption:
$ sudo zpool scrub linuxconfig
Monitor scrub progress:
$ zpool status linuxconfig
ZFS Events
View ZFS system events for troubleshooting:
$ sudo zpool events -v
I/O Statistics
Monitor real-time I/O activity. The number specifies the refresh interval in seconds:
$ zpool iostat linuxconfig 5
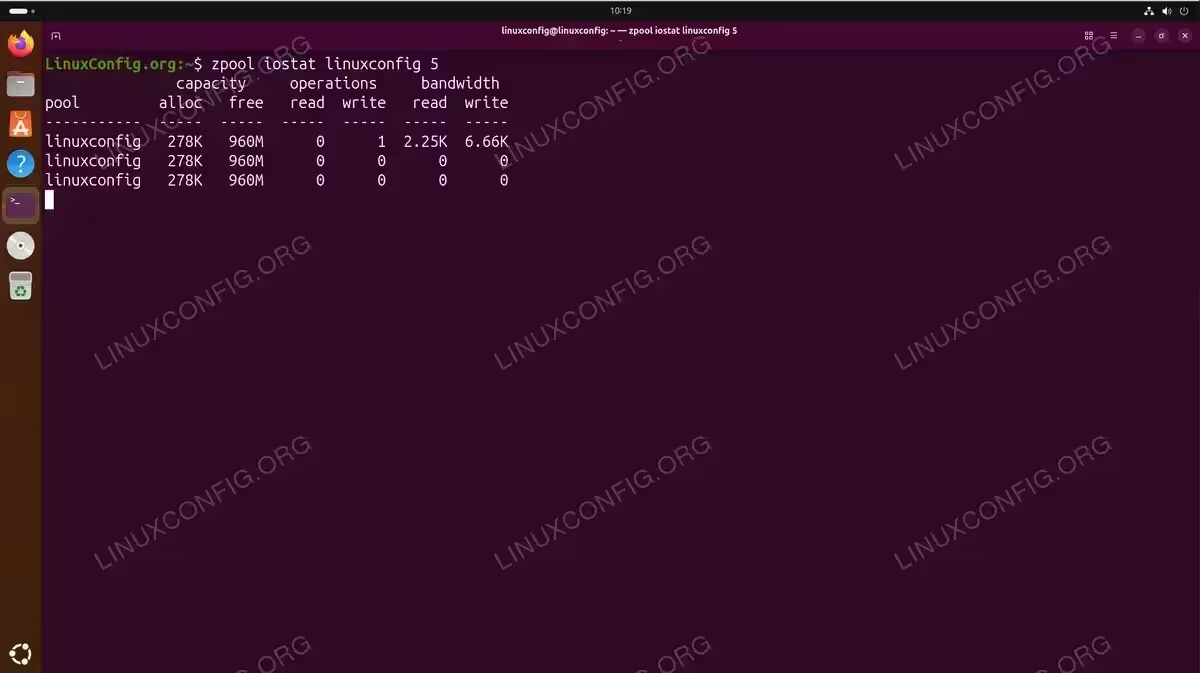
Press Ctrl+C to stop the continuous output.
Automated Health Monitoring
The ZFS Event Daemon (zed) monitors pool events and can send email notifications. Configure email alerts in /etc/zfs/zed.d/zed.rc:
ZED_EMAIL_ADDR="youremail@linuxconfig.org"
ZED_NOTIFY_VERBOSE=1
Reload systemd and restart the daemon after configuration changes:
$ sudo systemctl daemon-reload
$ sudo systemctl restart zfs-zed
Conclusion
This ZFS Ubuntu 26.04 guide covered the essential concepts and commands for managing ZFS storage. You learned how to install ZFS, create pools with various redundancy levels, manage datasets with properties and quotas, work with snapshots and clones, configure compression, and monitor pool health. ZFS provides enterprise-grade features that protect your data through checksumming, redundancy, and efficient snapshots. For advanced configurations like installing Ubuntu 26.04 on ZFS root, additional planning for boot configuration is required. Consult the official OpenZFS documentation for detailed reference material on advanced features and tuning options.
Frequently Asked Questions
- How much RAM does ZFS require on Ubuntu 26.04? ZFS benefits from available RAM for caching (ARC), but runs adequately with 2GB for basic use. For deduplication, plan approximately 5GB RAM per 1TB of deduplicated data. Without deduplication, 1GB RAM per 1TB of storage is a reasonable guideline for optimal performance.
- Can I add disks to an existing ZFS pool? Yes, you can expand a pool by adding new vdevs using
zpool add poolname /dev/sdX. However, you cannot add individual disks to existing RAID-Z vdevs. For mirrors, usezpool attachto add disks to an existing mirror. - What happens if a disk fails in a ZFS pool? In redundant configurations (mirror or RAID-Z), the pool continues operating in degraded mode. Replace the failed disk using
zpool replace poolname /dev/old-disk /dev/new-disk. ZFS automatically resilvers (rebuilds) the data onto the new disk. - Should I use RAID-Z or mirrors for my ZFS pool? Mirrors offer faster rebuild times and better random read performance, making them ideal for smaller pools or SSDs. RAID-Z provides better storage efficiency with larger disk counts but has longer rebuild times. For critical data, consider RAID-Z2 or mirrored vdevs.
- How do I import a ZFS pool from another system? Connect the disks to your Ubuntu 26.04 system and run
zpool importto list available pools. Import a specific pool withzpool import poolname. ZFS stores pool metadata on the disks, enabling seamless migration between systems.