Git is the most widely used distributed version control system, and knowing how to install and configure Git on Ubuntu 26.04 is essential for any developer or system administrator. Whether you are managing personal projects, collaborating with a team, or contributing to open-source software, Git provides the tools to track changes, manage branches, and synchronize code across multiple repositories. This guide walks you through the complete process of installing Git on Ubuntu 26.04 Resolute Raccoon, configuring your identity, setting up SSH keys for secure authentication with GitHub and GitLab, and mastering essential workflow commands.
Table of Contents
In this tutorial you will learn:
- How to install Git from the Ubuntu 26.04 repository
- How to configure your Git user identity globally and per-project
- How to generate and register SSH keys for GitHub and GitLab
- Essential Git commands for daily development workflows
- How to customize Git with aliases, default editor, and credential caching
Software Requirements
| Category | Requirements, Conventions or Software Version Used |
|---|---|
| System | Ubuntu 26.04 Resolute Raccoon |
| Software | Git, OpenSSH client |
| Other | Privileged access to your Linux system as root or via the sudo command. An active internet connection. A GitHub or GitLab account (optional, for remote repository operations). |
| Conventions | # – requires given linux commands to be executed with root privileges either directly as a root user or by use of sudo command$ – requires given linux commands to be executed as a regular non-privileged user |
| Step | Command/Action |
|---|---|
| 1. Install Git | $ sudo apt install git |
| 2. Set your name, email, and default branch | $ git config --global user.name "Your Name"$ git config --global user.email "you@example.com"$ git config --global init.defaultBranch main |
| 3. Generate an SSH key | $ ssh-keygen -t ed25519 -C "you@example.com" |
| 4. Verify the setup | $ git config --list |
Installing Git on Ubuntu 26.04
Git is available directly from the Ubuntu 26.04 default repositories, making the installation straightforward. Before installing, update your package index to ensure you receive the latest available version.
- Update the package index: Refresh the APT package cache to pull in the most recent package information.
$ sudo apt update
- Install Git: Use APT to install the
gitpackage along with any required dependencies.$ sudo apt install git
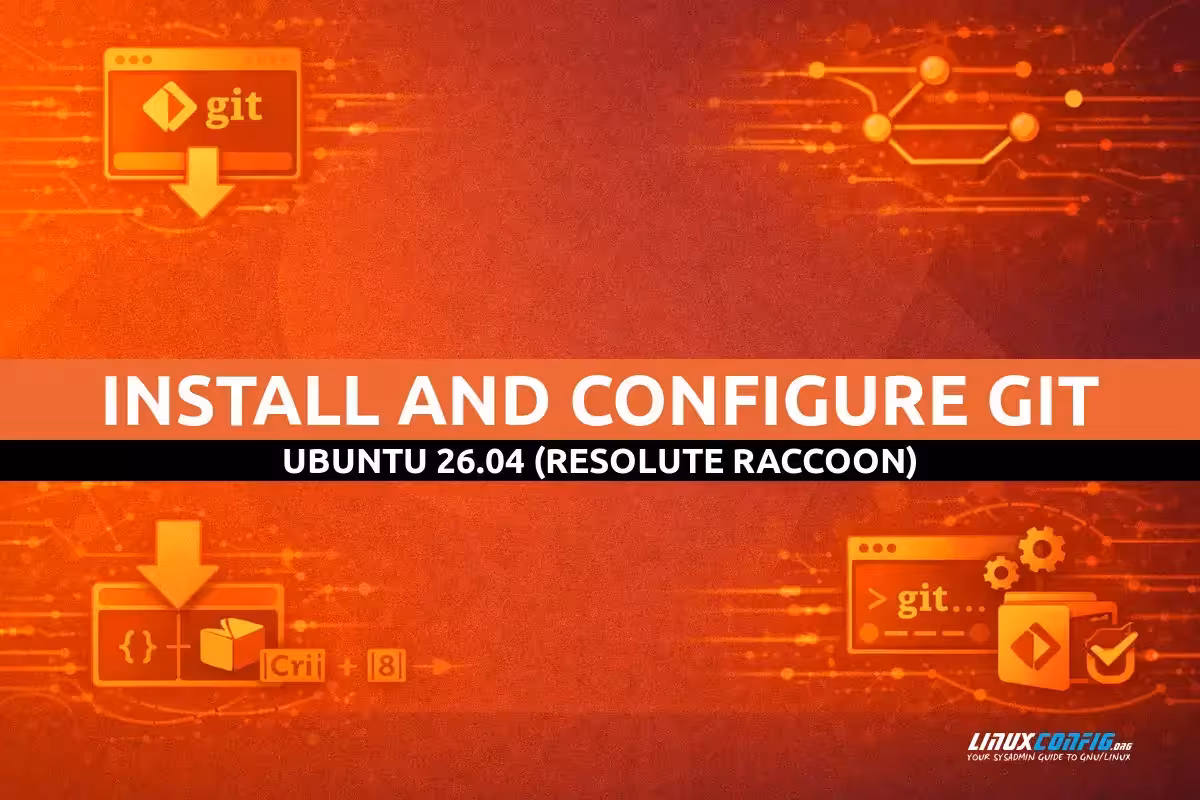
- Verify the installation: Confirm that Git is installed correctly by checking its version.
$ git --version
This command prints the installed Git version number, confirming the installation was successful.

Installing the Git package and verifying the installed version 2.53.0 on Ubuntu 26.04
IMPORTANT
Ubuntu 26.04 ships Git from its default repository. If you need the very latest Git release, you can optionally add the official Git PPA with $ sudo add-apt-repository ppa:git-core/ppa before installing. For most users, the default repository version is sufficient.
Configuring Git User Identity
After installation, the first and most important step is to configure your Git user identity. Every Git commit records the author’s name and email address, so this configuration is required before you can make any commits. Git stores configuration at three levels: system-wide (/etc/gitconfig), global (per-user ~/.gitconfig), and local (per-repository .git/config). The more specific level always overrides the broader one.
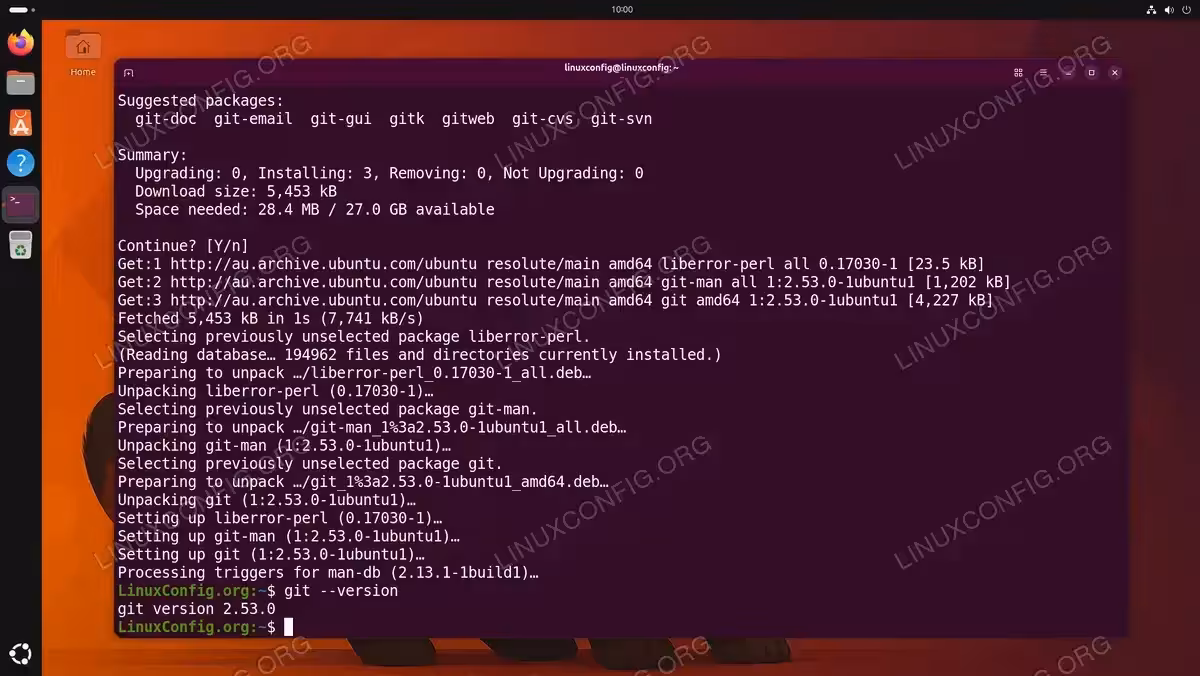
- Set your global username: This name will appear in the author field of every commit you make.
$ git config --global user.name "LinuxConfig"
- Set your global email address: Use the same email associated with your GitHub or GitLab account to ensure commits are properly linked to your profile.
$ git config --global user.email "admin@linuxconfig.org"
- Set the default branch name: By default,
git initcreates a branch calledmaster. Modern convention and platforms like GitHub usemaininstead. Set this globally so all new repositories usemainfrom the start:$ git config --global init.defaultBranch main
- Verify your configuration: List all active Git configuration values to confirm the identity settings are in place.
$ git config --list

Setting the global Git username, email, default branch name, and verifying the configuration
If you work on multiple projects that require different identities, you can override the global settings on a per-repository basis. Navigate to the repository directory and run the same commands without the --global flag:
$ cd ~/linuxconfig_project
$ git config user.name "Different Name"
$ git config user.email "other@example.com"
These local settings apply only to that specific repository and take precedence over your global configuration.
Generating SSH Keys for Git
While Git supports HTTPS authentication, using SSH keys is the preferred and more secure method for authenticating with remote repositories on GitHub and GitLab. SSH key authentication eliminates the need to enter your username and password for every push or pull operation. Additionally, many platforms are phasing out password-based authentication in favor of token or SSH key-based methods.
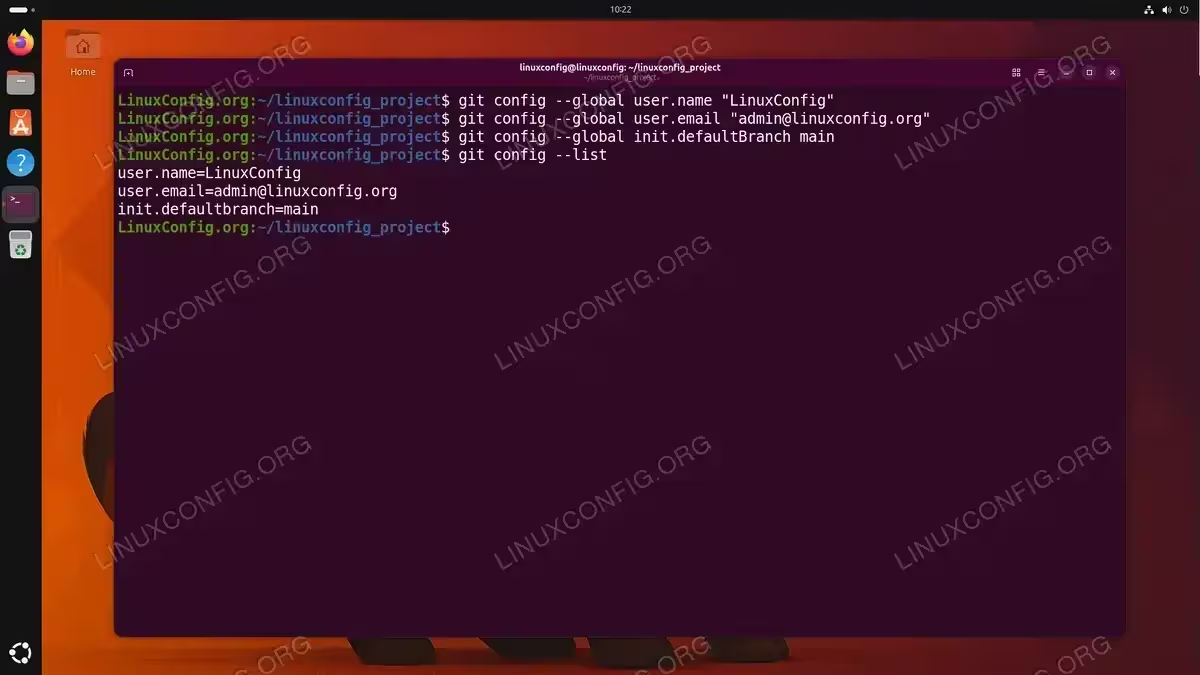
- Generate an Ed25519 SSH key pair: Ed25519 is the recommended algorithm for SSH keys due to its strong security and compact key size.
$ ssh-keygen -t ed25519 -C "linuxconfig@linuxconfig-server"
When prompted, press Enter to accept the default file location (
~/.ssh/id_ed25519). Optionally set a passphrase for additional security.
Generating an Ed25519 SSH key pair for secure Git authentication on Ubuntu 26.04 - Start the SSH agent and add your key: The SSH agent manages your keys in memory so you do not need to enter the passphrase repeatedly.
$ eval "$(ssh-agent -s)"
$ ssh-add ~/.ssh/id_ed25519
- Copy the public key: Display your public key and copy it to your clipboard.
$ cat ~/.ssh/id_ed25519.pub
Copy the entire output, which starts with
ssh-ed25519and ends with your comment. - Add the key to GitHub or GitLab:
- GitHub: Navigate to Settings → SSH and GPG keys → New SSH key. Paste the public key and save.
- GitLab: Navigate to Preferences → SSH Keys. Paste the public key, set an optional expiration date, and save.
- Test the SSH connection: Verify that your SSH key is correctly registered with the remote service.
$ ssh -T git@github.com
A successful connection to GitHub will return a greeting message confirming your username. For GitLab, use
ssh -T git@gitlab.cominstead.Starting the SSH agent, adding the key, and verifying successful authentication with GitHub

SECURITY ALERT
Never share your private key file (~/.ssh/id_ed25519). Only the public key (~/.ssh/id_ed25519.pub) should be added to remote services. If you suspect your private key has been compromised, immediately remove the corresponding public key from all services and generate a new key pair.
Essential Git Workflow Commands
With Git installed and configured on your Ubuntu 26.04 system, you are ready to start working with repositories. This section covers the core commands you will use in daily development workflows.
Initializing and Cloning Repositories
To practice the Git workflow, we will use a public sandbox repository at git@github.com:linuxconfig/linuxconfig_project.git. This is an empty repository created specifically for demonstration purposes. In your own workflow, you would replace this URL with your actual project repository.
IMPORTANT
The linuxconfig/linuxconfig_project repository on GitHub is a sandbox used for this tutorial. Feel free to follow along by creating your own empty repository on GitHub or GitLab instead.
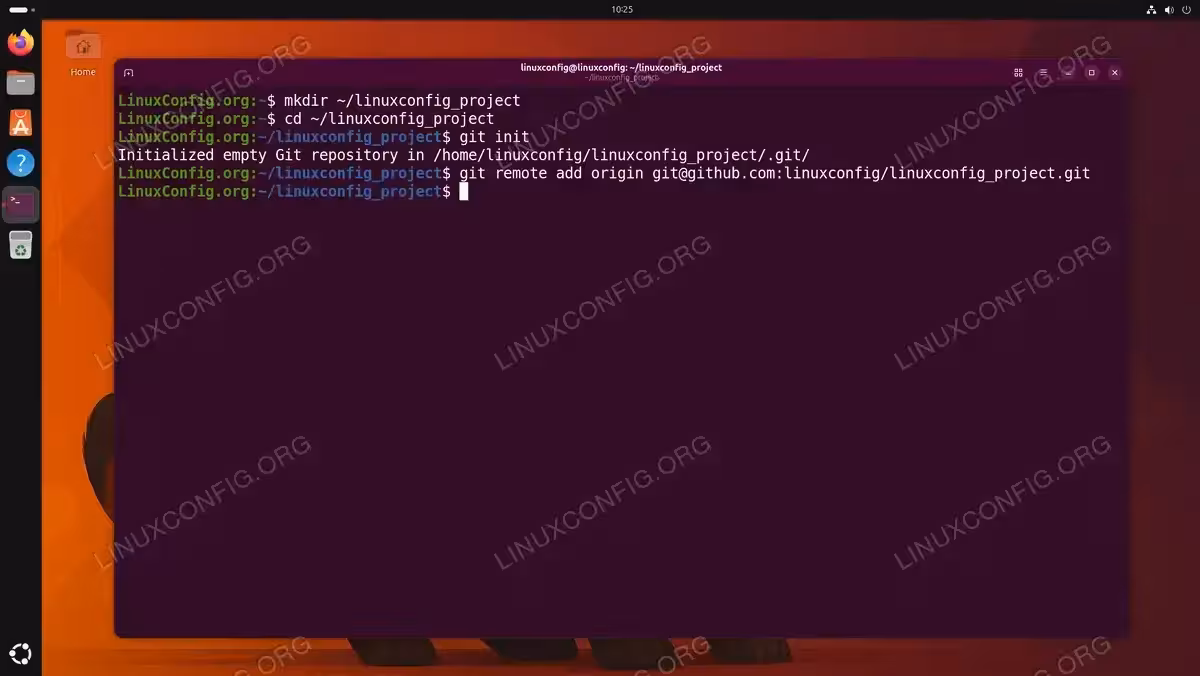
To start a new local project and connect it to a remote repository, initialize a repository in your project directory and add the remote:
$ mkdir ~/linuxconfig_project
$ cd ~/linuxconfig_project
$ git init
$ git remote add origin git@github.com:linuxconfig/linuxconfig_project.git
This creates a hidden .git directory that stores the entire history and configuration for your repository, and links it to the remote on GitHub. Since we configured init.defaultBranch main earlier, the initial branch is already named main. If you skipped that step, rename it now with $ git branch -M main.
Alternatively, to work on an existing remote project, clone it directly:
$ git clone git@github.com:linuxconfig/linuxconfig_project.git
Cloning downloads the complete repository, including all branches and commit history, to your local machine.
Staging, Committing, and Pushing Changes
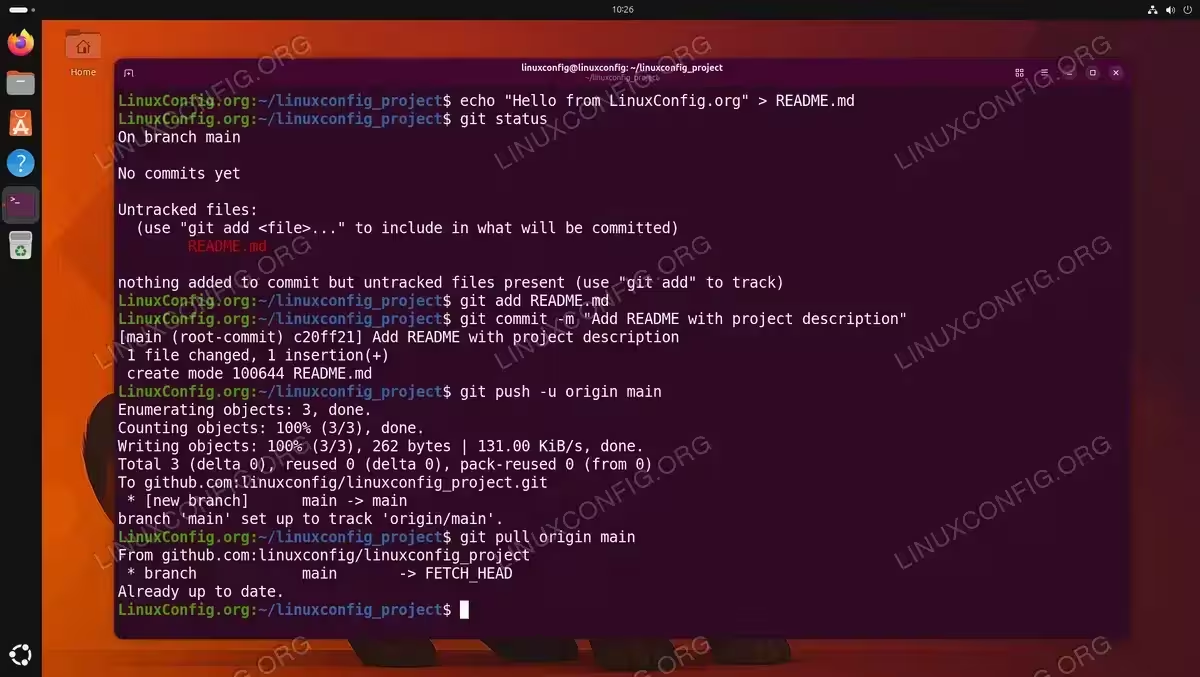
The fundamental Git workflow involves modifying files, staging changes, committing them with a message, and pushing to a remote repository. Let us walk through this using our sandbox repository.
- Create a file: Add a simple file to the project to have something to commit.
$ echo "Hello from LinuxConfig.org" > README.md
- Check the repository status: See which files have been modified, added, or are untracked.
$ git status
- Stage changes: Add specific files or all changes to the staging area.
$ git add README.md
To stage all changed files at once, you can use
$ git add .instead. - Commit the staged changes: Record the staged snapshot in the repository history with a descriptive message.
$ git commit -m "Add README with project description"
- Push to the remote repository: Upload your local commits to the remote server.
$ git push -u origin main
The
-uflag setsorigin/mainas the default upstream branch, so future pushes require only$ git push. - Pull remote changes: Download and integrate changes from the remote repository into your local branch.
$ git pull origin main
Complete Git workflow demonstrating file creation, staging, committing, pushing to GitHub, and pulling changes
Working with Branches
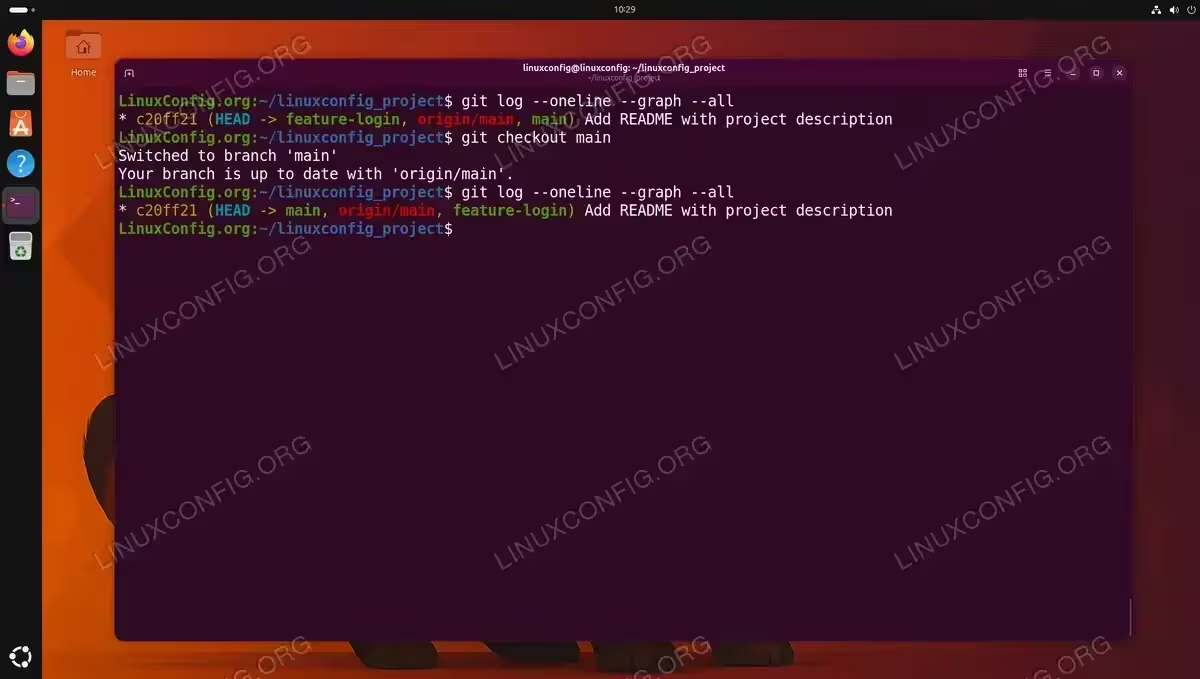
Branches allow you to develop features or fix bugs in isolation without affecting the main codebase.
$ git branch feature-login
$ git checkout feature-login
You can combine both commands into one using the -b flag:
$ git checkout -b feature-login

After completing your work on the branch, merge it back into main:
$ git checkout main
$ git merge feature-login
To view all branches in your repository:
$ git branch -a
Viewing History
Review your commit history using git log. For a compact overview:
$ git log --oneline --graph --all
This produces a condensed visual representation of the branch and merge history for the entire repository.
Configuring Git Defaults and Aliases
Customizing Git defaults and creating aliases can significantly improve your productivity. These settings are stored in your global ~/.gitconfig file.
Setting the Default Branch Name
We already configured the default branch name to main in the initial setup section using $ git config --global init.defaultBranch main. If you skipped that step or need to rename an existing master branch in a repository, use:
$ git branch -M main
This renames the current branch to main without losing any history.
Setting the Default Editor
Git uses an editor for writing commit messages, interactive rebases, and other tasks. Set your preferred editor globally:
$ git config --global core.editor "nano"
Replace nano with vim, code --wait (for VS Code), or any other editor of your choice.
Creating Useful Aliases
Aliases let you define shortcuts for frequently used Git commands. Here are some commonly used examples:
$ git config --global alias.st status
$ git config --global alias.co checkout
$ git config --global alias.br branch
$ git config --global alias.ci commit
$ git config --global alias.lg "log --oneline --graph --all --decorate"
After setting these aliases, you can use git st instead of git status, git co instead of git checkout, and so forth.
Credential Caching for HTTPS
If you use HTTPS URLs instead of SSH for remote repositories, you can configure Git to cache your credentials so you do not need to re-enter them for every operation:
$ git config --global credential.helper cache
By default, credentials are cached for 15 minutes. To extend this to one hour:
$ git config --global credential.helper 'cache --timeout=3600'
For a permanent store that saves credentials to disk (less secure, but convenient for personal machines):
$ git config --global credential.helper store
IMPORTANT
The store credential helper saves your credentials in plain text at ~/.git-credentials. Use this option only on personal machines where security is not a major concern. For shared or production systems, prefer SSH keys or the cache helper with a reasonable timeout.
Conclusion
You have successfully installed and configured Git on your Ubuntu 26.04 Resolute Raccoon system. Starting from the APT installation, you set up your user identity, generated SSH keys for secure authentication with GitHub and GitLab, learned the essential workflow commands for daily use, and customized Git with aliases and sensible defaults. Git is now ready to serve as the backbone of your development workflow. For more advanced topics, consult the official Git documentation, which covers topics such as rebasing, stashing, submodules, and hooks in detail.
Frequently Asked Questions
- How do I update Git to the latest version on Ubuntu 26.04? If you installed Git from the default Ubuntu repository, run
$ sudo apt update && sudo apt upgrade gitto get the latest packaged version. For the absolute latest release, add the Git PPA with$ sudo add-apt-repository ppa:git-core/ppabefore upgrading. - Can I use both SSH and HTTPS for different Git repositories? Yes. The authentication method is determined by the remote URL of each repository. Repositories cloned with
git@github.com:...use SSH, while those cloned withhttps://github.com/...use HTTPS. You can change a repository’s remote URL at any time with$ git remote set-url origin <new-url>. - How do I check which Git configuration values are active and where they come from? Run
$ git config --list --show-originto display all active settings along with the file path where each value is defined. This is particularly useful when troubleshooting unexpected behavior caused by conflicting settings across system, global, and local configuration files. - What is the difference between
git pullandgit fetch? Thegit fetchcommand downloads new data from the remote repository but does not modify your working directory or current branch. Thegit pullcommand performs a fetch followed by a merge, automatically integrating the remote changes into your current branch. Usinggit fetchfirst gives you the opportunity to review changes before merging them. - How do I remove Git from Ubuntu 26.04? To uninstall Git and remove its configuration files, run
$ sudo apt purge git. Note that this does not remove your personal Git configuration file at~/.gitconfigor any repositories on your system. Delete those manually if needed.