Knowing how to configure network settings on Ubuntu 26.04 is essential for both server administrators and desktop users. Whether you need to set up a static IP address, configure DNS servers, or troubleshoot connectivity issues, Ubuntu provides powerful tools to manage your network configuration. This guide covers both Netplan for server environments and NetworkManager for desktop installations, giving you complete control over your system’s networking.
Table of Contents
In this tutorial you will learn:
- The difference between Netplan and NetworkManager
- How to configure network settings using Netplan on Ubuntu Server
- How to manage network connections with nmcli on Ubuntu Desktop
- How to verify your network configuration
- How to troubleshoot common networking problems
Software Requirements
| Category | Requirements, Conventions or Software Version Used |
|---|---|
| System | Ubuntu 26.04 Resolute Raccoon |
| Software | Netplan 1.1+, NetworkManager 1.48+ |
| Other | Privileged access to your Linux system as root or via the sudo command. |
| Conventions | # – requires given linux commands to be executed with root privileges either directly as a root user or by use of sudo command$ – requires given linux commands to be executed as a regular non-privileged user |
/etc/netplan/ for server configurations or use nmcli for desktop systems.
| Step | Command/Action |
|---|---|
| 1. View current configuration | ip addr show |
| 2. Edit Netplan config (Server) | sudo nano /etc/netplan/00-installer-config.yaml |
| 3. Apply Netplan changes (Server) | sudo netplan apply |
| 4. Configure via nmcli (Desktop) | nmcli connection modify "netplan-ens18" ipv4.addresses 172.16.1.170/24 |
Understanding Network Configuration Tools on Ubuntu 26.04
Ubuntu 26.04 provides two primary methods to configure network settings, and understanding when to use each one will help you manage your system effectively. The tool you choose depends largely on whether you are running a server or desktop installation.
Netplan serves as the default network configuration abstraction layer on Ubuntu. It reads YAML configuration files from /etc/netplan/ and generates the appropriate configuration for either systemd-networkd (on servers) or NetworkManager (on desktops). This approach provides a unified configuration syntax regardless of the underlying network management daemon. For detailed information about network config files, see our dedicated guide.
NetworkManager is the default network management daemon on Ubuntu Desktop 26.04. It provides both graphical and command-line interfaces for managing network connections, making it ideal for systems that frequently change networks or require user-friendly configuration options.
IMPORTANT
On Ubuntu Server 26.04, systemd-networkd handles network configuration by default, while Ubuntu Desktop uses NetworkManager. Netplan acts as a frontend for both, allowing you to use the same YAML syntax regardless of the backend.
Configuring Network Settings with Netplan on Ubuntu Server 26.04
Netplan configuration files use YAML syntax and are stored in /etc/netplan/. While Netplan works on both server and desktop installations, directly editing these files is the primary method for Ubuntu Server 26.04 where no graphical interface is available. Desktop users typically use NetworkManager instead, covered in the next section.
Viewing Current Netplan Configuration
Before making changes, examine your existing configuration:
$ ls /etc/netplan/
The default configuration file on both Ubuntu Desktop and Server is 00-installer-config.yaml, created during system installation. View its contents:
$ cat /etc/netplan/00-installer-config.yaml
IMPORTANT
Depending on your installation method or if your system was upgraded from a previous Ubuntu version, you may encounter different configuration file names such as 50-cloud-init.yaml (cloud instances), 01-netcfg.yaml (older installations), or 01-network-manager-all.yaml (some desktop configurations). The principles remain the same regardless of the filename. Always check which files exist in /etc/netplan/ before editing.
Configuring a Static IP Address
To set a static IP address, edit the default Netplan configuration file:
$ sudo nano /etc/netplan/00-installer-config.yaml
Replace the contents with a static IP configuration:
network:
  version: 2
  renderer: networkd
  ethernets:
    ens18:
      addresses:
        - 172.16.1.170/24
      routes:
        - to: default
          via: 172.16.1.1
      nameservers:
        addresses:
          - 8.8.8.8
          - 8.8.4.4
IMPORTANT
Replace ens18 with your actual interface name. You can find it by running ip link show.
Configuring DHCP
For dynamic IP assignment, use a simpler configuration:
network:
  version: 2
  renderer: networkd
  ethernets:
    ens18:
      dhcp4: true
Applying Netplan Changes
After editing your configuration, validate and apply the changes:
- Test the configuration: Before applying permanently, test for syntax errors:
$ sudo netplan try
This command applies the configuration temporarily and reverts after 120 seconds if you do not confirm. This prevents lockouts from misconfiguration.
- Apply the configuration: Once validated, apply permanently:
$ sudo netplan apply
The changes take effect immediately without requiring a reboot.
If you need to restart network services after configuration changes, our dedicated guide covers additional methods.
Configuring Network Settings with NetworkManager on Ubuntu Desktop 26.04
On Ubuntu Desktop 26.04, NetworkManager provides both graphical and network configuration command line options. The nmcli command-line tool offers powerful capabilities for scripting and remote administration.
Viewing Current Connections
List all network connections managed by NetworkManager:
$ nmcli connection show
NAME           UUID                                  TYPE      DEVICE
netplan-ens18  64002eca-9493-3b7e-be64-07db9f81dd8b  ethernet  ens18
lo             cd89c283-5ec8-4b29-8540-ab405f01b257  loopback  lo
For detailed information about a specific connection:
$ nmcli connection show "netplan-ens18"
Configuring a Static IP with nmcli
To configure a static IP address using NetworkManager:
- Set the IP address and subnet:
$ sudo nmcli connection modify "netplan-ens18" ipv4.addresses 172.16.1.170/24
- Set the default gateway:
$ sudo nmcli connection modify "netplan-ens18" ipv4.gateway 172.16.1.1
- Configure DNS servers:
$ sudo nmcli connection modify "netplan-ens18" ipv4.dns "8.8.8.8 8.8.4.4"
- Change the method to manual:
$ sudo nmcli connection modify "netplan-ens18" ipv4.method manual
- Activate the connection:
$ sudo nmcli connection up "netplan-ens18"
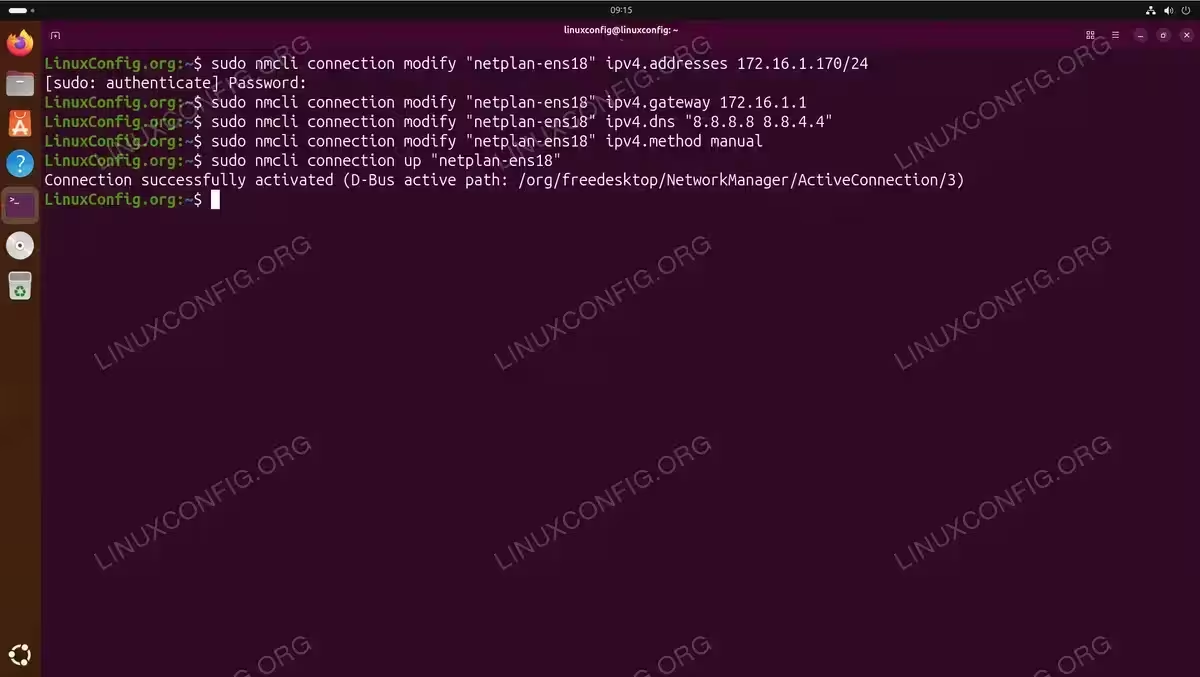
Using nmcli to configure a static IP address on Ubuntu Desktop 26.04
Switching Back to DHCP
To revert to automatic IP assignment:
$ sudo nmcli connection modify "netplan-ens18" ipv4.method auto
$ sudo nmcli connection modify "netplan-ens18" ipv4.addresses ""
$ sudo nmcli connection up "netplan-ens18"
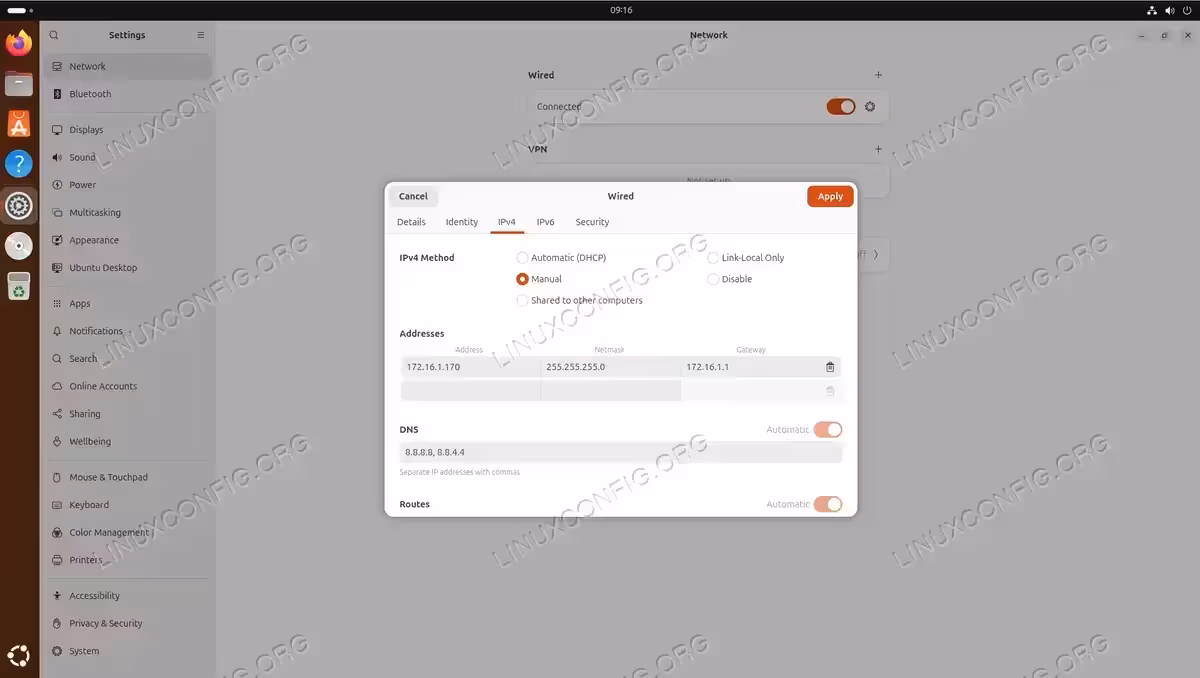
Using the GNOME Settings GUI
For desktop users who prefer graphical configuration:
- Open Settings: Click the system menu in the top-right corner and select the gear icon, or run:
$ gnome-control-center network
- Select your connection: Click on the wired or wireless connection you want to configure.
- Configure IPv4 settings: Click the gear icon next to the connection, navigate to the IPv4 tab, and switch from Automatic (DHCP) to Manual to enter static settings.
- Apply changes: Click Apply and toggle the connection off and on to activate the new settings.
Verifying Network Configuration on Ubuntu 26.04
After configuring your network settings, verify that everything works correctly. Ubuntu 26.04 provides several tools for checking network status.
Checking IP Address Configuration
View your current IP addresses and interface status:
$ ip addr show
For a more concise output showing only IPv4 addresses:
$ ip -4 addr show
Verifying the Default Gateway
Check your routing table to confirm the default gateway:
$ ip route show
The output should include a line starting with default via followed by your gateway address.
Testing DNS Resolution
Verify that DNS is working correctly:
$ resolvectl status
Test name resolution:
$ nslookup ubuntu.com
Testing Connectivity
Verify basic connectivity to your gateway and the internet:
$ ping -c 4 172.16.1.1
$ ping -c 4 8.8.8.8
$ ping -c 4 ubuntu.com
COMPLETED
If all three ping tests succeed, your network configuration is working correctly. The first test verifies local network connectivity, the second confirms internet access, and the third validates DNS resolution.
Troubleshooting Common Network Issues on Ubuntu 26.04
When network configure Ubuntu 26.04 tasks do not work as expected, systematic troubleshooting helps identify the problem quickly.
Interface Not Coming Up
If your network interface is not active:
$ ip link show ens18
$ sudo ip link set ens18 up
Check for Netplan configuration errors:
$ sudo netplan --debug generate
DNS Resolution Failures
If you can ping IP addresses but not hostnames, DNS is likely misconfigured. Check the current DNS configuration:
$ resolvectl status
Temporarily test with a different DNS server:
$ resolvectl dns ens18 8.8.8.8
Netplan YAML Syntax Errors
YAML is sensitive to indentation. Common errors include:
- Using tabs instead of spaces (always use spaces)
- Incorrect indentation levels
- Missing colons after keys
Validate your configuration before applying:
$ sudo netplan --debug generate 2>&1 | head -20
INSTALLATION TIPS
Always use netplan try instead of netplan apply when making changes remotely. This prevents permanent lockouts if you misconfigure network settings, as the changes automatically revert after 120 seconds unless confirmed.
NetworkManager and Netplan Conflicts
On systems where both tools are present, ensure they are not conflicting. Check which renderer Netplan is using:
$ grep renderer /etc/netplan/*.yaml
For desktop systems, the renderer should be NetworkManager. For servers, it should be networkd.
For more detailed information on Netplan configuration options, refer to the official Netplan documentation.
Conclusion
You now know how to configure network settings on Ubuntu 26.04 using both Netplan and NetworkManager. Both server and desktop installations use the same default configuration file, /etc/netplan/00-installer-config.yaml, though desktop users can also choose between the graphical interface and the nmcli command-line tool. Remember to always test your configuration with netplan try before applying changes permanently, especially when working remotely. With these tools and techniques, you can confidently manage static IP addresses, DHCP configurations, DNS settings, and troubleshoot common networking issues on your Ubuntu 26.04 system.
Frequently Asked Questions
- What is the difference between Netplan and NetworkManager on Ubuntu 26.04? Netplan is a configuration abstraction layer that reads YAML files and generates configurations for backend network daemons. NetworkManager is one of those backend daemons, primarily used on desktop installations. On servers, Netplan typically configures systemd-networkd instead. You can think of Netplan as the configuration frontend and NetworkManager as one possible backend that handles the actual network management.
- Where are the network configuration files located on Ubuntu 26.04? Netplan configuration files are stored in
/etc/netplan/with a.yamlextension. The default file created during installation is00-installer-config.yaml. NetworkManager connection profiles are stored in/etc/NetworkManager/system-connections/. The system resolves DNS configuration through/etc/resolv.conf, which is typically managed automatically by systemd-resolved. - How do I find my network interface name on Ubuntu 26.04? Run
ip link showorip addrto list all network interfaces. Common names includeens18,enp0s3, oreth0for Ethernet interfaces andwlan0orwlp2s0for wireless. The naming convention follows predictable network interface names based on hardware location. - Why do my network changes not persist after reboot? Temporary changes made with
ipcommands do not survive reboots. To make persistent changes, you must modify the Netplan YAML configuration files or usenmcli connection modifyfor NetworkManager-managed connections. Always runsudo netplan applyafter editing Netplan files to activate and save your changes. - Can I use both static IP and DHCP on Ubuntu 26.04? Yes, you can configure different interfaces with different methods. For example, your primary Ethernet interface might use a static IP for server access while a secondary interface uses DHCP. Each interface can be configured independently in your Netplan YAML file or through separate NetworkManager connection profiles.