This guide explains how to static ip configure ubuntu 26.04 desktop using graphical and command-line methods. Assigning a static IP address ensures consistent network accessibility and simplifies firewall rules, DNS entries, and service configurations.
Ubuntu 26.04 Resolute Raccoon desktop installations use NetworkManager as the network configuration backend. This article provides working examples using both the nmcli command-line tool and the GNOME graphical interface, so you can configure your static IP regardless of your preferred workflow. For server installations using Netplan, see our dedicated guide on how to configure static IP with Netplan.
Table of Contents
In this tutorial you will learn:
- How to identify your network interface name
- How to set a static IP with NetworkManager and nmcli
- How to assign a static IP through the GNOME Settings GUI
- How to verify your static IP configuration is working
Software Requirements
| Category | Requirements, Conventions or Software Version Used |
|---|---|
| System | Ubuntu 26.04 Resolute Raccoon |
| Software | NetworkManager 1.x, GNOME Settings (gnome-control-center) |
| Other | Privileged access to your Linux system as root or via the sudo command. |
| Conventions | # – requires given linux commands to be executed with root privileges either directly as a root user or by use of sudo command$ – requires given linux commands to be executed as a regular non-privileged user |
| Step | Command/Action |
|---|---|
| 1. List connections | nmcli connection show |
| 2. Set static IP | sudo nmcli connection modify "netplan-ens18" ipv4.addresses 172.16.1.165/24 ipv4.gateway 172.16.1.1 ipv4.method manual |
| 3. Restart connection | sudo nmcli connection up "netplan-ens18" |
Identify Your Network Interface
Before configuring a static IP, you need to know your network interface name. Modern Ubuntu systems use predictable interface names like ens18 or enp0s3 for Ethernet or wlp2s0 for wireless, rather than the legacy eth0 naming convention.
Run the following command to list all network interfaces:
$ ip link show
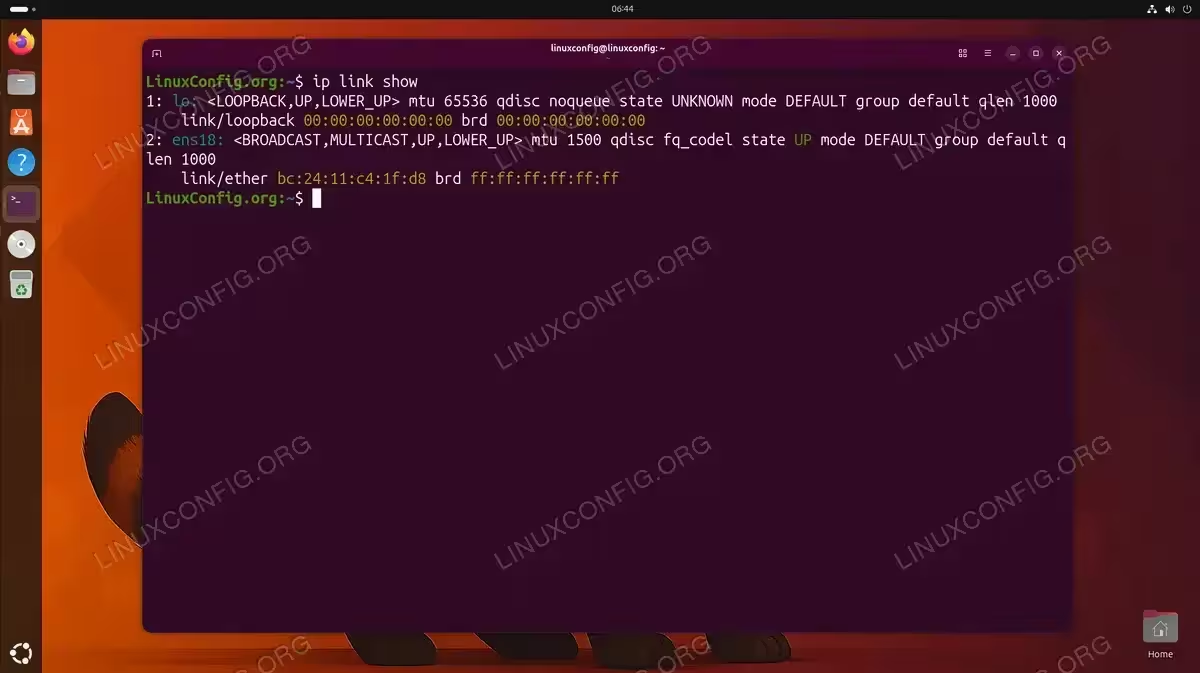
Identify your Ethernet interface from the output (it will not be lo, which is the loopback interface). Note this name, as you will need it for the configuration steps below. To change your IP address from the command line, you will reference this interface name in your configuration.
Configure Static IP with nmcli on Ubuntu 26.04 Desktop
NetworkManager provides the nmcli command-line tool for network configuration. This method works well on Ubuntu desktop installations and offers immediate feedback. You can also use this approach to set a static IP without editing configuration files directly.
In this example, we configure the following static IP settings. Replace these values with settings appropriate for your network.
| Parameter | Example Value |
|---|---|
| Interface | ens18 |
| Connection name | netplan-ens18 |
| Static IP | 172.16.1.165/24 |
| Gateway | 172.16.1.1 |
| DNS servers | 8.8.8.8, 8.8.4.4 |
- List existing connections: Identify the connection name associated with your interface.
$ nmcli connection show
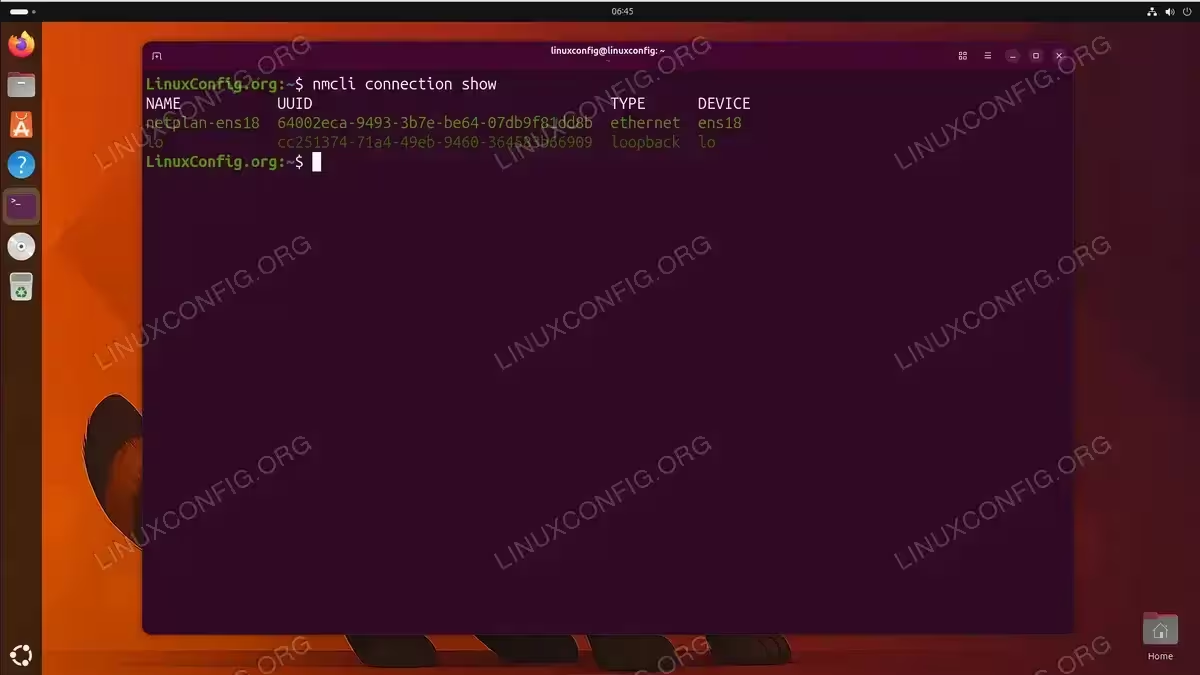
Output of nmcli connection show displaying the connection name netplan-ens18 for the ens18 interface - Modify the connection to use a static IP: Use
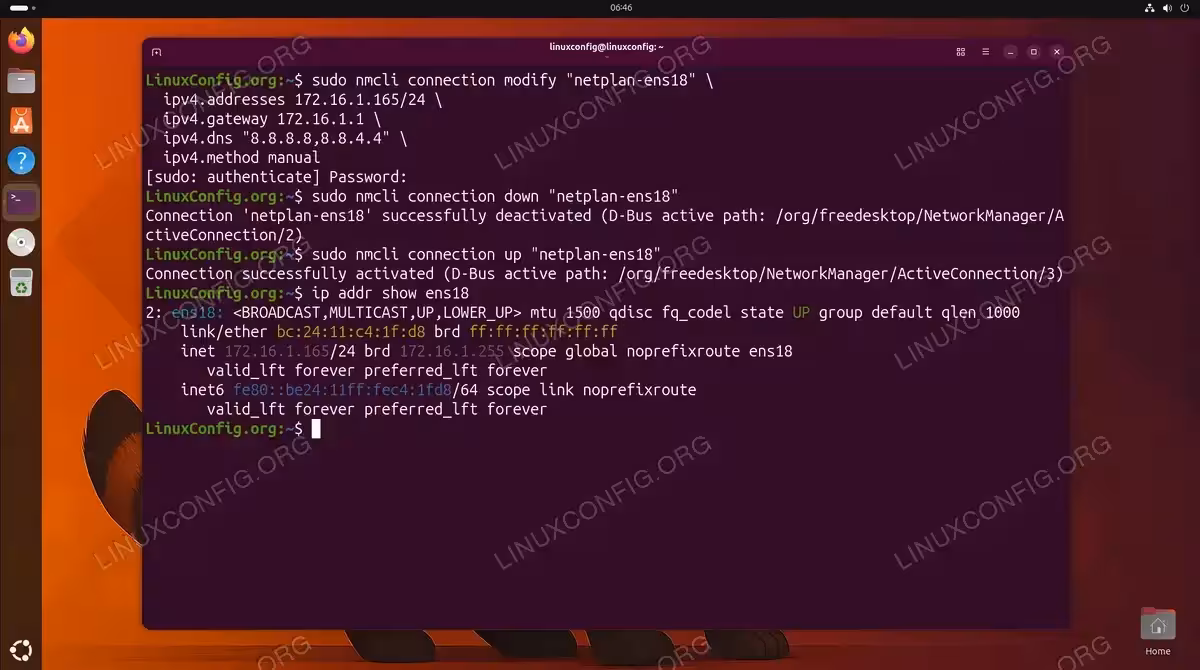
nmclito configure the IP address, gateway, and DNS settings.$ sudo nmcli connection modify "netplan-ens18" \ ipv4.addresses 172.16.1.165/24 \ ipv4.gateway 172.16.1.1 \ ipv4.dns "8.8.8.8,8.8.4.4" \ ipv4.method manual
Replace
netplan-ens18with your actual connection name from step 1, and adjust the IP address, gateway, and DNS servers to match your network. - Restart the connection: Deactivate and reactivate the connection to apply changes.
$ sudo nmcli connection down "netplan-ens18"
$ sudo nmcli connection up "netplan-ens18"
The configuration persists across reboots. NetworkManager stores connection profiles in /etc/NetworkManager/system-connections/ as keyfile-format files.
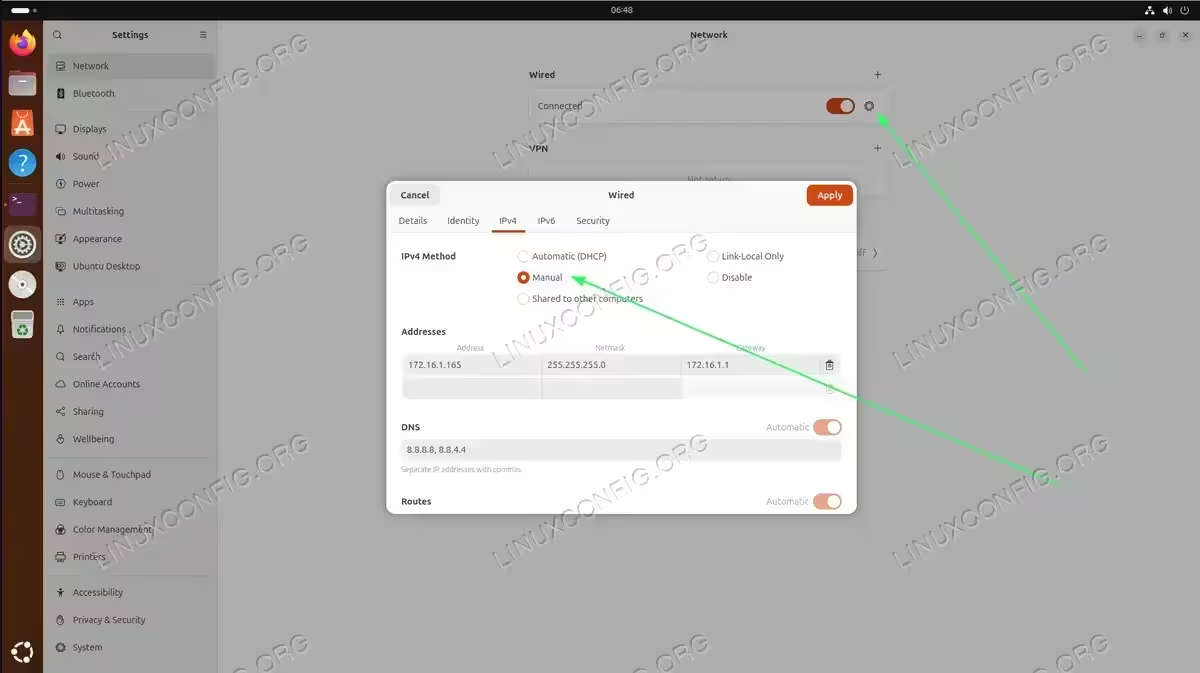
Configure Static IP via GNOME GUI
Ubuntu 26.04 desktop users can configure a static IP through the GNOME Settings application without touching the command line.
- Open Network Settings: Click the system menu in the top-right corner, then click the gear icon to open Settings. Navigate to Network (for wired) or Wi-Fi (for wireless connections).
- Access connection settings: Click the gear icon next to your active connection to open its settings dialog.
- Configure IPv4 settings: Select the IPv4 tab and change the Method from “Automatic (DHCP)” to “Manual”. Click Add and enter your desired IP address (e.g., 172.16.1.165), netmask (e.g., 255.255.255.0), and gateway (e.g., 172.16.1.1). Enter DNS servers in the DNS field, separated by commas (e.g., 8.8.8.8, 8.8.4.4).
- Apply the configuration: Click Apply. You may need to toggle the connection off and on, or disconnect and reconnect for changes to take effect.
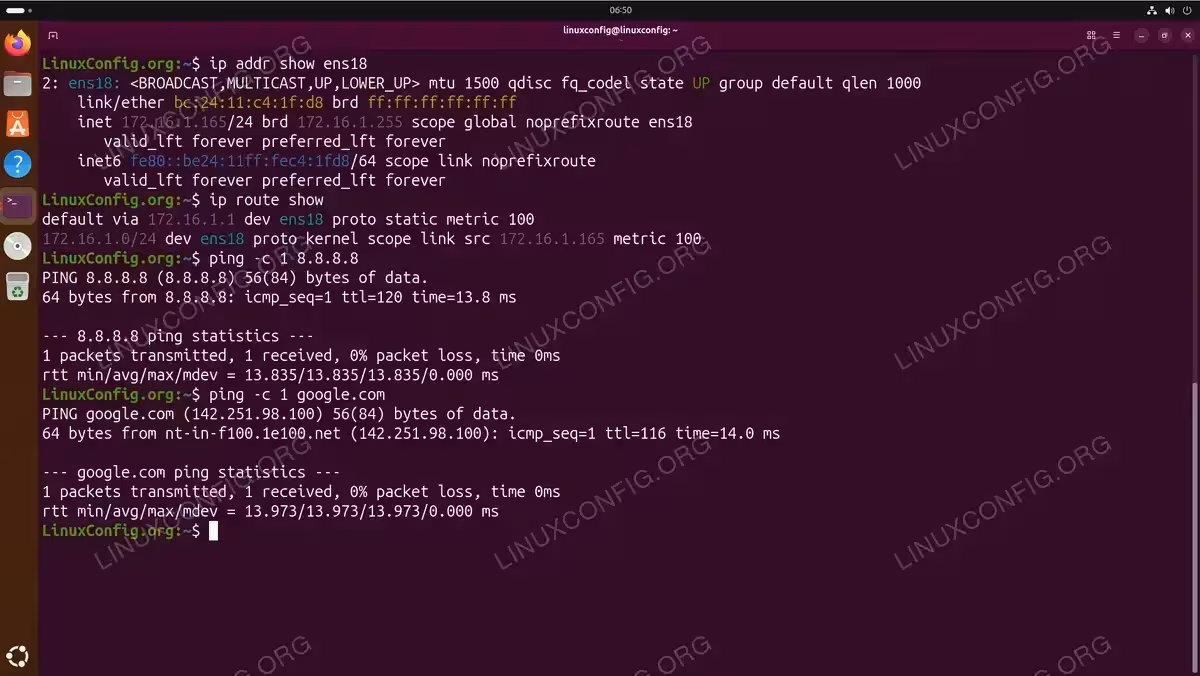
Verify Your Configuration
After configuring your static IP using any method, verify the settings are correctly applied.
- Check the assigned IP address: Confirm your interface has the expected IP.
$ ip addr show ens18
Look for the
inetline showing your static IP address. The absence of the worddynamicconfirms this is a static assignment. - Verify the default gateway: Ensure the routing table includes your gateway.
$ ip route show
You should see a line starting with
default viafollowed by your gateway address. - Test network connectivity: Ping an external host to confirm internet access.
$ ping -c 4 8.8.8.8
- Test DNS resolution: Verify name resolution is working.
$ ping -c 4 google.com
If this fails but the previous ping succeeded, check your DNS configuration.
For more details on managing network connections, see the official NetworkManager documentation.
Conclusion
You have learned how to static ip configure ubuntu 26.04 desktop using two methods: nmcli for command-line network management and the GNOME GUI for a graphical approach. Both methods use NetworkManager as the backend and create persistent configurations that survive reboots.
Command-line users may prefer nmcli for its scriptability and precision, while the GNOME interface offers an intuitive point-and-click experience. Regardless of your choice, always verify your configuration and test connectivity after making changes. For server installations, see our guide on how to configure static IP with Netplan.
Frequently Asked Questions
- What happens if I configure the wrong static IP address? If you assign an IP that conflicts with another device or is outside your network range, you may lose network connectivity. You can always access GNOME Settings or use nmcli from a local terminal to correct the configuration. If you lose GUI access, boot into recovery mode or use a live USB to fix the settings.
- Where does NetworkManager store connection profiles? NetworkManager stores connection profiles in
/etc/NetworkManager/system-connections/as keyfile-format files. You can view and edit these files directly, though using nmcli or the GUI is recommended to avoid syntax errors. - How do I revert to DHCP after setting a static IP? Using nmcli, run
sudo nmcli connection modify "netplan-ens18" ipv4.method autoand thensudo nmcli connection up "netplan-ens18"(replace with your connection name). In GNOME Settings, simply change the IPv4 method back to “Automatic (DHCP)” and click Apply. - Can I assign multiple static IP addresses to one interface? Yes. With nmcli, use a comma-separated list in the ipv4.addresses field or use the
+ipv4.addressessyntax to append additional addresses. This is useful for hosting multiple services or virtual hosts on the same machine.