Managing your firewall through a graphical interface simplifies the process of securing your Ubuntu 26.04 system, especially for users who prefer visual tools over the command line. GUFW (Graphical Uncomplicated Firewall) provides an intuitive frontend for the UFW firewall, allowing you to enable protection, create rules, and monitor activity without memorizing terminal commands. In this tutorial, you will learn how to install and configure the firewall GUI on Ubuntu 26.04 to manage incoming and outgoing network traffic effectively.
Table of Contents
In this tutorial you will learn:
- How to install and launch the GUFW firewall GUI on Ubuntu 26.04
- How to navigate the GUFW interface and understand its main components
- How to enable and disable the firewall using the graphical toggle
- How to create allow, deny, and reject rules for ports and applications
- How to switch between firewall profiles for different network environments
- How to monitor active rules and review firewall logs
Software Requirements
| Category | Requirements, Conventions or Software Version Used |
|---|---|
| System | Ubuntu 26.04 Resolute Raccoon |
| Software | GUFW (graphical UFW frontend), UFW (Uncomplicated Firewall) |
| Other | Privileged access to your Linux system as root or via the sudo command. A working desktop environment (GNOME, KDE, Xfce, or similar). |
| Conventions | # – requires given linux commands to be executed with root privileges either directly as a root user or by use of sudo command$ – requires given linux commands to be executed as a regular non-privileged user |
| Step | Command/Action |
|---|---|
| 1. Install GUFW | sudo apt install gufw |
| 2. Launch GUFW | Open from application menu or run gufw |
| 3. Enable firewall | Toggle the Status switch to ON |
| 4. Add rules | Click Rules tab, then + to add allow/deny rules |
Installing GUFW on Ubuntu 26.04
GUFW is not installed by default on Ubuntu 26.04, but it is available in the official repositories. UFW itself comes pre-installed on Ubuntu Desktop, so you only need to add the graphical frontend. Before installing, update your package index to ensure you get the latest version.
- Update the package index: Refresh your local package database to pull in the latest repository metadata.
$ sudo apt update
- Install the GUFW package: Install the graphical firewall frontend along with any required dependencies.
$ sudo apt install gufw
This command installs GUFW and, if not already present, ensures UFW is also installed as a dependency.
- Launch GUFW from the application menu: After installation, search for “Firewall Configuration” in your desktop application menu. GUFW appears with a shield icon. Alternatively, launch it from the terminal:
$ gufw
Since GUFW requires administrative privileges to modify firewall rules, you will be prompted for your password upon launch.
IMPORTANT
If you are running Ubuntu Server without a desktop environment, GUFW will not be useful. Instead, use the UFW command-line interface directly. Refer to our guide on how to configure firewall settings for CLI-based management.
Understanding the GUFW Interface
When you first open GUFW, you are presented with a clean interface divided into several key areas. Understanding these components is essential before you begin configuring your firewall GUI on Ubuntu 26.04.
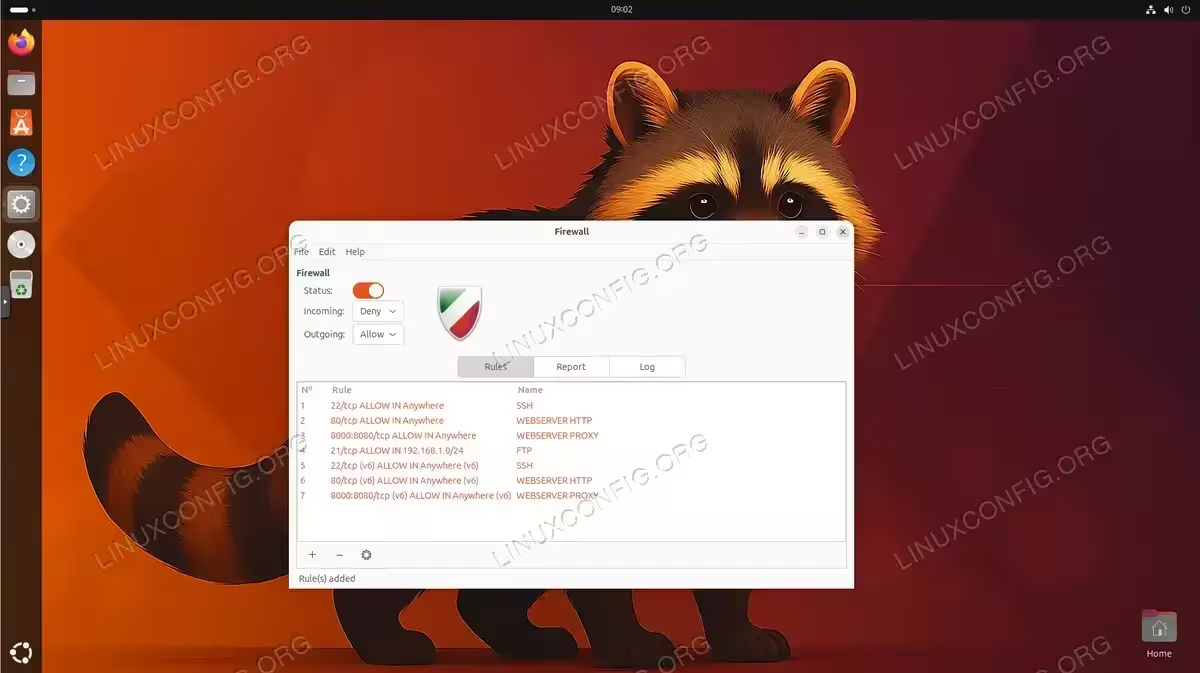
The main GUFW window consists of the following elements:
Status toggle – Located at the top of the window, this switch enables or disables the UFW firewall. When the toggle is OFF, no firewall rules are active and all traffic is permitted.
Profile selector – A dropdown menu that lets you switch between pre-defined profiles: Home, Office, and Public. Each profile can maintain its own set of rules, allowing you to quickly adapt your firewall posture based on your current network environment.
Incoming/Outgoing defaults – Two dropdown selectors that define the default policy for incoming and outgoing traffic. The standard configuration denies all incoming connections while allowing all outgoing connections. This means your system can initiate connections freely, but unsolicited inbound requests are blocked unless you create specific allow rules.
Rules tab – Displays all currently configured firewall rules. From here you can add, edit, or remove individual rules.
Report tab – Shows a listening report that displays currently active network services and their associated ports.
Log tab – Provides access to the firewall log, which records blocked and allowed connections based on your logging preferences.
Enabling and Disabling the Firewall via GUI
Controlling the firewall state through GUFW is straightforward. The Status toggle at the top of the window acts as the master switch for all firewall functionality.
- Enable the firewall: Click the Status toggle to switch it to the ON position. The shield icon changes color to indicate the firewall is active. Behind the scenes, GUFW executes the equivalent of
sudo ufw enable, which also configures the firewall to start automatically at boot. - Verify the firewall state: Once enabled, the GUFW window displays the active profile and default policies. You can also confirm the state from the terminal:
$ sudo ufw status verbose
This command shows the current status, default policies, and any configured rules.
- Disable the firewall: To temporarily turn off all firewall protection, toggle the Status switch back to OFF. This is equivalent to running
sudo ufw disable. All rules remain saved but are no longer enforced.
SECURITY ALERT
Disabling the firewall exposes all network services on your system to incoming connections. Only disable the firewall temporarily for troubleshooting, and re-enable it as soon as possible. You can check your firewall status at any time to confirm protection is active.

Configuring Firewall Rules with the Firewall GUI on Ubuntu 26.04
The core purpose of GUFW is to create rules that control which network connections are permitted or blocked. GUFW offers three methods for adding rules: preconfigured application rules, simple port-based rules, and advanced rules with full control over protocol, direction, and IP addresses.
Adding Preconfigured Application Rules
GUFW includes a library of preconfigured application profiles that automatically set the correct ports and protocols for common services.
- Open the rules dialog: Click the Rules tab, then click the + button at the bottom of the window to open the Add Rule dialog.
- Select the Preconfigured tab: Choose your desired policy (Allow, Deny, Reject, or Limit), the direction (In, Out, or Both), and then select an application from the dropdown. For example, selecting “SSH” automatically configures a rule for port 22/tcp.
- Add the rule: Click Add to create the rule. It appears immediately in the Rules list and takes effect without restarting the firewall.
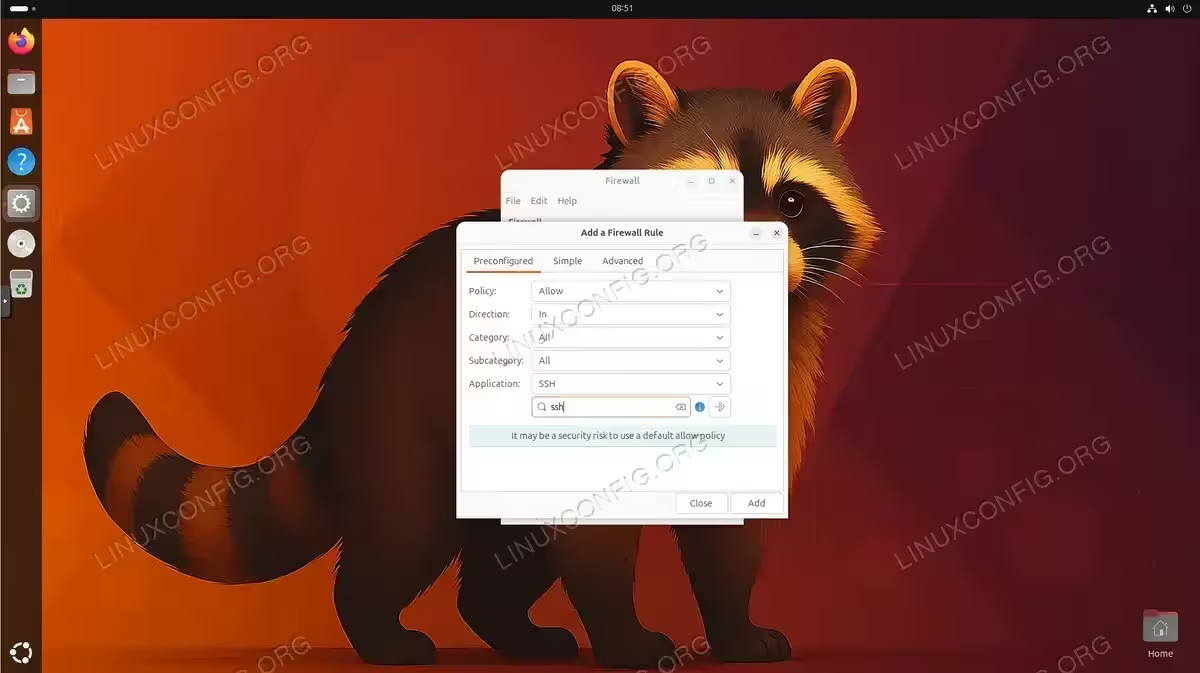
Using the GUFW Preconfigured tab to add an allow rule for the SSH application on Ubuntu 26.04
Adding Simple Port Rules
For services not included in the preconfigured list, use the Simple tab to specify ports manually.
- Switch to the Simple tab: In the Add Rule dialog, click Simple.
- Configure the rule: Set the policy (Allow/Deny/Reject/Limit), direction (In/Out/Both), protocol (TCP/UDP/Both), and enter the port number. For example, to allow a specific port for a web server, enter
80with TCP protocol and Allow policy.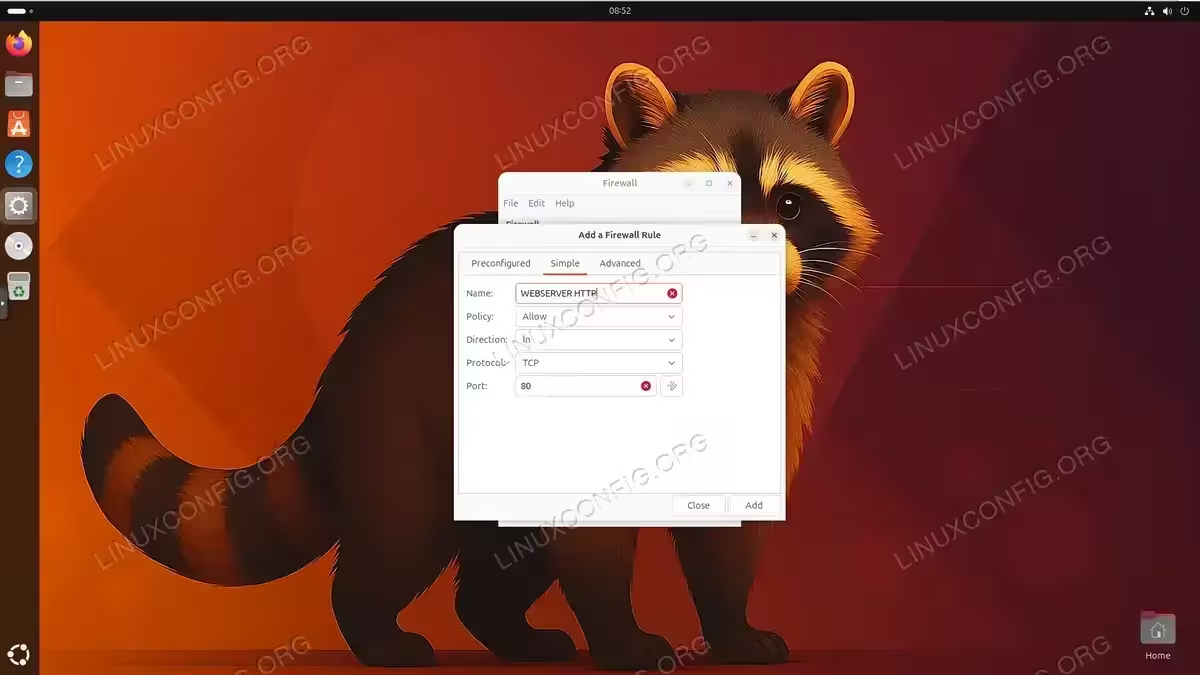
Creating a simple allow rule for incoming HTTP traffic on port 80 using the GUFW Simple tab on Ubuntu 26.04 - Add multiple ports: You can specify a port range using a colon separator. For instance,
8000:8080opens all ports from 8000 through 8080.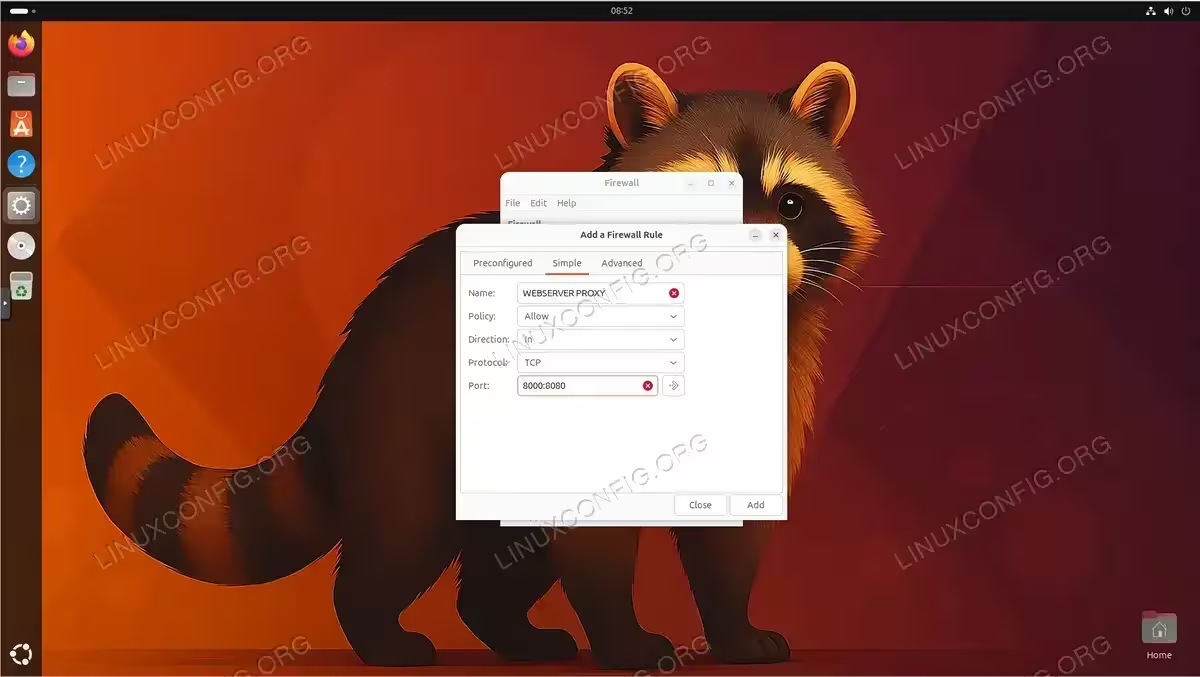
Creating a simple allow rule for incoming TCP traffic on port range 8000 through 8080 using the GUFW Simple tab on Ubuntu 26.04
Adding Advanced Rules
The Advanced tab provides granular control over firewall rules, including source and destination IP filtering.
- Switch to the Advanced tab: Click Advanced in the Add Rule dialog.
- Define rule parameters: The Advanced tab exposes all available rule options. Configure each field to match your requirements. For example, to allow FTP access only from your local network:
- Name: FTP
- Insert: 0 (appends to end of rule list; use a specific number to insert at a given position)
- Policy: Allow
- Direction: In
- Interface: All Interfaces
- Log: Do not Log
- Protocol: TCP
- From: 192.168.1.0/24, Port: (leave blank – client source port is random)
- To: (leave IP blank for any destination), Port: 21
- Apply the rule: Click Add to create the rule. Advanced rules are particularly useful for restricting service access to trusted networks only.
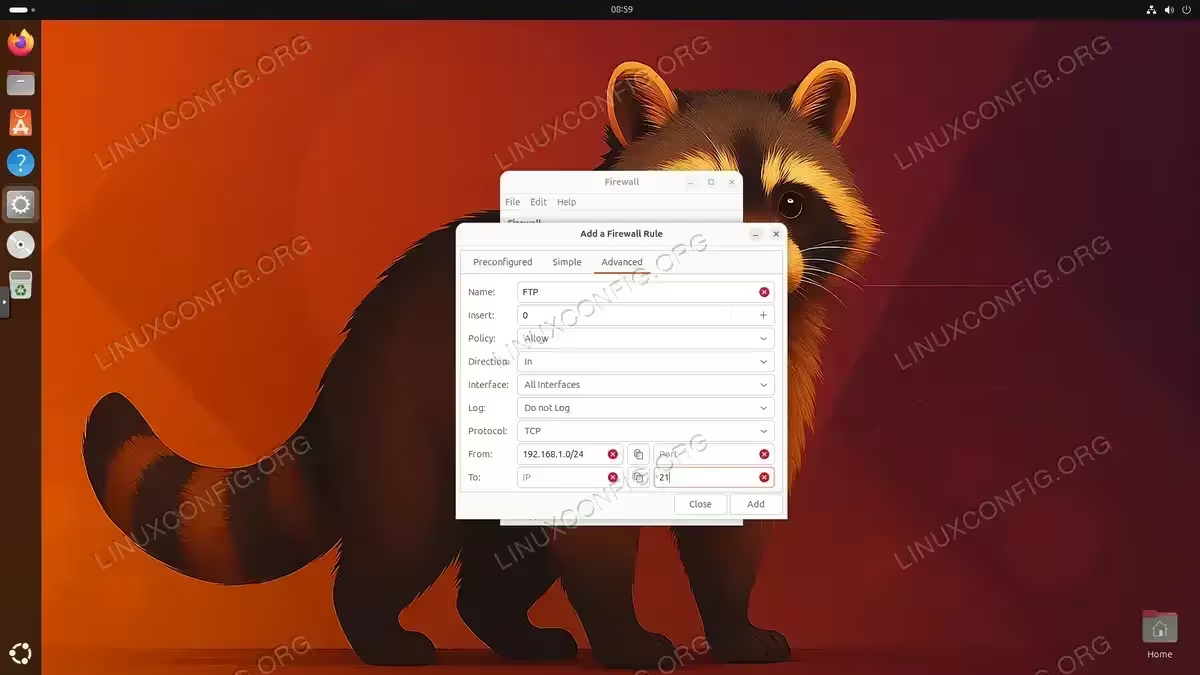
Creating an advanced allow rule for incoming FTP traffic restricted to the 192.168.1.0/24 subnet using the GUFW Advanced tab on Ubuntu 26.04
Editing and Removing Rules
To modify an existing rule, select it in the Rules list and click the gear icon. To delete a rule, select it and click the – (minus) button. Changes take effect immediately. You can verify the current rule set from the terminal to check your active firewall rules.
Managing Firewall Profiles
GUFW provides three built-in profiles that let you maintain separate rule configurations for different network environments. This is particularly useful if you use your Ubuntu 26.04 system across multiple networks, such as a trusted home network and an untrusted public Wi-Fi.
The available profiles are:
Home – Designed for trusted networks where you may want to allow file sharing, media streaming, or other local services. This is the default profile.
Office – Suitable for corporate or semi-trusted environments. You might allow specific work-related services while keeping tighter restrictions than the Home profile.
Public – The most restrictive profile, intended for use on untrusted networks like coffee shops or airports. Typically configured to deny all incoming connections with minimal exceptions.
To switch profiles, select the desired profile from the dropdown at the top of the GUFW window. Each profile maintains its own independent set of rules and default policies. When you add or remove rules, those changes apply only to the currently active profile.
INSTALLATION TIPS
Profile switching does not happen automatically based on your network connection. You must manually select the appropriate profile when you change environments. Consider setting the Public profile as your default and switching to Home or Office only when connected to trusted networks.
Monitoring Firewall Activity
Monitoring your firewall helps you understand what traffic is being blocked or allowed and can assist with troubleshooting connectivity issues. GUFW provides two monitoring tools: the listening report and the firewall log.
Viewing the Listening Report
Click the Report tab to see a real-time overview of all services currently listening for connections on your system. The report displays the protocol, port number, IP address, and application name for each listening service. This helps you identify services that may need firewall rules and spot any unexpected listeners.
Reviewing Firewall Logs
The Log tab displays recent firewall events based on your configured logging level. To enable or adjust logging, use the Edit menu and select Preferences. The available logging levels are:
- Off – No logging (not recommended for production systems)
- Low – Logs blocked packets that do not match the default policy
- Medium – Logs blocked packets plus invalid packets and new connections
- High – Logs medium-level events plus rate-limited packets
- Full – Logs all events without rate limiting (may impact performance)
For most users, the Low or Medium logging level provides sufficient information for troubleshooting without generating excessive log entries. The firewall log is also accessible from the terminal at /var/log/ufw.log, which is useful for more advanced analysis or scripting.
You can further explore your firewall configuration by learning how to set up your firewall for specific deployment scenarios, such as web servers or database hosts.
Conclusion
GUFW makes firewall management on Ubuntu 26.04 accessible to users of all skill levels. By providing a visual interface for UFW, it removes the need to remember specific command syntax while offering the same level of control. You have learned how to install GUFW, navigate its interface, enable and disable firewall protection, create rules using preconfigured, simple, and advanced methods, switch between profiles for different network environments, and monitor firewall activity through logs and reports.
For users who need more fine-grained control or plan to manage firewalls on headless servers, consider learning the UFW command-line interface as well. The GUI and CLI work on the same underlying UFW framework, so rules created in one tool are visible in the other. Visit the official Ubuntu UFW documentation for additional reference material and advanced configuration scenarios.
Frequently Asked Questions
- What is the difference between GUFW and UFW on Ubuntu 26.04? UFW (Uncomplicated Firewall) is the command-line firewall management tool that ships with Ubuntu. GUFW is a graphical frontend that provides a point-and-click interface for UFW. Both tools manage the same underlying iptables/nftables rules, so any rule you create in GUFW is also visible when running
sudo ufw statusin the terminal, and vice versa. - Do GUFW firewall rules persist after a reboot? Yes. When you enable the firewall through GUFW and add rules, those rules are saved to the UFW configuration files in
/etc/ufw/. The firewall and all its rules are automatically restored at every system boot. You do not need to re-apply rules after restarting your Ubuntu 26.04 system. - How do I reset all firewall rules to the default state? You can reset the firewall from the terminal by running
sudo ufw reset. This removes all custom rules and disables the firewall. After the reset, open GUFW again, re-enable the firewall, and add only the rules you need. There is no built-in reset button within the GUFW interface itself. - Can I use GUFW on Ubuntu Server without a desktop environment? GUFW requires a graphical desktop environment to run. If you are managing Ubuntu Server via a terminal or SSH session, use the UFW command-line tool instead. Our guide on firewall settings covers the CLI approach in detail. Alternatively, you can install a lightweight desktop environment and use X11 forwarding over SSH to run GUFW remotely.
- What does the “Limit” rule policy do in GUFW? The Limit policy is a rate-limiting rule that allows connections but restricts the frequency from a single IP address. Specifically, it denies connections if an IP address attempts more than 6 connections within 30 seconds. This is particularly useful for protecting services like SSH from brute-force login attempts while still allowing legitimate access.