Nginx is one of the most widely used web servers in the world, known for its high performance, stability, and low resource consumption. Whether you need to serve static content, run server blocks for multiple domains, or act as a reverse proxy for backend applications, Nginx is an excellent choice. In this tutorial, you will learn how to install and configure Nginx on Ubuntu 26.04 Resolute Raccoon from start to finish.
Table of Contents
In this tutorial you will learn:
- How to install Nginx on Ubuntu 26.04
- How Nginx organizes its configuration files and directories
- How to create and enable server blocks for multiple websites
- How to configure Nginx as a reverse proxy
- How to apply basic performance tuning settings
- How to open firewall ports to allow web traffic

Software Requirements
| Category | Requirements, Conventions or Software Version Used |
|---|---|
| System | Ubuntu 26.04 Resolute Raccoon |
| Software | Nginx |
| Other | Privileged access to your Linux system as root or via the sudo command. |
| Conventions | # – requires given linux commands to be executed with root privileges either directly as a root user or by use of sudo command$ – requires given linux commands to be executed as a regular non-privileged user |
| Step | Command/Action |
|---|---|
| 1. Install Nginx | $ sudo apt install nginx |
| 2. Start and enable Nginx | $ sudo systemctl enable --now nginx |
| 3. Create server block config | $ sudo nano /etc/nginx/sites-available/linuxconfig.conf |
| 4. Enable the server block | $ sudo ln -s /etc/nginx/sites-available/linuxconfig.conf /etc/nginx/sites-enabled/ |
Installing Nginx on Ubuntu 26.04
Nginx is available in the default Ubuntu 26.04 repositories, so the installation is straightforward. Before you begin, update your package index to ensure you are pulling the latest available version.
- Update the package index: Refresh the local package database so that
aptis aware of the most recent packages.$ sudo apt update
- Install Nginx: Install the Nginx package along with its dependencies.
$ sudo apt install nginx
- Start and enable the service: Ensure Nginx starts immediately and also launches automatically on every reboot.
$ sudo systemctl enable --now nginx
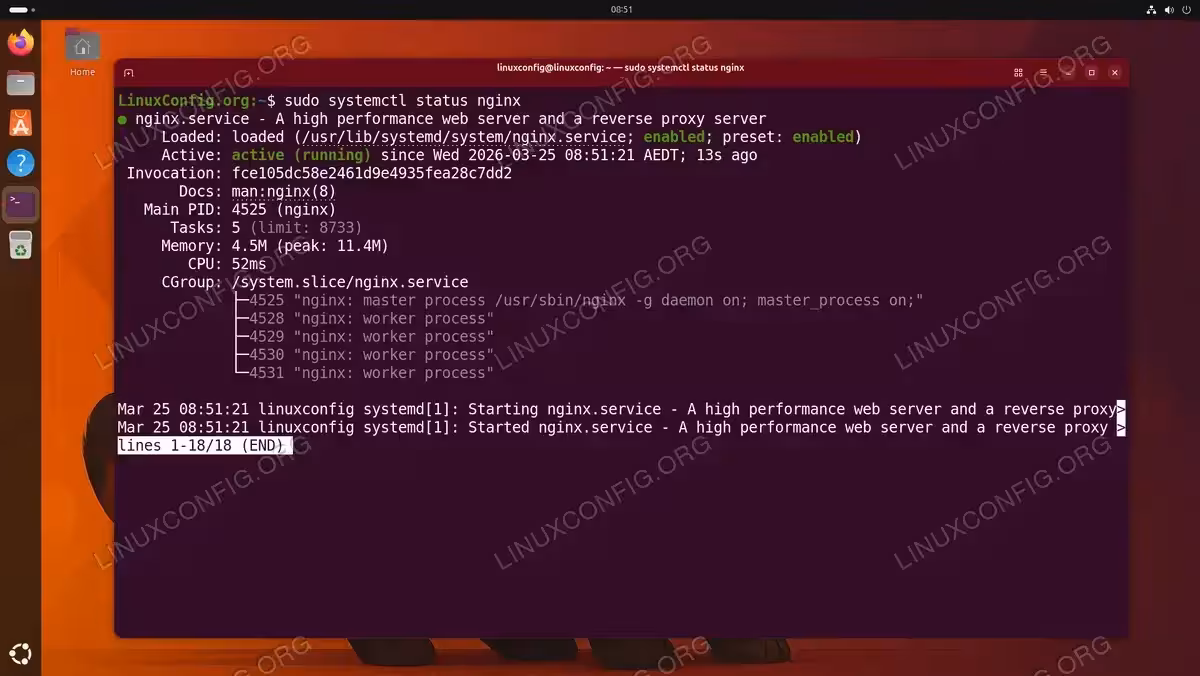
- Verify the service is running: Confirm that Nginx is active and responding.
$ sudo systemctl status nginx
You should see
active (running)in the output.
At this point, you can verify the installation by opening a web browser and navigating to your server’s IP address, for example http://192.168.1.100. You should see the default Nginx welcome page.
Understanding the Nginx File Structure
Before you start editing configurations, it is important to understand how Nginx organizes its files on Ubuntu 26.04. Familiarizing yourself with these directories will help you manage your web server more effectively.
| Path | Purpose |
|---|---|
/etc/nginx/nginx.conf |
Main Nginx configuration file. Controls global settings such as worker processes and connections. |
/etc/nginx/sites-available/ |
Stores all server block configuration files. Files here are not active until linked. |
/etc/nginx/sites-enabled/ |
Contains symbolic links to active server block files in sites-available. |
/etc/nginx/conf.d/ |
Alternative location for configuration snippets that are automatically included. |
/var/www/html/ |
Default document root serving the Nginx welcome page. |
/var/log/nginx/access.log |
Logs all incoming requests to the server. |
/var/log/nginx/error.log |
Records errors and diagnostic messages. |
The key pattern to understand is the relationship between sites-available and sites-enabled. You create your server block configuration in sites-available and then activate it by creating a symbolic link in sites-enabled. This approach allows you to disable a site without deleting its configuration.
Configuring Nginx Server Blocks on Ubuntu 26.04
Server blocks (similar to Apache virtual hosts) allow you to host multiple websites on a single Nginx server. Each server block defines settings for a specific domain. In this section, you will configure Nginx server blocks on Ubuntu 26.04 for a sample domain.
- Create the document root: Create a directory to hold the website files for your domain. Replace
linuxconfig.orgwith your actual domain if needed.$ sudo mkdir -p /var/www/linuxconfig.org/html
- Set ownership: Assign ownership to the regular user so that you can manage files without
sudo.$ sudo chown -R $USER:$USER /var/www/linuxconfig.org/html
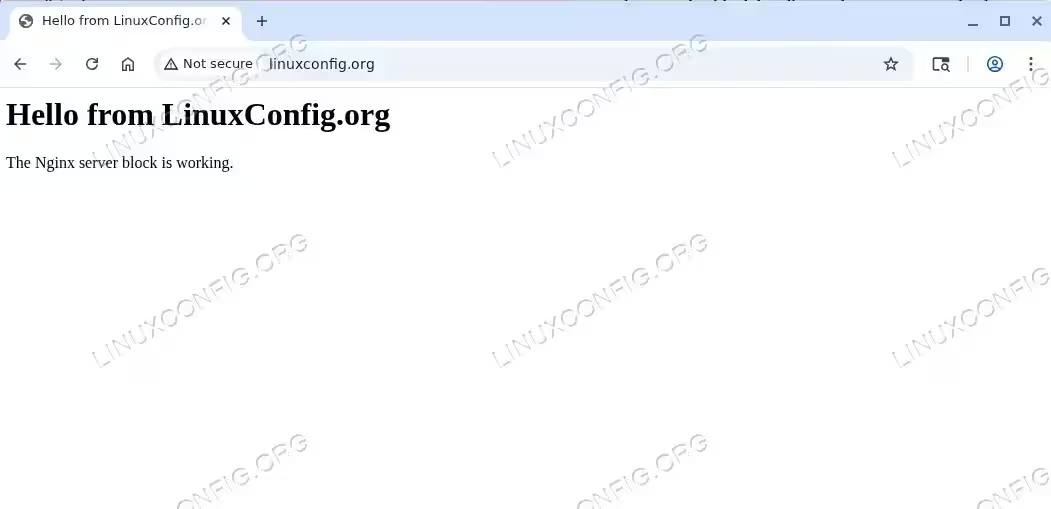
- Create a sample index page: Add a simple HTML file to verify the server block works.
$ nano /var/www/linuxconfig.org/html/index.html
Add the following content:
<html> <head> <title>Hello from LinuxConfig.org</title> </head> <body> <h1>Hello from LinuxConfig.org</h1> <p>The Nginx server block is working.</p> </body> </html> - Create the server block configuration: Create a new configuration file in
sites-available.$ sudo nano /etc/nginx/sites-available/linuxconfig.conf
Add the following configuration:
server {
    listen 80;
    listen [::]:80;

    server_name linuxconfig.org www.linuxconfig.org;
    root /var/www/linuxconfig.org/html;
    index index.html index.htm;

    location / {
        try_files $uri $uri/ =404;
    }
}
The
listendirectives tell Nginx to listen on port 80 for both IPv4 and IPv6. Theserver_namedirective specifies which domains this block handles, androotpoints to the document root you created earlier. - Enable the server block: Create a symbolic link from
sites-availabletosites-enabled.$ sudo ln -s /etc/nginx/sites-available/linuxconfig.conf /etc/nginx/sites-enabled/
- Test the configuration: Always test the Nginx configuration for syntax errors before reloading.
$ sudo nginx -t
You should see a message confirming that the syntax is OK and the test is successful.
- Reload Nginx: Apply the changes by reloading the service.
$ sudo systemctl reload nginx
IMPORTANT
If you plan to host multiple domains, it is recommended to uncomment or add the server_names_hash_bucket_size 64; directive inside the http block of /etc/nginx/nginx.conf. This prevents potential issues with long domain names.
You can now navigate to your domain in a browser to verify that the custom page loads. If you are testing locally, add an entry to your /etc/hosts file mapping the domain to your server’s IP address.
IMPORTANT
Note that accessing the server by its IP address (e.g. http://192.168.1.100) will still show the default Nginx welcome page. This is expected because your server block is configured with a specific server_name directive. Nginx matches incoming requests by the Host header, so only requests for the configured domain name will be served by your custom server block.

Setting Up Nginx as a Reverse Proxy
Nginx is frequently used as a reverse proxy, sitting in front of backend applications such as Node.js, Python, or Java services. The reverse proxy forwards incoming client requests to the backend and returns the response. This setup provides benefits such as load distribution, SSL termination, and caching.
To demonstrate this in practice, you will create a simple backend application using Python’s built-in HTTP server and then configure Nginx to proxy requests to it.
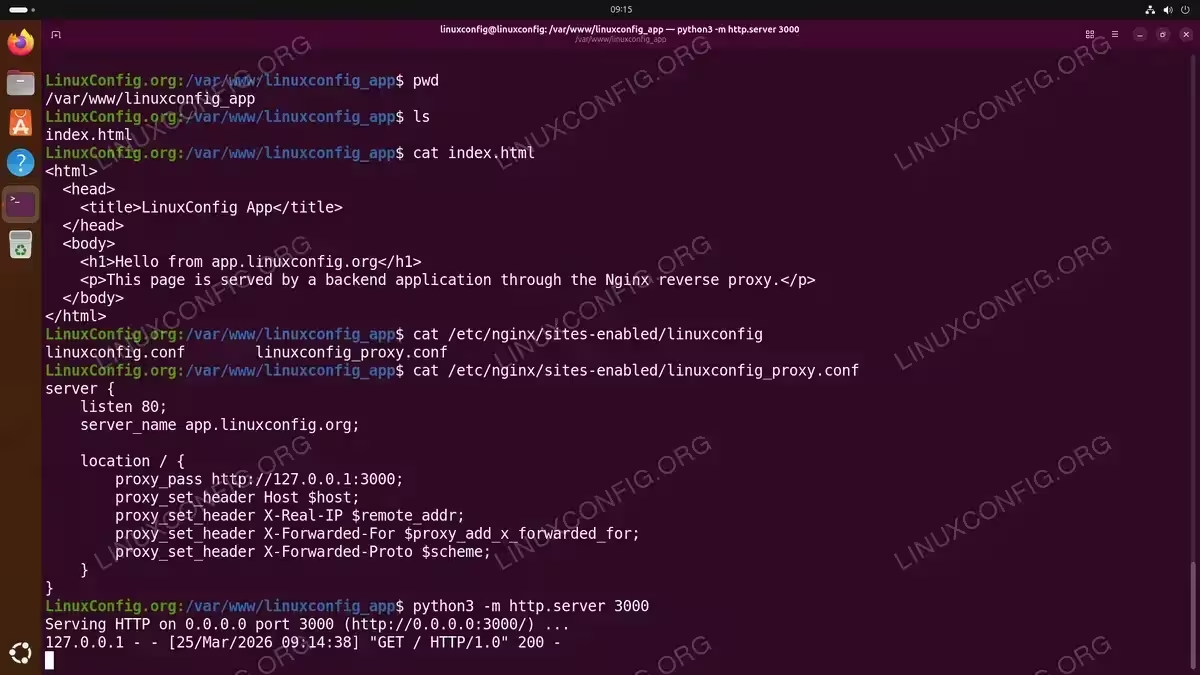
- Create the backend application directory and page: Set up a simple HTML page that the backend will serve.
$ mkdir -p /var/www/linuxconfig_app
$ nano /var/www/linuxconfig_app/index.html
Add the following content:
<html> <head> <title>LinuxConfig App</title> </head> <body> <h1>Hello from app.linuxconfig.org</h1> <p>This page is served by a backend application through the Nginx reverse proxy.</p> </body> </html> - Start the backend server: Use Python’s built-in HTTP server to serve the page on port 3000.
$ cd /var/www/linuxconfig_app
$ python3 -m http.server 3000
Leave this terminal open. The server will keep running in the foreground.
- Create the reverse proxy server block: Open a new terminal and create the Nginx configuration that forwards requests to the backend.
$ sudo nano /etc/nginx/sites-available/linuxconfig_proxy.conf
Add the following content:
server {
    listen 80;
    server_name app.linuxconfig.org;

    location / {
        proxy_pass http://127.0.0.1:3000;
        proxy_set_header Host $host;
        proxy_set_header X-Real-IP $remote_addr;
        proxy_set_header X-Forwarded-For $proxy_add_x_forwarded_for;
        proxy_set_header X-Forwarded-Proto $scheme;
    }
}
The
proxy_passdirective tells Nginx where to forward requests. Theproxy_set_headerdirectives ensure that the backend application receives the original client information rather than seeing all requests as coming from127.0.0.1. Consequently, your application can correctly log client IPs and handle redirects. - Enable and activate the configuration: Create the symbolic link, test, and reload.
$ sudo ln -s /etc/nginx/sites-available/linuxconfig_proxy.conf /etc/nginx/sites-enabled/
$ sudo nginx -t
$ sudo systemctl reload nginx
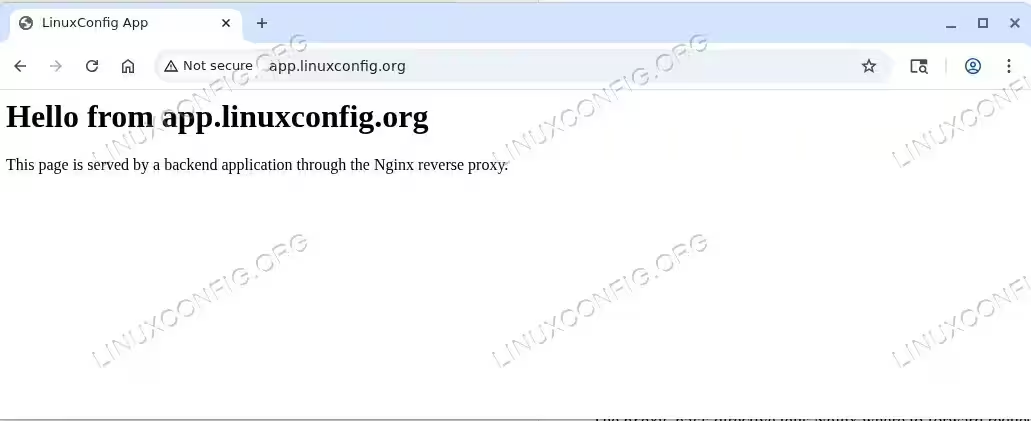
- Test the reverse proxy: Add
app.linuxconfig.orgto your/etc/hostsfile pointing to the server’s IP address, then openhttp://app.linuxconfig.orgin a browser. You should see the page served through the Nginx reverse proxy.
Basic Nginx Performance Tuning
Nginx performs well out of the box, but a few adjustments to the main configuration file can improve throughput and reduce latency, especially on busy servers. Open the main configuration file to make changes:
$ sudo nano /etc/nginx/nginx.conf
Worker Processes and Connections
The worker_processes directive controls how many worker processes Nginx spawns. Setting it to auto matches the number of available CPU cores, which is typically the optimal choice.
worker_processes auto;Inside the events block, the worker_connections directive sets the maximum number of simultaneous connections each worker process can handle. A value of 1024 is a reasonable default for most servers.
events {
    worker_connections 1024;
}
Enabling Gzip Compression
Gzip compression reduces the size of data transmitted to clients, resulting in faster page loads. Add or modify the following directives inside the http block:
gzip on;
gzip_vary on;
gzip_min_length 256;
gzip_types text/plain text/css application/json application/javascript text/xml application/xml application/xml+rss text/javascript;
This configuration enables compression for common text-based content types while skipping files smaller than 256 bytes, where compression overhead outweighs the benefit.
Keepalive Connections
Keepalive connections allow the browser to reuse a single TCP connection for multiple requests, reducing latency. The following directive inside the http block sets the timeout:
keepalive_timeout 65;After making changes, test and reload:
$ sudo nginx -t
$ sudo systemctl reload nginx
For additional tuning options, refer to the official Nginx documentation.
Opening Firewall Ports for Nginx
If UFW is enabled on your Ubuntu 26.04 system, you need to allow the appropriate ports with UFW so that web traffic can reach Nginx. Nginx registers application profiles with UFW during installation, which makes this step simple.
- List available Nginx profiles: Check which application profiles are registered.
$ sudo ufw app list
You should see entries for
Nginx Full,Nginx HTTP, andNginx HTTPS. - Allow HTTP and HTTPS traffic: To allow both port 80 and port 443, use the
Nginx Fullprofile.$ sudo ufw allow 'Nginx Full'
Alternatively, if you only need HTTP for now:
$ sudo ufw allow 'Nginx HTTP'
- Verify the firewall rules: Confirm that the rules have been added successfully.
$ sudo ufw status
If you prefer to open firewall ports by number instead of using application profiles, you can allow ports 80 and 443 directly with sudo ufw allow 80/tcp and sudo ufw allow 443/tcp.
Conclusion
You have successfully installed and configured Nginx on Ubuntu 26.04. Throughout this tutorial, you learned how to install the web server, understand its file structure, set up server blocks for hosting multiple sites, configure a reverse proxy, apply basic performance tuning, and open the necessary firewall ports. Nginx is now ready to serve your websites and applications. From here, you can extend this setup with SSL/TLS certificates, load balancing, or more advanced caching strategies to further enhance your deployment.
Frequently Asked Questions
- How do I check which version of Nginx is installed on Ubuntu 26.04? Run
nginx -vin the terminal. This displays the installed Nginx version number. - What is the difference between
systemctl reloadandsystemctl restartfor Nginx? Thereloadcommand gracefully applies configuration changes without dropping active connections. Therestartcommand fully stops and starts the service, which briefly interrupts all connections. Therefore, usereloadfor configuration changes whenever possible. - Can I run both Apache and Nginx on the same Ubuntu 26.04 server? Yes, but they cannot both listen on the same port. A common approach is to run Nginx on port 80/443 as a reverse proxy and Apache on a different internal port such as 8080.
- How do I disable a server block without deleting it? Remove the symbolic link from
/etc/nginx/sites-enabled/while keeping the configuration file in/etc/nginx/sites-available/. Then reload Nginx withsudo systemctl reload nginx. - Where do I find Nginx error logs on Ubuntu 26.04? The default error log is located at
/var/log/nginx/error.log. You can also define custom log paths per server block using theerror_logdirective.