MicroK8s is a lightweight, production-grade Kubernetes distribution developed by Canonical that runs entirely as a snap package. Whether you are exploring container orchestration or setting up a local development cluster, a k8s install on Ubuntu 26.04 with MicroK8s is one of the fastest paths to a fully functional Kubernetes environment. This guide walks you through every step, from installation and group configuration to enabling core add-ons and verifying your cluster.
Table of Contents
In this tutorial you will learn:
- How to install MicroK8s on Ubuntu 26.04 using snap
- How to configure user group permissions for kubectl access
- How to verify that the MicroK8s cluster is running correctly
- How to enable essential add-ons such as storage, dashboard, ingress, and registry
- How to create a kubectl alias for streamlined cluster management
- How to start, stop, and check the status of MicroK8s

Software Requirements
| Category | Requirements, Conventions or Software Version Used |
|---|---|
| System | Ubuntu 26.04 Resolute Raccoon |
| Software | MicroK8s (latest stable via snap), snapd (pre-installed on Ubuntu 26.04) |
| Other | Privileged access to your Linux system as root or via the sudo command. Internet access required for snap package download. |
| Conventions | # – requires given linux commands to be executed with root privileges either directly as a root user or by use of sudo command$ – requires given linux commands to be executed as a regular non-privileged user |
microk8s group, then verify the cluster status.
| Step | Command/Action |
|---|---|
| 1. Install MicroK8s | sudo snap install microk8s --classic |
| 2. Add user to group | sudo usermod -aG microk8s $USER && newgrp microk8s |
| 3. Wait for cluster ready | microk8s status --wait-ready |
| 4. Check nodes | microk8s kubectl get nodes |
Install MicroK8s on Ubuntu 26.04
MicroK8s is distributed exclusively as a snap package, and since snapd comes pre-installed on Ubuntu 26.04, you can begin the k8s install on Ubuntu 26.04 immediately without any additional preparation. The --classic flag grants MicroK8s the system access it needs to manage containers and networking.
Install MicroK8s with the following command:
$ sudo snap install microk8s --classic
Snap will download and install the latest stable MicroK8s release. The process typically takes a minute or two depending on your connection speed. Once the command completes, the MicroK8s service starts automatically in the background.
To install a specific Kubernetes version instead of the latest stable release, you can pass a channel flag:
$ sudo snap install microk8s --classic --channel=1.33/stable
This is useful in environments that require a pinned Kubernetes version for compatibility reasons. You can browse available channels on the MicroK8s snap store page.
Configure User Group Access
After installation, your user account does not yet have permission to interact with MicroK8s without sudo. To fix this, add your user to the microk8s group:
$ sudo usermod -aG microk8s $USER
Additionally, ensure your user has ownership of the ~/.kube directory if it exists:
$ mkdir -p ~/.kube
$ sudo chown -R $USER ~/.kube
For the group membership to take effect in your current shell session, use newgrp:
$ newgrp microk8s
IMPORTANT
On Ubuntu 26.04, the newgrp command requires the util-linux-extra package. If newgrp is not found, install it first with sudo apt install util-linux-extra, then run newgrp microk8s again.
Alternatively, you can log out and back in to apply the group change system-wide across all sessions.
Verify the Cluster
With group access configured, you can now verify that the k8s install on Ubuntu 26.04 completed successfully. First, wait for MicroK8s to finish its internal initialization:
$ microk8s status --wait-ready
This command blocks until MicroK8s reports that the cluster is ready. You will see output listing the current status and any enabled or disabled add-ons. A healthy cluster reports microk8s is running.
Next, confirm the node is visible and in the Ready state:
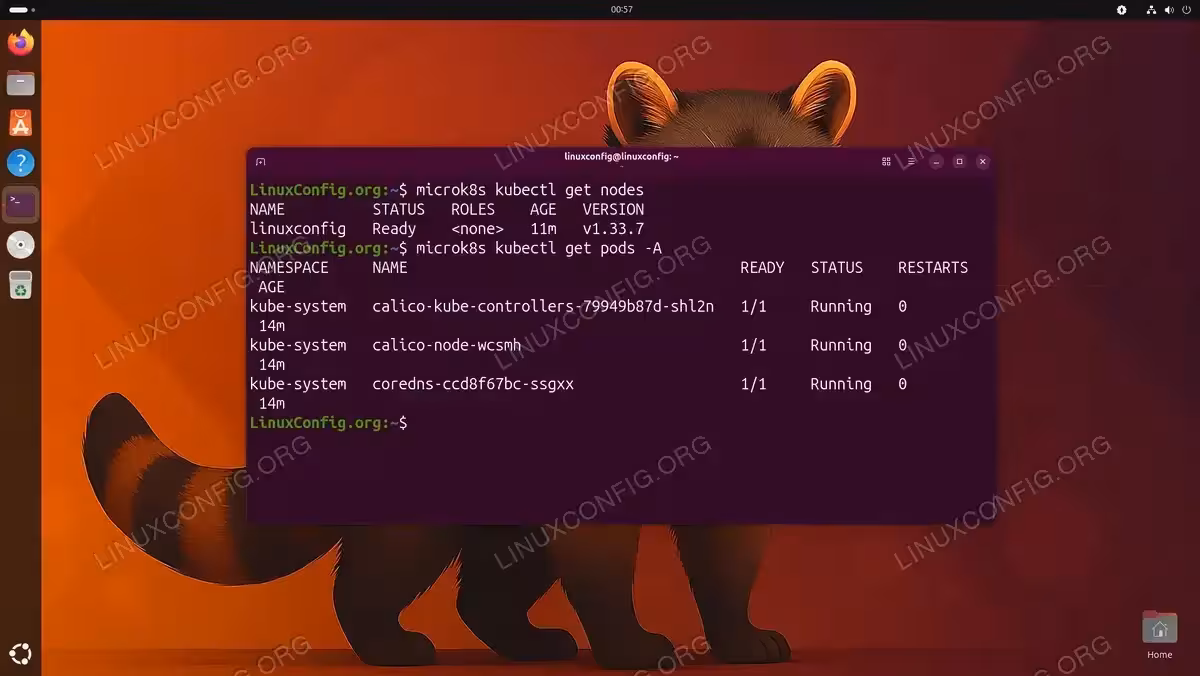
$ microk8s kubectl get nodes
Expected output:
NAME       STATUS   ROLES    AGE   VERSION
hostname   Ready    <none>   2m    v1.35.x
You can also inspect all running system pods to confirm the core Kubernetes components are functioning:
$ microk8s kubectl get pods -A
Enable Core Add-ons
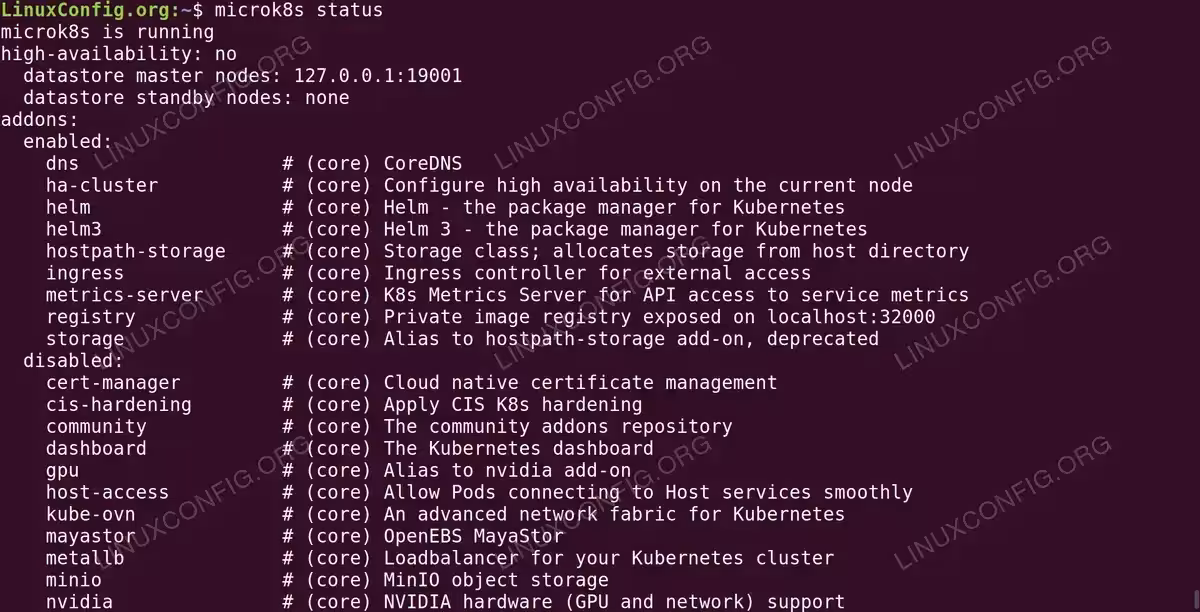
MicroK8s ships with a library of add-ons that extend cluster functionality. Several are enabled by default immediately after installation. You can confirm this at any time by running:
$ microk8s status
The following add-ons are enabled by default on a fresh MicroK8s install:
| Add-on | Description |
|---|---|
dns |
CoreDNS — in-cluster DNS resolution and service discovery |
ha-cluster |
High availability configuration support |
helm / helm3 |
Helm package manager for Kubernetes |
metrics-server |
API access to resource usage metrics |
The add-ons below are not enabled by default and are commonly needed for most workloads. Enable them as required:
- Enable hostpath storage: This add-on provisions a default StorageClass backed by the host filesystem, which is sufficient for development and single-node deployments:
$ microk8s enable hostpath-storage
After enabling, a StorageClass named
microk8s-hostpathbecomes available for PersistentVolumeClaim requests.
WARNING
Hostpath storage is not suitable for production environments. A hostpath volume can grow beyond the size limit set in the volume claim manifest. Use a proper storage provider for production workloads. - Enable the Kubernetes dashboard: For a browser-based cluster overview, enable the dashboard add-on. Note that enabling the dashboard also automatically enables
metrics-serverif it is not already active:$ microk8s enable dashboard
IMPORTANT
Themicrok8s dashboard-proxyconvenience command is currently non-functional due to a broken Helm chart repository URL in the bundled snap. To access the dashboard, usemicrok8s kubectl proxyand navigate to the dashboard URL manually. - Enable ingress: The ingress add-on deploys an NGINX ingress controller, which is required for routing external HTTP and HTTPS traffic to services running inside the cluster:
$ microk8s enable ingress
After enabling, you can define
Ingressresources in your manifests to expose services externally. - Enable the private registry: The registry add-on spins up a private container image registry accessible at
localhost:32000. This is particularly useful in development workflows to avoid repeated pulls from Docker Hub:$ microk8s enable registry
Once enabled, tag and push images to
localhost:32000/your-image:tagand reference them directly in your pod manifests.
The microk8s status command showing the cluster running with enabled and available add-ons on Ubuntu 26.04
Set Up kubectl Alias
MicroK8s provides its own bundled kubectl as microk8s kubectl. Typing this prefix for every command is verbose, so creating a shell alias streamlines day-to-day cluster management. Add the alias to your shell configuration file:
$ echo "alias kubectl='microk8s kubectl'" >> ~/.bashrc
$ source ~/.bashrc
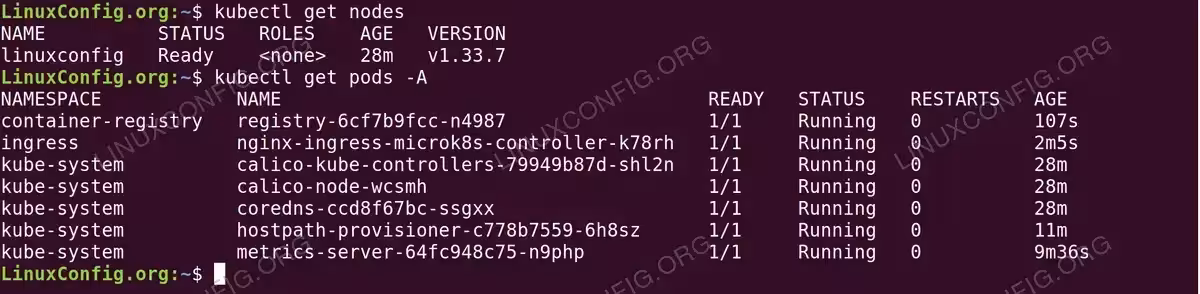
If you use Zsh, target ~/.zshrc instead. After sourcing the file, you can run standard kubectl commands directly:
$ kubectl get nodes
$ kubectl get pods -A
IMPORTANT
If you have a standalone kubectl binary installed on the same system, the alias will shadow it. Use the full microk8s kubectl form whenever you need to target a different cluster.
Manage the MicroK8s Service
MicroK8s provides its own start, stop, and inspect commands rather than relying on systemd directly. These commands offer a convenient way to manage the cluster lifecycle:
| Action | Command |
|---|---|
| Check status | microk8s status |
| Stop the cluster | microk8s stop |
| Start the cluster | microk8s start |
| Reset to factory defaults | microk8s reset |
| Inspect for issues | microk8s inspect |
The microk8s inspect command is intended for troubleshooting — it collects diagnostic information about the cluster and generates a report tarball.
IMPORTANT
The microk8s inspect command has known issues on the current snap revision (8596 / v1.33.7). Internal script functions are missing, causing unreliable output. Additionally, the FAILs reported for daemon-flanneld, daemon-etcd, and daemon-apiserver-proxy are expected on a single-node install and do not indicate a problem. If you need to diagnose cluster issues, use journalctl -u snap.microk8s.daemon-kubelite and microk8s kubectl get pods -A instead.
IMPORTANT
Running microk8s reset will remove all deployed workloads, add-ons, and configuration from the cluster. Use it only when you intend to start fresh.
Conclusion
You have successfully completed a MicroK8s k8s install on Ubuntu 26.04. Your cluster is running, your user has the necessary group permissions, and the core add-ons are enabled and ready. MicroK8s provides a self-contained Kubernetes environment that is well-suited for local development, CI pipelines, and lightweight production deployments on single or multi-node setups. As a next step, consider exploring multi-node clustering with microk8s add-node, or deploying a sample application to verify end-to-end workload scheduling on your new cluster.
Frequently Asked Questions
- What is the difference between MicroK8s and a full Kubernetes cluster? MicroK8s is a single-binary, snap-packaged Kubernetes distribution designed for simplicity and low resource usage. It runs all Kubernetes components within a confined snap environment rather than as separate system services. Consequently, it is easier to install and manage on a single machine, but it uses the same upstream Kubernetes API as any production cluster, making it fully compatible with standard tooling and manifests.
- Why do I need the
--classicflag when installing MicroK8s? The--classicconfinement mode grants MicroK8s access to system resources that are outside the strict snap sandbox, such as network interfaces, kernel modules, and the host filesystem. Without this flag, MicroK8s cannot function correctly because Kubernetes requires deep integration with the underlying operating system to manage containers and networking. - How do I update MicroK8s to a newer Kubernetes version on Ubuntu 26.04? You can refresh MicroK8s to a new channel using the snap refresh command. For example, to move to the 1.34 stable channel:
sudo snap refresh microk8s --channel=1.34/stable. MicroK8s will perform an in-place upgrade, preserving existing workloads where possible. It is advisable to back up any important configurations before upgrading. - What should I do if
microk8s statusshows the cluster is not running? First, try starting the cluster manually withmicrok8s start. If the cluster still does not come up, runmicrok8s inspectto gather diagnostic output. Common causes include insufficient system resources (MicroK8s recommends at least 2 CPU cores and 4 GB RAM), snap service failures, or missing kernel modules. Review the inspect report and checkjournalctl -xefor additional system-level errors. - Can I run MicroK8s alongside Docker on Ubuntu 26.04? Yes. MicroK8s uses its own container runtime (containerd) that operates independently of the Docker daemon. Both can coexist on the same system without conflict. Note that Docker’s official repository does not yet support Ubuntu 26.04, so Docker should be installed from the Ubuntu repository using
sudo apt install docker.ioif needed alongside MicroK8s.