Virtual Network Computing (VNC) is a powerful tool that allows you to connect to and control a remote desktop environment over the network. In this guide, we will walk through the process of setting up a VNC server on Ubuntu Linux, including installing a desktop environment, configuring the default session, and accessing it with a VNC client. This will allow you to work on the Ubuntu desktop remotely from another device, enhancing productivity and providing an easy remote access solution.
In this tutorial you will learn:
- How to install and configure a desktop environment for VNC sessions
- How to set up and start a VNC server and client

| Category | Requirements, Conventions or Software Version Used |
|---|---|
| System | Ubuntu 24.04 or later |
| Software | TigerVNC server and viewer, tasksel |
| Other | A stable network connection |
| Conventions | # – requires given linux commands to be executed with root privileges either directly as a root user or by use of sudo command$ – requires given linux commands to be executed as a regular non-privileged user |
Setting Up VNC Server and Client on Ubuntu
To successfully set up a VNC server on your Ubuntu system, you need to install a desktop environment and configure your VNC server appropriately. Below, you will find detailed steps for the entire process.
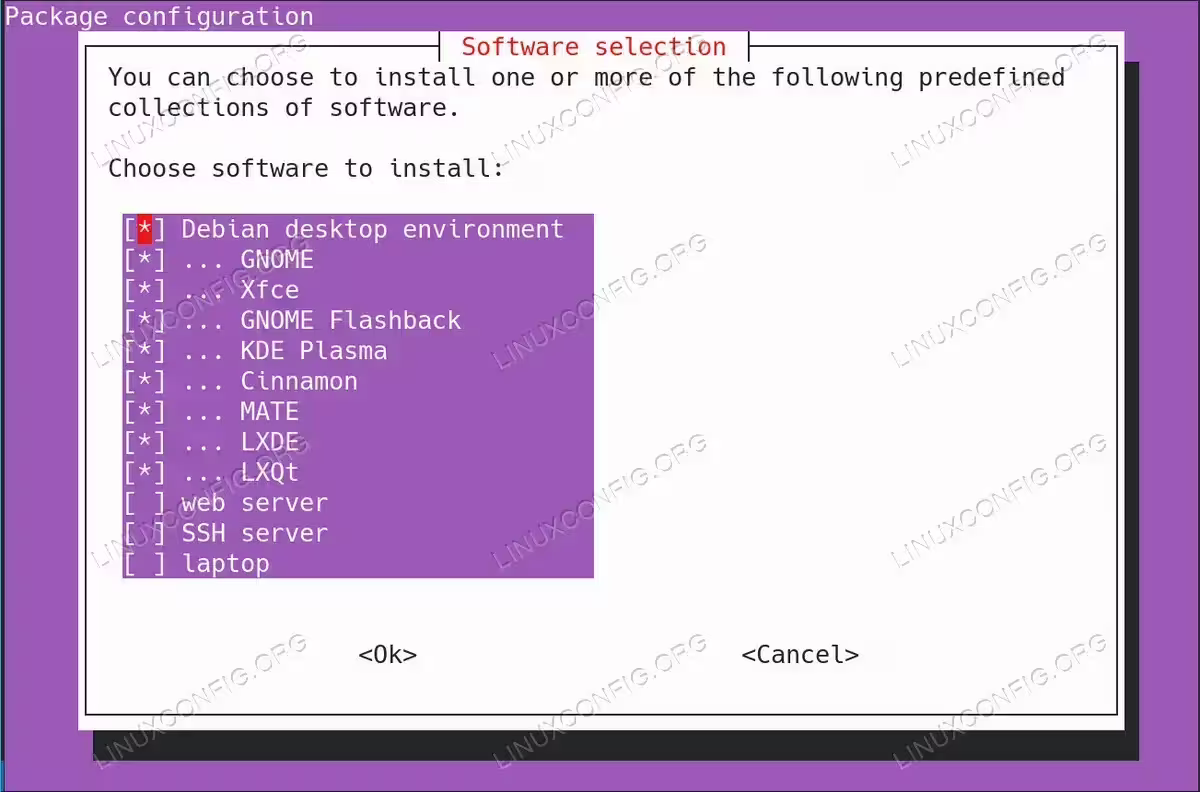
- Install a Desktop Environment: First, you need to install a desktop environment that you will use with your VNC sessions. For this, you can use the
taskselcommand to choose and install any desktop environment of your choice.$ sudo apt install tasksel $ sudo tasksel
Run the above command and follow the prompts to select and install a desktop environment (e.g., GNOME, KDE, XFCE, etc.). This will ensure you have a graphical interface available for your VNC connections.

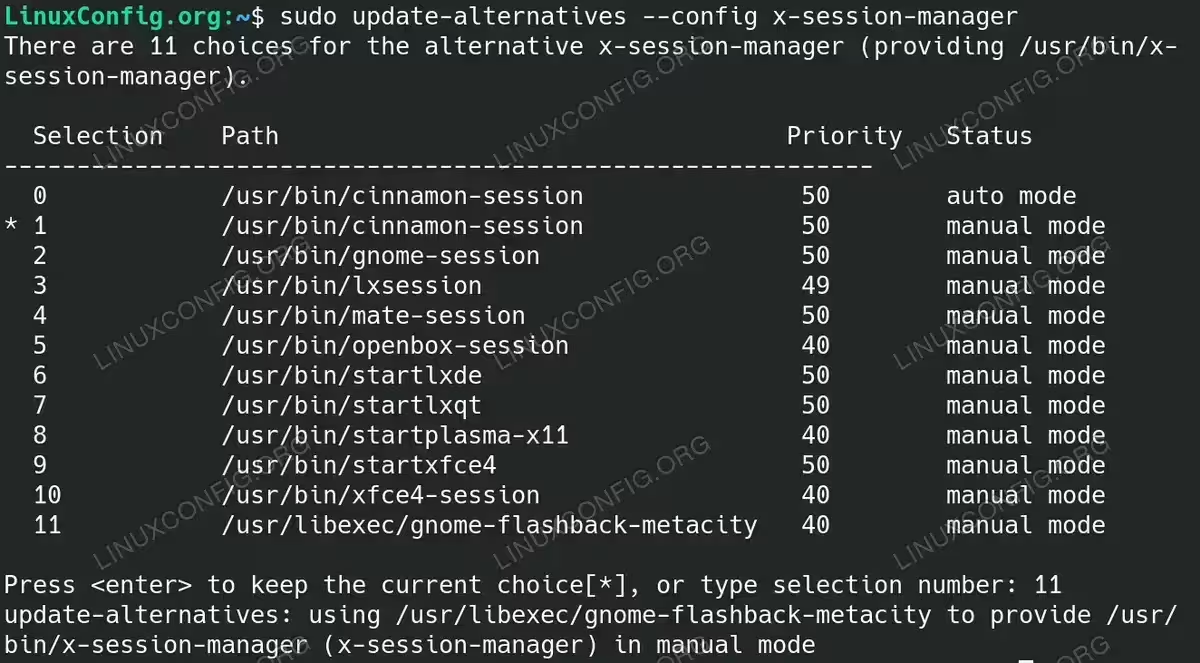
Install a Desktop Environment for VNC session - Set the Default X Session: After installing a desktop environment, you need to ensure that the session you wish to use is set as the default X session for your system.
$ sudo update-alternatives --config x-session-manager
Use this command to set your desired desktop environment as the default. The command will provide a list of available desktop environments, and you can choose the one you prefer to use for your VNC session.
GNOME USERS NOTE
Disable Wayland if you wish to use GNOME Desktop Environment, as Wayland is not compatible with VNC in some cases.
Select Default X Session for VNC client - Install the VNC Server: Next, you need to install the VNC server software on the server side. We will use TigerVNC for this purpose.
$ sudo apt install tigervnc-standalone-server
Running this command will install the TigerVNC server, which is necessary for creating VNC sessions.
- Start a New VNC Session: After installing the VNC server, you can start a new session and the VNC server using the following command:
$ vncserver -localhost no :1
This command starts a VNC session that listens on display :1 (usually accessible via port 5901). The option
-localhost noallows remote connections.NOTE
Unlike previous setups, no additional configuration is required, such as specifying~/.vnc/xstartupor session files. The VNC server is compatible out of the box with all Desktop Environments. For a functioning VNC server on Ubuntu, the~/.vnc/directory typically includes only:linuxconfig:1.log linuxconfig:1.pid passwd. - Start the VNC Client: Finally, to connect to the VNC server, you need to use a VNC viewer. From a client device, run the following command to start the viewer:
$ xtigervncviewer vncserver:5901
Replace
vncserverwith the IP address or hostname of your server. This command will prompt the VNC client to connect to the server, allowing you to interact with the remote desktop environment.AUTHOR'S NOTE
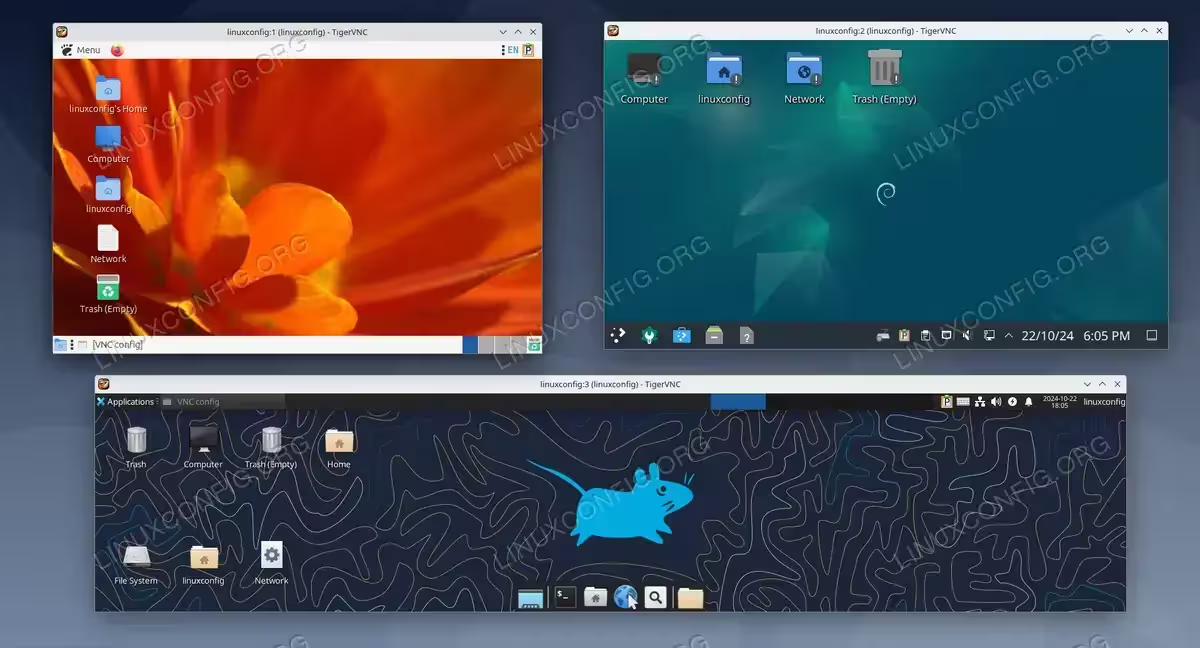
As of the time of writing, I have been able to start VNC sessions with most of the available Desktop Environments (DEs). However, the stability and performance of each DE can vary. The best results in terms of stability and responsiveness were achieved with XFCE and KDE Plasma.
VNC client connection to multiple VNC server sessions on the single VNC server with GNOME Classic, KDE and XFCE Desktop Environments
Conclusion
Setting up a VNC server on Ubuntu allows you to access your desktop environment remotely, providing convenience and flexibility for managing your system. By following these steps, you can install a desktop environment, configure a VNC server, and connect from a remote client easily. With TigerVNC, remote desktop control is just a few commands away, offering a reliable solution for Ubuntu remote access.