Immich is a free and open source alternative to Google Photos, with a focus on privacy. Both the server software and the mobile client application, are developed in the open on GitHub. Thanks to the container technology, deploying a private, self-hosted instance of Immich is quite easy. In this tutorial, we learn how to run a self-hosted Immich instance using Docker, to manage and backup our photos and videos.
In this tutorial you will learn:
- How to use Docker or Podman to deploy a self-hosted instance of Immich
- How to access Immich from browser and from the mobile app

| Category | Requirements, Conventions or Software Version Used |
|---|---|
| System | Distribution-agnostic |
| Software | Docker/Podman |
| Other | None |
| Conventions | # – requires given linux-commands to be executed with root privileges either directly as a root user or by use of sudo command$ – requires given linux-commands to be executed as a regular non-privileged user |
Introduction
The cloud is just someone else’s computer, and you shouldn’t trust it. Android is the most widespread mobile operating system; by consequence, the default application used to manage and sync photos and videos on the OS made by Google, Google Photos, is used daily by million of users. Relying on proprietary software for such as an essential task as the backup of your beloved pictures and videos, is not a good idea, since you are not really in control of your data. Immich is a free and open source alternative to Google Photo, which we can easily deploy using Docker, on our own machines and our own storage. Let’s see how.
Using Docker/Podman to run Immich
The easiest and most straightforward way to run a self-hosted instance of Immich, is by using Docker (or Podman) and docker-compose. A pre-configured docker-compose.yml file is available on the GitHub repository of the project. We can download it straight from the command line, by using the following command:
$ curl -LO https://github.com/immich-app/immich/releases/latest/download/docker-compose.yml
The command above downloads the file in our current working directory. Inside the file, some variables are used to provide confidential information, such as the Postgres database username and password, plus essential information such as the path where uploaded media should be saved. For obvious reasons, this information cannot be hard-coded inside the file; however, they are automatically read from an
.env environment file, which must be located in the same directory as the compose file. A sample of the file, can be downloaded from GitHub:
$ curl -L -o .env https://github.com/immich-app/immich/releases/latest/download/example.env
Inside the file, we can see all variables have a default value:
# You can find documentation for all the supported env variables at https://im

# The location where your uploaded files are stored
UPLOAD_LOCATION=./library
# The location where your database files are stored
DB_DATA_LOCATION=./postgres

# The Immich version to use. You can pin this to a specific version like "v1.7
IMMICH_VERSION=release

# Connection secret for postgres. You should change it to a random password
DB_PASSWORD=postgres

# The values below this line do not need to be changed
##############################################################################
DB_USERNAME=postgres
DB_DATABASE_NAME=immich
As clearly explained in the comments, the UPLOAD_LOCATION and DB_DATA_LOCATION variables are used to pass the path of the host directory which will be used to store uploaded images, and the one used for Postgres database files. The DB_DATABASE_NAME, DB_USERNAME and DB_PASSWORD variables, instead, are used to pass the database name, username, and password. (the database is automatically created the first time we launch the stack).
In recent version of Docker CE (Community Edition), docker-compose is installed as a plugin, so, you should substitute any docker-compose command in the examples with docker compose. If you are using the deprecated Python version of docker-compose, instead, you can just follow along. Remember that you can use docker-compose even if you are using Podman under the hood. All you need to know is basically star the Podman socket.
Using SELinux
To let bind-mounts described in the docker-compose.yml file work when SELinux is enabled, we need to add z as a mount option, so that the SELinux context of the host directories is automatically set to container_file_t. The lines we need to change are 17, 36 and 73:
volumes:
   - ${UPLOAD_LOCATION}:/usr/src/app/upload:z
volumes:
- ${UPLOAD_LOCATION}:/usr/src/app/upload:zvolumes:
- ${DB_DATA_LOCATION}:/var/lib/postgresql/data:zEnabling memory overcommit
Before we launch the containers stack, it is recommended to enable memory overcommit, otherwise certain operations mail fail under low memory conditions. To permanently enable memory overcommit, we can edit the /etc/sysctl.conf file, or create a dedicated drop-in file under /etc/sysctl.d, with the following content:
vm.overcommit_memory = 1
The change will be automatically applied at boot; to make it, immediately effective, we can run:
$ sysctl -p
Launching the container stack
To launch the container stack, we run:
$ docker-compose up
Since none of the containers maps to a host privileged port, we can run docker-compose without using root privileges (it is still possible to let an unprivileged container use a privileged port). When running the command, you may see the following error:
ERROR: The Compose file './docker-compose.yml' is invalid because:
'name' does not match any of the regexes: '^x-'
This means you are using the legacy version of docker-compose. As a workaround, it is enough to comment line 9 of the docker-compose file:
# name: immichOnce done, just relaunch the docker-compose up command; if everything goes as expected, after few seconds, we should be able to access the Immich admin page athttp://localhost:2283:

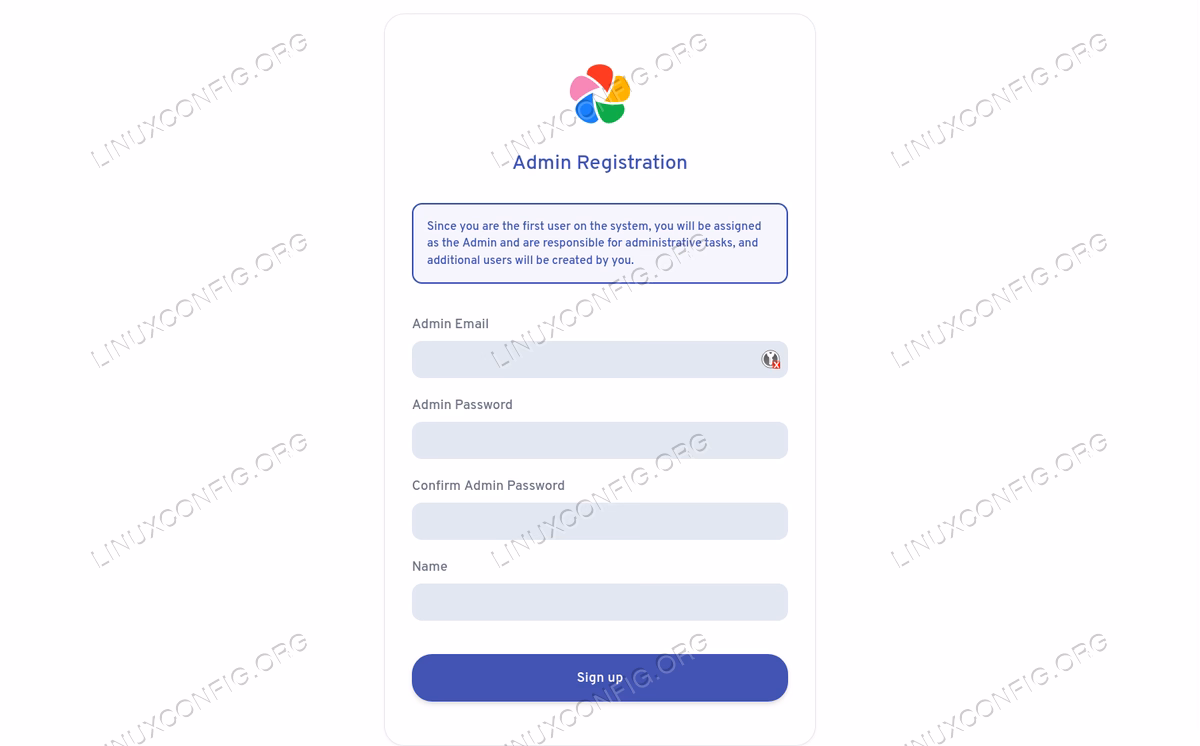
To create the admin account, just click on the “Getting started” button, and fill the form with required information:
Using a secure connection
If you want to safely access your Immich instance from outside your home network, you basically have two options: the first one consists into connecting using a VPN such as Wireguard; the second involves the use of an SSL/TLS certificate. If you have a public domain, you can obtain a valid certificate from Let’s Encrypt; if you are setting up Immich for your personal use only, as an alternative, you can generate and use a self-signed certificate.
In this context, the easiest way to make use of the certificate, is to serve Immich via a reverse-proxy such as Nginx or Caddy. The reverse proxy can either run as a container, perhaps as part of the Immich stack, or run directly on the host. Below, you can see an example of an Nginx reverse-proxy configuration which passes all requests from
https://immich.mydomain.com to http://192.168.0.39:2283 (local IP and port of the machine where containers are running), using a certificate obtained from Let’s Encrypt:
server {
  listen 443 ssl;
  server_name immich.mydomain.com;

  ssl_certificate     /etc/letsencrypt/live/immich.mydomain.com/fullchain.pem;
  ssl_certificate_key /etc/letsencrypt/live/immich.mydomain.com/privkey.pem;
  ssl_session_cache builtin:1000 shared:SSL:10m;
  ssl_protocols TLSv1 TLSv1.1 TLSv1.2;
  ssl_ciphers HIGH:!aNULL:!eNULL:!EXPORT:!CAMELLIA:!DES:!MD5:!PSK:!RC4;
  ssl_prefer_server_ciphers on;

  location / {
    proxy_set_header Host $host;
    proxy_set_header X-Real-IP $remote_addr;
    proxy_set_header X-Forwarded-For $proxy_add_x_forwarded_for;
    proxy_set_header X-Forwarded-Proto $scheme;
    proxy_pass http://192.168.0.39:2283;
    proxy_read_timeout 90;
  }
}
When using such configuration, we should also allow traffic through port 443. If using UFW as a firewall manager, we can run:
$ sudo ufw allow "WWW Secure"
When using Firewalld, instead, to permanently allow traffic through port 443 in the default zone, we can run:
$ sudo firewall-cmd --permanent --add-service=https
$ sudo firewall-cmd --reload
To apply the rule to a specific zone, instead, we can pass the name of the zone name as argument to the --zone option.
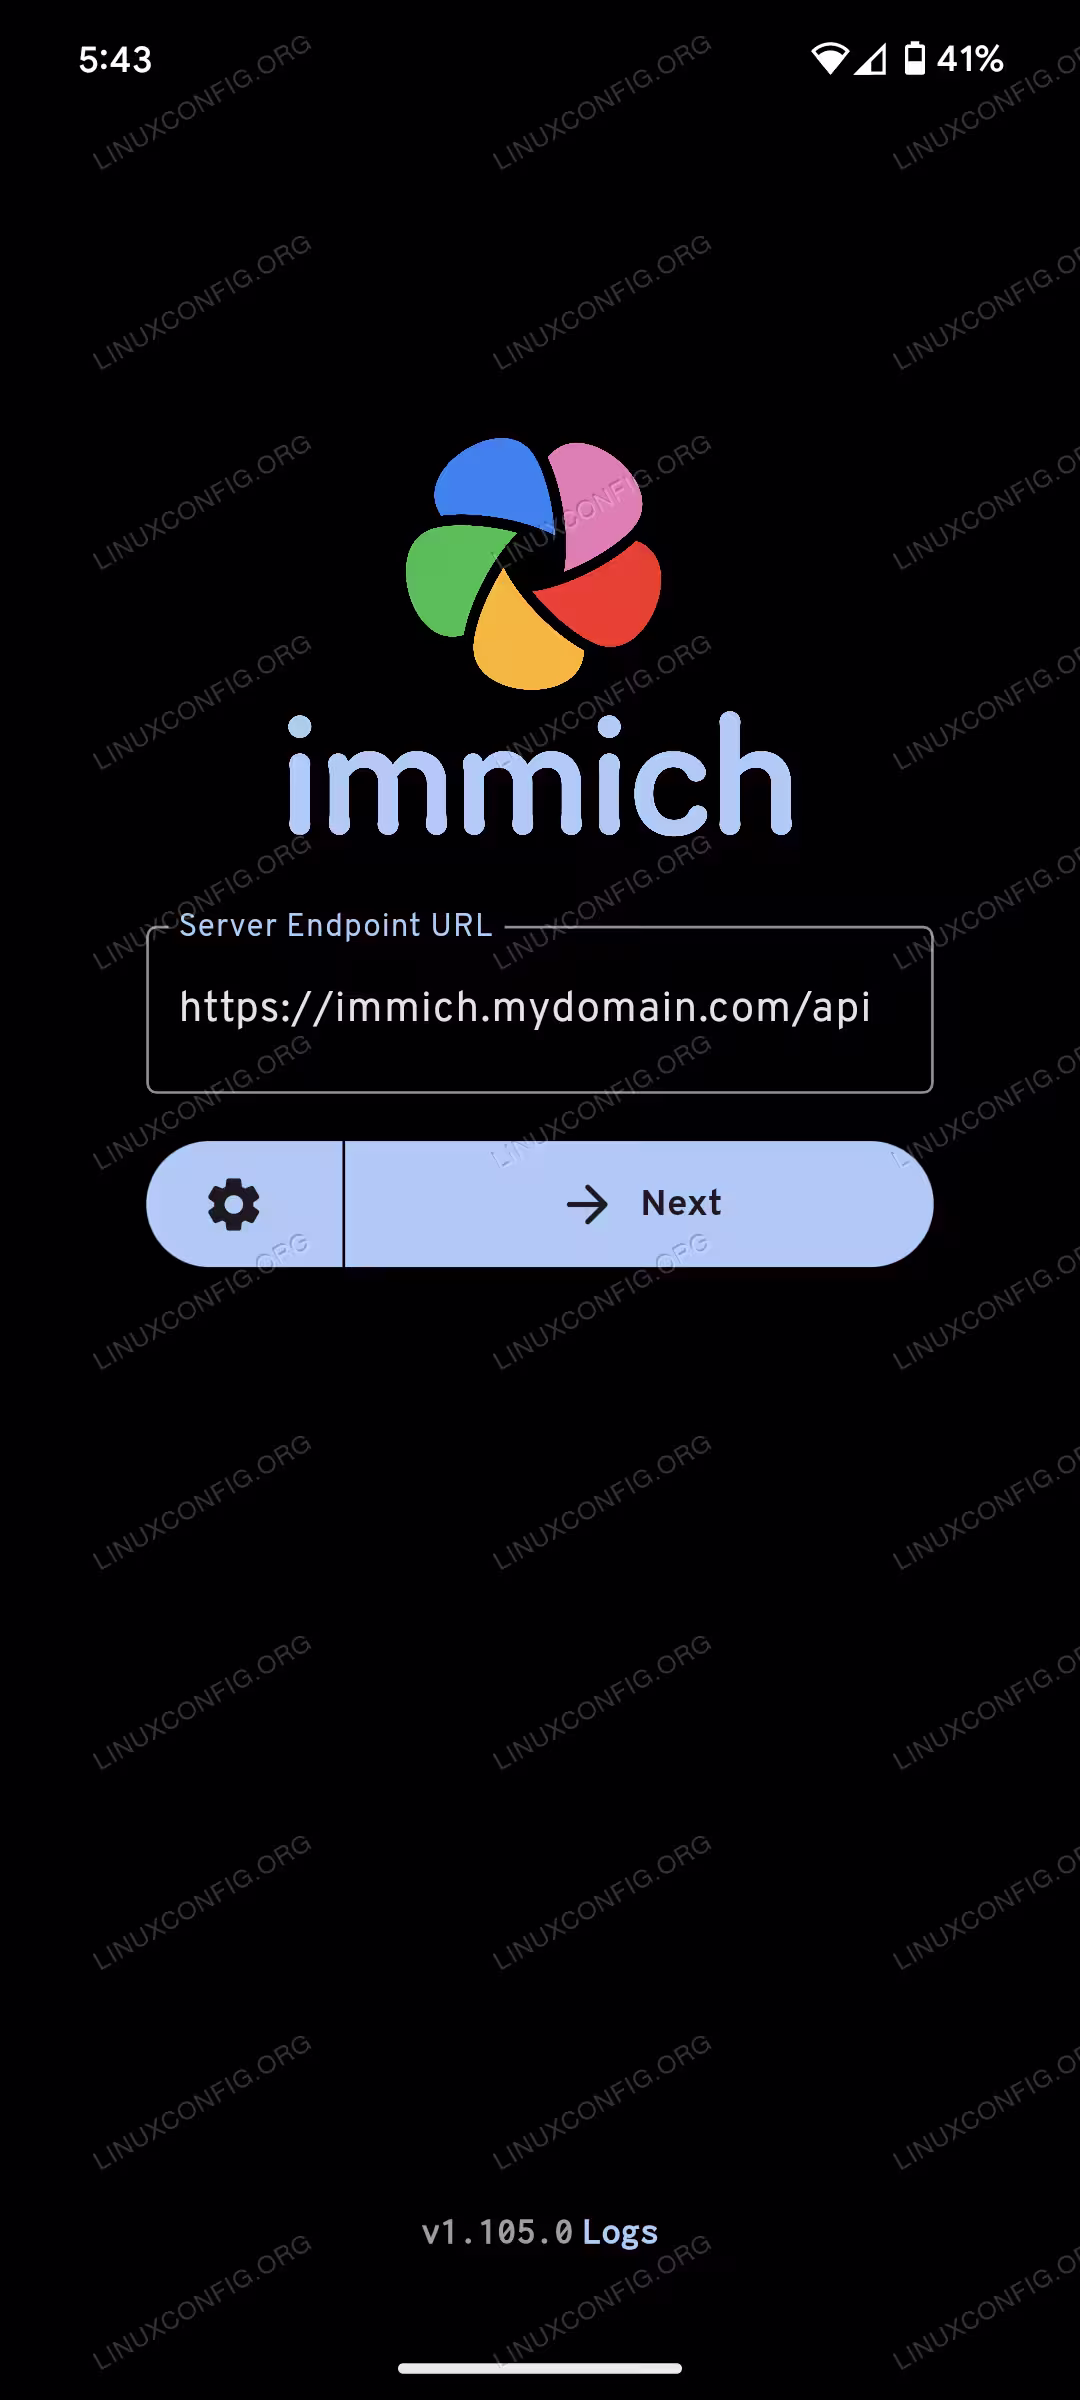
Installing the Android App
The Immich client app is available both on the Android Play Store, and on the iOS App Store. To access our Immich server, we launch the application and login with the account we created during installation. As endpoint URL, we use the server IP and the /api path:
Closing thoughts
Immich is a free and open source alternative to Google Photos to manage and backup videos and photos on mobile devices. In this tutorial, we saw how to deploy Immich using Docker. To securely access our self-hosted Immich instance from outside our local network, we can either connect using a VPN or use a TLS/SSL certificate and a reverse-proxy. As part of the tutorial, we saw a possible Nginx configuration to achieve such setup.