SSH is a communication protocol that allows us to access remote hosts and securely transfer data over unsecure networks, thanks to encrypted connections. By using the ssh tunnel technique, we can forward TCP traffic from and to a local machine, bypassing firewall restrictions. In this tutorial, we learn the difference between local and remote SSH tunnels, and how to create them.
In this tutorial you will learn:
- What is the difference between a local and a remote SSH tunnel
- How to create local and remote SSH tunnels

| Category | Requirements, Conventions or Software Version Used |
|---|---|
| System | Distribution-agnostic |
| Software | Openssh |
| Other | Root privileges are required to change the remote ssh server configuration |
| Conventions | # – requires given linux-commands to be executed with root privileges either directly as a root user or by use of sudo command$ – requires given linux-commands to be executed as a regular non-privileged user |
Creating a local SSH tunnel
By using a local SSH tunnel, we can forward any traffic from a given TCP port on the local machine, to a given remote host address and port. This can be useful when we want to access a service which is not directly reachable from our network, but can be accessed from another machine. Here is an example: suppose there is an Apache server instance running on a machine which is not accessible from the outside network, but only from other hosts inside its own private network. The local IP of this machine is 192.168.1.6. On it, the Apache web server is listening on port 80.
While we cannot reach the machine directly over the internet, we can establish an SSH connection to another machine which is in the same private network, and can be externally accessed using the
serverone.mydomain.com FQDN:
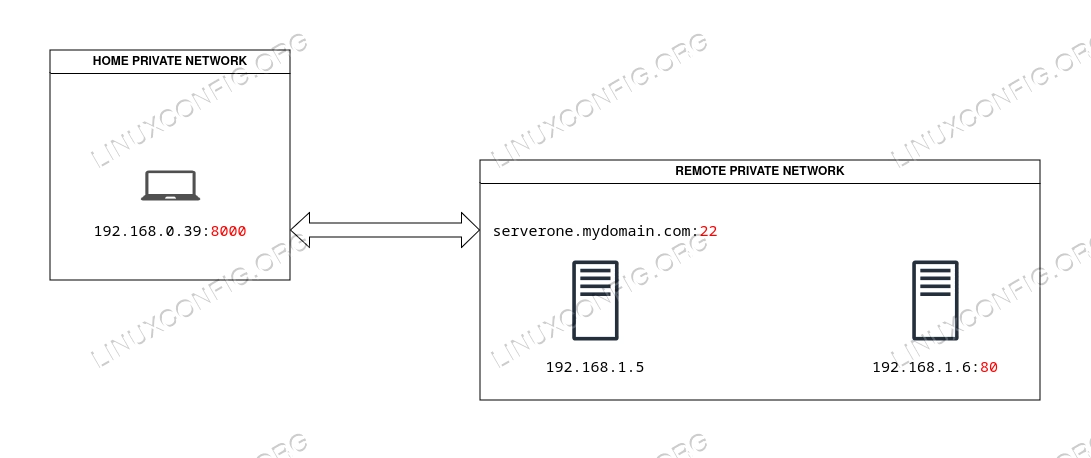
By creating a local SSH tunnel, we can access the web page served by Apache on the remote machine, as if it were running on our machine, and listening on port 8000. To create the local tunnel, we invoke the ssh client with the -L option, and pass the hosts mappings as argument, using the following syntax:
[local-address]:local-port:remote-address:remote-port
The local address is optional: if we don’t provide one, the forwarded port will be available on all interfaces. In this case we will be explicit, and use 192.168.0.39. To create the tunnel, we run:
$ ssh -N -L 192.168.0.39:8000:192.168.1.6:80 user@serverone.mydomain.com
You can notice we used the -N option in the command above: this is needed to specify we don’t want to run any command, but we just want to establish a connection with the remote server. Once the connection is established, we will be able to access the content served by Apache on the remote private server, by opening our web browser and navigating to http://192.168.0.39:8000.
Creating a remote SSH tunnel
A remote, or “reverse” SSH tunnel, works in the opposite direction of a local tunnel. By using a remote SSH tunnel, we can specify that connections to a given remote address and TCP port, are to be forwarded to a local host and port. What is a situation in which we may want to create a remote SSH tunnel?
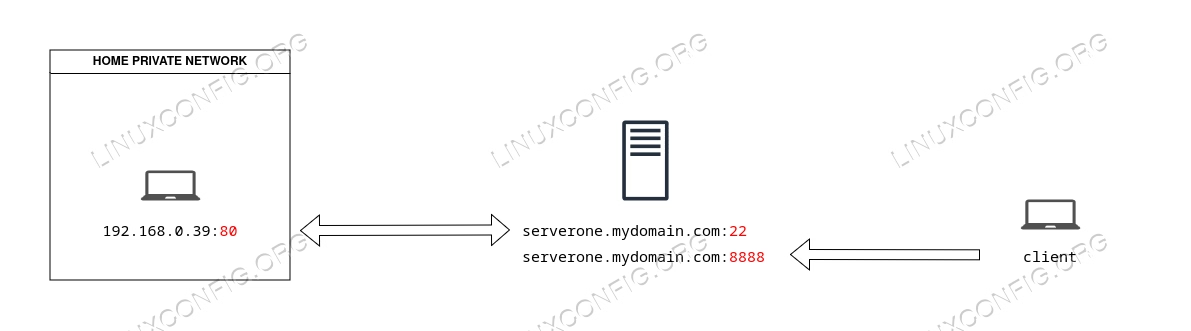
Let’s suppose we are developing a website, so we have an instance of the Apache web server running on our notebook, listening on port
80. The local IP address of our machine, is, once again: 192.168.0.39. Since the machine is behind a NAT firewall, it cannot be accessed from the outside world. Nonetheless, every once in a while, we want to be able to show how our project is evolving to a third party, without directly exposing the service. How can we reach our goal? We could create a remote SSH tunnel!
We connect via SSH to the publicly accessible server, which, beside port 22, exposes also port 8888 to the outside world. With the remote SSH tunnel, we forward all TCP traffic which occurs on that port, to port 80 on our machine, which is the port our local Apache web server is listening to. The third party client, will be able to see pages served by our local web server instance at http://serverone.mydomain.com:8888:
Since we want to allow external clients to access a port forwarded via SSH, in order for our tunnel to work, we need to ensure the GatewayPorts option is set to “yes” in the SSH server configuration. The directive is usually commented at line 88 of the /etc/ssh/sshd_config file:
#AllowTcpForwarding yes
GatewayPorts yes
#X11Forwarding no
For the change to be effective, we need to restart the ssh service:
$ sudo systemctl restart sshd
Now, to create the remote SSH tunnel, on our local machine, we run ssh with the -R option, and pass the host-port mappings:
[remote-address]remote-port:local-address:local-port
Where, “remote-address” and “remote-port” are, respectively, the address and port the client will be able to access the service at, while “local-address” and “local-port”, are the local address and port the server is listening to. To create the remote tunnel, we run:
$ ssh -N -R serverone.mydomain.com:8888:192.168.0.39:80 user@serverone.mydomain.com
Closing thoughts
In this tutorial, we learned the difference between local and a remote SSH tunnels, and we saw how to create them on Linux. Local tunnels are useful when we want to access a service not directly reachable over the internet; by using remote tunnels, instead, we can let someone else access a service running on our local machine, even though it is behind a NAT firewall.