Containers have revolutionized how we develop, test, and deploy applications. While Docker is the most well-known containerization technology, Podman offers a compelling alternative that doesn’t require a daemon running in the background. Podman is a free and open-source container engine that’s compatible with Docker while providing additional security benefits through its daemonless and rootless design. This tutorial will walk you through setting up Podman on Ubuntu and getting started with basic container operations.
In this tutorial you will learn:
- How to install Podman on Ubuntu
- Running containers without root privileges (rootless containers)
- Basic Podman commands for managing containers and images
- How to run a simple web server in a container
- Setting up docker aliasing to use Podman instead
| Category | Requirements, Conventions or Software Version Used |
|---|---|
| System | Ubuntu Linux (version agnostic, examples shown on 24.04) |
| Software | Podman |
| Other | Basic understanding of Linux commands |
| Conventions | # – requires given linux commands to be executed with root privileges either directly as a root user or by use of sudo command$ – requires given linux commands to be executed as a regular non-privileged user |
What is Podman and Why Use It?
Podman (Pod Manager) is a container engine that allows you to run and manage containers without requiring a daemon. Unlike Docker, which relies on a centralized daemon running with root privileges, Podman operates with a fork/exec model similar to regular Linux commands. This architecture provides several benefits:
- Improved security through rootless operation
- No daemon to manage or worry about
- Docker-compatible command-line interface
- Better integration with systemd for managing container lifecycles
ROOTLESS VS DOCKER GROUP
Rootless Podman isolates container processes with user namespaces, preventing privilege escalation even if a container is compromised. Users in the Docker group effectively have root-equivalent permissions on the host since the Docker socket provides unrestricted access to the Docker daemon running as root. While adding users to the Docker group seems convenient, it represents a significant security risk as any container breakout could lead to complete system compromise. Podman’s rootless approach offers a fundamentally more secure container runtime model by eliminating this privilege escalation path.
Installing Podman on Ubuntu
Let’s start by installing Podman on your Ubuntu system and verifying that it works correctly.
- Update your package repositories: Always start by ensuring your package lists are up to date
$ sudo apt update
This command refreshes your package indexes to ensure you’re getting the latest available versions.
- Install Podman: Install Podman from the Ubuntu repositories
$ sudo apt install -y podman
The -y flag automatically confirms the installation without requiring user input.
- Verify the installation: Check that Podman was installed correctly
$ podman --version
This command should display the installed version of Podman, confirming a successful installation.
- Configure for rootless mode: Set up your system for rootless container operation
$ podman system migrate
This command sets up the necessary user namespaces for rootless container operation. You may need to log out and log back in for all changes to take effect.
PODMAN VS DOCKER
Podman offers a daemonless container engine that runs containers as regular users without root privileges. Docker relies on a background daemon process but has broader ecosystem support and more mature tooling. Both technologies implement OCI standards, making containers largely compatible between them. Podman’s rootless security model and pod-native architecture make it increasingly popular for enterprise environments.
Understanding Rootless Containers
One of Podman’s key advantages is its native support for rootless containers, which allows you to run containers as a regular non-privileged user. This enhances security by isolating containers from the host system and from each other.
- Check your user namespace settings: Verify that user namespaces are properly configured
$ cat /proc/sys/user/max_user_namespaces
The output should be a non-zero number. If it’s 0, you’ll need to enable user namespaces with:
$ sudo sysctl user.max_user_namespaces=15000
To make this change permanent, add the following line to /etc/sysctl.conf:
user.max_user_namespaces=15000
- Configure subuid and subgid mappings: These mappings are essential for rootless containers
$ sudo usermod --add-subuids 100000-165535 --add-subgids 100000-165535 $(whoami)
This command allocates a range of subordinate UIDs and GIDs to your user account, which will be used for containerized processes.
PODMAN USER NAMESPACE WARNING
Properly configuring subuid and subgid mappings is essential for secure rootless container operations in Podman. Without these mappings, you may encounter permission errors when attempting to run containers as a non-root user. - Verify the configuration: Check that your user has the necessary mappings
$ grep $(whoami) /etc/subuid /etc/subgid
You should see entries in both files showing the UID/GID ranges allocated to your user.

Configured subuid and subgid mappings
Basic Podman Commands
Now let’s explore some basic Podman commands that allow you to manage containers and images. If you’re familiar with Docker, you’ll notice that most commands are identical.
- Pull your first container image: Download a simple web server image
$ podman pull docker.io/nginxinc/nginx-unprivileged:latest
This command downloads the nginx-unprivileged image from Docker Hub. We’re using the unprivileged version since we’re running in rootless mode.
- List available images: See what images are available locally
$ podman images
This shows all container images that have been downloaded to your system.
- Run a container: Start a web server container
$ podman run --name my-nginx -p 8080:8080 -d docker.io/nginxinc/nginx-unprivileged:latest
This command:
- –name my-nginx: Assigns a friendly name to the container
- -p 8080:8080: Maps port 8080 from the container to port 8080 on your host
- -d: Runs the container in detached mode (in the background)
- List running containers: See what containers are currently running
$ podman ps
This shows all running containers. To see all containers including stopped ones, use:
$ podman ps -a
- Check container logs: View the output from your container
$ podman logs my-nginx
This displays the logs generated by the container, which can be useful for troubleshooting.
- Access your web server: Verify the web server is working
$ curl http://localhost:8080
This should return the default Nginx welcome page HTML, confirming your container is running correctly.
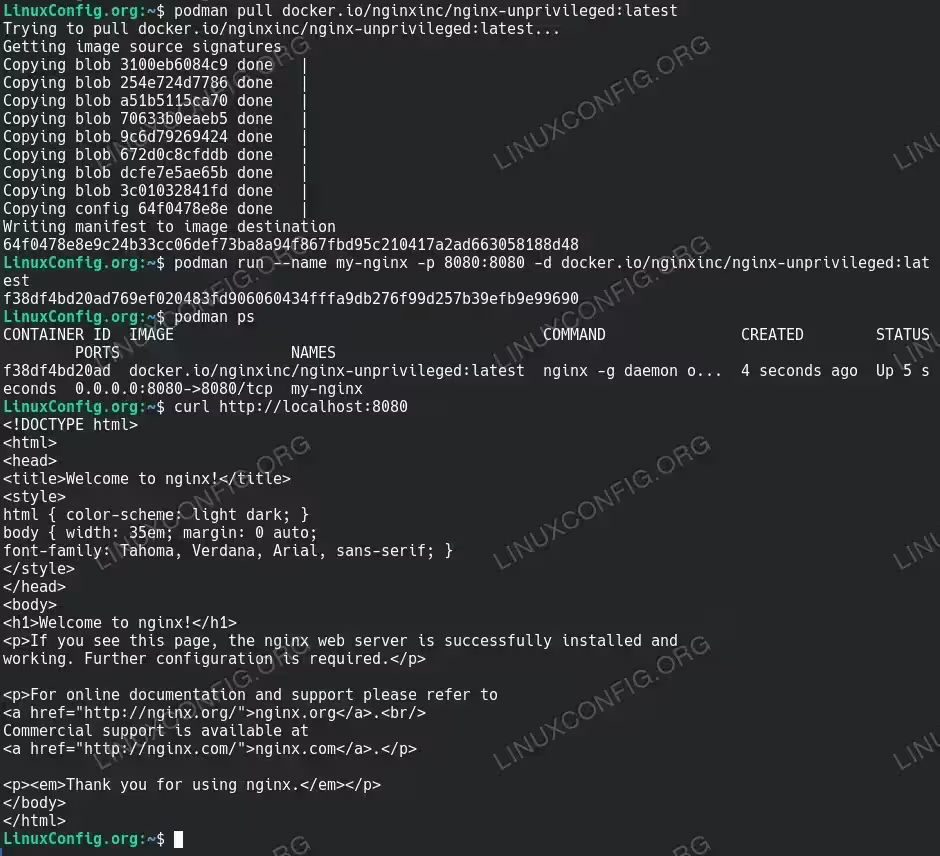
Running simple NGINX server with Podman - Stop a container: Gracefully stop the running container
$ podman stop my-nginx
This sends a SIGTERM signal to the container, allowing it to shut down gracefully.
- Start a stopped container: Restart an existing container
$ podman start my-nginx
This restarts a previously created container that was stopped.
- Remove a container: Delete a container when you’re done with it
$ podman stop my-nginx
$ podman rm my-nginx
You must stop a container before removing it unless you use the -f (force) flag.
- Remove an image: Delete an image to free up space
$ podman rmi docker.io/nginxinc/nginx-unprivileged:latest
This removes the specified image from your local storage. You cannot remove images that are used by containers unless you force removal with the -f flag.
Creating a Docker Alias for Podman
If you’re transitioning from Docker to Podman or need to use scripts that expect Docker commands, you can set up an alias to use Podman instead.
- Create the alias temporarily: Set up the alias for your current session
$ alias docker=podman
This creates a temporary alias that will be available only in your current terminal session.
- Make the alias permanent: Add the alias to your shell configuration
$ echo "alias docker=podman" >> ~/.bashrc
This adds the alias to your .bashrc file, making it permanent for all new Bash sessions.
For Zsh users:
$ echo "alias docker=podman" >> ~/.zshrc
After adding the alias, reload your shell configuration:
$ source ~/.bashrc # or source ~/.zshrc for Zsh users
- Test the alias: Verify that the docker command now uses Podman
$ docker --version
This should show the Podman version, confirming that the alias is working correctly.
Running a More Practical Web Application
Let’s create a simple web application container with a custom HTML file to understand how volumes work in Podman.
- Create a simple HTML file: First, let’s create a directory and an HTML file to serve
$ mkdir -p ~/podman-demo/html
$ echo "<html><body><h1>Hello from Podman\!</h1><p>This is my custom container running with Podman.</p></body></html>" > ~/podman-demo/html/index.html
This creates a directory structure and a simple HTML file that we’ll serve from our container.
- Run a container with a volume mount: Mount your HTML directory into the container
$ podman run --name custom-nginx -p 8080:8080 -v ~/podman-demo/html:/usr/share/nginx/html:Z -d docker.io/nginxinc/nginx-unprivileged:latest
This command:
- -v ~/podman-demo/html:/usr/share/nginx/html:Z: Mounts your local directory into the container
- The :Z suffix ensures proper SELinux labeling if SELinux is enabled on your system
- Verify your custom page: Check that your HTML is being served
$ curl http://localhost:8080
You should see the custom HTML content you created.
- Make changes on the fly: Modify your HTML and see immediate updates
$ echo "<html><body><h1>Updated Content\!</h1><p>I've updated this without restarting the container.</p></body></html>" > ~/podman-demo/html/index.html
$ curl http://localhost:8080
Since we mounted the directory as a volume, changes to files on the host are immediately reflected in the container.
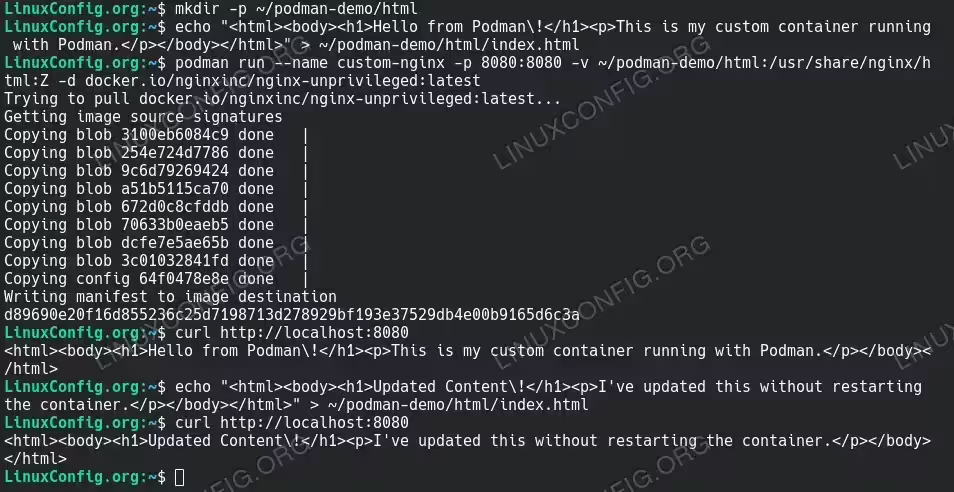
Updating NGNIX podman container web page without the need for a restart
Handling Unqualified Image Names
In newer versions of Podman, you may encounter an error like this when using short image names:
- Configure unqualified search registries: If you prefer shorter commands, you can configure Podman to search specific registries
$ sudo mkdir -p /etc/containers
$ sudo sh -c 'echo "[registries.search] registries = [\"docker.io\", \"quay.io\"]" > /etc/containers/registries.conf'
With this configuration, Podman will automatically search docker.io and quay.io when you use an unqualified image name.
After configuring the search registries, you can now use the shorter image names:
$ podman pull nginxinc/nginx-unprivileged:latest
$ podman run --name my-nginx -p 8080:8080 -d nginxinc/nginx-unprivileged:latest
This is particularly helpful if you’re transitioning from Docker or working with existing scripts that use unqualified image names.
- Verify your configuration: Confirm that your registries configuration is working
$ podman info | grep -A 10 registries
This will show your configured registries including the search registries you’ve added.
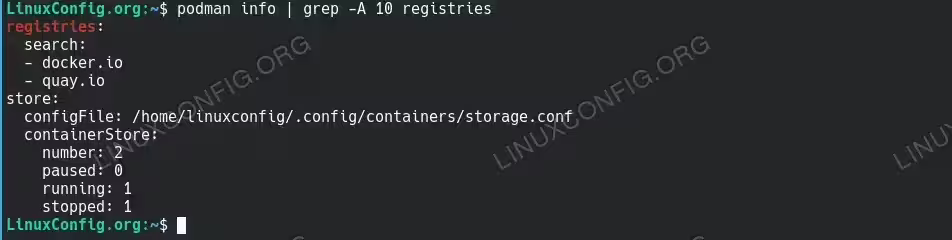
Podman configured registries. The output should show docker.io and quay.io
Managing Container Resources
Podman allows you to limit and control the resources your containers can use, which is important for production environments.
- Run a container with memory limits: Restrict how much memory a container can use
$ podman run --name limited-nginx -p 8081:8080 --memory 128m -d docker.io/nginxinc/nginx-unprivileged:latest
This limits the container to using no more than 128MB of RAM.
- Run a container with CPU limits: Restrict CPU usage
$ podman run --name cpu-limited-nginx -p 8082:8080 --cpus 0.5 -d docker.io/nginxinc/nginx-unprivileged:latest
This limits the container to using no more than half of a CPU core.
- Check resource constraints: Verify the limits are in place
$ podman inspect limited-nginx
This command shows the host configuration for the container, including resource limits.
Integrating Podman with Systemd
One of Podman’s advantages is its ability to be managed through systemd using Quadlets, allowing containers to be treated as system services.
- Create a proper Quadlet file: Set up a container unit file
$ mkdir -p ~/.config/containers/systemd
$ cat > ~/.config/containers/systemd/my-nginx.container << EOF
[Container]
Image=docker.io/nginxinc/nginx-unprivileged:latest
PublishPort=8081:8080
HostName=nginx-web

[Service]
Restart=always
TimeoutStartSec=900

[Install]
WantedBy=default.target
EOF
Note that we’re using port 8081 on the host to avoid potential conflicts with other services that might be using port 8080. The container’s internal port remains 8080, but it will be accessible externally on port 8081.
- Enable the Podman systemd socket activation: This is required for user systemd services
$ systemctl --user enable --now podman.socket
This ensures the Podman socket is activated which is necessary for systemd to manage Podman containers. You should see output confirming the socket is enabled:
Created symlink /home/username/.config/systemd/user/sockets.target.wants/podman.socket → /usr/lib/systemd/user/podman.socket.
- Reload systemd: Make systemd aware of the new unit file
$ systemctl --user daemon-reload
This reloads the systemd configuration to include your new service.
- Start the service: Run your containerized service
$ systemctl --user start my-nginx
Note that we’re using the base name without the .service suffix, which is the preferred way to reference the service.
You can verify the container is running with:
$ systemctl --user status my-nginx
You should see “active (running)” in the output, along with the Nginx processes.
- Enable lingering for user services: Allow services to run after logout
$ loginctl enable-linger $(whoami)
This allows your user services to start at boot time and continue running after you log out. Without this step, user services only run while you’re logged in.
- Enabling the service to run at boot: Configure service persistence
For Quadlet services, you need to use a symbolic link rather than the standard systemctl enable command:$ mkdir -p ~/.config/systemd/user/default.target.wants/ $ ln -sf ~/.config/containers/systemd/my-nginx.container ~/.config/systemd/user/default.target.wants/my-nginx.service
This manually creates the symbolic link that systemctl enable would normally create. This approach is necessary because Quadlet services are generated dynamically.
After creating the link, reload the systemd configuration:
$ systemctl --user daemon-reload
You can verify the service is properly linked with:
$ ls -la ~/.config/systemd/user/default.target.wants/
- Understanding Quadlet File Structure: Learn the key sections
The Quadlet file contains these primary sections:- [Unit]: Standard systemd unit metadata
- [Container]: Podman-specific container configuration
- [Service]: Service behavior settings
- [Install]: Systemd installation information
You can find more options by running
man podman-systemd.unit. - Creating a System-Wide Service: For services that should run for all users
For containers that should run as system services (not tied to a user session):$ sudo mkdir -p /etc/containers/systemd $ sudo nano /etc/containers/systemd/global-nginx.container
Use the same format as above, then enable with:
$ sudo systemctl daemon-reload $ sudo systemctl enable --now global-nginx
Building Custom Container Images with Podman
Podman can build container images using Dockerfiles, making it easy to create custom containers.
- Create a Dockerfile: Define your custom container image
$ mkdir -p ~/podman-build $ cd ~/podman-build $ cat > Dockerfile << EOF FROM docker.io/nginxinc/nginx-unprivileged:latest COPY index.html /usr/share/nginx/html/index.html EXPOSE 8080 CMD ["nginx", "-g", "daemon off;"] EOF $ echo "<html><body><h1>Custom Podman Image</h1><p>This content is baked into the image.</p></body></html>" > index.html
This creates a Dockerfile that adds a custom index.html to the nginx-unprivileged base image.
- Build the image: Create your custom image
$ podman build -t custom-nginx:1.0 .
This builds an image named custom-nginx with a tag of 1.0 using the Dockerfile in the current directory.
- Run a container from your custom image: Test your new image
$ podman run --name my-custom-nginx -p 8090:8080 -d custom-nginx:1.0
This starts a container using your custom image.
- Verify the custom content: Check that your custom HTML is being served
$ curl http://localhost:8090
You should see the custom HTML content that was baked into your image.
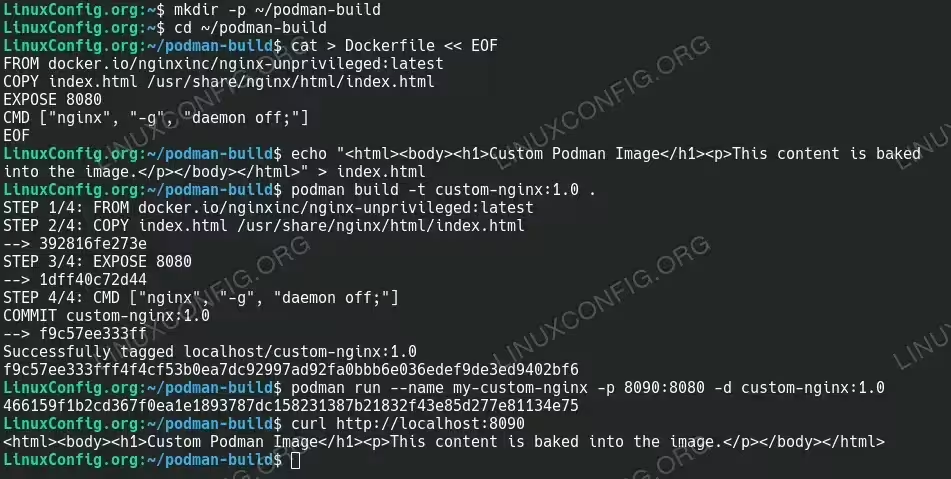
Custom Build Container Images with Podman
Conclusion
You’ve now learned the basics of Podman, including installation, running containers, managing images, and creating your own custom containers. Podman offers a secure, daemon-less alternative to Docker with full compatibility for most Docker commands and workflows.
With Podman, you can enjoy containerization without the security concerns of a root-owned daemon. The rootless operation provides an extra layer of isolation and security, making it an excellent choice for both development and production environments.
As you continue your containerization journey, you might want to explore more advanced topics like:
- Podman pods (groups of containers that share resources)
- Container networks and advanced networking features
- Using Podman Compose for multi-container applications
- Integration with Kubernetes via the Podman Kubernetes YAML generator
Remember that most Docker knowledge transfers directly to Podman, making it easy to switch between the two or use them side by side. With your new Podman skills, you’re well-equipped to containerize applications securely using free, open-source tools.
Troubleshooting Common Issues
- Unqualified Image Name Errors
Error: short-name "nginxinc/nginx-unprivileged:latest" did not resolve to an alias and no unqualified-search registries are defined in "/etc/containers/registries.conf"
- Always use fully qualified image names (e.g., docker.io/nginx:latest)
- Alternatively, configure search registries in /etc/containers/registries.conf
- Failed to Enable Quadlet Services
Failed to enable unit: Unit /run/user/1000/systemd/generator/my-nginx.service is transient or generated
- For Quadlet services, use symbolic links instead of systemctl enable:
-
$ mkdir -p ~/.config/systemd/user/default.target.wants/ $ ln -sf ~/.config/containers/systemd/my-nginx.container ~/.config/systemd/user/default.target.wants/my-nginx.service $ systemctl --user daemon-reload
- Port Binding Errors
Error: rootlessport listen tcp 0.0.0.0:8080: bind: address already in use
- Use lsof to identify what’s using the port:
sudo lsof -i :8080 - Change the host port mapping in your container configuration
- Kill or stop the process that’s using the port if appropriate
- Use lsof to identify what’s using the port:
- Permission Issues with Rootless Mode
- Ensure user namespaces are enabled:
sysctl user.max_user_namespaces - Verify subuid/subgid mappings:
grep $(whoami) /etc/subuid /etc/subgid - Check file permissions on your container files
- Ensure user namespaces are enabled:
- Container Start Failures
- Check detailed logs:
podman logs container_name - Inspect container:
podman inspect container_name - Use
journalctl --user -xeu service_name.servicefor systemd services - Pre-pull images before starting containers:
podman pull image_name
- Check detailed logs:
- Minimal Working Examples
If you’re struggling with complex configurations, start with a minimal working example:$ cat > ~/.config/containers/systemd/basic-nginx.container << EOF [Container] Image=docker.io/nginxinc/nginx-unprivileged:latest PublishPort=8081:8080 [Install] WantedBy=default.target EOF
Then reload and try the simpler service:
$ systemctl --user daemon-reload
$ systemctl --user start basic-nginx