Rclone is a free and open source command line program to manage files on cloud storage services like Google Drive, Backblaze B2, Amazon S3, and many more. The application is written in the Go programming language, and its source code is hosted on GitHub. In this tutorial we learn how to install Rclone on the most used Linux distributions, and how to perform basics operations like copying, syncing, moving and deleting data. In the process, we also see how to obtain Google Drive API credentials, and how to configure a Google Drive remote for Rclone.
In this tutorial you will learn:
- How to install Rclone on some of the most used Linux distributions
- How to obtain Google Drive API credentials and configure a Google Drive Rclone remote
- How to use Rclone to manage data on cloud storage
| Category | Requirements, Conventions or Software Version Used |
|---|---|
| System | Distribution-agnostic |
| Software | Rclone |
| Other | a Google account |
| Conventions | # – requires given linux-commands to be executed with root privileges either directly as a root user or by use of sudo command$ – requires given linux-commands to be executed as a regular non-privileged user |
Installation
Rclone is available in the official repositories of all the major linux distributions. To install the program on Fedora, we run:
$ sudo dnf install rclone
The same command can be used to install Rclone on RHEL, Rocky Linux and AlmaLinux, however, on those distributions, before proceeding with the installation, we need to add the EPEL repository to the system software sources.
On Debian, and Debian-based distributions, we install Rclone using apt:
$ sudo apt install rclone
Rclone is also available in the Archlinux “extra” repository; we can install the package with pacman:
$ sudo pacman -S rclone
Obtaining API credentials for Google Drive
For the sake of this tutorial, we will use Google Drive as cloud storage testing ground for Rclone. While it is possible to use Rclone native Google Drive API credentials, those are shared between all Rclone users, and have limited number of queries per second. To ensure operability, we may want to create our own.
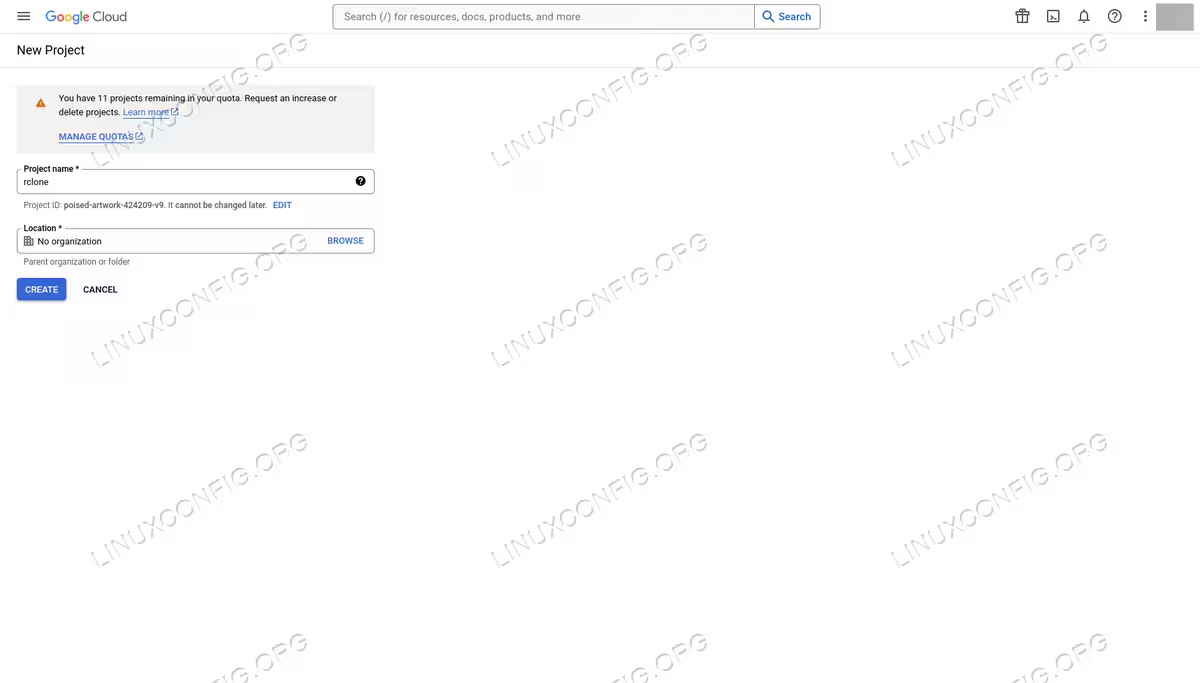
To obtain our Google Drive credentials, we access the Google Cloud Console and add a new project. We click on the “Select a project” dropdown menu, and then on “New project”:

We need to choose a name for our project. Here we simply use “rclone”:
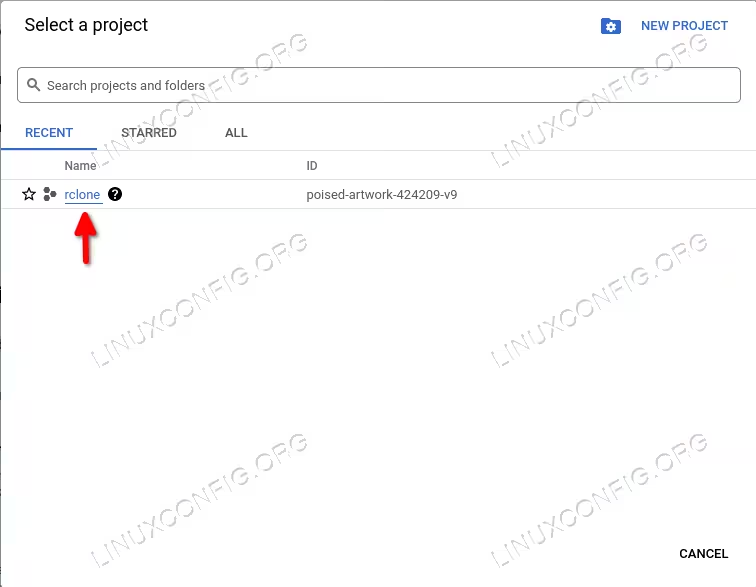
Once ready, we click on the “create” button. The project will be created with a random-generated ID. To select our project, we, once again, click on the “Select a project” dropdown. This time, however, we choose the project we just created:
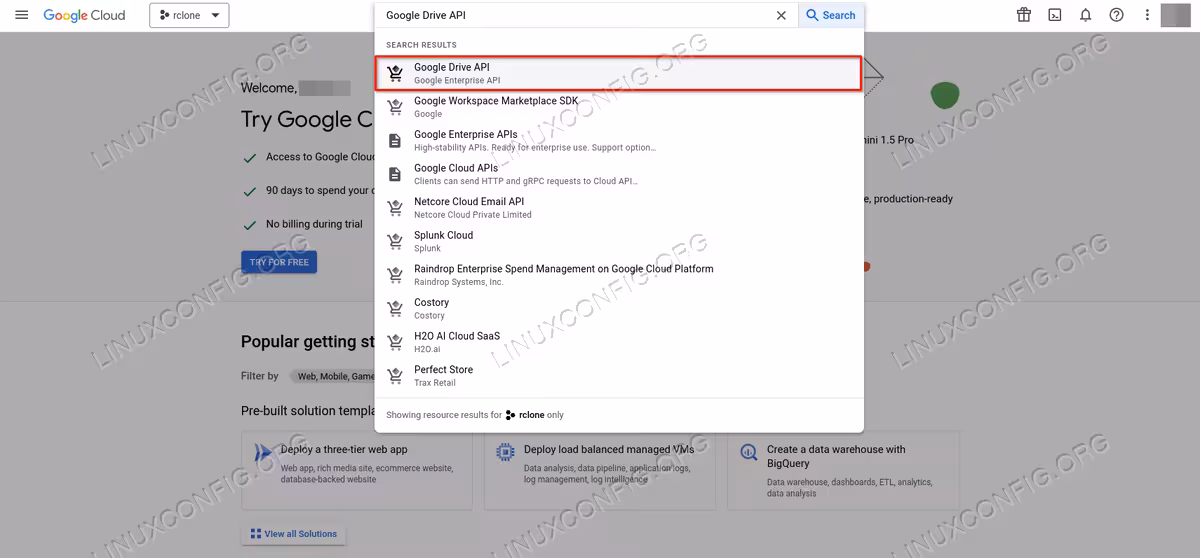
As the next step, we need to add Google Drive API to our project. We search for “Google Drive API”, and click on the first result:
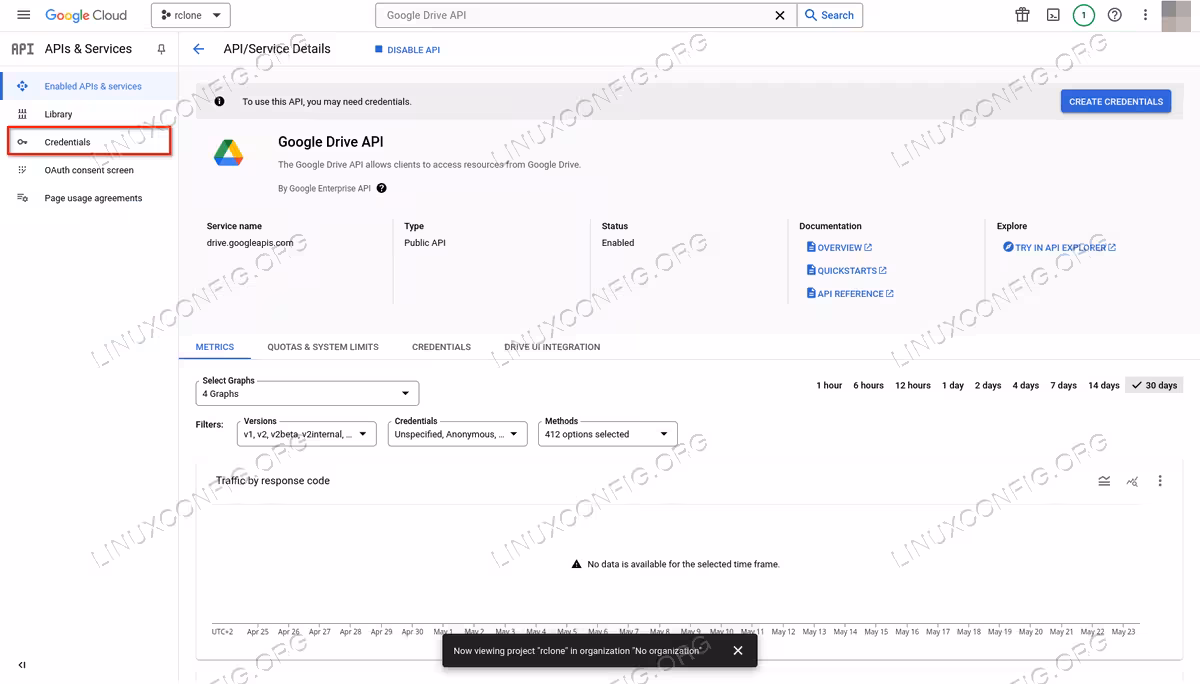
Once on the Google Drive API page, we activate the API by clicking on the “Enable” button; we will be redirected to the API service detail page. At this point, we click on the “Credentials” item in the left vertical menu:
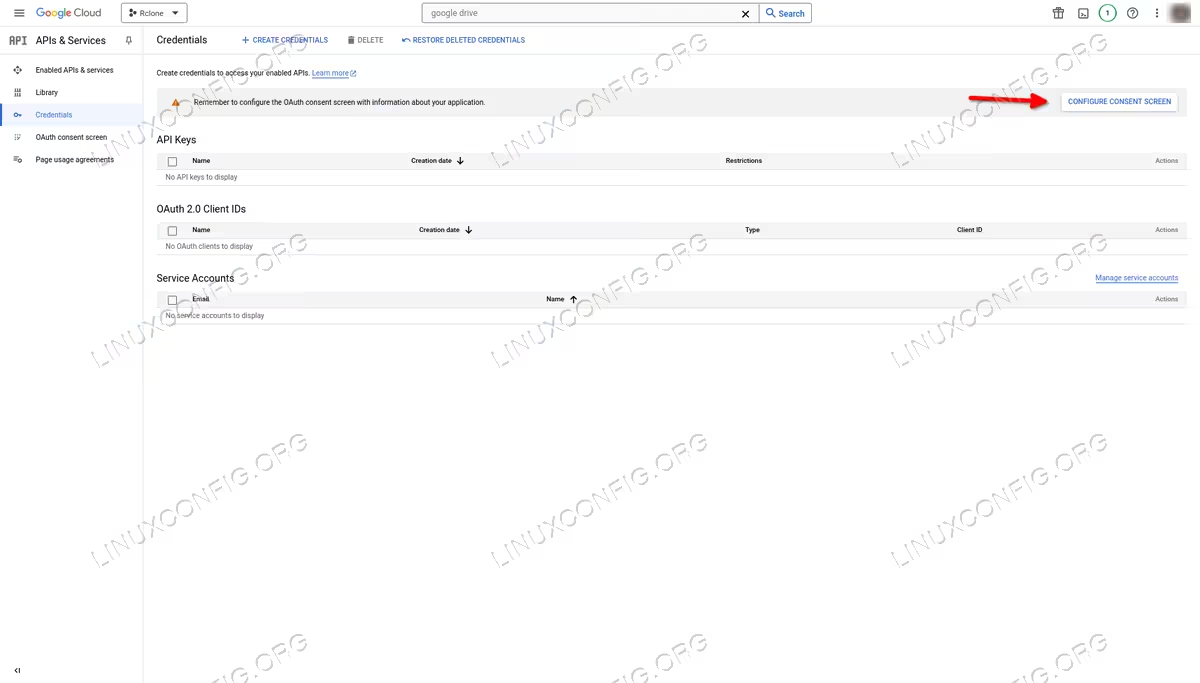
We now need to configure a consent screen for our project, therefore we click on the “Configure consent screen” button:
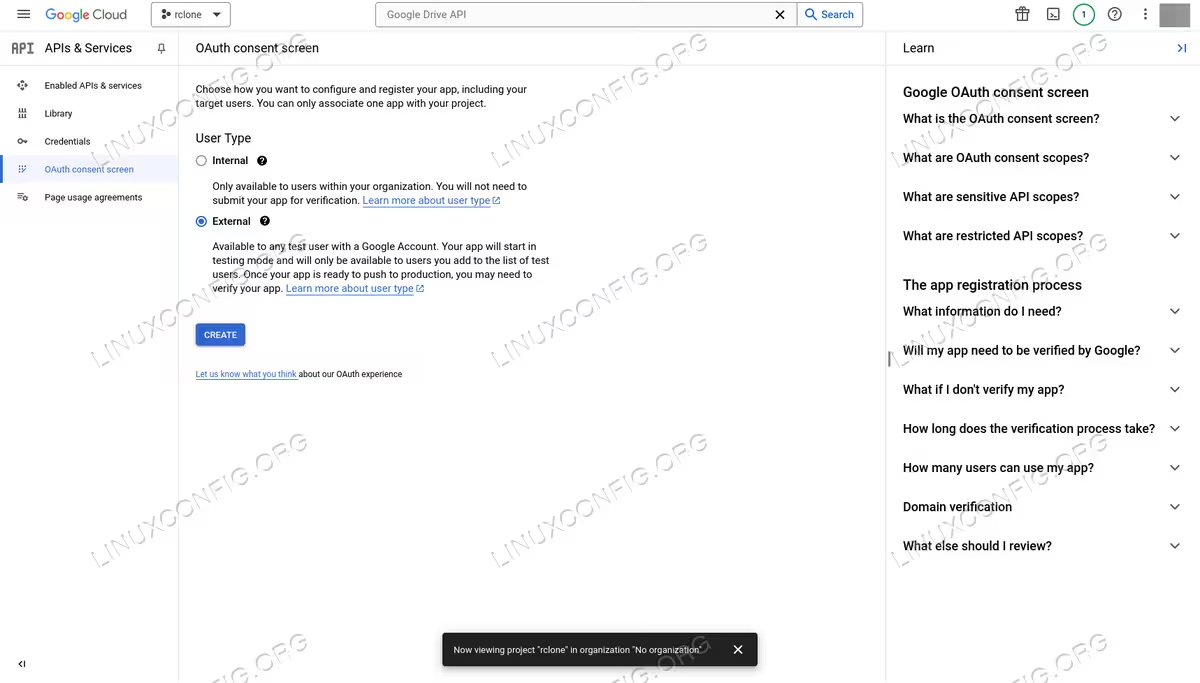
We choose “External” as the user type, then we click on the “Create” button:
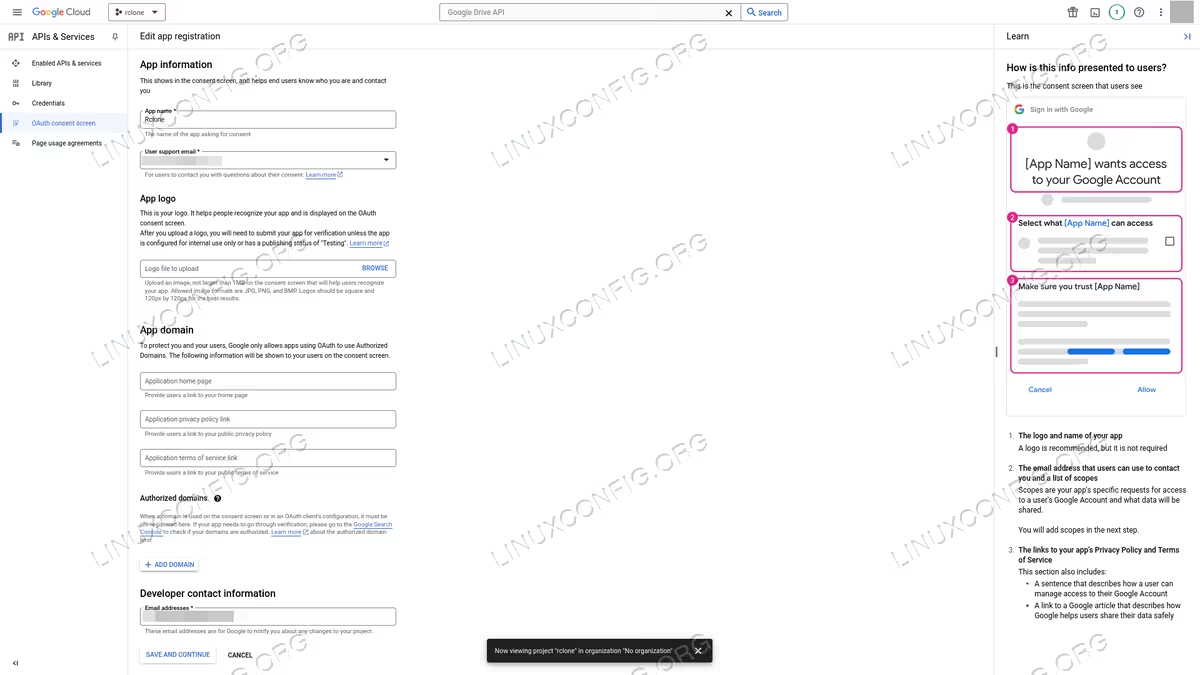
In the next page, we must provide information about our app. At minimum, we must enter the “App name”, an user support email, and developer contact information. When ready, we click on “Save and continue”:
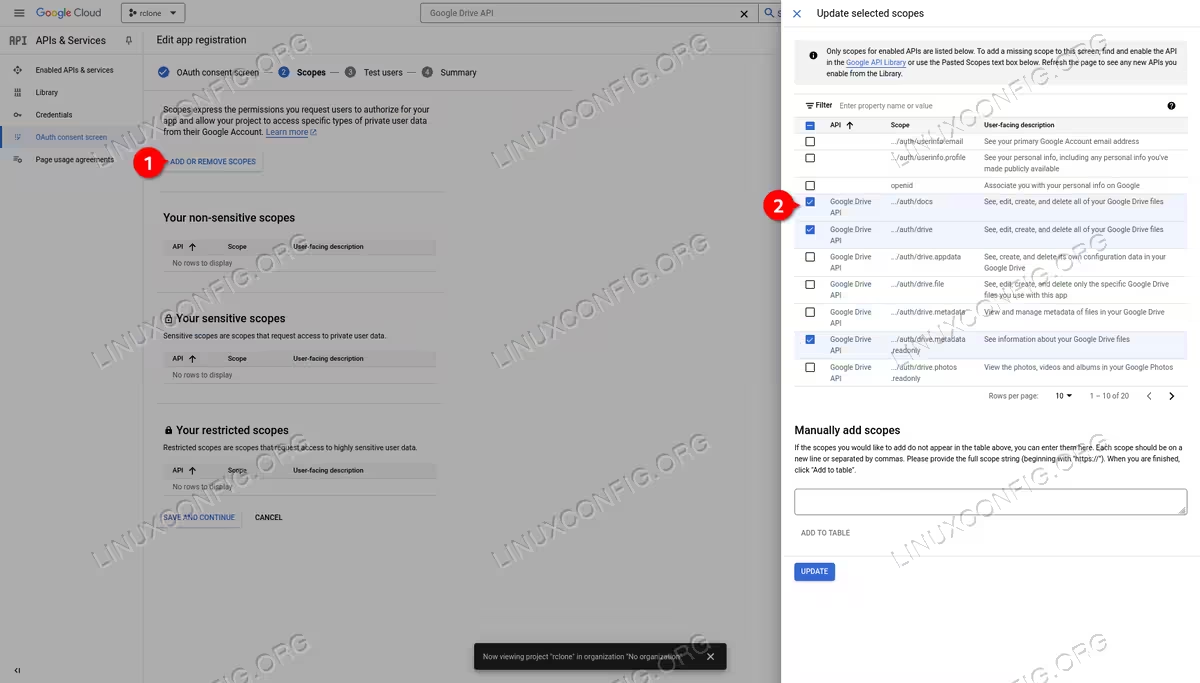
Next, we need to select what scopes to assign to our application. Those are basically the privileges the application will have on the Google Drive storage. To add a scope, we click on the “Add or remove scopes” button, then, to make sure Rclone is able to perform all type of operations, we choose ../auth-docs, ../auth-drive, and ../auth/drive.metadata.readonly:
Once done, we click on the “Update” button, and then, on “Save and continue”. We now need to add our own account as a test user. We click on the “Add users” button, and we enter the email address we want to use. When done, we click on the “Add” button, then, once again, on “Save and continue”:

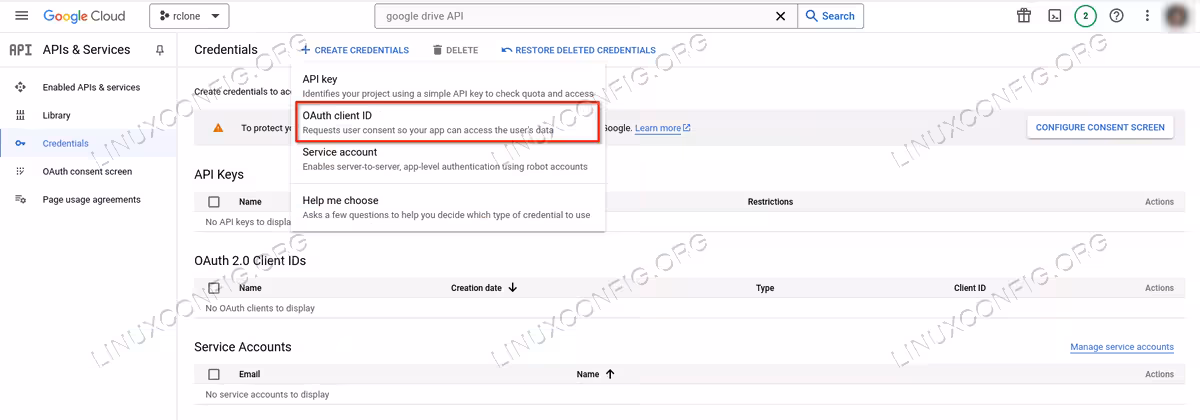
In the next page we will be able to take a look at the application settings summary. At this point, we need to click again on the “Credentials” entry in the left vertical menu. Once in the credentials page, we click on “Create credentials”, and then on “OAuth client ID”:
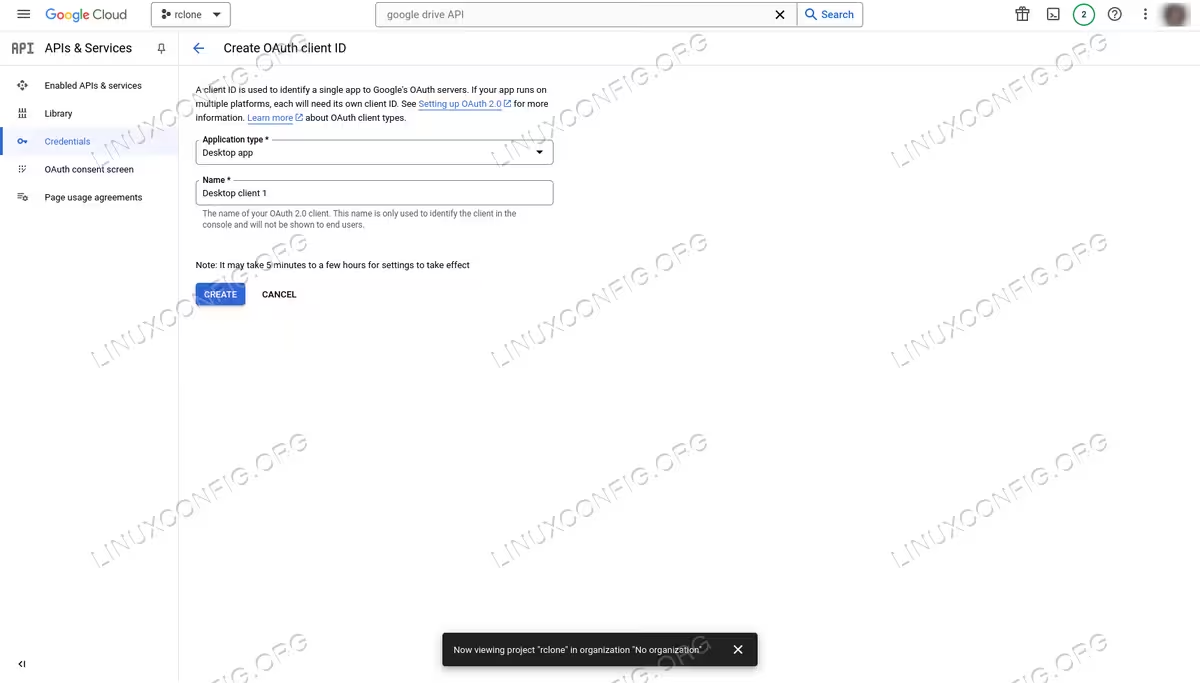
In the next page we select “Desktop app” as application type. We can leave the automatically generated client name. When ready, we click on the “Create” button:
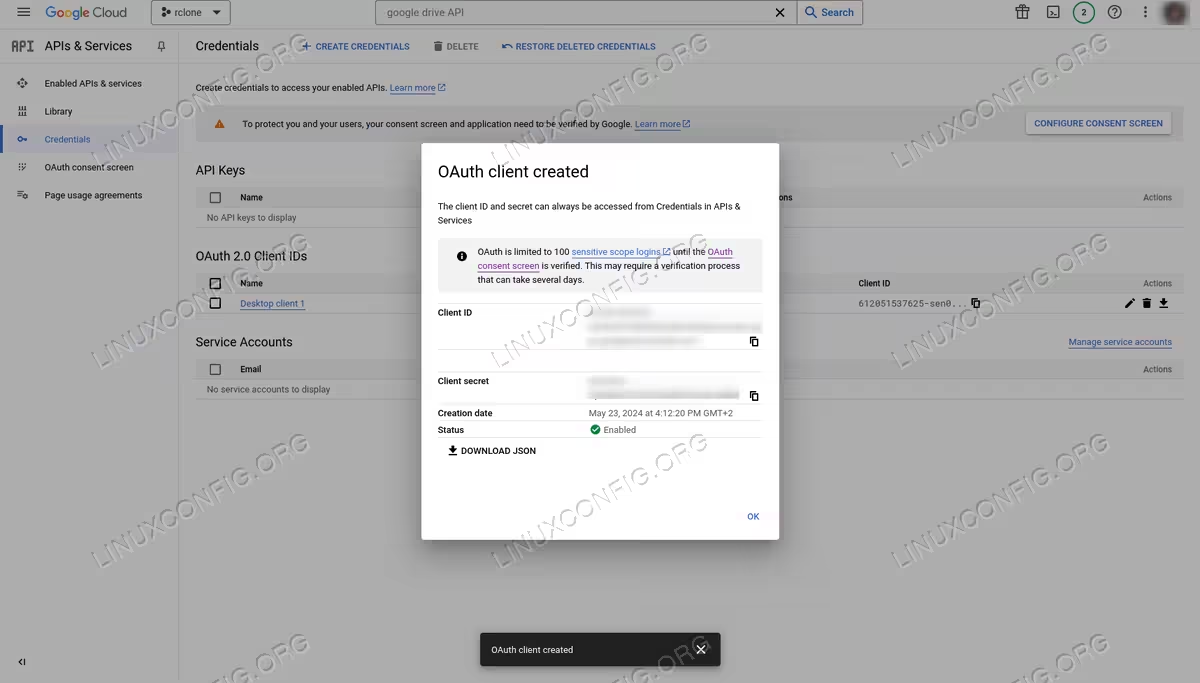
The OAuth credentials will be generated. We should keep note of them (we can easily retrieve them later from the “Credentials” page, anyway):
As the last step, we click on the OAuth consent screen in the left vertical menu, then on the “Publish app” button:
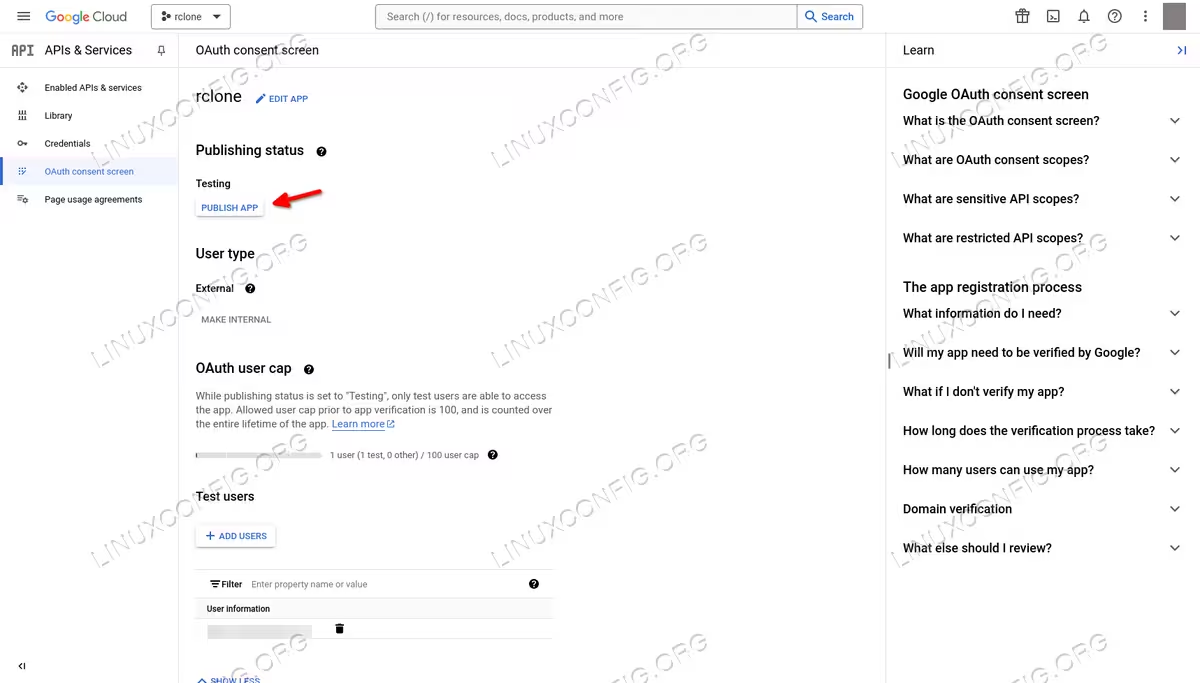
Theoretically we should prepare and submit the app to Google for verification, however, we should be able to use the “app” anyway. Now that we have our own Google Drive API credentials, we can see how to configure an Rclone remote.
Creating an Rclone Google Drive configuration
The easiest way to create a Google Drive remote configuration for Rclone, is to use the guided setup. To launch the “wizard”, we run:
$ rclone config
Rclone will ask us to choose an action. We select “n” to create a new remote:
No remotes found - make a new one
n) New remote
s) Set configuration password
q) Quit config
n/s/q> n
We must provide a name for the “remote”. In this case we just use “gdrive”:
name> gdrive
Next, we need to choose the appropriate cloud storage from a list. The exact position of Google Drive in the list may vary. On recent versions on Rclone, it should be 18:
Storage> 18
At this point, we need to enter the Google Drive credentials we generated in the previous step:
client_id> <your-client-id-here>
client_secret> <your-client-secret-here>
After entering our credentials, we need to select the scopes that Rclone should use. In this case, we choose “1”:
Choose a number from below, or type in your own value.
 1 / Full access all files, excluding Application Data Folder.
   \ "drive"
 2 / Read-only access to file metadata and file contents.
   \ "drive.readonly"
   / Access to files created by rclone only.
 3 | These are visible in the drive website.
   | File authorization is revoked when the user deauthorizes the app.
   \ "drive.file"
   / Allows read and write access to the Application Data folder.
 4 | This is not visible in the drive website.
   \ "drive.appfolder"
   / Allows read-only access to file metadata but
 5 | does not allow any access to read or download file content.
   \ "drive.metadata.readonly"
scope> 1
In the next prompt Rclone asks us if we want to use a service account credential JSON file, we can leave the field blank, and just press “Enter”:
Option service_account_file.
Service Account Credentials JSON file path.
Leave blank normally.
Needed only if you want use SA instead of interactive login.
Leading `~` will be expanded in the file name as will environment variables such as `${RCLONE_CONFIG_DIR}`.
Enter a value. Press Enter to leave empty.
service_account_file>
We can also skip editing advanced configuration:
Edit advanced config?
y) Yes
n) No (default)
y/n> n
Next, we need to choose if we want to use a Browser prompt to authenticate Rclone with our Google Drive app. We answer affirmatively:
Use web browser to automatically authenticate rclone with remote?
* Say Y if the machine running rclone has a web browser you can use
* Say N if running rclone on a (remote) machine without web browser access
If not sure try Y. If Y failed, try N.

y) Yes (default)
n) No
y/n> y
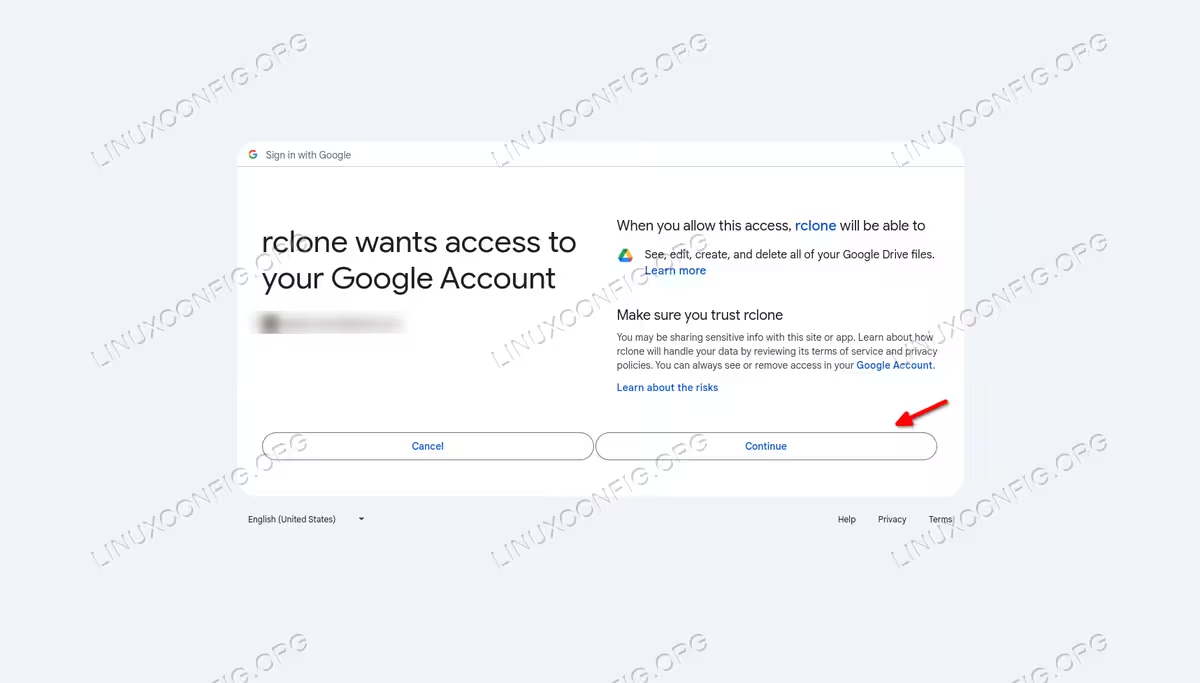
As soon as we press enter, a browser tab will be opened. As we previously said, we will see a warning since the app is not verified by google. To proceed with the authentication, we click on “Advanced”, and then on “Go to rclone (unsafe)”:

We have to confirm we want to grant the application the requested privileges. To confirm, we click on “Continue”:
Back in the terminal, we can choose if we want to configure a Shared Drive. In this case, we can provide a negative answer:
Configure this as a Shared Drive (Team Drive)?

y) Yes
n) No (default)
y/n> n
Finally, to confirm and keep the remote, we answer affirmatively to the last prompt:
Keep this "gdrive" remote?
y) Yes this is OK (default)
e) Edit this remote
d) Delete this remote
y/e/d> y
To exit the wizard, we select “q” in the last prompt:
Current remotes:
Name Type
==== ====
gdrive drive

e) Edit existing remote
n) New remote
d) Delete remote
r) Rename remote
c) Copy remote
s) Set configuration password
q) Quit config
e/n/d/r/c/s/q> q
Using rclone
Rclone provides many commands we can use to manage data on cloud storage. Here we can’t provide a detailed list, but we can see how to perform basic operations such as copying, syncing, moving and deleting data.
Listing files and directories on the remote
To obtain a list of the files currently hosted on a cloud storage, we run rclone with the ls command. To see the files available on the Google Drive remote, we would run:
$ rclone ls gdrive:/
The command returns the following output:
37 file1.txt
 5 file0.txt
As you can see, there are only two files hosted on Google Drive: file1.txt and file0.txt: their size is reported at the beginning of the line, in bytes. To obtain more information about each file, we can use the
lsl command, which returns also the modification time:
$ rclone lsl gdrive:
       37 2024-05-24 14:56:03.931000000 file1.txt
        5 2024-05-24 14:55:55.889000000 file0.txt
Both the ls and lsl command work recursively, so they list files also contained in subdirectories, but don’t include directories in their output. To actually retrieve a list of the directories existing on the remote, we use the lsd command:
$ rclone lsd gdrive:
           -1 2024-05-24 15:47:24 -1 mydir
Unlike ls and lsl, lsd works non-recusively, unless we use the -R option:
$ rclone lsd -R gdrive:
           -1 2024-05-24 15:47:24 -1 mydir
           -1 2024-05-24 15:52:41 -1 mydir/one
To list files and directories and obtain an easy to parse output, suitable to be used in scripts, we can use two other commands: lsf and lsjson. Both of them work non-recursively; the former returns just the name of files and directories, one per line:
$ rclone lsf gdrive:
file0.txt
file1.txt
mydir/
The latter, instead, returns the output in JSON format:
[
{"Path":"file0.txt","Name":"file0.txt","Size":5,"MimeType":"text/plain","ModTime":"2024-05-24T12:55:55.889Z","IsDir":false,"ID":"1keyQCpqiyQbiF6FWUjR4Mb2petECgFkE"},
{"Path":"file1.txt","Name":"file1.txt","Size":37,"MimeType":"text/plain","ModTime":"2024-05-24T12:56:03.931Z","IsDir":false,"ID":"1Aia5gGkvGEe40BlXQah7g3DZWjnCkxxJ"},
{"Path":"mydir","Name":"mydir","Size":-1,"MimeType":"inode/directory","ModTime":"2024-05-24T13:47:24.355Z","IsDir":true,"ID":"1qR6DF7ybJ29ghcUowvqiBowfxDNQf7yg"}
]
Copying files and directories
To copy files from and to a remote storage, we use the copy command. Suppose we want to copy file0.txt from Google Drive to the current working directory on localhost; we would run:
$ rclone copy gdrive:/file0.txt .
We can copy a directory in the same way, but we have to remember that Rclone copies a directory content, not the directory itself. Furthermore, it skips copying empty subdirectories, unless we use the --create-empty-src-dirs option.
When using copy, files existing on the source which doesn’t exist on the destination are created, and existing files are updated. Sometimes we want to change this behavior so that existing files on the destination are left untouched. A common case, is when copying a backup from a local repository to a remote, to avoid propagating possible corruptions of old snapshots. To implement such behavior we can use the
--immutable option: this causes a copy operation to fail if it implies the modification of existing files on the destination (notice, however, that this, at the moment of writing, doesn’t work when copying single files! – see this open bug on the Rclone GitHub repository).
Moving and renaming files and directories
To move files, we use the move command. Suppose we want to move file0.txt, from the remote to our localhost. We would run:
$ rclone move gdrive:/file0.txt .
Since this is a potentially destructive operation, we may first want to launch the command with the --dry-run option, which just simulates the operation.
If we want to rename a file, we use the moveto command. Suppose we want to rename file0.txt to file00.txt on the remote; we would run:
$ rclone moveto gdrive:/file0.txt gdrive:/file00.txt
The same command can be used if we want to upload a file, but store it with another name:
$ rclone moveto file0.txt gdrive:/file00.txt
Synchronizing directories with the sync command
Another command we can use to copy data from and to a remote storage, is sync. The main difference between sync and copy, is that the former creates a mirror copy of the source to the destination. In other words, file which exists on the source, but not on the destination, are copied, and modified files are updated. Additionally, files which doesn’t exist on the source but are present on the destination, are removed.
Suppose we want to synchronize the content of the local mydir directory, to the same directory on the remote (it is created if it doesn’t exist); we would run:
$ rclone sync mydir gdrive:/mydir
You can easily understand why this command must be used with caution. It is possible to use the --imutable option also when using the sync command; this will cause the command to refuse updating modified files, while it will still be able to delete files on destination which doesn’t exist on source.
Deleting files and directories
To remove files and directories we can use the delete command. Supposing we want to remove the file0.txt file on the remote, we would run:
$ rclone delete gdrive:/file0.txt
When we use the delete command against a directory, only the directory content is removed, while the directory itself remains in place. If the directory contains subdirectories, they will also be left untouched, unless we use the --rmdirs option (the root directory will still be preserved).
To remove all but certain files inside a directory, we can specify a pattern as argument of the --exclude option. To delete all files in the “mydir” directory, except those with the “.txt” extension, for example, we would run:
$ rclone delete --exclude=*.txt gdrive:/mydir
Files can also be filtered depending on their size and other paramenters. Just as an example, to delete only files >= 100 MiB, we would run:
$ rclone delete --min-size=100MiB gdrive:/mydir
To ensure we only remove single files, we can use the deletefile command. Finally, to remove a directory together with its content, we can use the purge command:
$ rclone purge gdrive:/mydir
By default, deleted files and directories are moved to Google Drive trash: to delete a file skipping the trash, however, we can use the
--drive-use-trash=false option. To list trashed files we use the ls command with the --drive-trashed-only option. Finally, to empty the trash, we use the the cleanup command:
$ rclone cleanup gdrive:/
Mounting the remote storage as a filesystem
Rclone is able to mount a remote storage as a network disk, using fuse (filesystem in userspace). In our case, to mount the “gdrive” remote on the ~/Public directory, we would run:
$ rclone mount gdrive:/ ~/Public
When launched in the foreground, the command blocks the terminal as long as the remote is mounted. To unmount the filesystem we can simply press the CTRL-c or explicitly send a SIGINT or SIGTERM signal to the process.
Closing thoughts
In this tutorial we saw how to install Rclone on some of the most used Linux distributions, and how to use it to perform basic operations on a remote storage. In the process, we learned how to obtain Google Drive API credentials, and how to create a Google Drive remote configuration for Rclone. There is a lot more which can be done with Rclone than we talked about in this article; to know more about all available commands and their options, please take a look at the project official website, or run each command with the -h option.