Being able to provision and create replicable installations of an operating system is crucial, especially in corporate environments. To perform unattended installations, Ubuntu used to support Debian preseed and Kickstart files. Starting with Ubuntu server 20.04, and version 23.04 of the Ubuntu desktop, those installation methods became deprecated, and the distribution adopted a new autoinstall format, which takes advantage of cloud-init.
In this tutorial we learn how to write an Ubuntu autoinstall file, and how to use it to perform unattended, replicable installations.
In this tutorial you will learn:
- How to write an autoinstall file and define an Ubuntu installation in all its aspects
- How to pass the autoinstall file to the Ubuntu desktop and server installers

| Category | Requirements, Conventions or Software Version Used |
|---|---|
| System | Ubuntu Server >= 20.04 / Ubuntu desktop >= 23.04 |
| Software | No specific software needed |
| Other | None |
| Conventions | # – requires given linux-commands to be executed with root privileges either directly as a root user or by use of sudo command$ – requires given linux-commands to be executed as a regular non-privileged user |
Introducing the autoinstall file
Being a Debian derivative distribution, Ubuntu originally supported preseed files as a method of performing unattended and replicable installations. Support to Kickstart installation syntax was later added as a layer of compatibility, but not all Kickstart commands were implemented. Starting from Ubuntu server 20.04, and since Ubuntu desktop 23.04, Ubuntu adopted its own auto-installation method, based on the YAML syntax: autoinstall.
The first thing we usually see in autoinstall files, is the “#cloud-config” comment: this is required if we want the file to be processed by cloud-init (more on this later). The main key used in the configuration file is
autoinstall; the file syntax version, instead, is specified with the version key. At the moment of writing only version 1 is available:
#cloud-config
autoinstall:
  version: 1
Choosing a source
To specify the “environment” we want to install, we can use the source key, which takes a mapping as value. Inside this mapping, we pass the name of the environment we want to install as the value of the id key. When installing Ubuntu desktop, for example, we can choose between ubuntu-minimal-desktop, and the full-fledged ubuntu-desktop. If the key is omitted, the first available source is used. You can use ubuntu-desktop-minimal for a lighter installation:
#cloud-config
autoinstall:
  source:
    id: ubuntu-desktop-minimal
Setting the system locale, timezone, and keyboard layout
To set the system locale, we use the locale key. Keyboard settings, instead, are specified via the keyboard key. This key takes a mapping as value; in the example below we only specify the layout we want to use (us); it is also possible to specify other parameters, such as the layout variant. Finally, to set the system timezone, we use the timezone key:
#cloud-config
autoinstall:
  locale: en_US.UTF-8
  keyboard:
    layout: us
  timezone: Europe/Rome
Configuring network interfaces
To configure the system network, we use the network key, using the netplan syntax. In the example below, I specify I want the enp1s0 Ethernet interface to be automatically configured via dhcp4:
#cloud-config
autoinstall:
  network:
    version: 2
    ethernets:
      enp1s0:
        dhcp4: true
Configuring the hostname and the system initial user
To use our system safely, we need to create at least one unprivileged user. We also need to set the system hostname. Both these aspects are managed via the identity key. The key takes a mapping as value; we define the username, password and hostname, with the respective keys:
#cloud-config
autoinstall:
  identity:
    username: egidio
    hostname: linuxconfig
    password: '$6$mzOdSSVUfhWRNhcX$mkm.drDfOLfpZRX/58ouJqMvitV2O0147VgKzKGYE6Qx4adJ8TXqMHs2dh2L7kT4TW5e97FCRDkGK1J.LouyV.'
As you can see in the example, the password we provide must be already hashed using the sha512 algorithm.
Setting up SSH server
In the autoinstall file, we have the chance to specify whether we want to install and configure the SSH server. We can enable or disable password authentication, and eventually pass the list of the authorized public keys which will be added to the authorized_keys file of the initial user:
#cloud-config
autoinstall:
  ssh:
    install-server: true
    allow-pw: true
    authorized-keys: []
Installing additional packages
To specify a list of additional packages to be pulled-in by the apt-get package manager, as part of the system installation, we can use the packages key. Here is an example:
#cloud-config
autoinstall:
  packages:
    - git
    - python3-pip
To install snap packages, instead, we use the
snaps keyword. The keyword accepts a list of mappings as value. In each mapping, we use the name, channel and classic keys to specify, respectively, the name of the snap package to be installed, the channel from which the snap should be installed (the default is “stable”), and whether the snap package should be installed in classic mode (default is “false”):
#cloud-config
autoinstall:
  snaps:
    - name: pycharm-community
      channel: stable
      classic: true
Defining the post-installaction action
To define the post-installation action we use the shutdown key. This key accepts two possible values: “poweroff” and “reboot”:
#cloud-config
autoinstall:
  shutdown: reboot
Defining storage setup
One of the most important aspects of the system installation, is the partitioning setup. When installing Ubuntu interactively we can choose among some predefined layouts, or create a custom setup. We can do the same thing when performing automatic installations. The available predefined layouts are: lvm, direct and zfs.
The lvm layout is the default: it creates the EFI (in case of modern UEFI systems) and boot standard partitions, and installs the rest of the system on an LVM logical volume. The size of the root logical volume is determined according to a policy: when it is set to “scaled” (default), the amount of space assigned to the logical volume depends on the volume group size. When possibile, some space is left unused, to allow the creation of snapshots:
| VG Size | Root LV Size |
|---|---|
| Less than 10 GiB | 100% of the available space |
| Between 10 GiB and 20 GiB | 10 GiB |
| Between 20GiB and 200 GiB | 50% of the available space |
| Greater than 200 GiB | 100 GiB |
When the policy is set to “all”, instead, all the available space is assigned to the root logical volume. In this context, thepassword key can be used to enable LUKS encryption, and to provide the encryption password:
#cloud-config
autoinstall:
  storage:
    layout:
      name: lvm
      policy: all
      password: mysecretpassword
The direct layout installs Ubuntu on standard partitions. On UEFI systems, it creates an EFI partition of 1GiB in size, and allocates the rest of the space to the root partition.
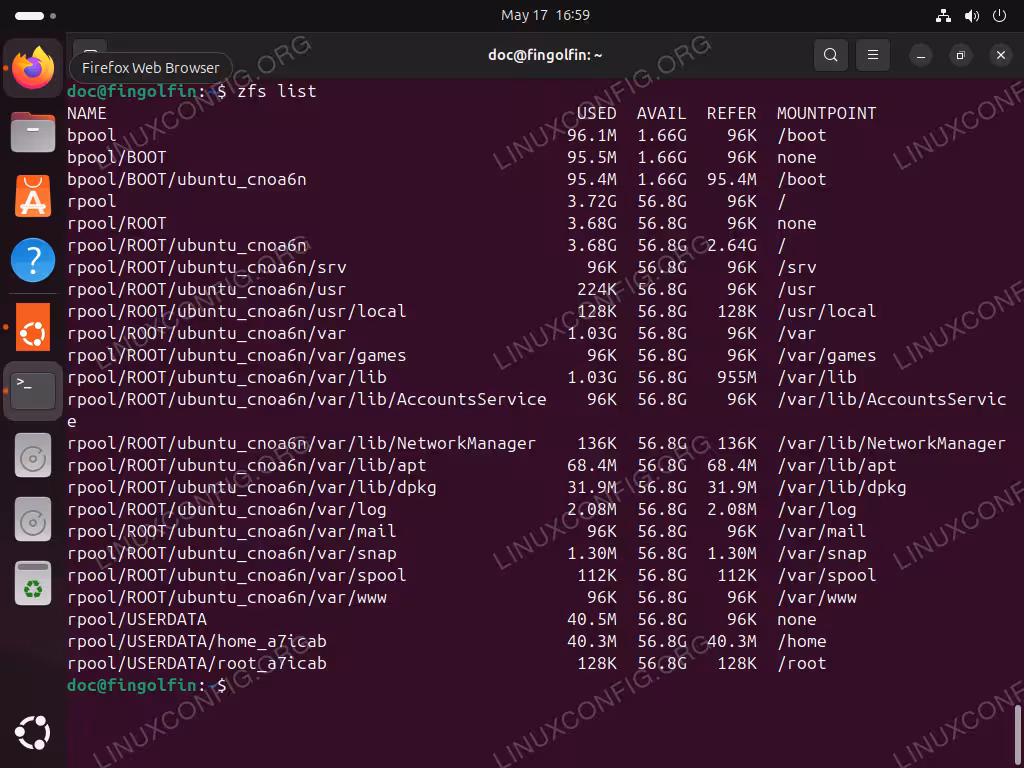
Finally, the zfs layout install the system on a ZFS pool, creating several volumes. Below you can see a screenshot of the zfs setup after an Ubuntu fresh install:
Choosing a disk for the installation
In addition to partition layouts, we can explicitly set what disk should be used for the installation. We do this via the match key. We can select a disk by path, by vendor, model, serial, and more. If the keyword is omitted, the installation happens on the largest available disk. In the example below we select a disk by path (/dev/vda):
#cloud-config
autoinstall:
  storage:
    layout:
      name: lvm
      match:
        path: /dev/vda
Creating a custom layout
To define a custom partitions layout, we use the config keyword. This keyword accepts a list of mappings as value, each one describing a command of the curtin installer. Let’s see an example. Suppose we want to install Ubuntu on a LVM on LUKS setup, creating the following partitions:
- A small EFI partition of 600 MiB, formatted in fat32, to be mounted on /boot/efi
- A boot partition of 1 GiB, formatted in ext4 to be mounted on /boot
- A third partition which spans over the rest of the space, encrypted with LUKS, and formatted as an LVM physical volume
- One LVM logical volume of 45 GiB to be mounted on /
- One LVM logical volume of 50 GiB to be mounted on /home
Here is how we would proceed. The first thing we need to do is to use the disk command. It is used to setup disks, and create partition tables:
#cloud-config
autoinstall:
  storage:
    config:
      - id: disk-vda
        type: disk
        ptable: gpt
        path: /dev/vda
        wipe: superblock-recursive
With the id keyword we provide an identifier for the section and the command: this allows us to reference the disk when using other commands. With the type keyword, instead, we specify the command we want to run, which, in this case is “disk”.
When the ptable key is present, a partition table of the specified type is created on the disk. In this case we used “gpt” as value. The path keyword is used to identify the disk by its path (/dev/vda).
The wipe keyword is very important: when used, it destroys the content of disks or partitions. There are many types of “wipe” we can use: superblock, superblock-recursive, zero, random, and pvremove. We use superblock when we want to wipe just the superblock of the disk, and superblock-recursive when we want to wipe also eventual embed superblocks (they may be present when using LVM, for example). Using the zero or random wipes, we can overwrite the disk with zeros or random data, respectively. Finally, pvremove specifically wipes LVM metadata in order to ensure the disk is not part of an LVM setup. In the example above, we used superblock-recursive, which should be enough in most cases.
Creating standard partitions with the “partition” command
We now need to create the three “standard” partitions on the disk. The first one is the EFI partition, the second one the partition which will be mounted on /boot, and the third one is the partition will be encrypted with LUKS, and used as an LVM physical volume. To create a partition, we use the partition command. In the examples below, for the sake of clarity, we focus on current commands, omitting those we used previously:
#cloud-config
autoinstall:
  storage:
    config:
      # [...]

      - id: efipart
        type: partition
        device: disk-vda
        offset: 1048576
        size: 600M
        flag: boot
        grub_device: true

      - id: bootpart
        type: partition
        device: disk-vda
        size: 1G

      - id: pvpart
        type: partition
        device: disk-vda
        size: -1
Since the “efipart” partition is the first one, we used the
offset keyword to ensure it is created at 1MiB from the start of the disk (the value is provided in bytes: 1048576). We used the flag keyword to specify a flag to be set on the partition, “boot” in this case. Finally, we used the grub_device keyword to ensure GRUB is installed on the partition.
In all definitions, we used the device key to reference the disk on which the partition must be created, and the size key to specify the partition size. In the case of the “pvpart” partition we use “-1” as value: this ensures the partition occupies all the remaining space on the disk.
Creating an encrypted LUKS volume with the dm_crypt command
As a next step we want to use LUKS to encrypt the “pvpart” partition. We can do this by using the dm_crypt command:
#cloud-config
autoinstall:
  storage:
    config:
      # [...]

      - id: pvpart-crypt
        type: dm_crypt
        volume: pvpart
        key: mysecretpassword
When using the dm_crypt command, we pass the identifier of the partition we want to encrypt as value of the volume key, and we use key to provide the encryption passphrase.
Creating the LVM volume group and logical volumes
To create an LVM volume group, we use the lvm_volgroup command, and use the devices keyword to list the physical volumes we want to add to the group:
#cloud-config
autoinstall:
  storage:
    config:
      # [...]

      - id: vg0
        type: lvm_volgroup
        name: vg0
        devices:
          - pvpart-crypt
To create logical volumes, we use the lvm_partition command. We specify the LV name with the name key, the volume group on which the LV should be created as the value of volgroup, and its size, via the size key:
#cloud-config
autoinstall:
  storage:
    config:
      # [...]
      - id: root_lv
        type: lvm_partition
        name: root_lv
        volgroup: vg0
        size: 45G

      - id: home_lv
        type: lvm_partition
        name: home_lv
        volgroup: vg0
        size: 50G
Formatting the partitions
To create filesystems on the partitions we defined, and set their mountpoints, we use the format command. We use the volume keyword to reference the partition by id, and the fstype keyword to specify what filesystem should be created:
#cloud-config
autoinstall:
  storage:
    config:
      # [...]

      - id: efipart_fs
        type: format
        volume: efipart
        fstype: fat32

      - id: bootpart_fs
        type: format
        volume: bootpart
        fstype: ext4

      - id: root_lv_fs
        type: format
        volume: root_lv
        fstype: ext4

      - id: home_lv_fs
        type: format
        volume: home_lv
        fstype: ext4
Finally, to specify where the filesystem should be mounted, we use the mount command. With the device key we specify the filesystem id; with path, instead, its mountpoint:
#cloud-config
autoinstall:
  storage:
    config:
      # [...]

      - id: efipart-mount
        type: mount
        device: efipart_fs
        path: /boot/efi

      - id: bootpart-mount
        type: mount
        device: bootpart_fs
        path: /boot

      - id: root_lv_mount
        type: mount
        device: root_lv_fs
        path: /

      - id: home_lv_mount
        type: mount
        device: home_lv_fs
        path: /home
Passing the configuration to the Ubuntu installer
Here is what our autoinstall configuration file looks in its entirety:
#cloud-config
autoinstall:
version: 1
source:
id: ubuntu-server-minimal
locale: en_US.UTF-8
keyboard:
layout: us
timezone: Europe/Rome
network:
version: 2
ethernets:
enp1s0:
dhcp4: true
identity:
username: egidio
hostname: linuxconfig
password: '$6$mzOdSSVUfhWRNhcX$mkm.drDfOLfpZRX/58ouJqMvitV2O0147VgKzKGYE6Qx4adJ8TXqMHs2dh2L7kT4TW5e97FCRDkGK1J.LouyV.'
ssh:
install-server: true
allow-pw: true
authorized-keys: []
packages:
- git
- python3-pip
snaps:
- name: pycharm-community
channel: stable
classic: true
shutdown: reboot
storage:
config:
- id: disk-vda
type: disk
ptable: gpt
path: /dev/vda
wipe: superblock-recursive
- id: efipart
type: partition
device: disk-vda
offset: 1048576
size: 600M
flag: boot
grub_device: true
- id: bootpart
type: partition
device: disk-vda
size: 1G
- id: pvpart
type: partition
device: disk-vda
size: -1
- id: pvpart-crypt
type: dm_crypt
volume: pvpart
key: mysecretpassword
- id: vg0
type: lvm_volgroup
name: vg0
devices:
- pvpart-crypt
- id: root_lv
type: lvm_partition
name: root_lv
volgroup: vg0
size: 45G
- id: home_lv
type: lvm_partition
name: home_lv
volgroup: vg0
size: 50G
- id: efipart_fs
type: format
volume: efipart
fstype: fat32
- id: bootpart_fs
type: format
volume: bootpart
fstype: ext4
- id: root_lv_fs
type: format
volume: root_lv
fstype: ext4
- id: home_lv_fs
type: format
volume: home_lv
fstype: ext4
- id: efipart-mount
type: mount
device: efipart_fs
path: /boot/efi
- id: bootpart-mount
type: mount
device: bootpart_fs
path: /boot
- id: root_lv_mount
type: mount
device: root_lv_fs
path: /
- id: home_lv_mount
type: mount
device: home_lv_fs
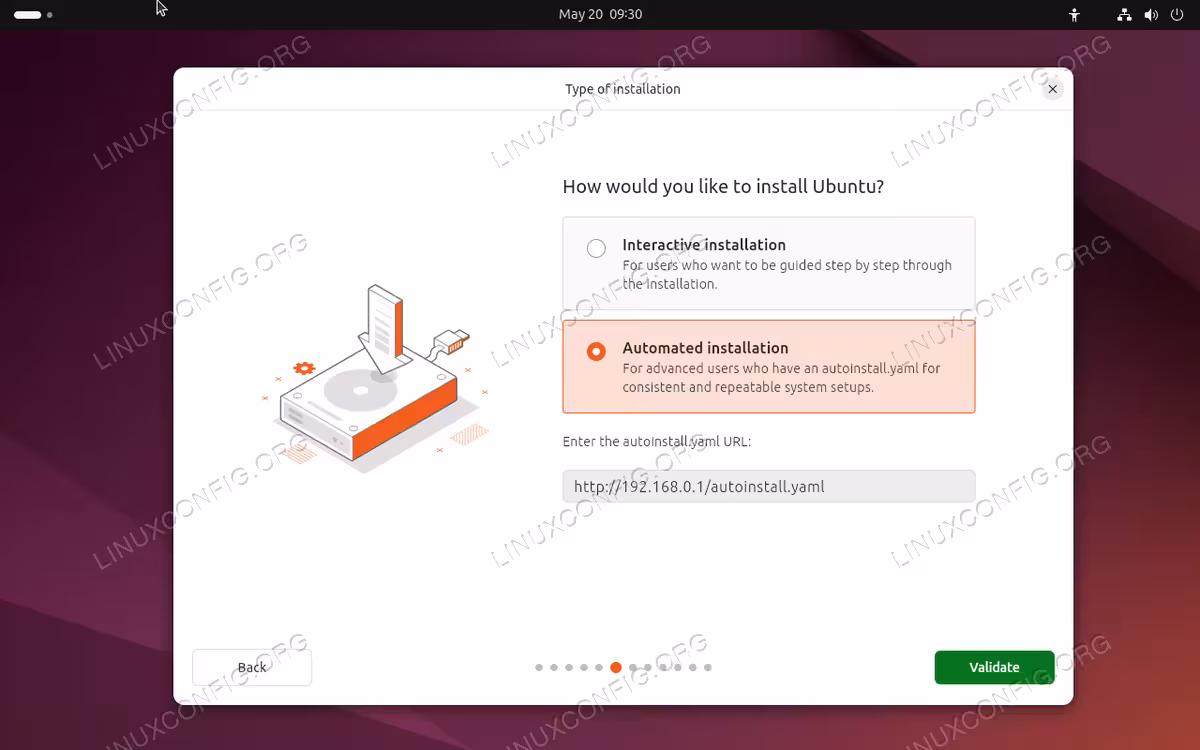
path: /homeHow to pass the configuration to the Ubuntu installer? When installing the Desktop version of Ubuntu, the easiest and most convenient method consists into making our configuration file available via HTTP or FTP, and pass its URL in the apposite section of the graphical installer:
An autoinstall configuration file is automatically created after every Ubuntu installation, even those performed interactively. You can find the file saved as /var/log/installer/autoinstall-user-data. The file can be used to replicate the installation.
If we want to perform a completely automated installation, or use the autoinstall configuration when installing Ubuntu server, we must make use of cloud-init, and use the configuration as a cloud-config data file: this is what the “#cloud-config” comment at the very beginning of the autoinstall file is for.
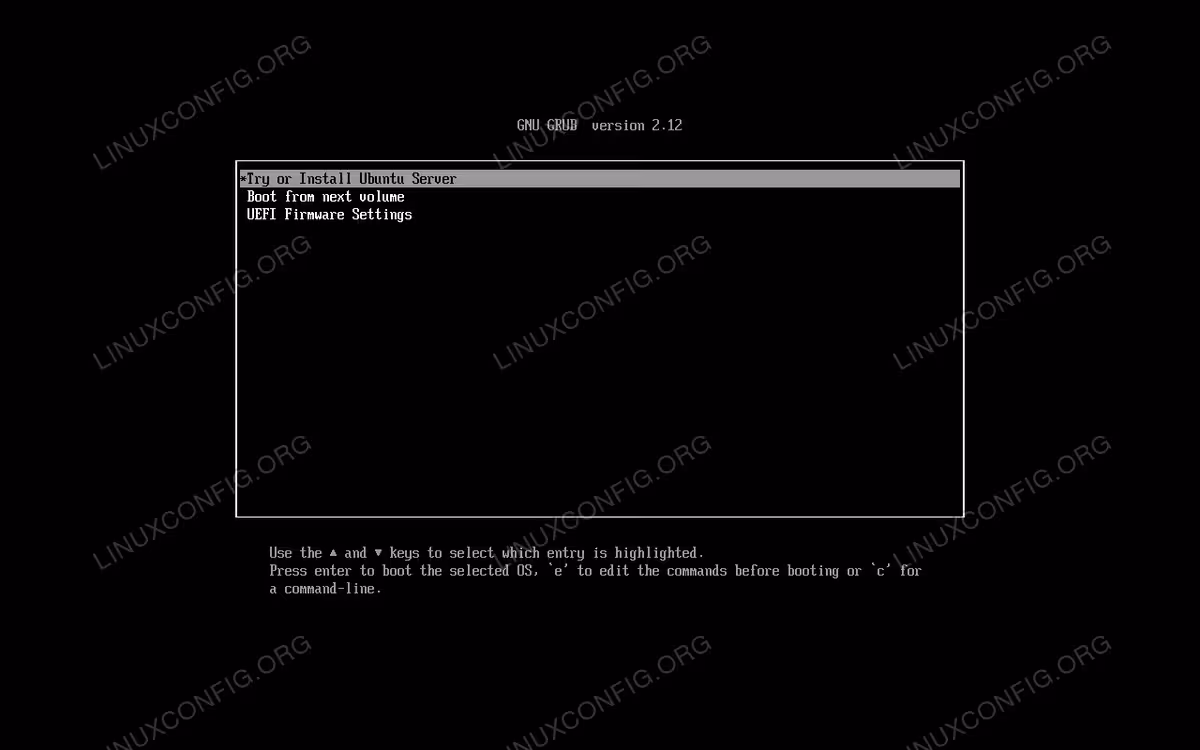
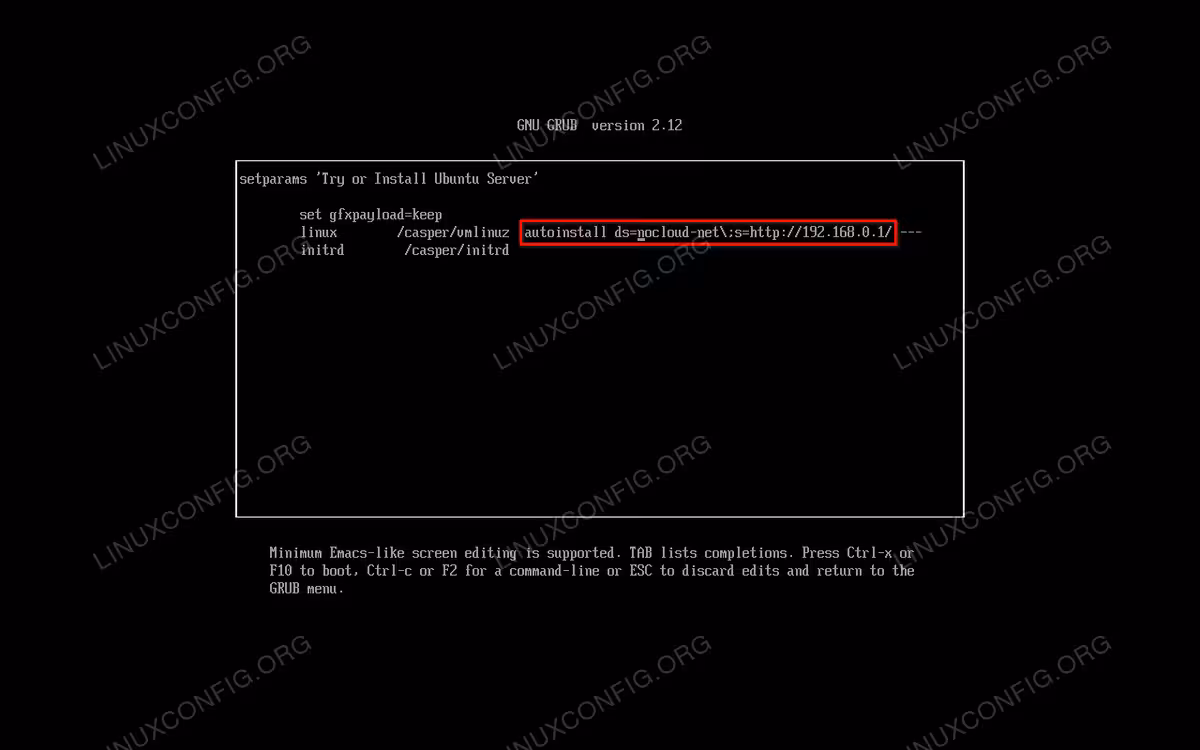
In order for cloud-init to read the file at boot, we need to rename it as user-data and create an empty file named meta-data in the same directory. We press “e” to modify the first entry of the live ISO GRUB menu:
We then modify the line starting with “linux”, adding the following string before the three hypens (escaping the semicolon is important!):
autoinstall ds=nocloud-net\;s=<directory-URL>
Where <directory-URL> is the URL of the directory containing the user-data and meta-data files:
At this point to start the installation, we just press Ctrl-x.
Closing thoughts
Since Ubuntu server 20.04 and Ubuntu desktop 23.04, it is possibile to perform unattended and reproducible system installations using the native autoinstall format. In this tutorial we saw how to write an autoinstall file, and some of the keys which can be used in it. Finally we saw how to pass the file to the Ubuntu desktop and server installers. For a complete Ubuntu autoinstall reference, please take a look at the official documentation.