Preseed is the equivalent of Kickstart for the RedHat family of distributions, and “autoinstall” for Ubuntu. By preparing a “preseed” file, and populating it with answers to the questions asked by the Debian installer, we can perform unattended and replicable Debian installations. In this tutorial, we learn how to create a preseed file or generate it from an existing installation, and how to pass it to the Debian installer.
In this tutorial you will learn:
- How to create a preseed file or generate it from an existing Debian installation
- How to pass a preseed file to the Debian installer
| Category | Requirements, Conventions or Software Version Used |
|---|---|
| System | Debian |
| Software | None |
| Other | Root privileges |
| Conventions | # – requires given linux-commands to be executed with root privileges either directly as a root user or by use of sudo command$ – requires given linux-commands to be executed as a regular non-privileged user |
Obtanining a preseed file from an existing Debian installation
Let’s start with the easiest way to obtain a valid preseed file. Supposing we already performed a Debian installation, to obtain the preseed file containing the answers we provided to the installer, we can simply use the debconf-get-selections utility, which is part of the debconf-utils package. To ensure the latter is installed, we can run:
$ sudo apt-get update && sudo apt-get install debconf-utils
Once the utility is installed, to obtain the preseed file, we run the following command:
$ sudo debconf-get-selections --installer > preseed.cfg
In the example above, we redirected the output of the command to a file called preseed.cfg; this can be used to replicate the installation, and will repeat the choices we made manually in the Debian installer. Admittedly, although efficient, the file can be pretty verbose. Let’s see how to create one with the bare minimum content.
Creating a preseed file from scratch
Let’s see how to create a preseed file from scratch. As approach, we will go through the main Debian installer steps, and try to answer the questions via instructions, in the preseed config file.
When we install Debian selecting the “Graphical Install” option, the first question the installer asks us, is what language should be used for the system (English being the default choice), our location, and the desired keyboard layout. Inside our preseed file, we can provide answers to those questions with the following instructions:
d-i debian-installer/language string en
d-i debian-installer/country string US
d-i keyboard-configuration/xkb-keymap select us
The syntax we must use when providing installer answers is the one used by the debconf-set-selections utility:
<owner> <question-name> <question-type> <value>
In the first field, we provide the “owner” of the question, the one who will handle the answer. In the vast majority of cases, in the preseed file, this will be “d-i”, which stands for Debian-Installer. The second field contains the question name, and the third the question type. Finally, the fourth field, contains the value, the answer to the question itself.
Configuring the network
Let’s proceed further. The next step, in a standard Debian installation, is the network configuration. The installer asks us to provide a hostname and an optional domain for our system, and, at least in the “non-advanced” installation mode, automatically configures the network using a DHCP server, if one is available in the LAN. Here, just as an example, we will use “linuxconfig” as hostname, and leave the domain field blank. In our preseed file, we translate those choices by adding the following instructions:
d-i netcfg/get_hostname string linuxconfig
d-i netcfg/get_domain string
In certain situations, we may want to configure the network statically, without relying on a DHCP server. The instructions in the example below, when added to a preseed file, disable the network autoconfiguration, explicitly select a network interface (“eth0” in this case), and assign an IP address to it. The netmask value, together with the gateway and nameservers addresses are also assigned statically. The last instruction, is needed to confirm those choices without being prompted:
d-i netcfg/disable_autoconfig boolean true
d-i netcfg/choose_interface select eth0
d-i netcfg/get_ipaddress string 192.168.122.150
d-i netcfg/get_netmask string 255.255.255.0
d-i netcfg/get_gateway string 192.168.122.1
d-i netcfg/get_nameservers string 192.168.122.1
d-i netcfg/confirm_static boolean true
It is important to note that network instructions reported in the preseed file are effective only if the preseed file itself is not retrieved from the network (from a web server, for example). This is a typical chicken-and-egg problem: in order to fetch the preseed file containing the instructions to configure the network, the network itself must be already configured. We can work around this issue using a DHCP server, or, as we will see, by providing network configuration instructions as boot arguments.
Configuring system users
The next step, in the operating system installation, consists into setting up users and passwords. We normally want to leave the root password blank and provide standard user information: its “full name” (the “real” name), its username, and its password. This will lock the root account, and let us perform administrative tasks using sudo. In the preseed file, we translate it by writing:
d-i passwd/root-login boolean false
d-i passwd/user-fullname string egidio
d-i passwd/username string egidio
d-i passwd/user-password-crypted password $6$GjYHPm0qkEd/Ijea$msrqFWfBzuVsVtlTbD.8mbRTq3I5lBegbv1ZtNMse5YyTohQIrMoz.m37lMzVwEm75Klp9bCVU12ySg.7twFj0
Notice that while in the installer we provide the password in clear, in the preseed file, we need to provide it in hashed format using the sha512 algorithm. One of the quickest method of obtaining a hash + salt of a password, is by using the mkpasswd utility:
$ mkpasswd -m sha512crypt
Once we launch the command above, the utility will prompt us to provide our password, and will output the hashed and salted version. We could also provide the password directly as an argument, but this may make it visible in the process lists, and it may also be saved in our shell history. If we omit providing the password in the preseed file, the installer will ask for it interactively, as for any other missing information.
Specifying a timezone
As next step, the installer prompts us to choose the system timezone. To select the US “Eastern” timezone, for example, we would write:
d-i time/zone string US/Eastern
Partitioning the disk
Partitioning the disk is probably the most important part of the installation process, and can also be one of the most complex to report in the preseed file. The Debian installer, by default, let us choose among three guided partitioning “methods”:
- Guided – use entire disk
- Guided – use entire disk and setup LVM
- Guided – use entire disk and setup up encrypted LVM
The installer, has a fourth option, “Manual”, which let us create a more customized partitioning scheme. At this point in the tutorial we will see how to translate the “LVM” preconfigured recipe. Later on, we will also see how to use a custom recipe. Here I will assume we are running on a modern UEFI firmware, and the disk we want to use for Debian installation is
/dev/vda.
As a first thing we explicitly tell the installer we want to use a GPT partition table, and we want to use the vda disk for the installation:
d-i partman-partitioning/choose_label string gpt
d-i partman-auto/disk string /dev/vda
If on the disk there are pre-existing lvm or raid partitions, the installer will issue a warning. To avoid this, we can include the following instructions in the preseed file:
d-i partman-lvm/device_remove_lvm boolean true
d-i partman-md/device_remove_md boolean true
d-i partman-lvm/confirm boolean true
d-i partman-lvm/confirm_nooverwrite boolean true
Next, we select the LVM installation method, and we specify we want to use all available space for the LVM volume group:
d-i partman-auto/method string lvm
d-i partman-auto-lvm/guided_size string max
At this point we can choose among the three available partitioning schemes: the first one installs the entire system in one partition (“atomic” choice), the second creates a separate partition for /home (“home” choice), and the third creates separate partitions (logical volumes, to be precise) for /home, /var and /tmp (“multi” choice). Here we choose the second option:
d-i partman-auto/choose_recipe select home
Finally, we tell the installer we finished setting up the partitions, we confirm our selections, and write them to disk:
d-i partman-partitioning/confirm_write_new_label boolean true
d-i partman/choose_partition select finish
d-i partman/confirm boolean true
d-i partman/confirm_nooverwrite boolean true
Configuring the package manager
The installer let us choose whether we want to use a repository mirror for apt, specify which one to use, and whether we want/need to use an HTTP proxy. In this, example, we explicitly tell the installer we want to use a mirror in the US (deb.debian.org) and we leave the proxy field blank:
d-i apt-setup/use_mirror boolean true
d-i mirror/country string US
d-i mirror/http/mirror select deb.debian.org
d-i mirror/http/proxy string
To skip the prompt asking us if we want to scan extra installation media, we use the following instruction:
d-i apt-setup/cdrom/set-first boolean false
If we install the system from a non-netinstall image, by default, the “cdrom” entry is saved as a software source in the /etc/apt/source.list file. To avoid this, we add the following line to our preseed file:
d-i apt-setup/disable-cdrom-entries boolean true
We also can choose whether we want to participate in the package usage survey. Here we say “no” (which is the default, anyway):
popularity-contest popularity-contest/participate boolean false
Choosing what packages to install
The Debian installer uses tasksel to let us choose what packages should be installed in the system. The available choices (at least on Debian Bookworm), are:
- Debian desktop environment
- …GNOME
- …Xfce
- …GNOME Flashback
- …KDE Plasma
- …Cinnamon
- …MATE
- …LXDE
- …LXQt
- web server
- SSH server
- Standard system utilities
- laptop
Here we choose to install the GNOME desktop environment, the Standard system utilities and the ssh server meta-packages:
tasksel tasksel/first multiselect gnome-desktop,standard,ssh
To install single packages, instead, we can use the pkgsel/include option, and prove a space-separated list of package names. Just as an example, to install vim and git, we would write:
d-i pkgsel/include string vim git
Finishing the installation and rebooting
To finish the installation and rebooting we add the following lines to the file:
d-i finish-install/reboot_in_progress note
d-i cdrom-detect/eject boolean false
We use the first instruction to skipt the prompt asking us if we want to reboot the system once the installation is complete; we use the latter, instead, to avoid the warning about ejecting the cdrom before rebooting.
Passing the preseed file to the Debian installer
To pass the preseed file to the Debian installer, we basically have two options. The first consists into selecting the “Advanced options” entry in the installer boot menu, and then choosing either “Graphical automated install” or “Automated install”. When we do this, the installer will load the needed modules, will attempt to configure the network, and will prompt us to provide the URL of the preesed file:
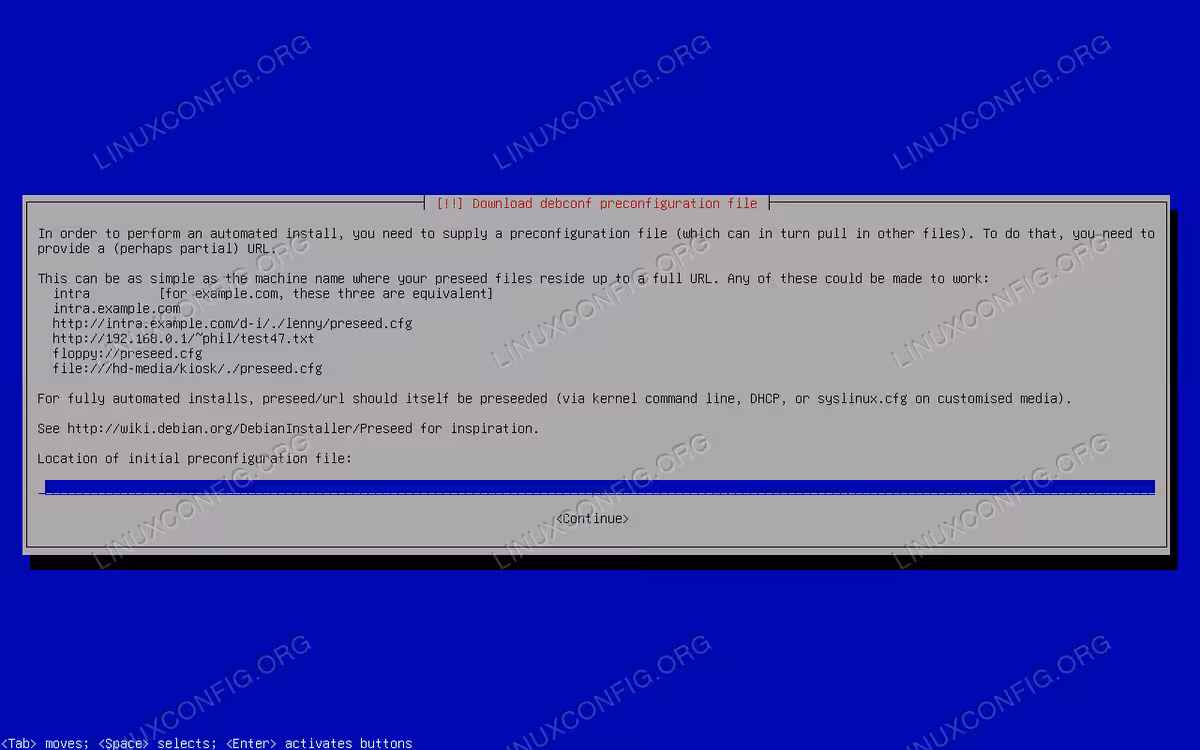
The other option consists into modifying an existing menu entry. Here is an example: suppose our preseed file is available at http://192.168.0.35/preseed.cfg; we could modify the first entry, “Graphical install”, by appending the following string to the “linux” line, so that it becomes:
linux /install.amd/vmlinuz vga=788 --- quiet auto=true url=http://192.168.0.35/preseed.cfg
The
auto option (set to true, just “auto” doesn’t work in my experience) is needed to launch the installation in the automated mode, where the network is automatically configured via DHCP before the preseed file is fetched, and questions about locale and keymap are postponed so that they are configured via the preseed file.
The installation will not be fully automated, however, since the installer will still ask for an hostname and optional domain. Only once we provide this information, the preseed file will be retrieved and used to answer the other installer questions. For a fully automated installation, when fetching the preseed file from the network, we can provide the hostname and domain name early, as boot arguments. For example:
linux /install.amd/vmlinuz vga=788 --- quiet auto=true url=http://192.168.0.35/preseed.cfg netcfg/get_hostname=linuxconfig netcfg/get_domain=""
If we want, we can use this method to statically configure the network, so that a DHCP server is not required:
linux    /install.amd/vmlinuz vga=788 --- quiet \
  auto=true \
  url=http://192.168.0.35/preseed.cfg \
  netcfg/get_hostname=linuxconfig \
  netcfg/get_domain="" \
  netcfg/disable_autoconfig=true \
  netcfg/choose_interface=eth0 \
  netcfg/get_ipaddress=192.168.122.150 \
  netcfg/get_netmask=255.255.255.0 \
  netcfg/get_gateway=192.168.122.1 \
  netcfg/get_nameservers=192.168.122.1 \
  netcfg/confirm_static=true
As an alternative, preseed files can be included in the debian iso filesystem or in the initramfs. Those options, have the advantage of not requiring a working network configuration to retrieve the file, but are less convenient, since the distribution image should be rebuilt each time we modify the file.
Closing thoughts
In this tutorial, we learn how to perform unattended (or semi-unattended) and replicable Debian installations using a preseed file. Preseed files contain answers to the questions asked by the Debian installer, similarly to Kickstart configurations for distributions which use the Anaconda installer, and “autoinstall” in recent versions of Ubuntu. We saw how to obtain a preseed file from an already installed Debian system, and how to create a configuration from scratch. Finally, we saw how to pass the preseed file to the Debian installer.