You have two options when configuring the IP address on your Ubuntu system, and that is either a static IP address or DHCP. A static IP address allows you to manually select your IP address by configuring it on the Linux system, whereas DHCP relies on the router or DHCP server to lease you an IP address, either a reserved one or the next available one that is currently free, depending on the setup.
In addition to the IP address configuration, Linux administrators may also need to set the DNS server and default gateway, or setup a virtual IP address. In this tutorial, you will see how to change IP address on Ubuntu Server using the command line and on Ubuntu Desktop using the GUI, switch between static IP and DHCP, and configure additional network settings.
- Change IP address on Ubuntu Server (command line)
- Change IP address on Ubuntu Desktop (GUI)
- Switch between static IP and DHCP configuration
- Configure virtual/multiple IP addresses
- Manage cloud-init network configuration

| Category | Requirements, Conventions or Software Version Used |
|---|---|
| System | Ubuntu Linux 20.04 or higher |
| Software | netplan (Server), NetworkManager (Desktop) |
| Other | Privileged access to your Linux system as root or via the sudo command. |
| Conventions | # – requires given linux commands to be executed with root privileges either directly as a root user or by use of sudo command$ – requires given linux commands to be executed as a regular non-privileged user |
| Method | Quick Steps |
|---|---|
| Server (CLI) | Edit /etc/netplan/50-cloud-init.yaml → Set dhcp4: false → Add address/routes → sudo netplan apply |
| Desktop (GUI) | Network Settings → Click gear icon → IPv4 tab → Manual → Enter IP/Gateway/DNS → Apply |
Change IP Address on Ubuntu Server
Ubuntu uses netplan for network configuration. The configuration file is typically located in
/etc/netplan/ and may be named differently depending on your installation:
50-cloud-init.yaml– Common on cloud instances and server installations01-netcfg.yaml– Common on some standard installations01-network-manager-all.yaml– Desktop installations using NetworkManager
Use ls /etc/netplan/ to see which file(s) exist on your system. Throughout this guide, we reference 50-cloud-init.yaml, but substitute with your actual filename.
Changing to a static IP address will allow you to manually choose an IP address on Ubuntu Server. On the other hand, using DHCP leaves it up to the router or DHCP server’s configuration to choose which IP address your machine will have. Follow the step by step instructions below to change the IP address on Ubuntu Server using the command line.
Change to Static IP Address
- Identify your network interface name: Before configuring, you need to know which network interface you want to configure.
FINDING YOUR NETWORK INTERFACE NAME
Use theip acommand to list all network interfaces on your system:$ ip a
Look for your active network interface. Common names include
enp0s3,ens18,eth0, or similar. Note your interface name as you’ll need to use it in the configuration file. - Check if cloud-init network management needs to be disabled: Some systems have cloud-init actively managing network configuration. Check your netplan file for a header comment:
$ sudo cat /etc/netplan/50-cloud-init.yaml
If you see a header stating “Changes to it will not persist across an instance,” disable cloud-init before making changes:
$ sudo bash -c 'echo "network: {config: disabled}" > /etc/cloud/cloud.cfg.d/99-disable-network-config.cfg'For detailed information on cloud-init and netplan configuration, see our comprehensive netplan static IP configuration guide.
- Locate and edit with administrative privileges the
/etc/netplan/50-cloud-init.yamlconfiguration file (see the netplan configuration files box above if your filename differs) with the following configuration. Update your desired static IP address, DNS server and gateway where appropriate. Replaceenp0s3with your actual interface name. Save and exit the file after you have applied your changes.network: version: 2 ethernets: enp0s3: dhcp4: false addresses: - 192.168.1.202/24 routes: - to: default via: 192.168.1.1 nameservers: addresses: [8.8.8.8, 8.8.4.4, 192.168.1.1] - Secure configuration file permissions: Ensure that only root can read and write the network configuration files:
$ sudo chmod 600 /etc/netplan/*.yaml
This security step prevents unauthorized access to your network configuration.
- To apply the new Netplan changes execute:
$ sudo netplan apply
Alternatively, if you run into some issues run:
$ sudo netplan --debug apply
- Confirm your new static IP address by using the
ip acommand:$ ip a
Change to DHCP
If you have previously configured a static IP on Ubuntu Server and wish to revert to using DHCP for your network settings, all you need to do is open your /etc/netplan/50-cloud-init.yaml file (see the netplan configuration files box above if your filename differs) and change the dhcp4 to true.
dhcp4: true
Then apply the changes:
$ sudo netplan apply
How to create a virtual IP Address
- To configure a second IP address, we will start by once again opening the
/etc/netplan/50-cloud-init.yamlfile (see the netplan configuration files box above if your filename differs). The following configuration contains two IP addresses, and as you can see they are separated by a comma within the list format.network: version: 2 ethernets: enp0s3: dhcp4: false addresses: - 192.168.1.202/24 - 192.168.1.204/24 routes: - to: default via: 192.168.1.1 nameservers: addresses: [8.8.8.8, 8.8.4.4, 192.168.1.1]Our secondary or virtual IP address in this case is
192.168.1.204. - To apply the new Netplan changes execute:
$ sudo netplan apply
Alternatively, if you run into some issues run:
$ sudo netplan --debug apply
- Confirm that you now have a virtual IP address by using the
ip acommand:$ ip a
Temporary Virtual IP
If, instead, you would like to configure a temporary virtual IP address, you can use the following command syntax:
$ sudo ip addr add 192.168.1.204/24 dev enp0s3 label enp0s3:1
This will once again configure 192.168.1.204 as the virtual IP address. However, this configuration will not persist after reboot.
Change IP Address on Ubuntu Desktop
For Ubuntu Desktop users, changing the IP address can be done through the graphical NetworkManager interface. This method is preferred for desktop environments as it provides an intuitive way to manage network settings without editing configuration files.
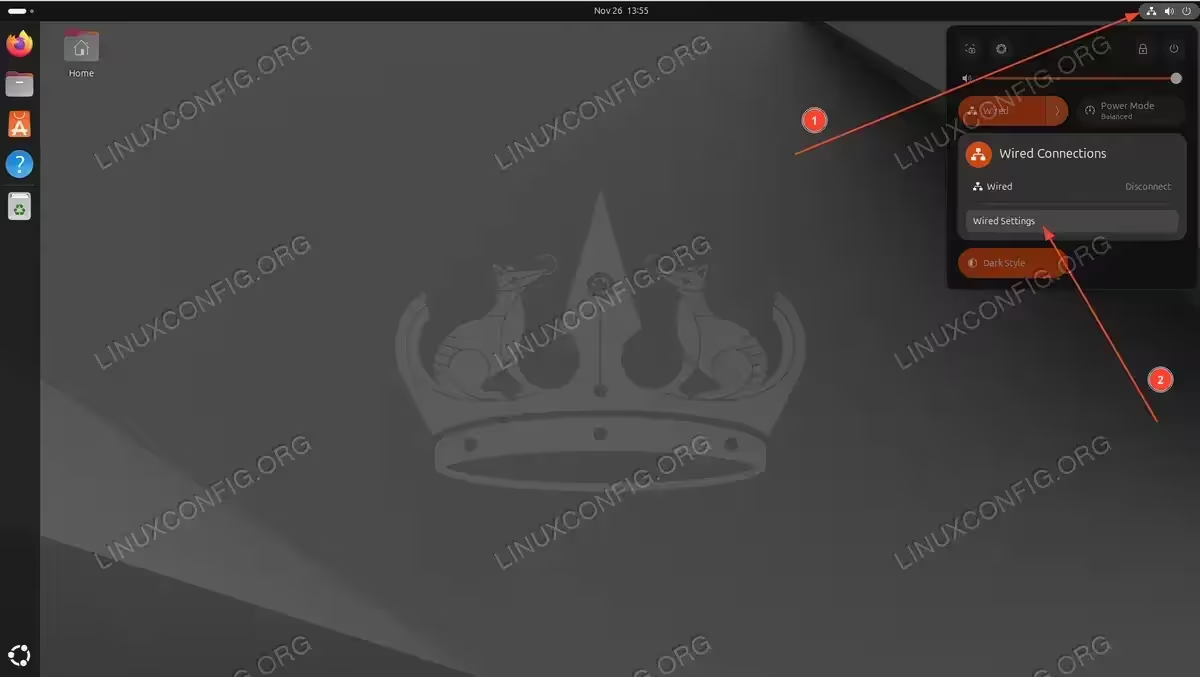
- Click on the network icon in the top right corner of your screen and select Settings corresponding to the network interface you wish to configure.

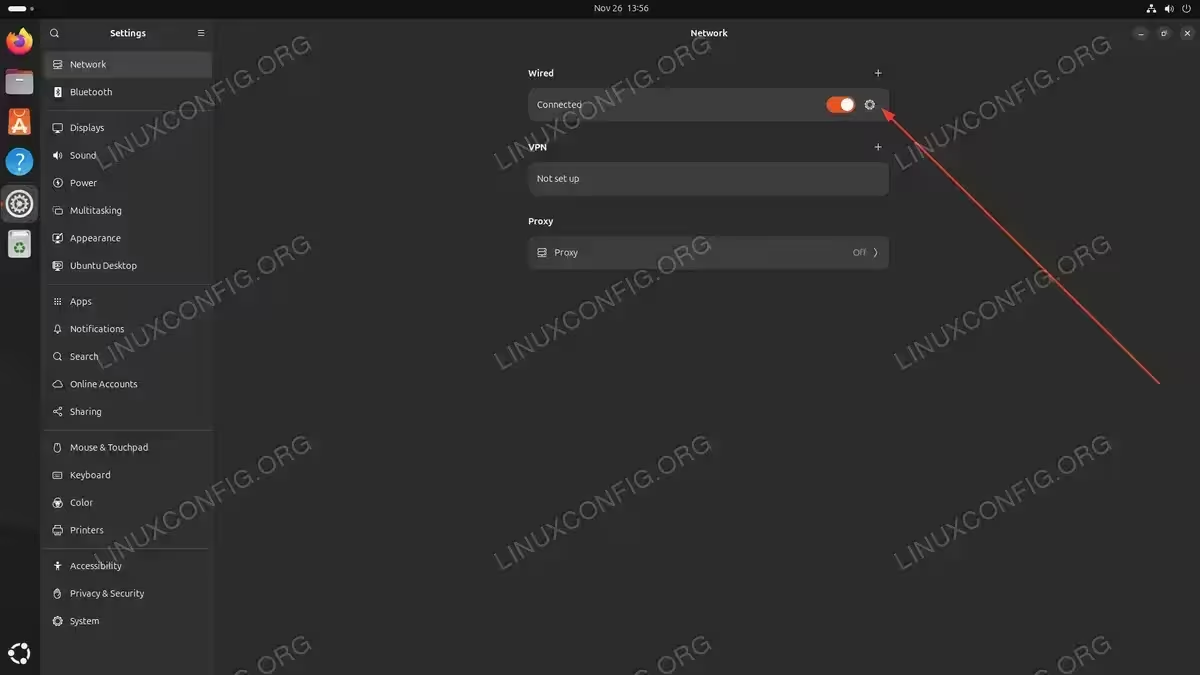
Ubuntu system menu displaying Wired Connections panel with Settings option highlighted for network configuration - In the Network settings window, click on the gear icon next to your network connection (either wired or wireless).

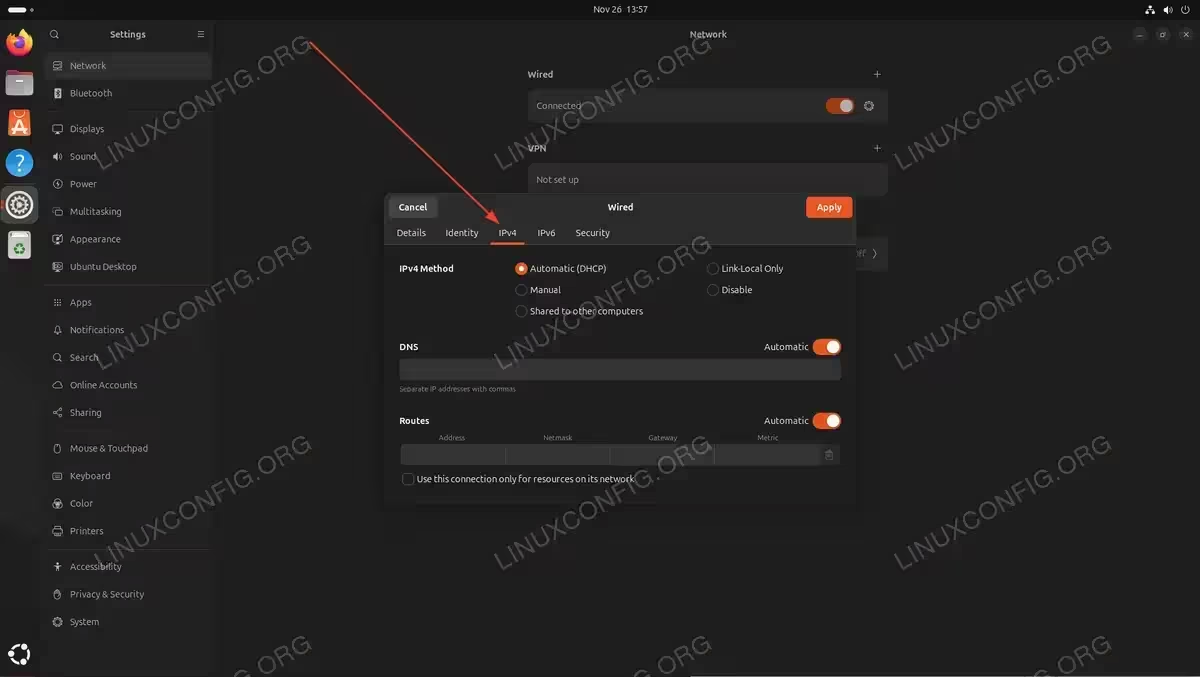
Ubuntu Network Settings displaying connected wired interface with configuration gear icon for accessing IP settings - Select the IPv4 tab from the top menu.
Network configuration dialog displaying IPv4 tab with Automatic DHCP method selected and Manual option available - To configure a static IP address, change the IPv4 Method from Automatic (DHCP) to Manual.For a static IP configuration, enter:
- Address: Your desired IP address (e.g., 192.168.1.202)
- Netmask: Your network mask (e.g., 255.255.255.0 or 24)
- Gateway: Your router’s IP address (e.g., 192.168.1.1)
- DNS: DNS servers separated by commas (e.g., 8.8.8.8, 8.8.4.4)
To revert to DHCP, simply select Automatic (DHCP) from the IPv4 Method dropdown.

Network IPv4 settings configured with Manual method displaying static IP address 192.168.1.202 with netmask and gateway - Click Apply to save your changes.
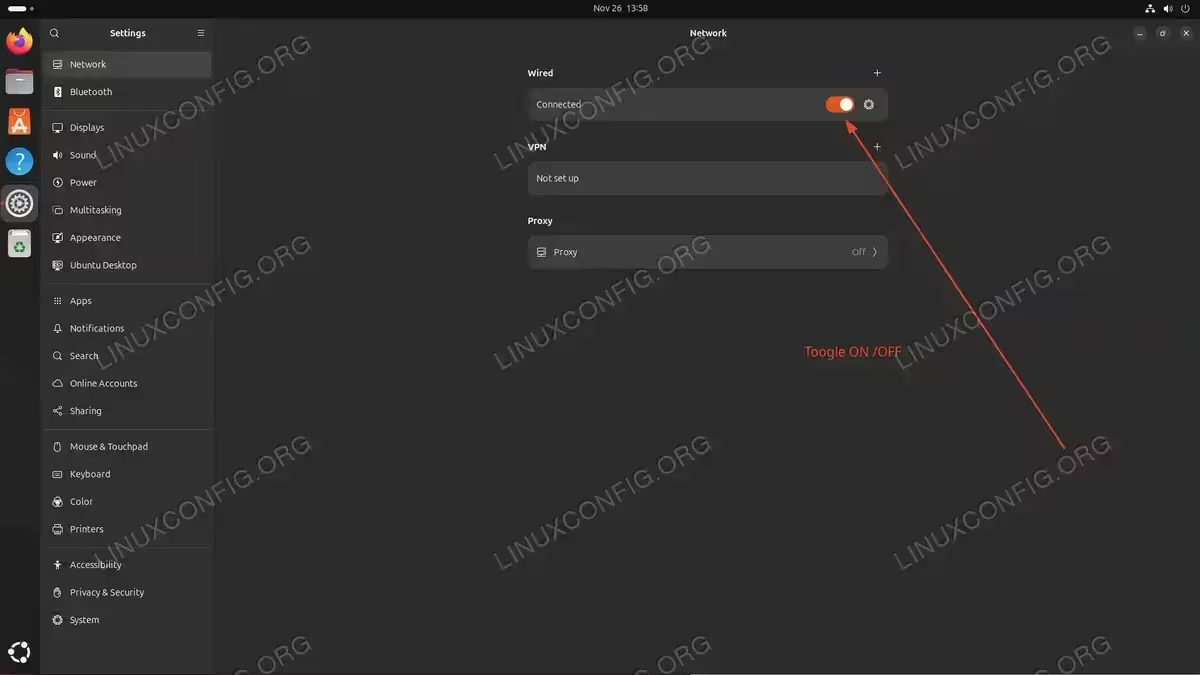
- Toggle the network connection OFF and then ON again to apply the new settings.
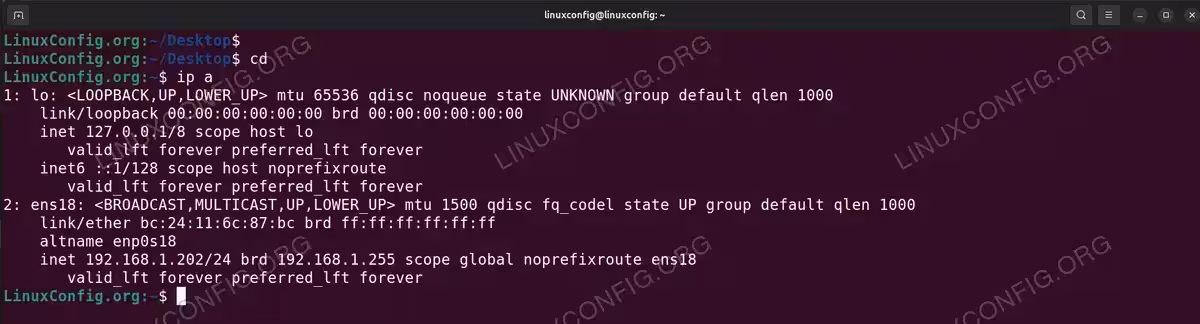
Wired network connection with toggle switch highlighted for restarting connection after IP configuration changes - Verify your new IP address configuration by opening a terminal and using the
ip acommand:$ ip a

Terminal output of ip a command confirming static IP address 192.168.1.202 assigned to enp0s18 interface

Closing Thoughts
In this tutorial, we saw how to change IP address on Ubuntu using both command line methods (for Server) and GUI methods (for Desktop). We covered configuring a static IP address, reverting to DHCP configuration, and setting up virtual IP addresses. We also learned how to manage cloud-init network configuration and secure netplan files. Network administration is an important part of managing your Ubuntu system, and these methods should cover most scenarios you’ll encounter.
Frequently Asked Questions
- How do I change IP address on Ubuntu from command line? Edit the netplan configuration file at
/etc/netplan/50-cloud-init.yaml, setdhcp4: false, add your desired IP address underaddresses, configure routes and nameservers, then runsudo netplan applyto activate the changes. - What’s the difference between static IP and DHCP? A static IP address is manually configured and remains constant, making it ideal for servers and devices that need consistent addressing. DHCP automatically assigns IP addresses from a pool managed by your router or DHCP server, which is convenient but may change after reboot or lease expiration.
- How do I change from DHCP to static IP on Ubuntu? In the netplan configuration file, change
dhcp4: truetodhcp4: false, then add your static IP configuration including addresses, routes, and nameservers. Apply changes withsudo netplan apply. On Ubuntu Desktop, use the GUI to change IPv4 Method from Automatic (DHCP) to Manual. - Can I configure multiple IP addresses on one interface in Ubuntu? Yes, you can configure multiple IP addresses (virtual IPs) on a single interface by adding them to the addresses list in your netplan configuration. For example:
addresses:
  - 192.168.1.202/24
  - 192.168.1.204/24
Apply the changes with
sudo netplan applyand all IP addresses will be active on the same interface.