Setting DNS servers on Ubuntu 26.04 is essential for proper network name resolution. Whether you are configuring a server or desktop system, Ubuntu provides multiple methods to set DNS servers depending on your network management backend. This guide covers how to set DNS on Ubuntu 26.04 using Netplan for servers and NetworkManager for desktops, with practical examples for each approach.
Table of Contents
In this tutorial you will learn:
- How to check your current DNS configuration
- How to set DNS servers using Netplan on Ubuntu Server
- How to set DNS using NetworkManager on Ubuntu Desktop
- How to verify DNS resolution is working correctly
Software Requirements
| Category | Requirements, Conventions or Software Version Used |
|---|---|
| System | Ubuntu 26.04 Resolute Raccoon |
| Software | Netplan or NetworkManager (installed by default) |
| Other | Privileged access to your Linux system as root or via the sudo command. |
| Conventions | # – requires given linux commands to be executed with root privileges either directly as a root user or by use of sudo command$ – requires given linux commands to be executed as a regular non-privileged user |
nameservers directive, then apply the changes.
| Step | Command/Action |
|---|---|
| 1. Edit Netplan config | sudo nano /etc/netplan/00-installer-config.yaml |
| 2. Add nameservers section | nameservers: addresses: [9.9.9.9, 1.1.1.1] |
| 3. Apply configuration | sudo netplan apply |
| 4. Verify DNS | resolvectl status |
PRIVACY-FOCUSED DNS PROVIDERS
This guide uses privacy-respecting DNS providers in all examples. Quad9 (9.9.9.9, 149.112.112.112) is a non-profit based in Switzerland that includes malware blocking. Cloudflare (1.1.1.1, 1.0.0.1) offers fast resolution with independently audited privacy policies. Mullvad (194.242.2.2) provides a strict no-logging policy. All three support DNS over TLS and DNS over HTTPS for encrypted queries.
Check Current DNS Configuration
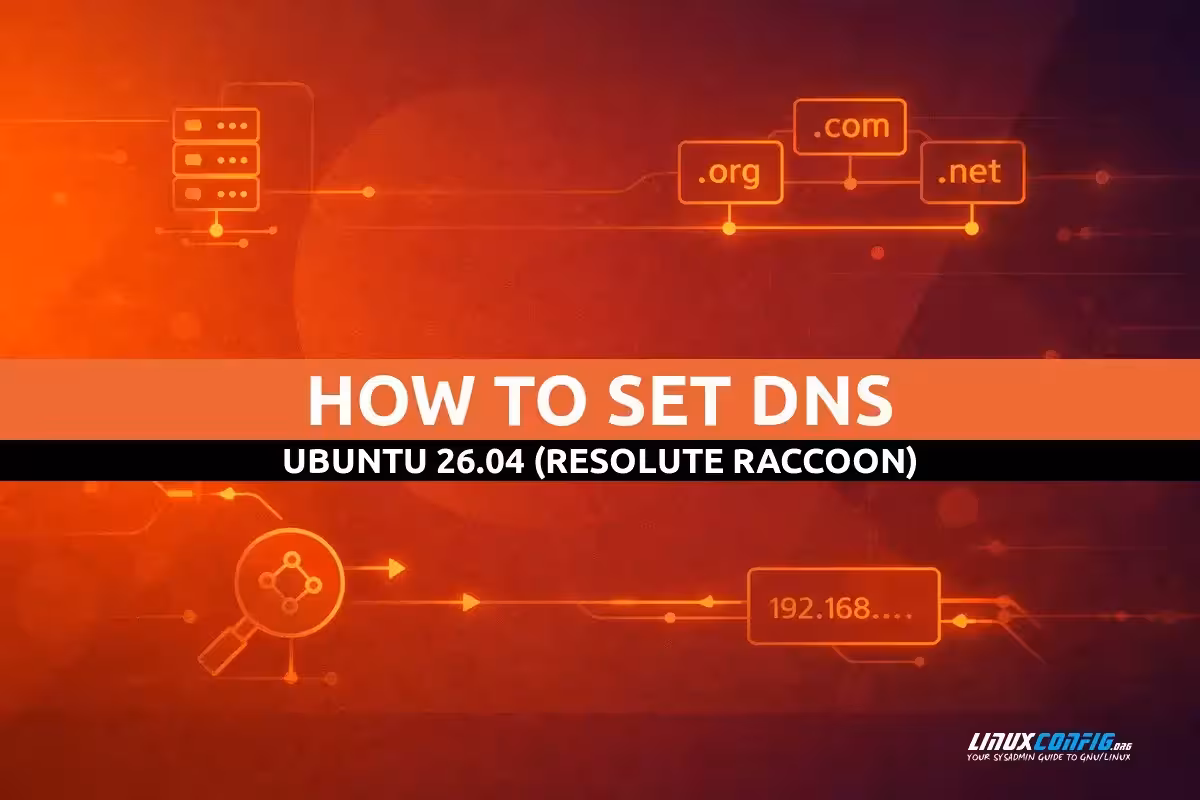
Before making changes, you should check your current DNS settings on Ubuntu 26.04. The resolvectl command provides detailed information about your DNS configuration, including which DNS servers are currently active and which interface they are associated with.
- View DNS status: Run the following command to display your current DNS configuration:
$ resolvectl status
This command shows the DNS servers for each network interface, along with the current DNS resolution settings. Look for the “DNS Servers” line under your active interface.
- Check resolv.conf: You can also examine the traditional resolver configuration file:
$ cat /etc/resolv.conf
On Ubuntu 26.04, this file is typically a symlink managed by systemd-resolved. The nameserver entry usually points to
127.0.0.53(the local stub resolver) or may show a DNS server provided by DHCP, such as your ISP’s DNS or a private DNS server on your network.
Set DNS on Ubuntu 26.04 with Netplan (Server)
Netplan is the default network configuration tool on Ubuntu Server 26.04. To set DNS servers using Netplan, you need to modify the YAML configuration file and add the nameservers directive. This method is recommended for static IP configurations and server deployments where direct control over network settings is required.
- Identify your Netplan configuration file: List the files in the Netplan directory:
$ ls /etc/netplan/
Common filenames include
00-installer-config.yaml(Ubuntu Server default),01-netcfg.yaml, or50-cloud-init.yaml(cloud deployments) depending on your installation method. - Edit the Netplan configuration: Open the configuration file with a text editor:
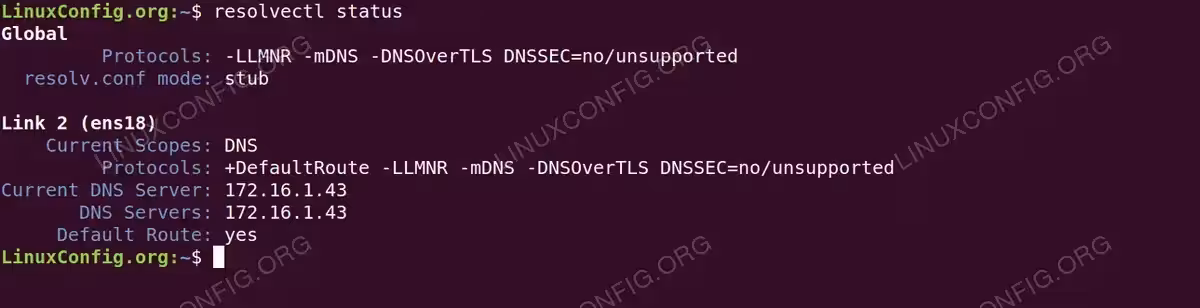
$ sudo nano /etc/netplan/00-installer-config.yaml
Add or modify the
nameserverssection under your network interface. Here is a complete example using static IP with custom DNS:# This is the network config written by 'subiquity' network: version: 2 ethernets: ens18: addresses: - 172.16.1.170/24 routes: - to: default via: 172.16.1.1 nameservers: addresses: - 9.9.9.9 - 149.112.112.112 search: - example.com match: macaddress: bc:24:11:5e:a0:5f set-name: ens18The
addressesfield specifies the DNS servers to use (this example uses Quad9, a privacy-focused DNS provider), while the optionalsearchfield defines the domain search list for short hostnames. Thematchandset-namedirectives ensure consistent interface naming based on MAC address.If you use DHCP for IP assignment but want to specify your own DNS servers, use this configuration:
# This is the network config written by 'subiquity'
network:
  version: 2
  ethernets:
    ens18:
      dhcp4: true
      dhcp6: true
      nameservers:
        addresses:
          - 1.1.1.1
          - 1.0.0.1
        search:
          - example.com
      match:
        macaddress: bc:24:11:5e:a0:5f
      set-name: ens18
This configuration obtains the IP address, gateway, and other network parameters from DHCP while using your manually specified DNS servers (Cloudflare in this example) instead of those provided by the DHCP server.
- Validate the configuration: Before applying changes, test the configuration for syntax errors:
$ sudo netplan try
This command applies the configuration temporarily and reverts automatically after 120 seconds if you do not confirm. This prevents lockouts from configuration mistakes.
- Apply the configuration: Once validated, apply the changes permanently:
$ sudo netplan apply
IMPORTANT
If your system uses DHCP, you can still override the DNS servers provided by DHCP by adding the nameservers section to your Netplan configuration. The manually specified DNS servers will take precedence.
Set DNS on Ubuntu 26.04 with NetworkManager (Desktop)
Ubuntu Desktop uses NetworkManager for network configuration. You can set DNS servers through the graphical interface or using the nmcli command-line tool. On Ubuntu 26.04 Desktop, NetworkManager manages network connections with names prefixed by netplan- (e.g., netplan-ens18). This approach is ideal for desktop users who want to configure network settings without editing configuration files directly.
Using the Graphical Interface
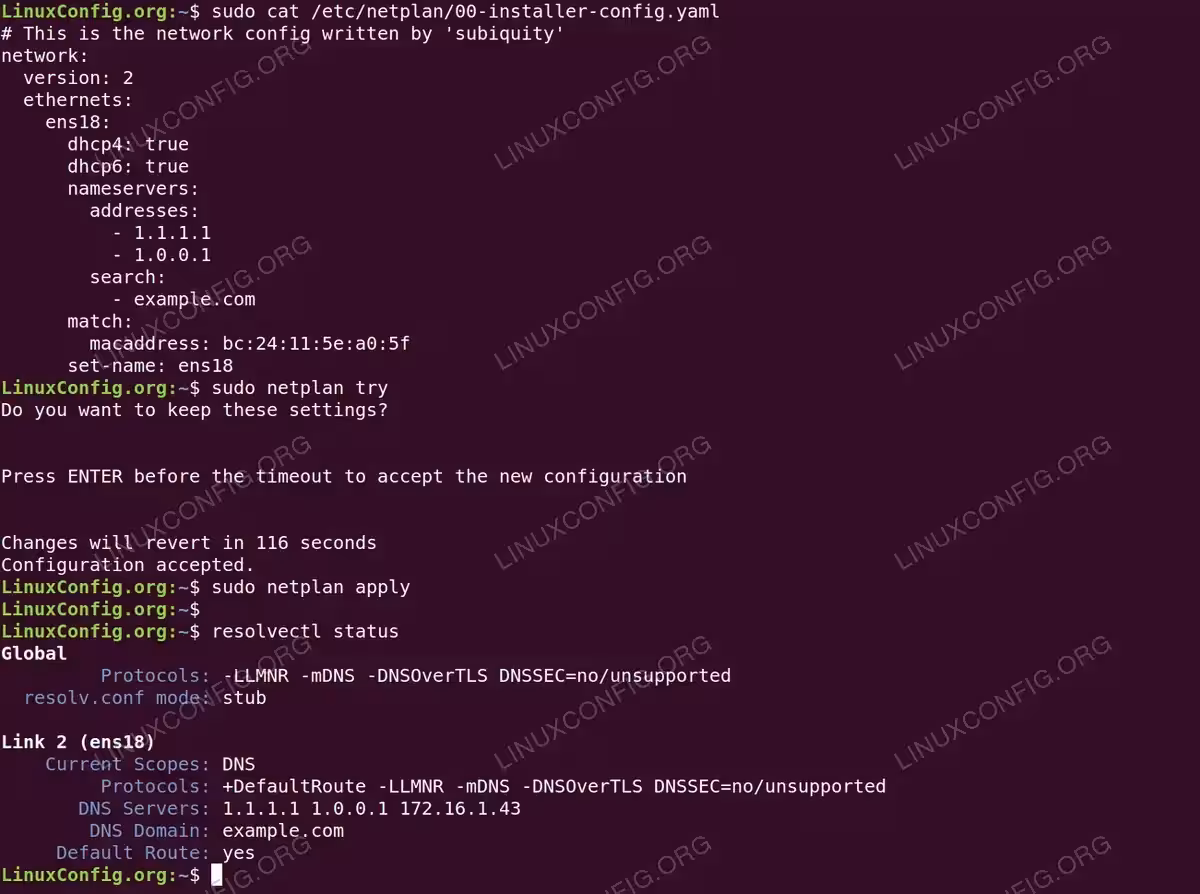
- Open Network Settings: Click the network icon in the system tray and select “Settings” or navigate to Settings > Network.
- Edit your connection: Click the gear icon next to your active connection to open the connection settings.
- Configure DNS: Go to the IPv4 (or IPv6) tab. Change the “DNS” toggle from Automatic to Manual, then enter your preferred DNS servers separated by commas (e.g.,
9.9.9.9, 1.1.1.1). - Apply changes: Click “Apply” and reconnect to the network for changes to take effect.
Setting custom DNS servers through the GNOME Network Settings GUI on Ubuntu Desktop
Using nmcli Command Line
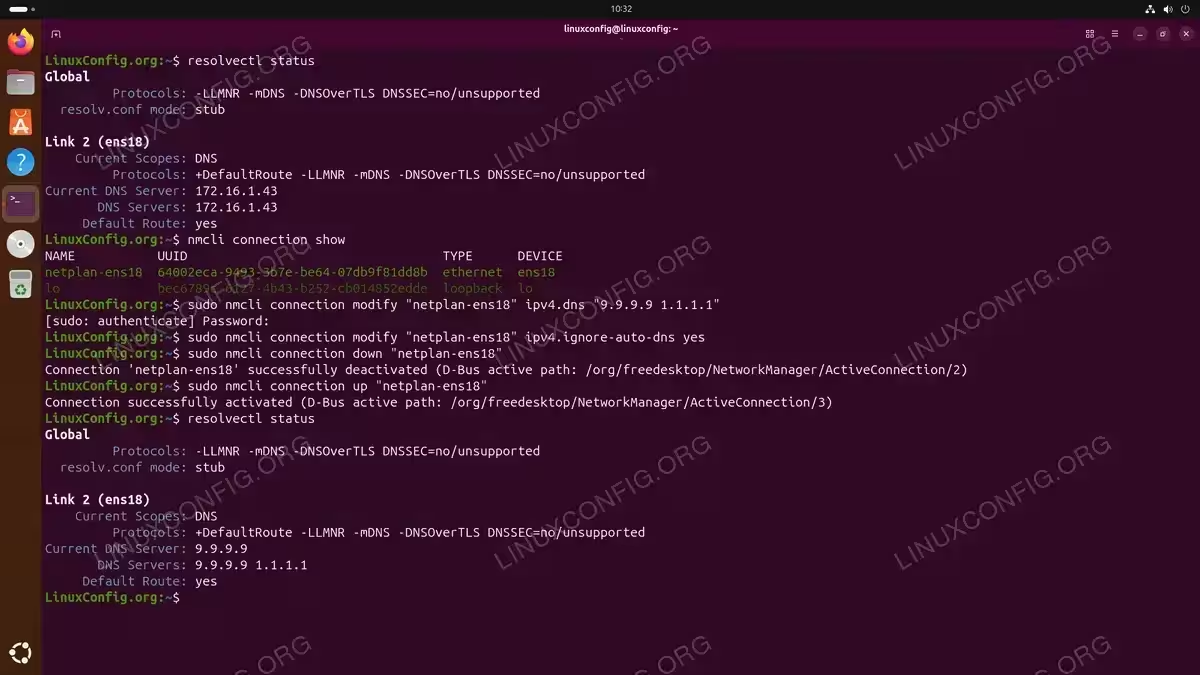
For users who prefer the terminal, the nmcli command provides full control over NetworkManager connections:
- List your connections: Find the name of your active connection:
$ nmcli connection show
- Set DNS servers: Modify the connection to use custom DNS servers:
$ sudo nmcli connection modify "netplan-ens18" ipv4.dns "9.9.9.9 1.1.1.1"
$ sudo nmcli connection modify "netplan-ens18" ipv4.ignore-auto-dns yes
The
ipv4.ignore-auto-dns yesoption prevents DHCP-provided DNS servers from overriding your manual settings. - Reactivate the connection: Apply the changes by bringing the connection down and up:
$ sudo nmcli connection down "netplan-ens18"
$ sudo nmcli connection up "netplan-ens18"
Verify DNS Settings
After configuring DNS on Ubuntu 26.04, you should verify that name resolution works correctly with your new DNS servers.
- Check active DNS servers: Confirm which DNS servers are currently in use:
$ resolvectl status
Look for your configured DNS servers under the appropriate interface or global section.
- Test DNS resolution: Verify that DNS queries resolve correctly:
$ resolvectl query ubuntu.com
This command queries the DNS server and displays the resolved IP address along with the DNS server that provided the answer.
- Test with dig: For more detailed DNS testing, use the
digcommand:$ dig ubuntu.com
The output shows the query result, response time, and the DNS server used. If
digis not installed, install it withsudo apt install dnsutils.
TROUBLESHOOTING
If DNS resolution fails after configuration changes, verify that your DNS servers are reachable with ping 1.1.1.1. If ping works but DNS does not, check for firewall rules blocking UDP port 53. You can check firewall rules using sudo ufw status.
Conclusion
Setting DNS on Ubuntu 26.04 can be accomplished through different methods depending on your system configuration. For Ubuntu Server, Netplan provides the most straightforward approach by adding the nameservers directive to your network configuration. Desktop users can use NetworkManager through the GUI or nmcli commands. After making changes, always verify your configuration using resolvectl status and test actual DNS resolution to confirm everything works as expected.
Frequently Asked Questions
- Why does /etc/resolv.conf show 127.0.0.53 as the nameserver? On Ubuntu 26.04, systemd-resolved manages DNS resolution and runs a local DNS stub resolver on 127.0.0.53. This is normal behavior. Your actual configured DNS servers are used by systemd-resolved behind the scenes. Use
resolvectl statusto see the real DNS servers in use. - How do I prevent DHCP from overwriting my DNS settings? When using Netplan, add your DNS servers in the nameservers section and they will take precedence over DHCP-provided servers. With NetworkManager, set
ipv4.ignore-auto-dns yeson your connection to ignore DNS servers from DHCP. - Which DNS provider should I choose for privacy? For privacy, consider Quad9 (9.9.9.9) which is a non-profit with built-in malware blocking, Cloudflare (1.1.1.1) which offers fast speeds with audited privacy practices, or Mullvad (194.242.2.2) for the strictest no-logging policy. All three are better privacy choices than default ISP DNS servers, which often log your queries.
- What is the difference between Netplan and NetworkManager for DNS configuration? Netplan is the default network configuration tool on Ubuntu Server and uses YAML configuration files. NetworkManager is the default on Ubuntu Desktop and provides both GUI and command-line (nmcli) interfaces. Use Netplan for servers and NetworkManager for desktops.