Disabling IPv6 can resolve network conflicts, improve security in IPv4-only environments, or troubleshoot connectivity issues on Ubuntu servers. This guide shows you how to disable IPv6 with Netplan on Ubuntu 26.04 using the native network configuration tool. The method applies to Ubuntu Server installations using systemd-networkd as the network renderer.
- How to modify Netplan configuration to disable IPv6
- The three directives required to fully disable IPv6 on an interface
- How to apply and verify Netplan changes
- How to re-enable IPv6 when needed
Software Requirements
| Category | Requirements, Conventions or Software Version Used |
|---|---|
| System | Ubuntu 26.04 Resolute Raccoon (Server) |
| Software | Netplan 1.1+ with systemd-networkd renderer |
| Other | Privileged access to your Linux system as root or via the sudo command. |
| Conventions | # – requires given linux commands to be executed with root privileges either directly as a root user or by use of sudo command$ – requires given linux commands to be executed as a regular non-privileged user |
dhcp6: false, link-local: [], and accept-ra: false.
| Step | Command/Action |
|---|---|
| 1. Edit Netplan config | sudo nano /etc/netplan/00-installer-config.yaml |
| 2. Add IPv6 disable directives | dhcp6: false, link-local: [], accept-ra: false |
| 3. Apply changes | sudo netplan apply |
Disable IPv6 with Netplan on Ubuntu 26.04
Netplan uses YAML configuration files located in /etc/netplan/. On Ubuntu Server 26.04, the default configuration file is typically named 00-installer-config.yaml. To disable IPv6 on a network interface, you need to add three specific directives that prevent IPv6 address assignment and router advertisement processing.
- Locate your Netplan configuration file: List the files in the Netplan directory to identify your configuration file.
$ ls /etc/netplan/
The output shows available configuration files. Ubuntu Server typically uses
00-installer-config.yaml. - View the current configuration: Before making changes, examine your existing Netplan configuration.
$ sudo cat /etc/netplan/00-installer-config.yaml
A default Ubuntu Server installation looks similar to this:
# This is the network config written by 'subiquity' network: ethernets: ens18: dhcp4: true dhcp6: true version: 2 - Edit the Netplan configuration: Open the file in a text editor to add the IPv6 disable directives.
$ sudo nano /etc/netplan/00-installer-config.yaml
- Add IPv6 disable directives: Modify the interface configuration to include three directives that disable IPv6. Your complete configuration should look like this:
# This is the network config written by 'subiquity'
network:
  ethernets:
    ens18:
      dhcp4: true
      dhcp6: false
      link-local: []
      accept-ra: false
  version: 2
The three directives work together to fully disable IPv6:
dhcp6: false– Disables DHCPv6 client, preventing automatic IPv6 address assignmentlink-local: []– Prevents assignment of link-local IPv6 addresses (fe80::)accept-ra: false– Ignores IPv6 Router Advertisements
- Apply the Netplan configuration: Save your changes and apply the Netplan configuration.
$ sudo netplan apply
The changes take effect immediately without requiring a system reboot.

IMPORTANT
This guide focuses on Ubuntu Server using systemd-networkd as the network renderer. Ubuntu Desktop installations use NetworkManager by default, which requires different methods such as nmcli connection modify "connection-name" ipv6.method "disabled" or the GNOME Settings GUI to disable IPv6.
Verify IPv6 is Disabled
After applying the Netplan configuration, verify that IPv6 addresses are no longer assigned to your network interface.
- Check interface addresses: Use the
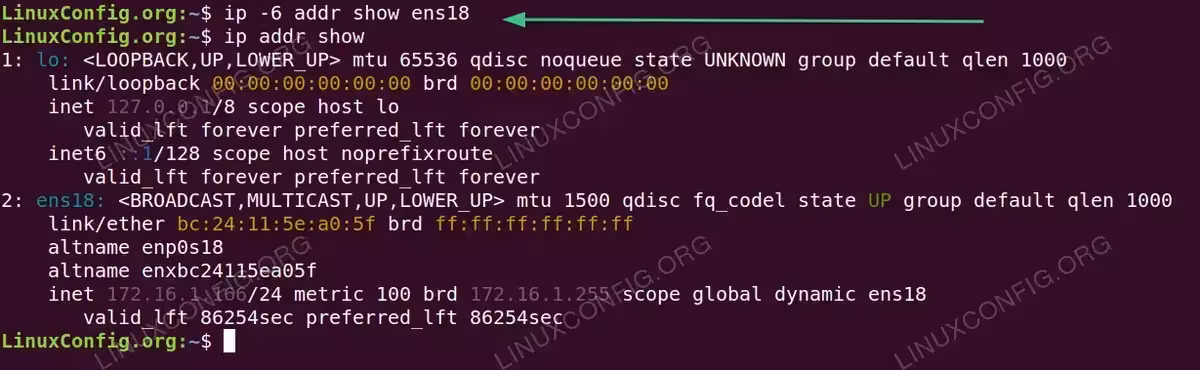
ipcommand to display addresses for your network interface.$ ip -6 addr show ens18
If IPv6 is successfully disabled, this command returns no output. Previously, you would have seen a link-local address starting with
fe80::. - Verify all interfaces: Check all interfaces to confirm IPv6 status across the system.
$ ip addr show
The network interface should only display an IPv4 address (inet) without any IPv6 addresses (inet6). The loopback interface (lo) will still show
::1/128as this cannot be disabled via Netplan.
LOOPBACK IPV6 ADDRESS
Netplan cannot disable IPv6 on the loopback interface. The ::1/128 address on lo is managed at the kernel level. To fully disable IPv6 system-wide including loopback, use sysctl:
# sysctl -w net.ipv6.conf.all.disable_ipv6=1
# sysctl -w net.ipv6.conf.lo.disable_ipv6=1
For permanent changes, add these settings to /etc/sysctl.d/99-disable-ipv6.conf.
Re-enable IPv6
If you need to restore IPv6 functionality, remove or modify the directives added earlier.
- Edit the Netplan configuration: Open your configuration file.
$ sudo nano /etc/netplan/00-installer-config.yaml
- Restore IPv6 settings: Change the configuration back to enable IPv6:
# This is the network config written by 'subiquity'
network:
  ethernets:
    ens18:
      dhcp4: true
      dhcp6: true
  version: 2
Remove
link-local: []andaccept-ra: false, and setdhcp6: trueto re-enable automatic IPv6 configuration. - Apply changes: Apply the updated configuration.
$ sudo netplan apply
- Verify IPv6 is restored: Check that IPv6 addresses are assigned again.
$ ip -6 addr show ens18
You should see a link-local address (fe80::) and potentially a global IPv6 address if available on your network.
Conclusion
You have successfully disabled IPv6 with Netplan on Ubuntu 26.04 Server by adding three configuration directives: dhcp6: false, link-local: [], and accept-ra: false. This method provides a clean, Netplan-native approach to disable IPv6 on specific interfaces without modifying kernel parameters. For more complex network configurations, refer to the official Netplan documentation for additional Netplan configuration examples. Remember that Ubuntu Desktop users with NetworkManager should use nmcli or the graphical network settings instead.
Frequently Asked Questions
- Why does the loopback interface still show an IPv6 address after disabling IPv6 with Netplan? Netplan manages network interfaces through systemd-networkd but cannot control the loopback interface’s IPv6 configuration. The loopback ::1 address is managed at the kernel level. To disable it, you need to use sysctl with
net.ipv6.conf.lo.disable_ipv6=1. - Will disabling IPv6 break any applications on my Ubuntu server? Most server applications work fine with IPv4 only. However, some modern applications and services prefer IPv6 or require it for certain features. Test your specific applications after disabling IPv6 to ensure they function correctly.
- What is the difference between
link-local: []and settingdhcp6: false? Settingdhcp6: falseonly prevents automatic IPv6 address assignment via DHCPv6. The system can still generate link-local addresses (fe80::) automatically. Addinglink-local: []explicitly prevents any link-local address assignment, ensuring no IPv6 addresses appear on the interface. - Do I need to reboot after applying Netplan changes? No, running
sudo netplan applyactivates the new configuration immediately. However, existing connections using IPv6 may need to be re-established using IPv4.