SSH connection failures can be frustrating, especially when you need remote access to your Ubuntu 26.04 server. This troubleshooting guide walks you through the most common causes of SSH problems and provides proven solutions to get your connections working again. Whether you’re dealing with “Connection refused” errors, authentication failures, or timeout issues, you’ll find systematic diagnostic steps and fixes to ssh troubleshoot ubuntu 26.04 systems effectively.
Table of Contents
In this tutorial you will learn:
- How to identify the root cause of SSH connection failures
- Systematic diagnostic commands for SSH troubleshooting
- How to fix service, firewall, and configuration issues
- How to resolve authentication and key permission problems
- How to verify your SSH connection is working correctly

Software Requirements
| Category | Requirements, Conventions or Software Version Used |
|---|---|
| System | Ubuntu 26.04 Resolute Raccoon |
| Software | OpenSSH server (openssh-server), UFW firewall |
| Other | Privileged access to your Linux system as root or via the sudo command. Physical or console access to the server for troubleshooting. |
| Conventions | # – requires given linux commands to be executed with root privileges either directly as a root user or by use of sudo command$ – requires given linux commands to be executed as a regular non-privileged user |
| Step | Command/Action |
|---|---|
| 1. Check SSH service status | sudo systemctl status ssh |
| 2. Verify SSH is listening | sudo ss -tlnp | grep ssh |
| 3. Check firewall rules | sudo ufw status |
| 4. Review SSH logs | sudo journalctl -u ssh -n 50 |
Common Causes of SSH Connection Failures
Before diving into fixes, understanding why SSH connections fail helps you ssh troubleshoot ubuntu 26.04 systems more efficiently. The most common causes fall into five categories, and identifying which one applies to your situation saves significant time.
The first and most frequent cause is the SSH service not running. Ubuntu 26.04 uses systemd socket activation by default, which means the ssh.socket unit listens for connections and starts the ssh.service on demand. If both units are stopped or disabled, connections will be refused immediately.
Firewall rules blocking port 22 (or your custom SSH port) represent the second major cause. Ubuntu’s UFW firewall may be active with rules that don’t permit SSH traffic, resulting in connection timeouts rather than immediate refusal.
Configuration errors in /etc/ssh/sshd_config can prevent the SSH daemon from starting entirely or cause it to reject valid connections. A single syntax error or invalid directive will cause the service to fail on restart.
Authentication failures occur when key permissions are incorrect, the authorized_keys file is misconfigured, or password authentication is disabled when needed. These typically show as “Permission denied” errors after the initial connection succeeds.
Finally, network connectivity issues such as incorrect IP addresses, routing problems, or DNS resolution failures can prevent clients from reaching the server at all. These problems exist outside SSH itself but manifest as SSH connection failures.
Diagnosing SSH Problems on Ubuntu 26.04
Systematic diagnosis is essential when you need to ssh troubleshoot ubuntu 26.04 servers. Follow these steps in order to identify exactly where the connection is failing.
- Check SSH service status: Start by verifying the SSH service is running on the server.
$ sudo systemctl status ssh
Look for “active (running)” in the output. If you see “inactive” or “failed”, the service needs attention.
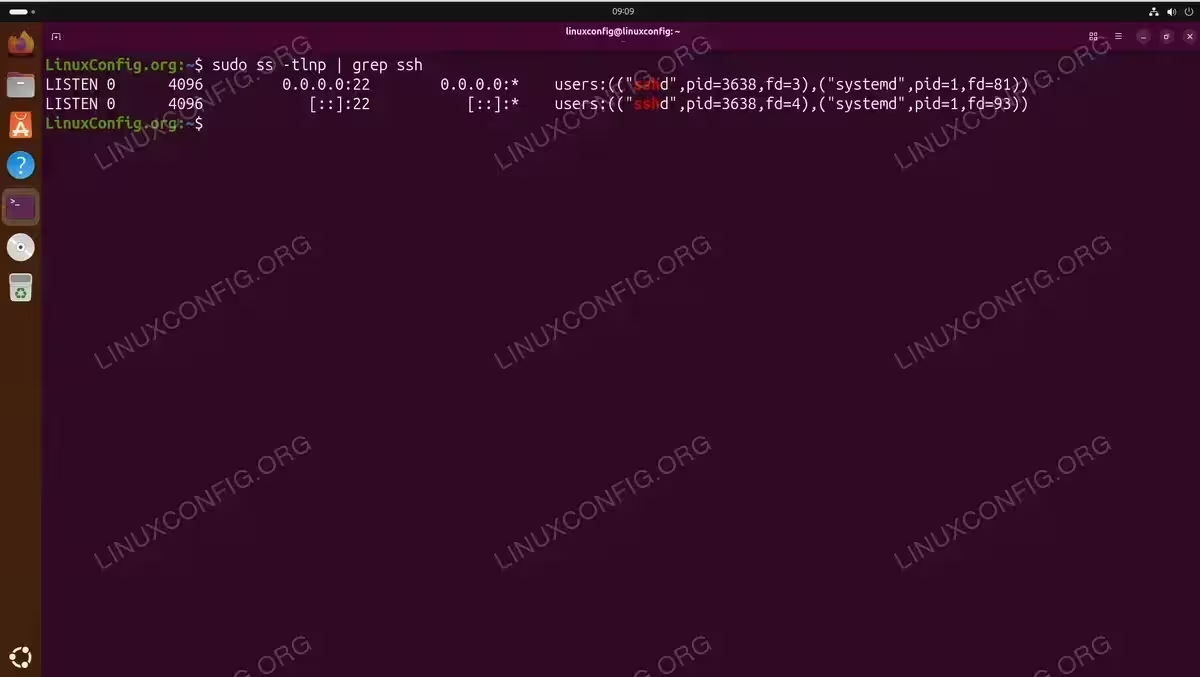
- Verify SSH is listening on the expected port: Confirm the SSH daemon is actually accepting connections.
$ sudo ss -tlnp | grep ssh
You should see sshd listening on port 22 (or your configured port). No output means SSH isn’t listening.
- Check firewall status and rules: Review whether the firewall permits SSH traffic.
$ sudo ufw status verbose
Look for a rule allowing port 22/tcp or the OpenSSH application profile.
- Review SSH logs for errors: The system journal contains detailed information about SSH failures.
$ sudo journalctl -u ssh -n 50
Look for authentication failures, configuration errors, or connection attempts.
- Test connectivity from the client: Use verbose mode to see where the connection fails.
$ ssh -vvv user@server-ip
The debug output shows each step of the connection process, revealing exactly where it stops.
Fix 1: SSH Service Not Running
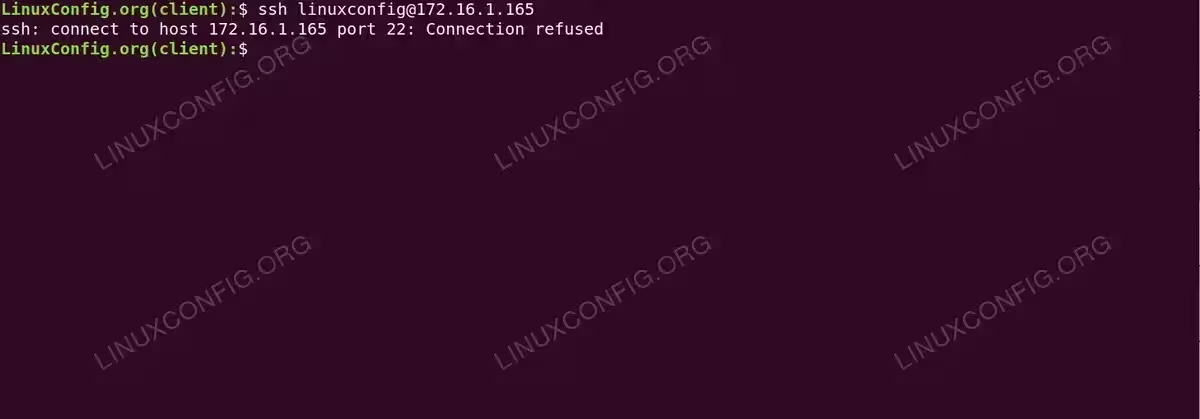
When the SSH service isn’t running, clients receive “Connection refused” errors immediately upon attempting to connect. This is one of the easiest problems to fix once identified.
Ubuntu 26.04 uses socket activation for SSH, meaning the ssh.socket unit listens for incoming connections and spawns the ssh.service when needed. You need to ensure both units are properly enabled.
- Start the SSH socket and service: Enable socket activation and start the service.
$ sudo systemctl enable --now ssh.socket
$ sudo systemctl enable ssh.service
The
--nowflag starts the socket immediately while also enabling it for boot. - Verify the service is running: Confirm SSH is now accepting connections.
$ sudo systemctl status ssh.socket ssh.service
Both units should show as active.
- Check if SSH is installed: If the service doesn’t exist, the OpenSSH server may not be installed.
$ sudo apt update
$ sudo apt install openssh-server
After installation, the service starts automatically. For detailed installation steps, see our guide on setting up an SSH server.
SOCKET ACTIVATION
Ubuntu 26.04 defaults to socket activation where ssh.socket listens on port 22 and starts ssh.service on demand. This conserves resources on systems where SSH connections are infrequent.
Fix 2: Firewall Blocking SSH Connections
Firewall rules blocking SSH traffic cause connection timeouts rather than immediate refusal. The client waits for a response that never arrives because packets are being dropped.

- Check current firewall rules: Review what rules are currently active.
$ sudo ufw status numbered
Look for any rules that deny or don’t explicitly allow SSH traffic.
- Allow SSH through the firewall: Add a rule permitting SSH connections.
$ sudo ufw allow ssh
This allows traffic on port 22 using the predefined SSH application profile. Alternatively, specify the port directly with
sudo ufw allow 22/tcp. - Remove conflicting deny rules: If a deny rule exists, remove it by number.
$ sudo ufw delete deny 22/tcp
Confirm removal when prompted.
- Verify the new rules: Check that SSH is now allowed.
$ sudo ufw status
You should see “22/tcp ALLOW Anywhere” or “OpenSSH ALLOW Anywhere” in the output.
If you’re using a custom SSH port, replace 22 with your port number in the firewall rules. For more information on firewall configuration, see our UFW troubleshooting guide.
Fix 3: SSH Configuration Errors
Configuration errors in /etc/ssh/sshd_config prevent the SSH daemon from starting. A syntax error, invalid directive, or misconfigured option causes the service to fail with an error message in the logs.

- Test the configuration syntax: Validate the config file before restarting.
$ sudo sshd -t
This command checks for syntax errors without affecting the running service. Any errors are displayed with line numbers.
- Review recent changes: Check if the config file was recently modified.
$ ls -la /etc/ssh/sshd_config
$ sudo journalctl -u ssh --since "1 hour ago"
The journal shows exactly which directive caused the failure.
- Fix the configuration error: Edit the config file to correct the problem.
$ sudo nano /etc/ssh/sshd_config
Remove or correct the invalid directive identified by
sshd -t. - Restart the SSH service: Apply the corrected configuration.
$ sudo systemctl restart ssh
Verify success with
sudo systemctl status ssh.
BACKUP CONFIGURATION
Before editing sshd_config, create a backup with sudo cp /etc/ssh/sshd_config /etc/ssh/sshd_config.backup. This allows quick recovery if changes cause problems.
For a comprehensive overview of SSH configuration options, refer to our SSH configuration guide or the official OpenSSH sshd_config documentation.
Fix 4: Authentication Failures
Authentication failures occur after the TCP connection succeeds but before you gain shell access. These manifest as “Permission denied” errors and have several possible causes.
Key Permission Problems
SSH requires strict permissions on key files. Private keys that are readable by others are rejected for security reasons.
@ WARNING: UNPROTECTED PRIVATE KEY FILE! Permissions 0644 for '/home/user/.ssh/id_rsa' are too open.
- Fix private key permissions on the client: Set correct permissions for your private key.
$ chmod 600 ~/.ssh/id_rsa
Private keys must be readable only by the owner (mode 600).
- Fix .ssh directory permissions: Ensure the directory itself has correct permissions.
$ chmod 700 ~/.ssh
The .ssh directory should be accessible only by the owner.
- Fix authorized_keys permissions on the server: The server-side file also requires strict permissions.
$ chmod 600 ~/.ssh/authorized_keys
SSH refuses to use authorized_keys files that are writable by others.
Password Authentication Disabled
If key-based authentication fails and password authentication is disabled, you cannot log in remotely.
- Check password authentication setting: Review the SSH configuration.
$ sudo grep -i passwordauthentication /etc/ssh/sshd_config
If set to “no”, password logins are disabled.
- Enable password authentication temporarily: Edit the config to allow passwords.
$ sudo nano /etc/ssh/sshd_config
Change
PasswordAuthentication notoPasswordAuthentication yes, then restart SSH withsudo systemctl restart ssh. - Add your public key: Once logged in, set up key-based authentication properly.
$ ssh-copy-id user@server-ip
Then disable password authentication again for security.
For detailed SSH configuration options, see our guide on configuring SSH.
Fix 5: Network Connectivity Issues
Network problems prevent the client from reaching the server at all. These issues exist outside SSH but must be resolved before SSH can work.
- Verify the server’s IP address: Confirm you’re connecting to the correct address.
$ ip addr show
Run this on the server to see its current IP addresses.
- Test basic connectivity: Check if the server is reachable.
$ ping -c 4 server-ip
If ping fails, the problem is network routing, not SSH.
- Test port connectivity: Check if the SSH port is reachable.
$ nc -zv server-ip 22
This tests whether port 22 accepts connections without actually logging in.
- Check DNS resolution: If using a hostname, verify it resolves correctly.
$ host server-hostname
DNS problems cause “Could not resolve hostname” errors.
NETWORK DIAGNOSTICS
If ping succeeds but SSH fails, the problem is likely firewall or SSH service related. If ping fails, focus on network configuration and routing first.
Verifying SSH is Working Correctly
After applying fixes, verify that SSH connections work reliably. A thorough verification ensures the problem is fully resolved.
- Test the connection: Connect from a remote machine.
$ ssh user@server-ip
A successful login confirms the fix worked.
- Verify persistent configuration: Ensure fixes survive reboot.
$ sudo systemctl is-enabled ssh.socket
$ sudo ufw status
The socket should be “enabled” and firewall rules should show SSH allowed.
- Test after reboot: Reboot and verify SSH still works.
$ sudo reboot
After the server comes back up, connect again to confirm everything persists.

Conclusion
Troubleshooting SSH on Ubuntu 26.04 requires systematic diagnosis followed by targeted fixes. The most common issues involve the service not running, firewall rules blocking connections, configuration errors, authentication problems, or underlying network connectivity. By following the diagnostic steps in this guide, you can quickly identify which category your problem falls into and apply the appropriate solution.
Remember to always verify your fixes survive a reboot, especially for production servers where you need reliable remote access. If you encounter issues not covered here, the SSH logs in journalctl -u ssh provide detailed information about connection failures that can guide further troubleshooting.
Frequently Asked Questions
- Why do I get “Connection refused” when trying to SSH? “Connection refused” means the server is reachable but nothing is listening on the SSH port. This typically indicates the SSH service isn’t running. Check with
sudo systemctl status sshand start it withsudo systemctl enable --now ssh.socket. - Why does my SSH connection timeout instead of being refused? Connection timeouts usually indicate a firewall is dropping packets before they reach the SSH service. Check your firewall rules with
sudo ufw statusand ensure port 22 is allowed. Network routing issues can also cause timeouts. - How do I fix “Permission denied (publickey)” errors? This error means key-based authentication failed and password authentication is disabled. Either fix your key setup (check permissions with
ls -la ~/.ssh/) or temporarily enable password authentication in/etc/ssh/sshd_configto regain access. - What does “Host key verification failed” mean? This error occurs when the server’s host key doesn’t match what’s stored in your
~/.ssh/known_hostsfile. If the server was reinstalled, remove the old entry withssh-keygen -R server-ipand reconnect. If unexpected, this could indicate a security issue.