Protecting your Ubuntu 26.04 server from brute-force attacks is essential, and Fail2ban is one of the most effective tools for the job. In this guide, we will walk you through how to install and configure Fail2ban on Ubuntu 26.04, covering everything from SSH protection and custom jail configuration to ban management and UFW integration. By the end, your server will automatically block malicious IPs that repeatedly fail authentication.
- → What Is Fail2ban and Why Use It
- → Installing Fail2ban on Ubuntu 26.04
- → Understanding Fail2ban Configuration Files
- → Configuring SSH Protection with Fail2ban
- → Creating Custom Jail Configurations
- → Managing Banned IPs
- → Integrating Fail2ban with UFW
- → Appendix: Jail Examples for Common Services
- → Frequently Asked Questions
- How to install and enable Fail2ban on Ubuntu 26.04
- How Fail2ban configuration files are structured
- How to protect SSH with a Fail2ban jail
- How to create custom jails for other services
- How to manage bans, unban IPs, and whitelist addresses
- How to integrate Fail2ban with UFW firewall
Software Requirements
| Category | Requirements, Conventions or Software Version Used |
|---|---|
| System | Ubuntu 26.04 Resolute Raccoon |
| Software | Fail2ban |
| Other | Privileged access to your Linux system as root or via the sudo command. A running SSH server or other network service to protect. |
| Conventions | # – requires given linux commands to be executed with root privileges either directly as a root user or by use of sudo command$ – requires given linux commands to be executed as a regular non-privileged user |
| Step | Command/Action |
|---|---|
| 1. Install Fail2ban | $ sudo apt install fail2ban |
| 2. Create local jail config | $ sudo touch /etc/fail2ban/jail.local |
| 3. Enable SSH jail and set parameters | Edit /etc/fail2ban/jail.local: set enabled = true under [sshd] |
| 4. Restart Fail2ban | $ sudo systemctl restart fail2ban |
What Is Fail2ban and Why Use It
Fail2ban is an intrusion prevention framework that monitors log files for signs of malicious activity, such as repeated failed login attempts, and automatically bans the offending IP addresses. It works by scanning log entries in real time, matching them against predefined patterns (filters), and then executing actions like adding firewall rules to block the attacker.
Any server exposed to the internet will inevitably face automated brute-force attacks, particularly against SSH. Without protection, attackers can try thousands of password combinations per minute. Fail2ban significantly reduces this risk by temporarily or permanently banning IPs after a configurable number of failures. Moreover, it is lightweight and flexible enough to protect virtually any service that produces authentication logs, including web servers, mail servers, and FTP daemons.
Consequently, Fail2ban is considered a fundamental security layer for any Ubuntu 26.04 server deployment. For more information about the project, visit the official Fail2ban GitHub repository.
Installing Fail2ban on Ubuntu 26.04
Fail2ban is available directly from the Ubuntu 26.04 default repositories. Therefore, the installation process is straightforward.
- Update the package index: Begin by refreshing the package list to ensure you install the latest available version:
$ sudo apt update
- Install the Fail2ban package: Install Fail2ban along with its dependencies:
$ sudo apt install fail2ban
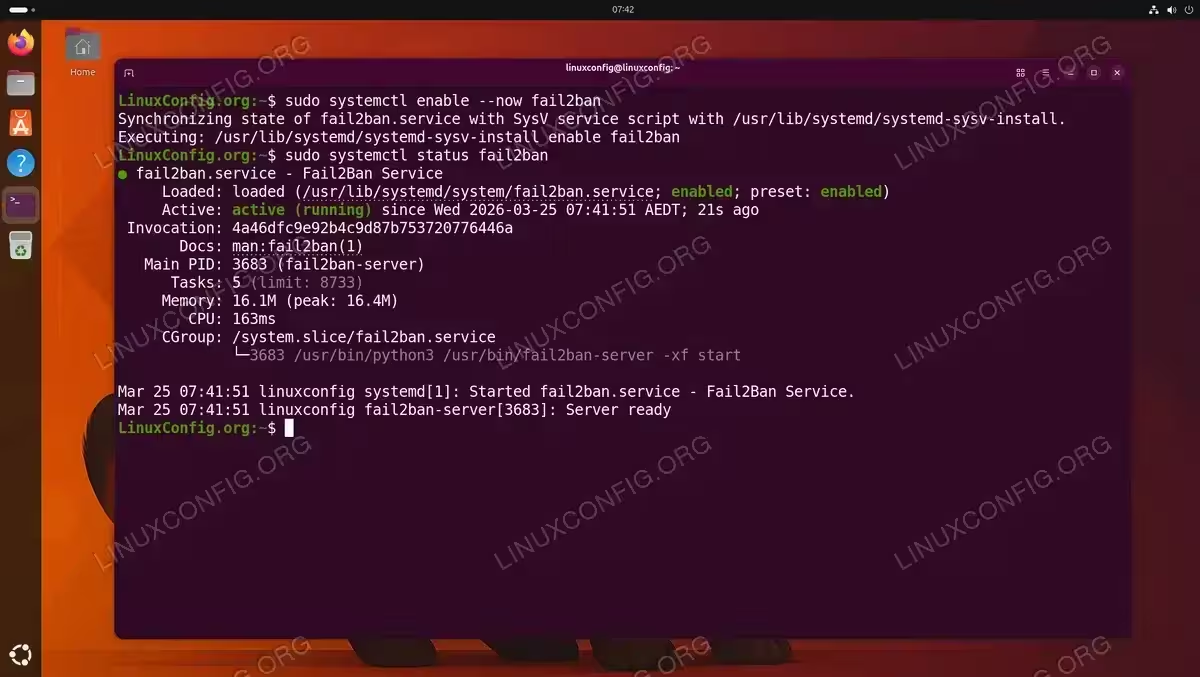
- Enable and start the service: Ensure that Fail2ban starts automatically on boot and is running:
$ sudo systemctl enable --now fail2ban
- Verify the service status: Confirm that Fail2ban is active and running:
$ sudo systemctl status fail2ban
You should see output indicating that the service is
active (running).
Understanding Fail2ban Configuration Files
Before making any changes, it is important to understand how Fail2ban organizes its configuration. The main configuration directory is /etc/fail2ban/, and it contains several key components.
The primary configuration file is /etc/fail2ban/jail.conf. This file contains all default jail definitions and global settings. However, you should never edit this file directly because package updates will overwrite your changes. Instead, Fail2ban uses an override system where local files take precedence.
To customize Fail2ban, create a file called /etc/fail2ban/jail.local. Any settings defined here will override the corresponding values in jail.conf, while all other defaults remain in effect. This means you only need to include the settings you want to change, keeping your configuration minimal and easy to maintain:
$ sudo touch /etc/fail2ban/jail.local
Additionally, the configuration directory contains the following subdirectories:
filter.d/– Contains filter definitions that specify the log patterns (regular expressions) Fail2ban uses to detect failed authentication attempts.action.d/– Contains action definitions that specify what happens when an IP is banned (for example, adding an iptables rule or sending an email notification).jail.d/– An alternative directory for drop-in jail configuration files. Files placed here are also read and merged with the main configuration.
IMPORTANT
Always use jail.local or files in jail.d/ for your customizations. The override hierarchy is: jail.d/*.local > jail.local > jail.d/*.conf > jail.conf. This means that settings in files higher in the chain take precedence and silently override the same settings defined in files lower in the chain.
Configuring SSH Protection with Fail2ban on Ubuntu 26.04
Protecting SSH is the most common use case for Fail2ban. On Ubuntu 26.04, the SSH jail may already be present in the default configuration, but you should explicitly configure it in your local file to ensure it is active and tuned to your needs.
- Open your local jail configuration: Edit the
jail.localfile you created earlier:$ sudo nano /etc/fail2ban/jail.local
- Configure the default settings: Locate the
[DEFAULT]section and adjust the global parameters. These values apply to all jails unless overridden:[DEFAULT] bantime = 1h findtime = 10m maxretry = 5 ignoreip = 127.0.0.1/8 ::1Here is what each parameter means:
bantime– How long an IP is banned. Accepts suffixes likem(minutes),h(hours),d(days). Use-1for permanent bans.findtime– The time window in whichmaxretryfailures must occur to trigger a ban.maxretry– Number of failures allowed withinfindtimebefore banning.ignoreip– Whitelist of IP addresses or CIDR ranges that are never banned. Always include localhost.
- Enable the SSH jail: Locate or add the
[sshd]section and configure it:[sshd] enabled = true port = ssh filter = sshd logpath = /var/log/auth.log maxretry = 3 bantime = 2hThis configuration enables SSH protection with a stricter policy than the defaults: only 3 failed attempts are allowed before the IP is banned for 2 hours. The
filter = sshdparameter tells Fail2ban to use the predefined filter in/etc/fail2ban/filter.d/sshd.conf, which contains the regular expressions to match failed SSH login attempts. - Restart Fail2ban: Apply the new configuration by restarting the service:
$ sudo systemctl restart fail2ban
If you see a warning about changed unit files on disk, run
sudo systemctl daemon-reloadfirst and then restart the service again. - Verify the SSH jail is active: Check that the sshd jail is running:
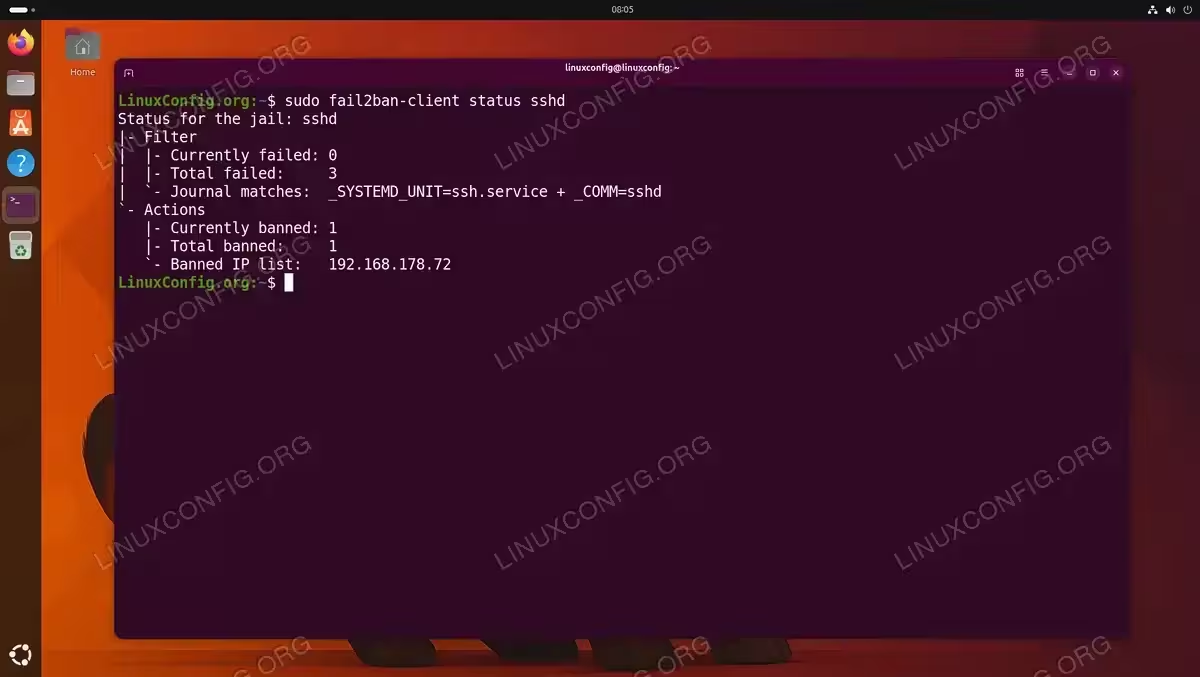
$ sudo fail2ban-client status sshd
The output should show the jail as active with its current filter and action details.
DID YOU KNOW
On Ubuntu 26.04, the SSH server uses systemd socket activation (ssh.socket) by default. Fail2ban monitors the authentication log file (/var/log/auth.log) rather than the SSH service directly, so this does not affect Fail2ban’s operation.
Testing the SSH Jail
To confirm that Fail2ban is actively protecting your SSH server, attempt to log in from another machine using an incorrect password. Repeat the failed login more times than your maxretry value. Then check the jail status:
$ sudo fail2ban-client status sshd
You should see the offending IP address in the banned list, confirming that Fail2ban is working as expected. Once banned, any further SSH connection attempts from that IP will be refused:
$ ssh linuxconfig@192.168.178.79
ssh: connect to host 192.168.178.79 port 22: Connection refused
To unban the test IP afterwards, run:
$ sudo fail2ban-client set sshd unbanip 192.168.178.72
IMPORTANT
Make sure your own IP is listed in ignoreip before testing, so you do not accidentally lock yourself out of the server.
Creating Custom Jail Configurations
Beyond SSH, Fail2ban can protect virtually any service that writes authentication failures to a log file. Creating a custom jail involves defining which log to monitor, what patterns to match, and what action to take.
A jail definition has the following structure:
[jail-name]
enabled  = true
port     = service-port
filter   = filter-name
logpath  = /path/to/log/file
maxretry = 5
bantime  = 1h
The following examples demonstrate how to create jails for common services.
Protecting Apache HTTP Authentication
If you run an Apache web server with password-protected areas, you can monitor its error log for repeated authentication failures:
[apache-auth]
enabled  = true
port     = http,https
filter   = apache-auth
logpath  = /var/log/apache2/error.log
maxretry = 5
bantime  = 1h
The apache-auth filter is included with Fail2ban by default, so no additional filter file is needed.
Protecting Nginx HTTP Authentication
Similarly, for Nginx servers with HTTP basic authentication:
[nginx-http-auth]
enabled  = true
port     = http,https
filter   = nginx-http-auth
logpath  = /var/log/nginx/error.log
maxretry = 5
bantime  = 1h
After adding any new jail, restart Fail2ban to activate it:
$ sudo systemctl restart fail2ban
You can then verify that all active jails are loaded:
$ sudo fail2ban-client status
This command lists all currently active jails.
Managing Banned IPs
Fail2ban provides the fail2ban-client command-line tool for managing bans and monitoring jail activity. Knowing how to use it is essential for day-to-day administration.
Checking Overall Status
To see a summary of all active jails:
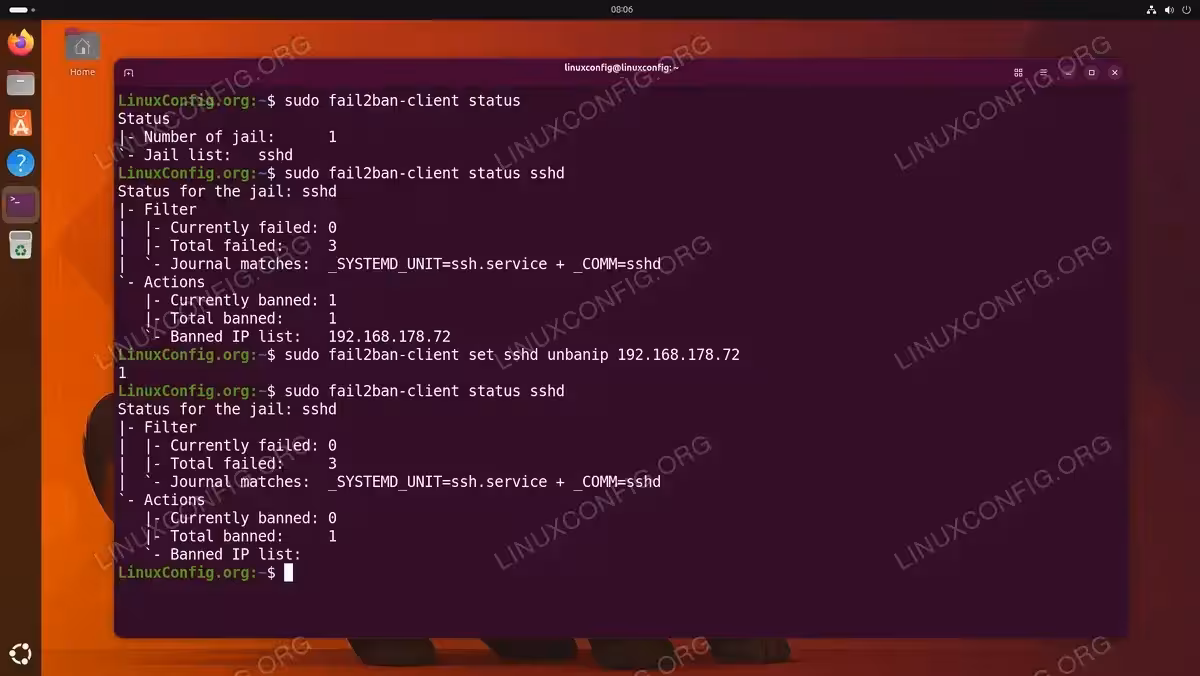
$ sudo fail2ban-client status
This outputs a list of jail names and the total number of active jails.
Checking a Specific Jail
For detailed information about a particular jail, including the number of currently banned IPs:
$ sudo fail2ban-client status sshd
The output shows the current number of failed attempts, the total number of bans, and the list of currently banned IP addresses.
Unbanning an IP Address
If a legitimate user gets accidentally banned, you can manually remove the ban:
$ sudo fail2ban-client set sshd unbanip 192.168.178.72
Replace sshd with the relevant jail name and 192.168.178.72 with the actual IP address to unban.
Whitelisting IP Addresses
To prevent certain IPs from ever being banned, add them to the ignoreip directive in your [DEFAULT] section of jail.local:
[DEFAULT]
ignoreip = 127.0.0.1/8 ::1 192.168.1.0/24 10.0.0.0/8
This is especially useful for whitelisting your own management network. Separate multiple entries with spaces. After making changes, restart Fail2ban:
$ sudo systemctl restart fail2ban
Integrating Fail2ban with UFW
By default, Fail2ban uses iptables to enforce bans. However, if you are managing your firewall with UFW on Ubuntu 26.04, you should configure Fail2ban to use UFW actions instead. This ensures that ban rules are consistent with your existing firewall management approach.
- Edit your jail.local configuration: Set the default ban action to use UFW in the
[DEFAULT]section:[DEFAULT] banaction = ufw banaction_allports = ufwThe
banactionparameter applies to jails that block specific ports, whilebanaction_allportsapplies to jails configured to block all ports for the offending IP. - Restart Fail2ban: Apply the changes:
$ sudo systemctl restart fail2ban
- Verify UFW integration: After a ban is triggered, you can confirm the UFW rules are being applied by checking UFW status:
$ sudo ufw status numbered
You should see Fail2ban-inserted DENY rules for banned IP addresses at the top of the rule list.
IMPORTANT
The UFW action file (/etc/fail2ban/action.d/ufw.conf) is included with Fail2ban by default. If it is missing for any reason, you may need to reinstall the fail2ban package.
Conclusion
You have successfully installed and configured Fail2ban on your Ubuntu 26.04 system. Your server is now protected against brute-force attacks with automatic IP banning. We covered the installation process, the configuration file hierarchy, SSH jail setup, custom jail creation, ban management, and UFW firewall integration.
For ongoing maintenance, periodically review your Fail2ban logs at /var/log/fail2ban.log to monitor ban activity and fine-tune your maxretry and bantime values based on real-world traffic patterns. Additionally, consider setting up email notifications through Fail2ban’s built-in sendmail or mail actions for immediate alerts when bans occur.
Appendix: Fail2ban Jail Examples for Common Services
The following jail configurations can be added to your /etc/fail2ban/jail.local file to protect additional services. Most of these use filters that are already included with Fail2ban. Remember to restart Fail2ban after adding new jails.
1. Apache Bad Bots
Blocks malicious web crawlers and scanners based on suspicious User-Agent strings:
[apache-badbots]
enabled  = true
port     = http,https
filter   = apache-badbots
logpath  = /var/log/apache2/access.log
maxretry = 2
bantime  = 48h
2. Postfix SMTP
Protects your mail server from SMTP authentication brute-force attempts:
[postfix]
enabled  = true
port     = smtp,465,submission
filter   = postfix
logpath  = /var/log/mail.log
maxretry = 5
bantime  = 1h
3. Dovecot
Protects IMAP and POP3 authentication against brute-force attacks:
[dovecot]
enabled  = true
port     = pop3,pop3s,imap,imaps
filter   = dovecot
logpath  = /var/log/mail.log
maxretry = 5
bantime  = 1h
4. Pure-FTPd
Blocks repeated FTP login failures on Pure-FTPd servers:
[pure-ftpd]
enabled  = true
port     = ftp,ftp-data,ftps,ftps-data
filter   = pure-ftpd
logpath  = /var/log/syslog
maxretry = 5
bantime  = 1h
5. vsftpd
Alternative FTP jail for vsftpd servers:
[vsftpd]
enabled  = true
port     = ftp,ftp-data,ftps,ftps-data
filter   = vsftpd
logpath  = /var/log/vsftpd.log
maxretry = 5
bantime  = 1h
6. WordPress
Protects the WordPress login page from brute-force attacks. This requires a custom filter file. First, create /etc/fail2ban/filter.d/wordpress.conf:
[Definition]
failregex = ^ .* "POST /wp-login.php
ignoreregex =
Then add the jail:
[wordpress]
enabled  = true
port     = http,https
filter   = wordpress
logpath  = /var/log/apache2/access.log
maxretry = 5
bantime  = 1h
If you use Nginx, change logpath to /var/log/nginx/access.log.
7. phpMyAdmin
Blocks brute-force attempts against the phpMyAdmin login page:
[phpmyadmin-syslog]
enabled  = true
port     = http,https
filter   = phpmyadmin-syslog
logpath  = /var/log/auth.log
maxretry = 5
bantime  = 1h
8. Nextcloud
Protects your Nextcloud instance from login brute-force attempts. Nextcloud logs failed logins to its own log file:
[nextcloud]
enabled  = true
port     = http,https
filter   = nextcloud
logpath  = /var/log/nextcloud/nextcloud.log
maxretry = 5
bantime  = 1h
The nextcloud filter is not included with Fail2ban by default. Create /etc/fail2ban/filter.d/nextcloud.conf:
[Definition]
failregex = ^.*Login failed: .* \(Remote IP: \).*$
ignoreregex =
9. Grafana
Blocks brute-force attempts against the Grafana dashboard login. Create /etc/fail2ban/filter.d/grafana.conf:
[Definition]
failregex = ^.*t].*lvl=eror.*msg="Invalid username or password".*remote_addr=.*$
ignoreregex =
Then add the jail:
[grafana]
enabled  = true
port     = 3000
filter   = grafana
logpath  = /var/log/grafana/grafana.log
maxretry = 5
bantime  = 1h
10. Asterisk VoIP
Protects your Asterisk PBX from SIP authentication brute-force attacks:
[asterisk]
enabled  = true
port     = 5060,5061
filter   = asterisk
logpath  = /var/log/asterisk/messages
maxretry = 5
bantime  = 1h
Frequently Asked Questions
- How do I check if Fail2ban is running on Ubuntu 26.04? Run
sudo systemctl status fail2banto see the current service status. Additionally,sudo fail2ban-client statusshows all active jails. If the service is not running, start it withsudo systemctl start fail2ban. - Can I permanently ban an IP with Fail2ban? Yes, set
bantime = -1in your jail configuration to permanently ban offending IPs. However, be cautious with permanent bans because they can accumulate over time and consume firewall resources. A long ban duration such asbantime = 30dis often more practical. - Why is a legitimate user getting banned by Fail2ban? This usually happens when the user repeatedly enters incorrect credentials. You can unban them with
sudo fail2ban-client set sshd unbanip IP_ADDRESSand then add their IP to theignoreipwhitelist injail.localto prevent future bans. Also check thatmaxretryis not set too low. - Does Fail2ban work with UFW on Ubuntu 26.04? Yes. By default Fail2ban uses iptables, but you can configure it to use UFW by setting
banaction = ufwin the[DEFAULT]section of yourjail.localfile. This ensures all bans appear as UFW rules and remain consistent with your firewall configuration. - How do I view the Fail2ban log on Ubuntu 26.04? The Fail2ban log file is located at
/var/log/fail2ban.log. You can view it withsudo cat /var/log/fail2ban.logor follow it in real time usingsudo tail -f /var/log/fail2ban.log. This log records all ban and unban events along with timestamps.