Swap space serves as an extension of your system’s physical RAM, providing a safety net when memory runs low. On Ubuntu 26.04, using a swap file rather than a dedicated swap partition offers greater flexibility, since you can easily create, resize, or remove it without repartitioning your disk. In this tutorial, you will learn how to swap file create manage ubuntu 26.04 systems effectively, from initial setup through performance tuning.
Table of Contents
In this tutorial you will learn:
- What swap space is and when you need it
- How to check your current swap configuration
- How to create and activate a swap file
- How to make swap persistent across reboots
- How to resize or remove an existing swap file
- How to tune swappiness and cache pressure for optimal performance

Software Requirements
| Category | Requirements, Conventions or Software Version Used |
|---|---|
| System | Ubuntu 26.04 Resolute Raccoon |
| Software | util-linux (provides mkswap, swapon, swapoff) |
| Other | Privileged access to your Linux system as root or via the sudo command. |
| Conventions | # – requires given linux commands to be executed with root privileges either directly as a root user or by use of sudo command$ – requires given linux commands to be executed as a regular non-privileged user |
dd, format it with mkswap, and activate it with swapon. Add an entry to /etc/fstab to make it persistent.
| Step | Command/Action |
|---|---|
| 1. Create a 2 GB swap file | sudo dd if=/dev/zero of=/swapfile bs=1M count=2048 status=progress |
| 2. Set permissions and format | sudo chmod 600 /swapfile && sudo mkswap /swapfile |
| 3. Activate the swap file | sudo swapon /swapfile |
| 4. Make permanent in fstab | echo '/swapfile none swap sw 0 0' | sudo tee -a /etc/fstab |
What Is Swap Space?
Swap space is a designated area on your storage device that the Linux kernel uses as an overflow for RAM. When your system’s physical memory is fully utilized, the kernel moves less frequently accessed memory pages to swap, thereby freeing RAM for active processes. This mechanism prevents out-of-memory crashes and keeps the system responsive under heavy load.
There are two primary ways to provide swap on Linux: a dedicated swap partition or a swap file. Historically, swap partitions were the standard approach. However, swap files offer several advantages. Consequently, they have become the preferred method on modern Ubuntu installations. You can create, resize, or delete a swap file without touching your partition table, which makes capacity planning far more flexible.
SWAP FILE VS SWAP PARTITION
Ubuntu 26.04 desktop installations typically create a swap file by default rather than a swap partition. Server installations may vary depending on the installer options you chose. Additionally, if you need hibernation support, your swap space must be at least as large as your physical RAM.
When Do You Need Swap?
Several scenarios make swap space essential. Servers with limited RAM benefit from swap as a safety net during traffic spikes. Desktop users running memory-intensive applications like video editors or virtual machines may also need extra breathing room. Furthermore, swap is a requirement for hibernation, where the entire contents of RAM are written to disk before the system powers off.
As a general guideline, systems with 2 GB of RAM or less should have swap equal to double the RAM size. Systems with 4-8 GB can use a swap file equal to the RAM size. For systems with more than 8 GB, a swap file of 2-4 GB is typically sufficient unless hibernation is planned.
Checking Existing Swap on Ubuntu 26.04
Before creating a new swap file, you should first verify whether your Ubuntu 26.04 system already has swap configured. There are several commands to inspect the current swap setup.
- Check active swap devices: The
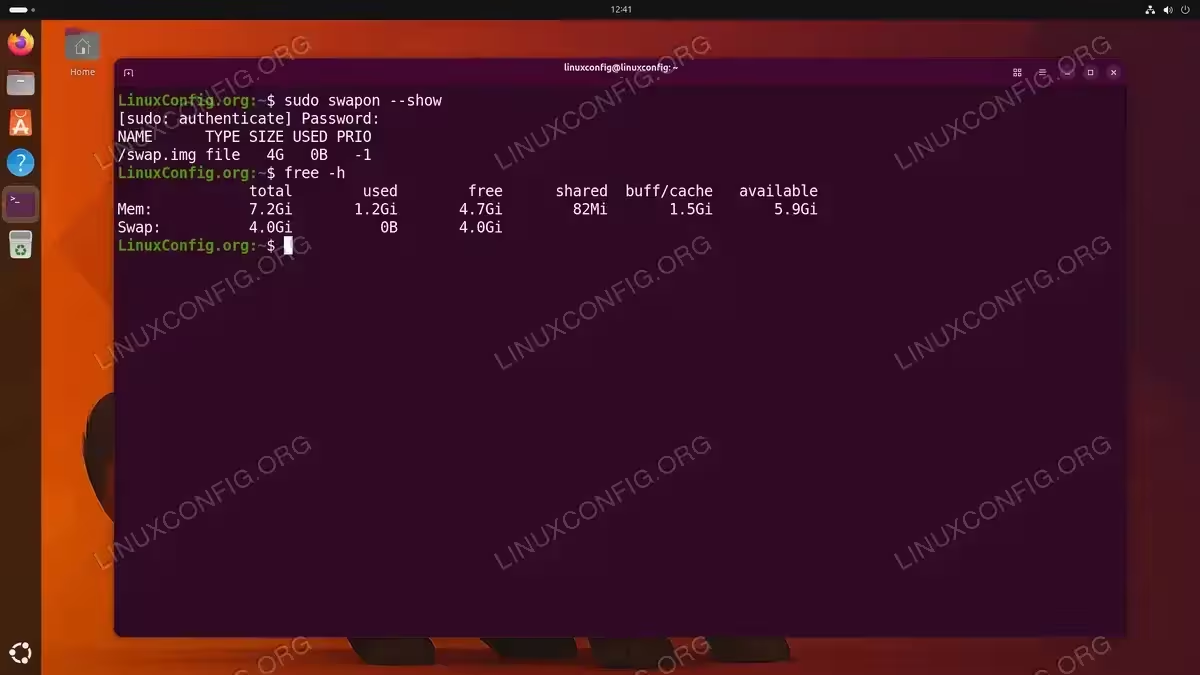
swapon --showcommand provides a clean summary of all active swap areas, including their type, size, and priority.$ sudo swapon --show
If the command produces no output, your system currently has no active swap.
- View memory and swap summary: The
freecommand shows both RAM and swap usage at a glance.$ free -h
Look at the “Swap” row. If it shows all zeros, no swap is active.
- Inspect /proc/swaps: For a more detailed view, read the kernel’s swap information directly.
$ cat /proc/swaps
This file lists each swap area with its filename, type, size, usage, and priority.
Creating a Swap File on Ubuntu 26.04
Creating a swap file on Ubuntu 26.04 involves allocating a file of the desired size, setting proper permissions, formatting it as swap, and then activating it. Follow these steps to create and manage a swap file on your system.
- Allocate the swap file: Use the
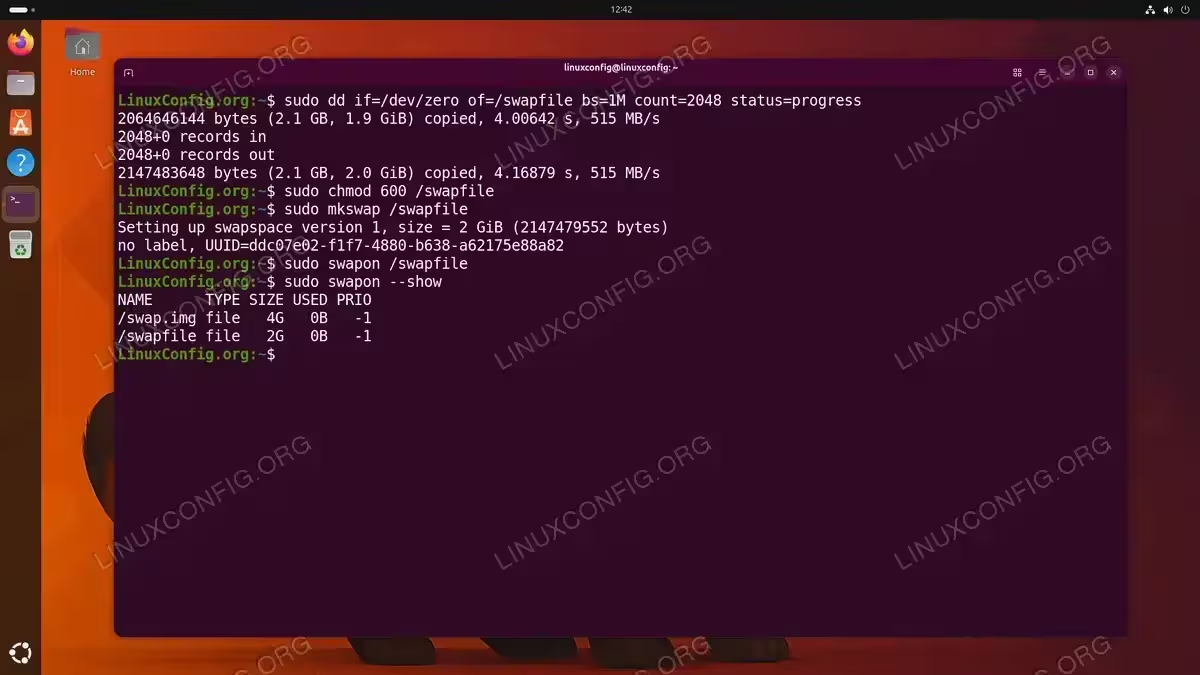
ddcommand to create a file filled with zeros. The following example creates a 2 GB swap file at/swapfile.$ sudo dd if=/dev/zero of=/swapfile bs=1M count=2048 status=progress
The
bs=1Mparameter sets the block size to 1 megabyte, andcount=2048writes 2048 blocks, resulting in a 2 GB file. Thestatus=progressflag displays the write progress. Adjust thecountvalue to match your desired swap size. For instance, usecount=4096for a 4 GB swap file. - Set correct permissions: The swap file must only be readable and writable by root. If the permissions are too open, you may encounter permission denied errors or security warnings.
$ sudo chmod 600 /swapfile
This ensures that no regular user can read or modify the swap file contents.
- Format the file as swap: The
mkswapcommand writes a swap signature to the file, preparing it for use.$ sudo mkswap /swapfile
You should see output confirming the swap area size and UUID.
- Activate the swap file: Use
swaponto enable the swap file immediately.$ sudo swapon /swapfile
- Verify the swap is active: Confirm that the swap file is now in use.
$ sudo swapon --show
The output should list
/swapfilewith the correct size. You can also runfree -hto verify the total swap shown matches your new file size.
WHY NOT FALLOCATE?
While fallocate is faster than dd because it allocates space without writing data, it may create files with “holes” on certain filesystems. The mkswap command will reject such files. Therefore, using dd is the recommended and reliable approach for swap file creation on Ubuntu 26.04.
Making Swap Permanent via /etc/fstab
The swapon command activates swap only for the current session. To ensure the swap file is activated automatically after a restart, you must add an entry to /etc/fstab.
- Back up your fstab file: Before making any changes, create a backup of the existing file.
$ sudo cp /etc/fstab /etc/fstab.bak
- Add the swap entry: Append the swap file entry to
/etc/fstab.$ echo '/swapfile none swap sw 0 0' | sudo tee -a /etc/fstab
This line tells the system to mount
/swapfileas swap space during boot. - Verify the fstab entry: Review the file to confirm the entry was added correctly.
$ cat /etc/fstab
You should see a line reading
/swapfile none swap sw 0 0at the end of the file.
TESTING FSTAB
You can test your /etc/fstab configuration without rebooting by running sudo swapoff /swapfile followed by sudo swapon -a. The -a flag activates all swap entries listed in fstab. If there are no errors, the configuration is correct.

Resizing or Removing a Swap File
One of the key advantages of swap files over swap partitions is the ability to resize or remove them without modifying your disk layout. Whether you need more swap space or want to reclaim disk space, the process is straightforward.
Resizing a Swap File
To resize an existing swap file, you must first deactivate it, recreate it at the new size, and then reactivate it.
- Deactivate the current swap file: Turn off the swap file before making changes.
$ sudo swapoff /swapfile
- Recreate the file at the new size: For example, to increase the swap to 4 GB:
$ sudo dd if=/dev/zero of=/swapfile bs=1M count=4096 status=progress
- Set permissions and format: Repeat the permission and format steps.
$ sudo chmod 600 /swapfile
$ sudo mkswap /swapfile
- Reactivate the swap file:
$ sudo swapon /swapfile
No changes to
/etc/fstabare needed since the filename remains the same.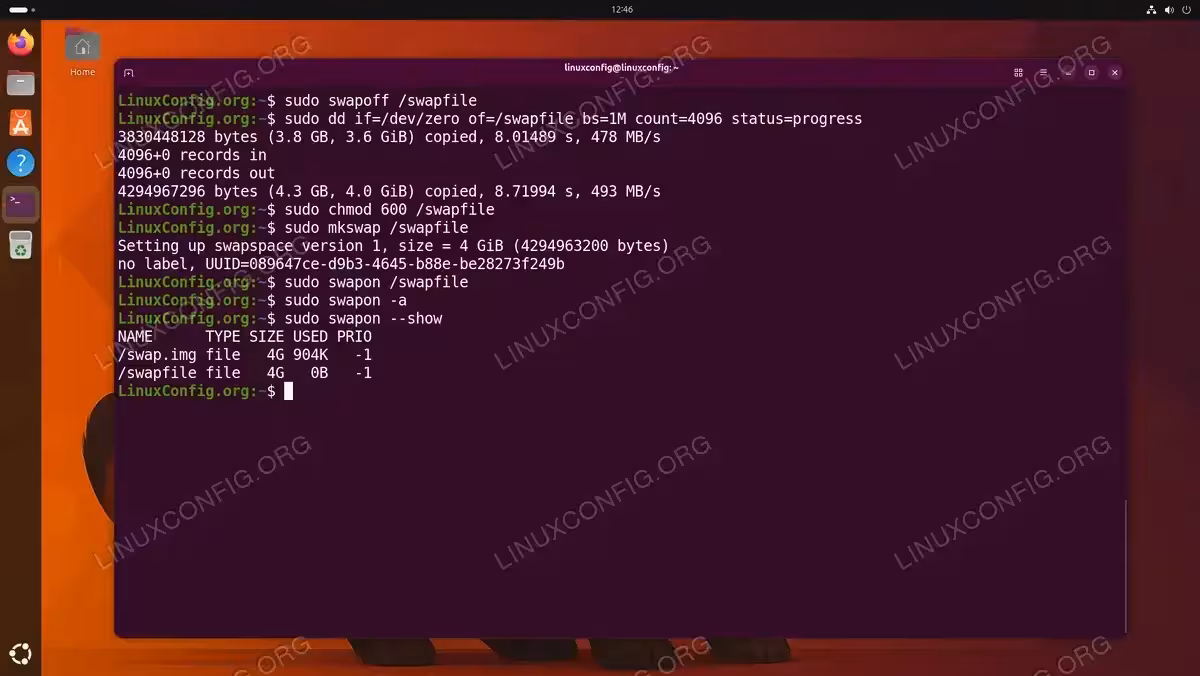
Resizing an existing swap file by deactivating, recreating at 4 GiB, and reactivating
Removing a Swap File
If you no longer need the swap file, remove it completely with these steps.
- Deactivate the swap file:
$ sudo swapoff /swapfile
- Remove the fstab entry: Edit
/etc/fstaband delete the line containing/swapfile.$ sudo nano /etc/fstab
Remove the line
/swapfile none swap sw 0 0, then save and exit. - Delete the swap file:
$ sudo rm /swapfile
Tuning Swappiness and Cache Pressure
The Linux kernel exposes tunable parameters that control how aggressively it uses swap. Adjusting these values can improve performance depending on your workload.
Understanding Swappiness
The vm.swappiness parameter controls the kernel’s tendency to move processes from physical memory to swap. The value ranges from 0 to 200, with the default set to 60 on most Ubuntu systems. A lower value tells the kernel to prefer keeping data in RAM, while a higher value encourages more swap usage.
- Check the current swappiness value:
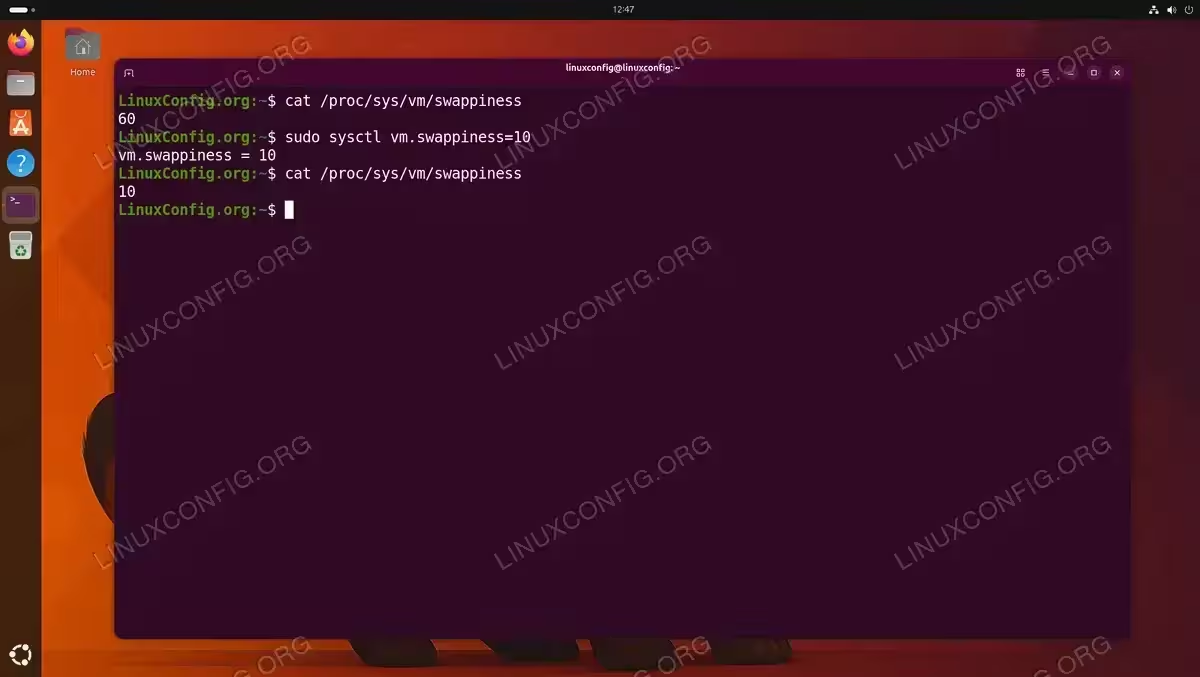
$ cat /proc/sys/vm/swappiness
- Change swappiness temporarily: To set swappiness to 10 for the current session:
$ sudo sysctl vm.swappiness=10
- Make the change permanent: Create a configuration file in
/etc/sysctl.d/to persist the setting across reboots.$ echo 'vm.swappiness=10' | sudo tee /etc/sysctl.d/99-swappiness.conf
RECOMMENDED SWAPPINESS VALUES
For desktop systems, a swappiness of 10-20 is typically a good choice, as it keeps applications responsive by favoring RAM. For servers that need to handle memory spikes gracefully, the default value of 60 or slightly lower (around 30-40) may be more appropriate.
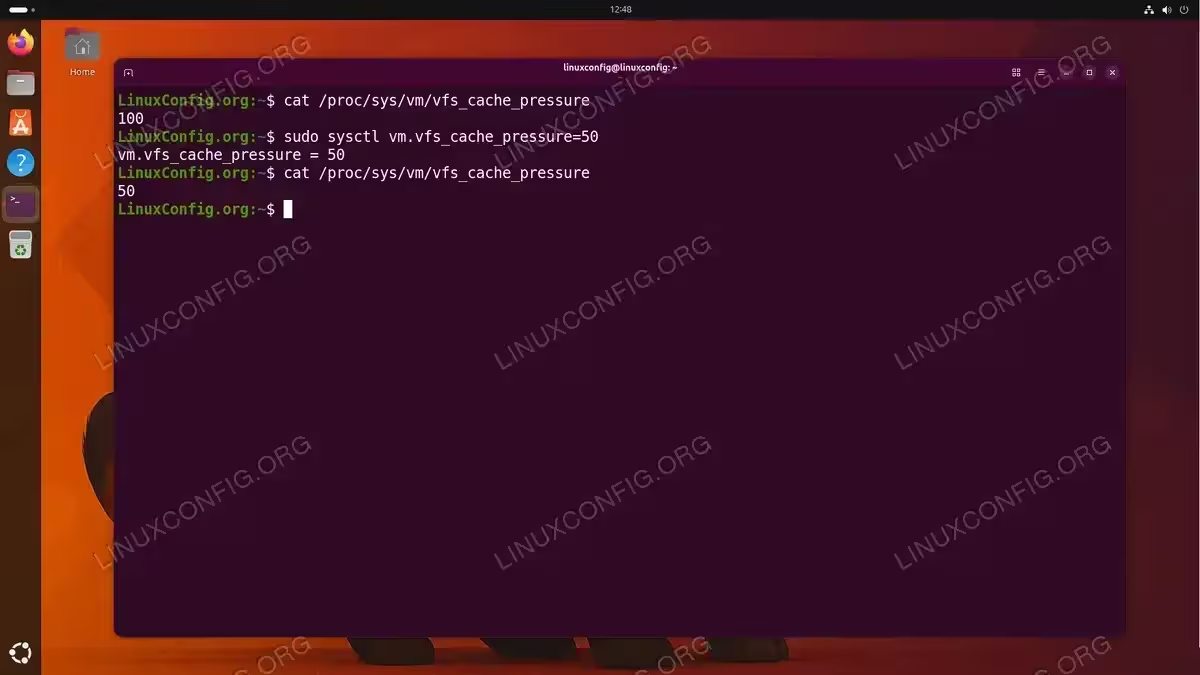
Adjusting VFS Cache Pressure
The vm.vfs_cache_pressure parameter controls how aggressively the kernel reclaims memory used for caching directory and inode objects. The default value is 100. Lowering it makes the kernel prefer to retain these caches, which can improve filesystem performance.
- Check the current value:
$ cat /proc/sys/vm/vfs_cache_pressure
- Set a lower cache pressure: A value of 50 is a common recommendation for desktop use.
$ sudo sysctl vm.vfs_cache_pressure=50
- Persist the change:
$ echo 'vm.vfs_cache_pressure=50' | sudo tee -a /etc/sysctl.d/99-swappiness.conf
This appends the setting to the same file used for swappiness, keeping all swap-related tuning in one place.
RECOMMENDED VFS_CACHE_PRESSURE VALUES
For desktop systems, a value of 50 is a good starting point, as it encourages the kernel to retain directory and inode caches longer, resulting in snappier file browsing and application launches. For servers handling many small files (such as web or mail servers), the default of 100 is generally appropriate. Values below 50 are rarely needed and may cause excessive memory use by caches. Only increase above 100 if your system is under heavy memory pressure and you need to reclaim cache aggressively at the cost of slower filesystem operations.
Conclusion
In this tutorial, you learned how to create and manage swap files on Ubuntu 26.04. You checked your existing swap configuration, created a new swap file with dd, set proper permissions, formatted and activated it, and added it to /etc/fstab for persistence. Additionally, you explored how to resize or remove swap files and how to tune vm.swappiness and vm.vfs_cache_pressure for optimal performance. Swap files provide a simple yet powerful way to extend your system’s memory capacity without repartitioning your disk. For further reading, consult the Ubuntu Swap FAQ on the official community documentation.
Frequently Asked Questions
- How much swap space do I need on Ubuntu 26.04? The recommended size depends on your RAM and use case. Systems with 2 GB or less should have swap equal to double the RAM. Systems with 4-8 GB can match the RAM size. For systems with more than 8 GB, 2-4 GB of swap is usually enough unless you plan to use hibernation, which requires swap at least equal to your total RAM.
- Can I have multiple swap files on Ubuntu 26.04? Yes, Linux supports multiple swap areas simultaneously. You can create additional swap files with different filenames (for example,
/swapfile2) and activate them alongside the first. Use thepriorityoption in/etc/fstabto control which swap area is used first, such as/swapfile2 none swap sw,pri=10 0 0. - Does swap slow down my system? Swap on disk is significantly slower than RAM. However, having swap available prevents out-of-memory errors that could crash your applications. The performance impact depends on how frequently swap is used. By tuning the
vm.swappinessvalue to a lower number, you can minimize unnecessary swapping and keep your system performing well. - Why does mkswap fail when I use fallocate? On some filesystems,
fallocatecreates files with holes (sparse allocations) rather than contiguous blocks. Themkswapcommand detects this and refuses to proceed because swap requires fully allocated space. Usedd if=/dev/zeroinstead, which writes actual data to every byte of the file. - How do I check if my swap is being used? Run
free -hand look at the “Swap” row. The “used” column indicates how much swap is currently occupied. Alternatively,swapon --showdisplays each swap area with its total and used space. If you want to monitor swap usage over time, usevmstat 1and watch thesi(swap in) andso(swap out) columns.