Managing network access is a fundamental aspect of Ubuntu server administration, and knowing how to open firewall ports on Ubuntu 26.04 is essential for running web servers, databases, and other network services. Ubuntu uses UFW (Uncomplicated Firewall) as its default firewall management tool, providing a user-friendly interface to the underlying iptables rules. This guide covers everything from opening single ports to creating custom application profiles, giving you complete control over your system’s network accessibility.
Table of Contents
In this tutorial you will learn:
- How to open TCP and UDP ports using UFW
- How to allow port ranges and restrict access by IP address
- How to use and create UFW application profiles
- How to verify that ports are open and accessible
- How to remove firewall rules when no longer needed
Software Requirements
| Category | Requirements, Conventions or Software Version Used |
|---|---|
| System | Ubuntu 26.04 Resolute Raccoon |
| Software | UFW (pre-installed on Ubuntu 26.04) |
| Other | Privileged access to your Linux system as root or via the sudo command. |
| Conventions | # – requires given linux commands to be executed with root privileges either directly as a root user or by use of sudo command$ – requires given linux commands to be executed as a regular non-privileged user |
sudo ufw allow PORT/PROTOCOL to open firewall ports on Ubuntu 26.04. For example, sudo ufw allow 80/tcp opens HTTP traffic.
| Step | Command/Action |
|---|---|
| 1. Check UFW status | sudo ufw status |
| 2. Open the port | sudo ufw allow 80/tcp |
| 3. Verify the rule | sudo ufw status numbered |
Understanding UFW Port Syntax on Ubuntu 26.04
Before opening ports, it helps to understand UFW’s syntax options. UFW accepts several formats for specifying ports and protocols, giving you flexibility in how you define firewall rules. The basic syntax follows the pattern ufw allow|deny PORT/PROTOCOL, where the protocol is either tcp or udp.
When you omit the protocol, UFW opens the port for both TCP and UDP traffic. While this approach is simpler, specifying the exact protocol is considered best practice for security. Most common services use TCP, including web servers (HTTP/HTTPS), SSH, and databases. UDP is typically used for DNS queries, VPN connections, and streaming applications.
The following table summarizes the common syntax patterns you will use when working with UFW:
| Syntax | Description | Example |
|---|---|---|
PORT |
Opens port for TCP and UDP | ufw allow 53 |
PORT/tcp |
Opens port for TCP only | ufw allow 80/tcp |
PORT/udp |
Opens port for UDP only | ufw allow 123/udp |
START:END/PROTOCOL |
Opens a range of ports | ufw allow 8000:8100/tcp |
SERVICE_NAME |
Opens port by service name | ufw allow ssh |
Opening Single Ports with UFW
Opening a single port is the most common firewall operation. Whether you are running a web server, database, or custom application, you will need to allow traffic through specific ports. The process to firewall open port Ubuntu 26.04 is straightforward using the ufw allow command.
- Open HTTP port (80/tcp): Web servers require port 80 for unencrypted HTTP traffic.
$ sudo ufw allow 80/tcp
This rule permits incoming TCP connections on port 80 from any source IP address.
- Open HTTPS port (443/tcp): Secure web traffic uses port 443 for TLS-encrypted connections.
$ sudo ufw allow 443/tcp
Always open this port alongside port 80 if you are serving HTTPS content.
- Open SSH port (22/tcp): Remote administration requires SSH access on port 22.
$ sudo ufw allow 22/tcp
Alternatively, you can use the service name:
sudo ufw allow ssh. - Open MySQL/MariaDB port (3306/tcp): Database servers need port 3306 for client connections.
$ sudo ufw allow 3306/tcp
Consider restricting this to specific IPs for better security, as covered in a later section.
SECURITY ALERT
Opening database ports (3306, 5432, 27017) to all IP addresses poses a significant security risk. Always restrict database access to specific trusted IPs or use SSH tunneling for remote connections.
Opening Port Ranges on Ubuntu 26.04
Some applications require multiple consecutive ports. Rather than creating individual rules for each port, UFW allows you to specify a range using the colon separator. This is particularly useful for services like passive FTP, SIP, or custom applications that use dynamic port allocation.
- Open a TCP port range: Allow ports 8000 through 8100 for a development environment.
$ sudo ufw allow 8000:8100/tcp
This single rule opens 101 ports for TCP traffic.
- Open a UDP port range: Allow UDP ports for a media streaming application.
$ sudo ufw allow 10000:10100/udp
UDP ranges are common for RTP media streams and gaming servers.
- Open passive FTP ports: FTP data transfers use a configurable port range.
$ sudo ufw allow 21/tcp
$ sudo ufw allow 40000:40100/tcp
The control channel uses port 21, while data transfers occur over the passive port range.
IMPORTANT
When opening port ranges, ensure your application is actually configured to use those specific ports. Opening unnecessary ports increases your attack surface without providing any benefit.
Opening Ports for Specific IPs and Subnets
Restricting port access to specific IP addresses or subnets significantly improves security. This approach is essential for services that should only be accessible from known locations, such as database servers, administrative interfaces, or internal APIs. UFW provides the from keyword to specify source IP restrictions.
- Allow SSH from a specific IP: Restrict SSH access to your office IP address.
$ sudo ufw allow from 203.0.113.50 to any port 22 proto tcp
Only the specified IP can connect via SSH; all other sources are blocked.
- Allow database access from a subnet: Permit your internal network to access MariaDB.
$ sudo ufw allow from 192.168.1.0/24 to any port 3306 proto tcp
The /24 CIDR notation covers all addresses from 192.168.1.1 to 192.168.1.254.
- Allow web traffic from specific IP to specific interface: For multi-homed servers, restrict access to a particular network interface.
$ sudo ufw allow in on eth1 from 10.0.0.0/8 to any port 443 proto tcp
This rule only applies to traffic arriving on the eth1 interface from the 10.0.0.0/8 network.
You can also combine IP restrictions with port ranges for fine-grained control:
$ sudo ufw allow from 192.168.1.0/24 to any port 5900:5910 proto tcp
This example allows VNC connections (ports 5900-5910) only from your local network.
Opening Ports by Application Profile
UFW includes application profiles that bundle port configurations for common services. These profiles simplify firewall management by allowing you to reference applications by name rather than remembering specific port numbers. To check firewall status and view available profiles, use the ufw app list command.
IMPORTANT
UFW application profiles are installed alongside their respective software packages. A profile will only appear in ufw app list after the associated application is installed on your system.
- List available application profiles: View all profiles installed on your system.
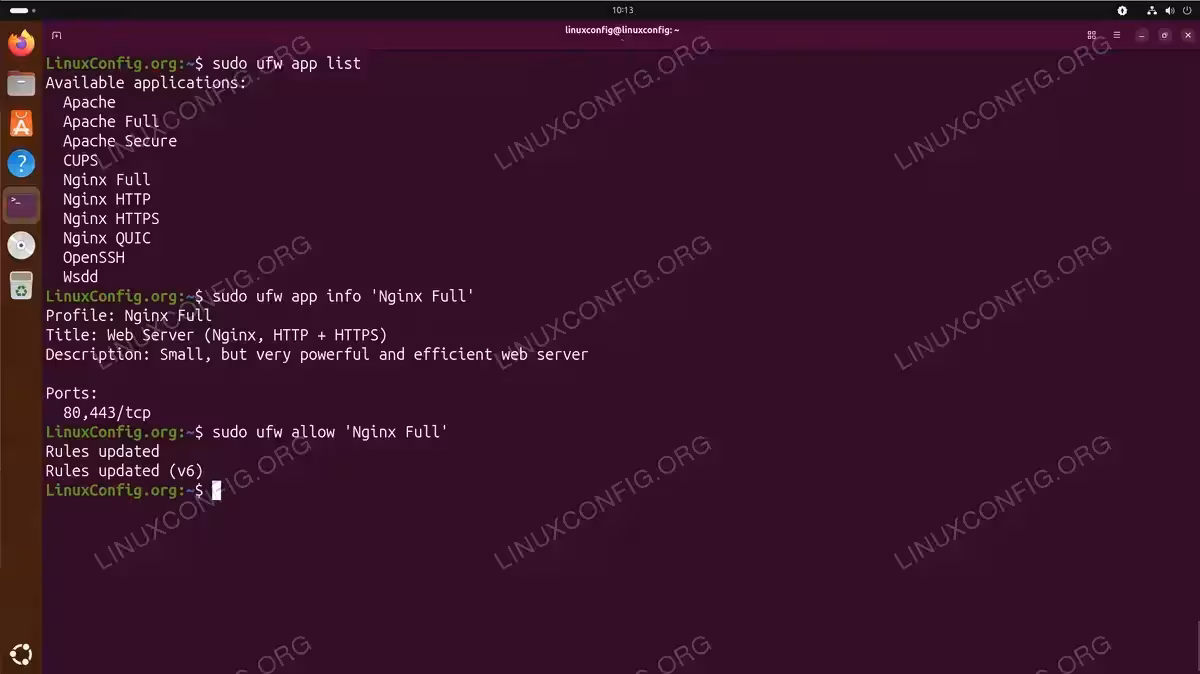
$ sudo ufw app list
Available applications:
  Apache
  Apache Full
  Apache Secure
  CUPS
  Nginx Full
  Nginx HTTP
  Nginx HTTPS
  Nginx QUIC
  OpenSSH
  Wsdd
The available profiles depend on which software packages you have installed.
- View profile details: Check which ports a profile will open before applying it.
$ sudo ufw app info 'Nginx Full'
Profile: Nginx Full
Title: Web Server (Nginx, HTTP + HTTPS)
Description: Small, but very powerful and efficient web server

Ports:
  80,443/tcp
This shows that allowing ‘Nginx Full’ opens both ports 80 and 443 for TCP.
- Allow an application profile: Open ports using the profile name.
$ sudo ufw allow 'Nginx Full'
UFW automatically opens all ports defined in the profile.
- Allow OpenSSH profile: Enable SSH access using the application profile.
$ sudo ufw allow 'OpenSSH'
This is equivalent to
sudo ufw allow 22/tcp.
Creating Custom UFW Application Profiles
When software does not include a UFW profile, you can create your own. Custom profiles are stored in /etc/ufw/applications.d/ and follow a simple INI-style format. This section demonstrates creating a profile for MariaDB, which does not ship with a built-in UFW profile despite being a popular database server.
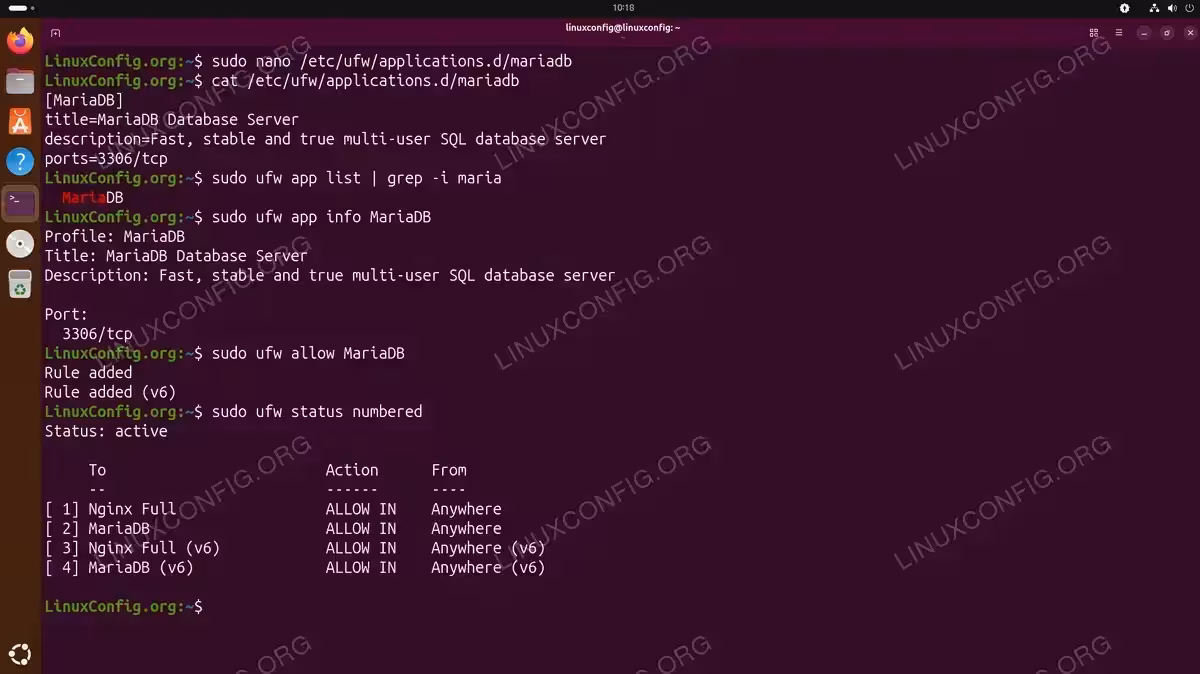
- Create the profile file: Use a text editor to create a new profile for MariaDB.
$ sudo nano /etc/ufw/applications.d/mariadb
Add the following content to the file:
[MariaDB]
title=MariaDB Database Server
description=Fast, stable and true multi-user SQL database server
ports=3306/tcp
Save and exit the editor.
- Verify the new profile: Check that UFW recognizes your custom profile.
$ sudo ufw app list | grep -i maria
  MariaDB
The new profile now appears in the application list.
- View the profile details: Confirm the port configuration is correct.
$ sudo ufw app info MariaDB
Profile: MariaDB
Title: MariaDB Database Server
Description: Fast, stable and true multi-user SQL database server

Ports:
  3306/tcp
- Allow the custom profile: Use your new profile to open the database port.
$ sudo ufw allow MariaDB
The firewall now permits TCP connections on port 3306.
For applications requiring multiple ports, separate them with commas or use a pipe for different protocols:
[CustomApp]
title=Custom Application
description=Application requiring multiple ports
ports=8080,8443/tcp|9000/udp
This example opens TCP ports 8080 and 8443, plus UDP port 9000.
Verifying Open Ports on Ubuntu 26.04
After opening ports, you should verify that your rules are active and that services are actually listening. This involves checking both the UFW configuration and the actual network state. Use these methods to check firewall rules and confirm connectivity.
- Check UFW status with numbered rules: View all active firewall rules.
$ sudo ufw status numbered
Status: active

     To                         Action      From
     --                         ------      ----
[ 1] 22/tcp                     ALLOW IN    Anywhere
[ 2] 80/tcp                     ALLOW IN    Anywhere
[ 3] 443/tcp                    ALLOW IN    Anywhere
[ 4] 3306/tcp                   ALLOW IN    192.168.1.0/24
[ 5] 22/tcp (v6)                ALLOW IN    Anywhere (v6)
[ 6] 80/tcp (v6)                ALLOW IN    Anywhere (v6)
[ 7] 443/tcp (v6)               ALLOW IN    Anywhere (v6)
The numbered format is useful for identifying rules you may want to delete later.
- Check listening ports with ss: Verify that services are bound to the expected ports.
$ sudo ss -tlnp
State  Recv-Q Send-Q Local Address:Port  Peer Address:Port Process
LISTEN 0      128          0.0.0.0:22         0.0.0.0:*     users:(("sshd",pid=1234,fd=3))
LISTEN 0      511          0.0.0.0:80         0.0.0.0:*     users:(("nginx",pid=5678,fd=6))
LISTEN 0      511          0.0.0.0:443        0.0.0.0:*     users:(("nginx",pid=5678,fd=7))
LISTEN 0      80         127.0.0.1:3306       0.0.0.0:*     users:(("mariadbd",pid=9012,fd=20))
The
-tflag shows TCP sockets,-lshows listening sockets,-nshows numeric ports, and-pshows process information. - Test connectivity from another machine: Use netcat or telnet to verify the port is accessible.
$ nc -zv server-ip 80
Connection to server-ip 80 port [tcp/http] succeeded!
A successful connection confirms both the firewall rule and the listening service are working.
INSTALLATION TIPS
If a port appears open in UFW but connections fail, verify that the service is actually running and listening on the correct interface. Services bound to 127.0.0.1 (localhost) will not accept external connections regardless of firewall settings.
Removing Port Rules from UFW
When services are decommissioned or security requirements change, you should remove unnecessary firewall rules. UFW provides two methods for deleting rules: by rule number or by specifying the exact rule. Keeping your firewall settings clean reduces complexity and improves security.
- Delete by rule number: First display numbered rules, then delete by index.
$ sudo ufw status numbered
$ sudo ufw delete 3
UFW prompts for confirmation before removing the rule. Note that rule numbers shift after deletion, so always check the current numbering before deleting multiple rules.
- Delete by rule specification: Remove a rule by specifying its exact syntax.
$ sudo ufw delete allow 80/tcp
This method is useful when you know the exact rule but do not want to look up its number.
- Delete an application profile rule: Remove access granted by a profile.
$ sudo ufw delete allow 'Nginx Full'
This removes all ports associated with the specified profile.
If you need to temporarily disable all firewall rules without deleting them, you can disable the firewall entirely with sudo ufw disable. To set up your firewall again, simply run sudo ufw enable.
Conclusion
You now have comprehensive knowledge of how to firewall open port Ubuntu 26.04 using UFW. From basic single port rules to custom application profiles, these techniques cover the vast majority of firewall configuration scenarios. Remember to always specify the protocol (TCP or UDP) when opening ports, restrict access to specific IPs whenever possible, and regularly audit your firewall rules to remove unnecessary entries. For more detailed information about UFW capabilities, consult the official Ubuntu firewall documentation.
Frequently Asked Questions
- How do I check if a specific port is open in UFW? Run
sudo ufw statusto see all active rules. For a more detailed view, usesudo ufw status verbose. To check if a service is actually listening on that port, usesudo ss -tlnp | grep PORT_NUMBER. - What is the difference between allowing a port and allowing an application profile? Allowing a port creates a rule for that specific port number, while allowing an application profile uses predefined port configurations stored in
/etc/ufw/applications.d/. Profiles are more readable and can include multiple ports, but both methods achieve the same result at the firewall level. - Do I need to reload UFW after adding rules? No, UFW rules take effect immediately after you add them. Unlike some firewall systems, there is no need to reload or restart UFW for new rules to become active.
- How can I open a port for IPv6 traffic only? UFW automatically creates both IPv4 and IPv6 rules when you allow a port. If you need IPv6-only rules, you must edit the
/etc/ufw/user6.rulesfile directly or useip6tablescommands.