By default, Ubuntu 26.04 disables direct root login over SSH for security reasons. However, there are scenarios where you may need to ssh allow ubuntu 26.04 root access, such as automated deployments, legacy system migrations, or specific administrative tasks. This guide walks you through the process of enabling root SSH login on Ubuntu 26.04 Resolute Raccoon, while also covering security best practices to minimize risk.
Table of Contents
In this tutorial you will learn:
- Why root SSH login is disabled by default on Ubuntu 26.04
- How to set a root password for SSH authentication
- How to enable root SSH login with password or key-based authentication
- How to restrict root SSH access to specific IP addresses
- How to verify and troubleshoot root SSH connections
- How to revert changes and disable root SSH login
Software Requirements
| Category | Requirements, Conventions or Software Version Used |
|---|---|
| System | Ubuntu 26.04 Resolute Raccoon |
| Software | OpenSSH Server (openssh-server) |
| Other | Privileged access to your Linux system as root or via the sudo command. |
| Conventions | # – requires given linux commands to be executed with root privileges either directly as a root user or by use of sudo command$ – requires given linux commands to be executed as a regular non-privileged user |
PermitRootLogin to yes.
| Step | Command/Action |
|---|---|
| 1. Set root password | $ sudo passwd root |
| 2. Enable root login in SSH config | $ sudo sed -i 's/^#PermitRootLogin.*/PermitRootLogin yes/' /etc/ssh/sshd_config |
| 3. Restart SSH service | $ sudo systemctl daemon-reload && sudo systemctl restart ssh |
| 4. Test root SSH login | $ ssh root@your-server-ip |
Understanding Root SSH Login on Ubuntu 26.04
Ubuntu 26.04 ships with root SSH login disabled by default. This is a deliberate security measure, as the root account is a well-known target for brute-force attacks. Consequently, the default SSH configuration sets PermitRootLogin to prohibit-password, which blocks password-based root authentication while still permitting key-based login.
Before proceeding, consider whether you truly need direct root access. In most cases, using sudo from a regular user account is the preferred approach. Nevertheless, certain scenarios require direct root SSH access:
- Automated deployment scripts that require root privileges
- Legacy applications that expect root-level SSH connections
- Disaster recovery situations where the regular user account is inaccessible
- Remote system administration tools that operate as root
SECURITY ALERT
Enabling root SSH login increases your attack surface. Always combine this with additional security measures such as key-based authentication, IP restrictions, and firewall rules. If you only need root access temporarily, remember to disable it once your task is complete.
Setting the Root Password
By default, the root account on Ubuntu 26.04 does not have a password set. Therefore, before you can ssh allow ubuntu 26.04 root login with password authentication, you must first assign a root password.
- Set the root password: Use the
passwdcommand withsudoto assign a password to the root account:$ sudo passwd root
You will be prompted to enter and confirm the new password. Choose a strong, unique password that combines uppercase and lowercase letters, numbers, and special characters.
- Verify the root account is unlocked: Confirm the root account status by checking the password field:
$ sudo passwd -S root
The output should show
root Pat the beginning, indicating the account has a usable password. If it showsroot L, the account is still locked.
IMPORTANT
If you plan to use only SSH key-based authentication for root login, setting a root password is optional. However, having a root password provides a fallback method for console access in emergency situations.
Enabling Root SSH Login on Ubuntu 26.04
To allow root SSH login on Ubuntu 26.04, you need to modify the SSH daemon configuration file. The PermitRootLogin directive controls whether the root user can log in via SSH.
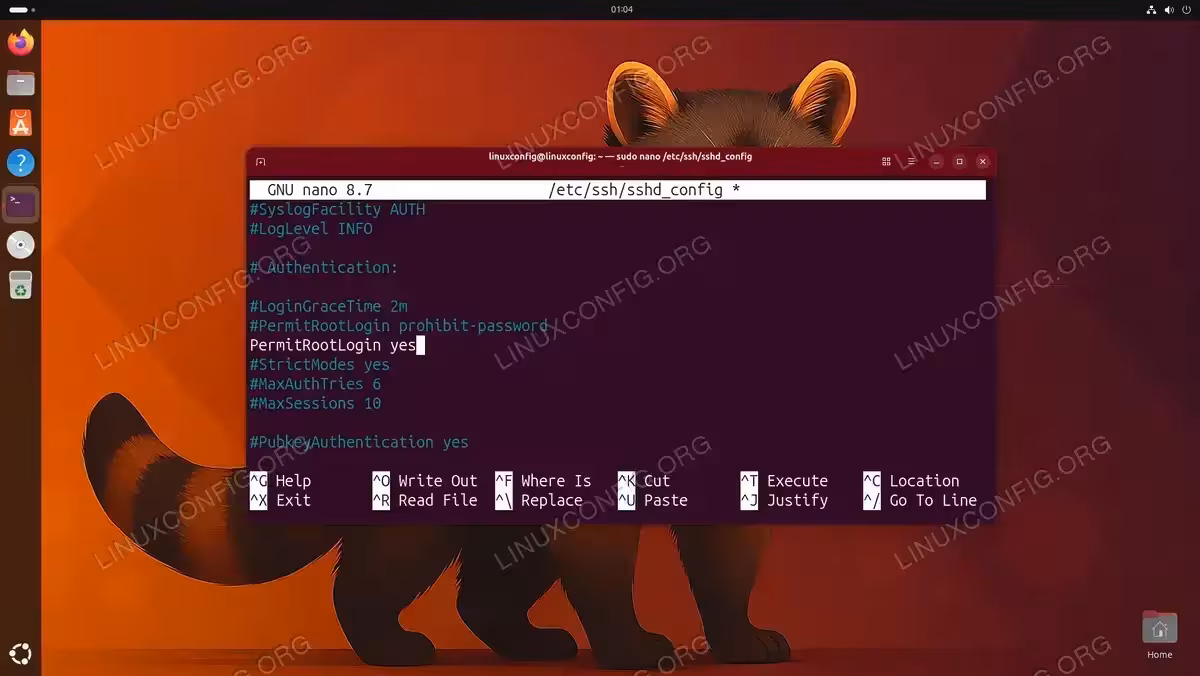
- Open the SSH configuration file: Edit the main SSH daemon configuration file using your preferred text editor:
$ sudo nano /etc/ssh/sshd_config
Alternatively, you can create a drop-in configuration file, which is the recommended approach for maintaining cleaner configuration management:
$ sudo nano /etc/ssh/sshd_config.d/allow-root.conf
- Configure the PermitRootLogin directive: Locate the
PermitRootLoginline. If editing the main configuration file, uncomment it and change the value. If using a drop-in file, simply add the directive. The available options are:
PermitRootLogin Options Value Description yesAllows root login with any authentication method (password, key, etc.) prohibit-passwordAllows root login only with SSH keys (default on Ubuntu 26.04) forced-commands-onlyAllows root login with keys only if a command is specified noCompletely disables root SSH login To allow root login with password authentication, set:
PermitRootLogin yes
To allow root login with SSH keys only (more secure), set:
PermitRootLogin prohibit-password
- Save and close the file: In nano, press
Ctrl+Oto save, thenCtrl+Xto exit. - Restart the SSH service: Apply the configuration changes by restarting the SSH daemon. On Ubuntu 26.04, reload the systemd unit files first, then restart the service:
$ sudo systemctl daemon-reload
$ sudo systemctl restart ssh
Additionally, if your system uses SSH socket activation, also restart the socket:
$ sudo systemctl restart ssh.socket
INSTALLATION TIPS
If you are connected to the server via SSH while making these changes, ensure you do not close your current session until you have verified the new configuration works. This prevents locking yourself out of the server.
Configuring Root SSH Key-Based Authentication
Key-based authentication is significantly more secure than password authentication. If you need to configure SSH root access, using SSH keys is the recommended method.
- Generate an SSH key pair on the client: If you do not already have an SSH key pair, generate one on your local machine:
$ ssh-keygen -t ed25519 -C "root-access-key"
The Ed25519 algorithm provides excellent security with shorter key lengths. If you are currently using older RSA keys, consider following our guide to migrate SSH keys from RSA to Ed25519. When prompted, save the key to the default location or specify a custom path.
- Copy the public key to the server: Transfer your public key to the root user’s authorized keys file on the server. Since root login may not yet be enabled, use your regular user account first:
$ ssh regular-user@server-ip "sudo mkdir -p /root/.ssh && sudo chmod 700 /root/.ssh"
Then copy the key:
$ cat ~/.ssh/id_ed25519.pub | ssh regular-user@server-ip "sudo tee -a /root/.ssh/authorized_keys"
Set the correct permissions:
$ ssh regular-user@server-ip "sudo chmod 600 /root/.ssh/authorized_keys && sudo chown root:root /root/.ssh/authorized_keys"
- Verify the key configuration: Confirm the key has been correctly installed by listing the authorized keys:
$ ssh regular-user@server-ip "sudo cat /root/.ssh/authorized_keys"
You should see your public key listed in the output.
- Test root key-based login: With
PermitRootLoginset to eitheryesorprohibit-password, test the connection:$ ssh -i ~/.ssh/id_ed25519 root@server-ip
If the login succeeds without a password prompt, key-based authentication is working correctly.
COMPLETED
Root SSH key-based authentication is now configured. This method provides secure root access without exposing the system to password brute-force attacks.
Restricting Root SSH Access
If you must allow root SSH login, restricting access to specific IP addresses significantly improves security. You can achieve this through SSH configuration or firewall rules on your SSH server.
Method 1: SSH Configuration Match Block
Add a Match block to your SSH configuration that limits root login to specific addresses:
$ sudo nano /etc/ssh/sshd_config.d/root-restrict.conf
Add the following content:
# Deny root login by default
PermitRootLogin no

# Allow root login from specific IP
Match Address 192.168.1.100
    PermitRootLogin yes
This configuration denies root login from all addresses except 192.168.1.100. You can specify multiple IP addresses or CIDR ranges as needed.
Method 2: UFW Firewall Rules
If you want to restrict SSH access at the firewall level, use UFW to limit which IP addresses can connect to the SSH port:
$ sudo ufw allow from 192.168.1.100 to any port 22
$ sudo ufw deny 22
This approach blocks SSH connections at the network level before they reach the SSH daemon. Moreover, consider changing the SSH port to a non-standard port to reduce automated scanning attempts.
After making any SSH configuration changes, reload and restart the service:
$ sudo systemctl daemon-reload
$ sudo systemctl restart ssh
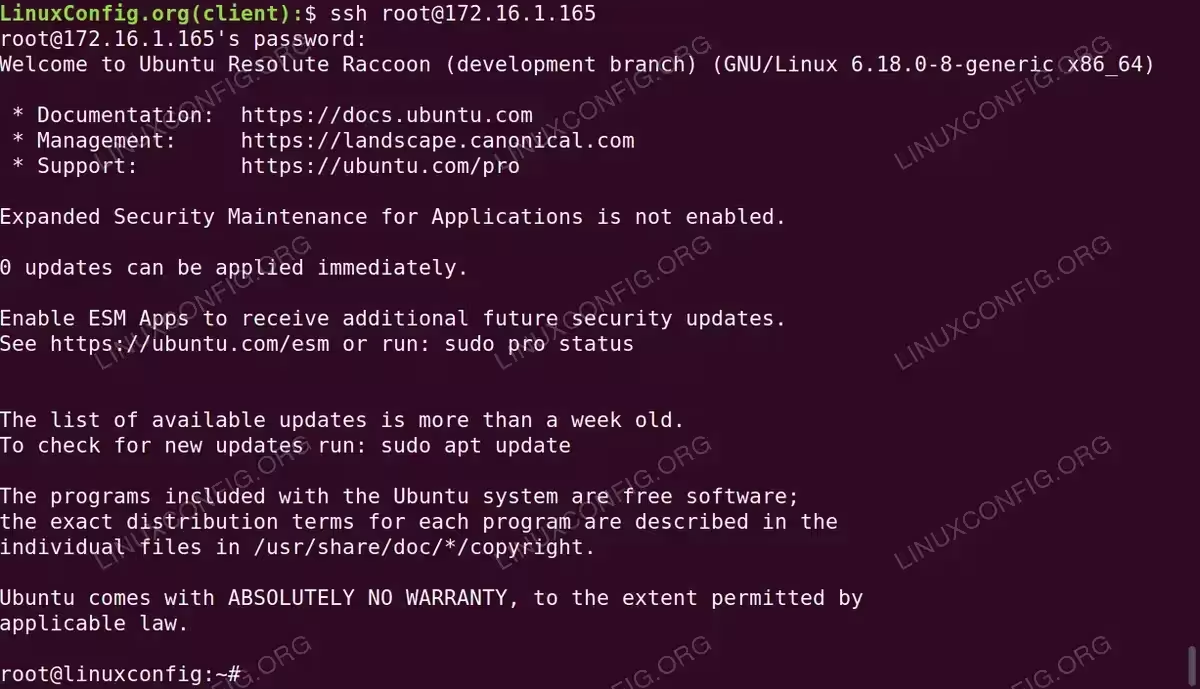
Verifying Root SSH Login
After enabling root SSH access, it is essential to verify the configuration works as expected. Additionally, understanding how to troubleshoot SSH issues will help you resolve any problems quickly.
- Test from a remote client: Open a new terminal on your local machine and attempt to connect as root:
$ ssh root@your-server-ip
If using a non-default SSH key:
$ ssh -i ~/.ssh/id_ed25519 root@your-server-ip
- Check the SSH daemon status: Verify the SSH service is running correctly with the updated configuration:
$ sudo systemctl status ssh
Look for
active (running)in the output to confirm the service is operational. - Verify the active SSH configuration: Use
sshd -Tto display the effective configuration and confirm your changes are applied:$ sudo sshd -T | grep -i permitrootlogin
The output should display the value you configured, such as
permitrootlogin yes. - Review SSH authentication logs: If the connection fails, check the authentication logs for detailed error messages:
$ sudo journalctl -u ssh -n 50 --no-pager
Common issues include incorrect file permissions on
/root/.ssh, mismatched keys, or firewall rules blocking the connection.
Disabling Root SSH Login
Once you have completed your administrative tasks, it is strongly recommended to disable root SSH login to restore the default security posture. To revert the changes:
- Remove or edit the SSH configuration: If you used a drop-in configuration file, simply remove it:
$ sudo rm /etc/ssh/sshd_config.d/allow-root.conf
If you edited the main configuration file, change the directive back:
$ sudo sed -i 's/^PermitRootLogin yes/PermitRootLogin prohibit-password/' /etc/ssh/sshd_config
- Restart the SSH service: Apply the reverted configuration:
$ sudo systemctl daemon-reload
$ sudo systemctl restart ssh
- Verify root login is disabled: Confirm the change took effect:
$ sudo sshd -T | grep -i permitrootlogin
The output should show
permitrootlogin prohibit-passwordorpermitrootlogin no.
IMPORTANT
Optionally, you can also lock the root account password again with sudo passwd -l root to prevent any password-based console login as root.
Conclusion
You have learned how to ssh allow ubuntu 26.04 root login through multiple methods, including password authentication and the more secure key-based approach. While enabling root SSH access is sometimes necessary, it should always be treated as a temporary measure or secured with key-based authentication and IP restrictions. For ongoing server administration, using sudo from a regular user account remains the recommended practice. Refer to the official OpenSSH sshd_config documentation for a complete list of configuration directives and their descriptions.
Frequently Asked Questions
- Is it safe to allow root SSH login on Ubuntu 26.04? Enabling root SSH login increases the attack surface of your server. If you must enable it, use SSH key-based authentication instead of passwords, restrict access to specific IP addresses, and disable it when no longer needed. For most use cases, using
sudofrom a regular account is the safer alternative. - Why can’t I log in as root even after enabling PermitRootLogin? The most common cause is that the root account does not have a password set. Run
sudo passwd rootto set one. Additionally, check that no other configuration files in/etc/ssh/sshd_config.d/are overriding your setting, and verify the SSH service has been restarted after changes. - What is the difference between PermitRootLogin yes and prohibit-password? Setting
PermitRootLogin yesallows root to authenticate with any method, including passwords and keys. Setting it toprohibit-passwordonly permits authentication methods that are not keyboard-interactive, effectively requiring SSH keys. Theprohibit-passwordoption is the default on Ubuntu 26.04 and is more secure. - How do I allow root SSH login from only one specific IP address? Use a
Match Addressblock in your SSH configuration. SetPermitRootLogin noglobally, then add aMatch Address 192.168.1.100block withPermitRootLogin yesinside it. This allows root login exclusively from the specified address while blocking it from all others. - Should I use a drop-in config file or edit sshd_config directly? Using a drop-in file in
/etc/ssh/sshd_config.d/is the recommended approach on Ubuntu 26.04. Drop-in files keep your customizations separate from the default configuration, making them easier to manage, track, and revert. They also survive package upgrades that might overwrite the mainsshd_configfile.