Running an VPN server on your local area network will allow outside clients to connect to your server and access the network as if they were directly connected to it. This is a common setup for many companies, which let their employees connect to the local business network remotely, so that they have access to internal resources that are only available on the local network. Linux administrators and power users may also be interested in setting up an VPN server at home, since they can then use their laptop or other portable device to connect to their home network while on the go.
One of the best implementations of a VPN system is OpenVPN. It is completely open source and supports many features for customization. In this tutorial, we will go through the step by step instructions of installing and setting up OpenVPN on a Linux system. This will include installation of Easy-RSA for CA and client certificates. Then, we will show how to use a client system to connect to the VPN server and begin accessing the local network of the server. Follow along with us below to get started.
In this tutorial you will learn:
- How to install OpenVPN Server on major Linux distros
- How to configure a Certificate Authority server with Easy-RSA
- How to configure OpenVPN server settings
- How to generate certificates and keys for VPN clients
- How to manage the OpenVPN service
- How to configure IP forwarding kernel parameter
- How to create client configuration files
- How to connect to the OpenVPN server

| Category | Requirements, Conventions or Software Version Used |
|---|---|
| System | Any Linux distro |
| Software | OpenVPN |
| Other | Privileged access to your Linux system as root or via the sudo command. |
| Conventions |
# – requires given linux commands to be executed with root privileges either directly as a root user or by use of sudo command$ – requires given linux commands to be executed as a regular non-privileged user |
This tutorial will assume that you have at least three devices. One is for the OpenVPN server, another is for the certificate authority, and finally at least one client device that you plan on using to connect to the VPN server.
Setting Up a Certificate Authority
First, we will set up the system that we plan on using for the certificate authority (CA). Follow the step by step instructions below to finish the CA server:
- First, install the Easy-RSA package. This will be the tool that we use in order to generate a private key which will then sign requests from incoming client connections that need the CA to verify the identity of the OpenVPN server. On debian and ubuntu based systems:
$ sudo apt install easy-rsa
On Fedora based systems:
$ sudo dnf install easy-rsa
- Next, let’s get started with configuring Easy-RSA. We will do this by creating a directory for our Public Key Infrastrucure (PKI). This can be named whatever you want, but we will keep it straightforward for the sake of example:
$ mkdir ~/easy-rsa
- Next, we can either copy all the Easy-RSA files into our new PKI directory, or just create a symbolic link to them. The advantage of creating the symbolic link is that we will not need to modify our PKI directory in case there are future updates to the Easy-RSA package. Execute the following command to create the link:
$ ln -s /usr/share/easy-rsa/* ~/easy-rsa/
$ cd ~/easy-rsa
- Once we are in the
~/easy-rsadirectory, we run the script that initializes it as a PKI directory.$ ./easyrsa init-pki
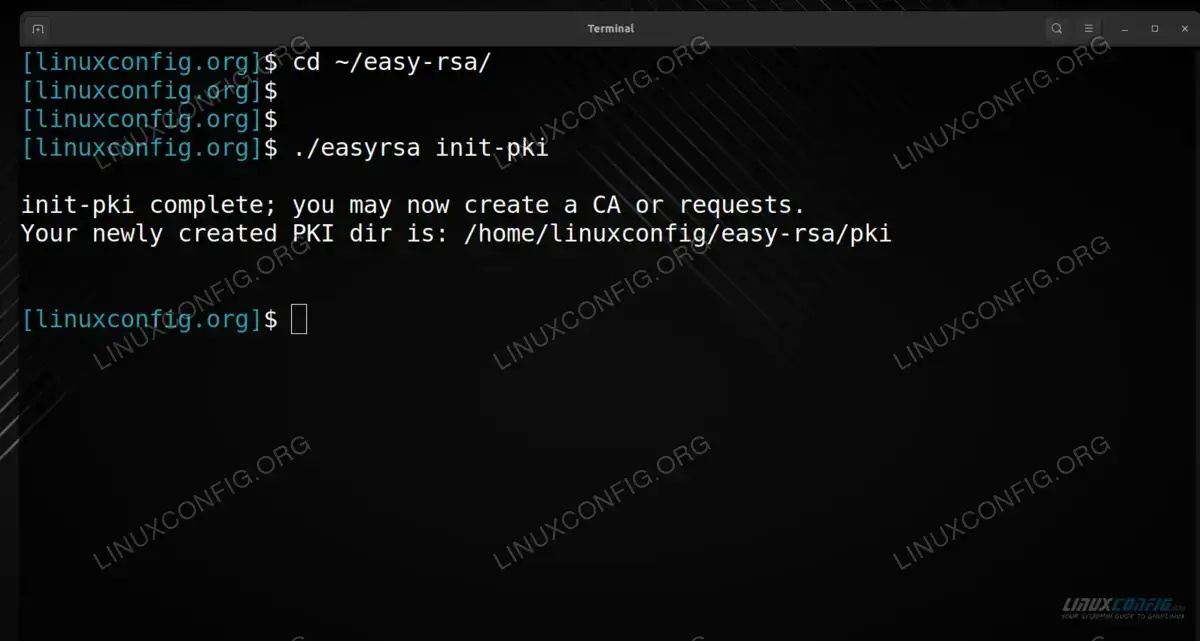
Initializing the PKI directory of our CA
- Next, we need to set some variables in our configuration. This can be done by creating a file named
varsinside of the PKI directory~/easy-rsa.$ nano vars
The following content can be pasted inside; just adapt it to reflect your own information:
set_var EASYRSA_REQ_COUNTRY    "US"
set_var EASYRSA_REQ_PROVINCE   "LA"
set_var EASYRSA_REQ_CITY       "Los Angeles"
set_var EASYRSA_REQ_ORG        "LinuxConfig.org"
set_var EASYRSA_REQ_EMAIL      "admin@linuxconfig.org"
set_var EASYRSA_REQ_OU         "Linux Tutorials"
set_var EASYRSA_ALGO           "ec"
set_var EASYRSA_DIGEST         "sha512"
After editing the file to your satisfaction, save changes and exit it.
- Next, we will run the
build-cascript. This will build the Certificate Authority, which generates a public and private key pair.$ ./easyrsa build-ca
You will be prompted to enter a passphrase that secures the key pair. Then, enter a name that represents your CA server, such as the hostname or username. We use
linuxconfig-CAin the screenshot below: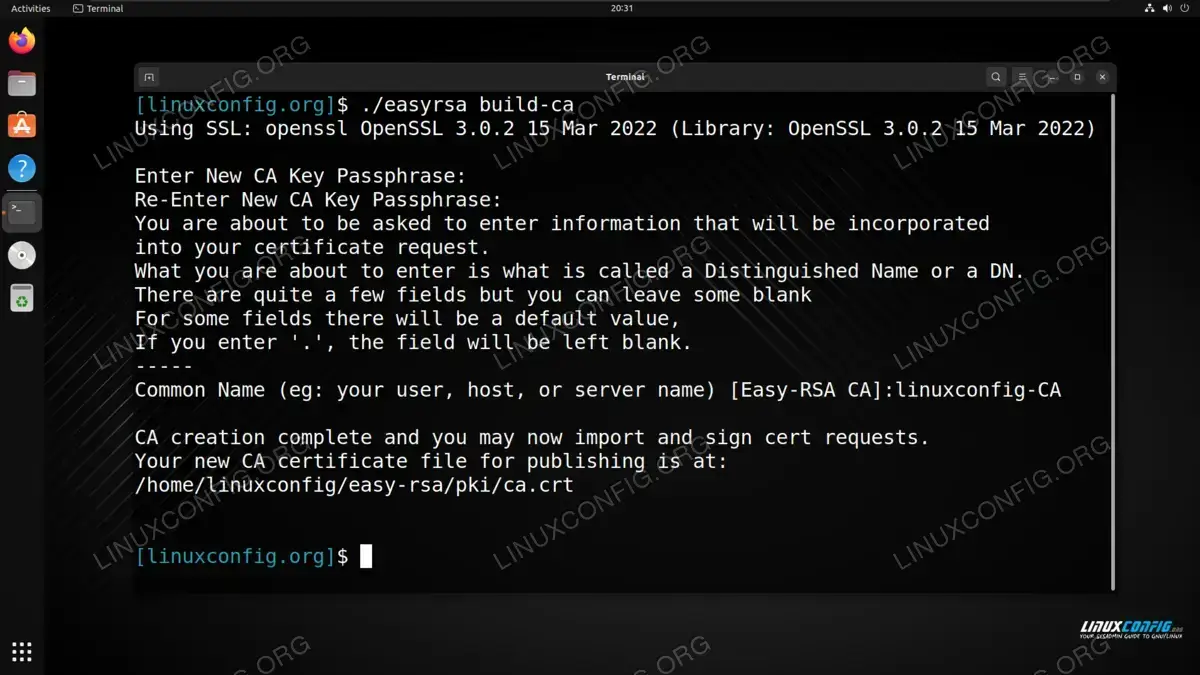
Building the certificate authority - Your server is now ready to act as a Certificate Authority. All clients that need to interact with your CA will need a copy of the
ca.crtfile, which should be stored in the~/easy-rsa/pkidirectory, if you have been following along with us.$ cat ~/easy-rsa/pki/ca.crt
It is up to you how you choose to distribute the file, but all VPN clients will need a copy of it.
Be sure to keep your
ca.key file secure. This file is stored at ~/easy-rsa/pki/private/ca.key and should never leave the system. If this file becomes compromised, the purpose of the CA will be rendered useless. OpenVPN and Easy-RSA Installation
Now we move over to the VPN server. This is where we will install the VPN server software, while the CA server we configured in the previous section will be resposible for issuing or revoking certificates.
The first step is to install the OpenVPN software and Easy-RSA. These can be easily installed via official repositories on all major Linux distros. You can use the appropriate command below to install OpenVPN and Easy-RSA with your system’s package manager.
To install OpenVPN and Easy-RSA on Ubuntu, Debian, and Linux Mint:
$ sudo apt install openvpn easy-rsa
To install OpenVPN and Easy-RSA on Fedora, CentOS, AlmaLinux, and Red Hat:
$ sudo dnf install openvpn easy-rsa
To install OpenVPN and Easy-RSA on Arch Linux and Manjaro:
$ sudo pacman -S openvpn easy-rsa
Setting Up OpenVPN Server and Easy-RSA
We will now begin setting up the VPN server. The first few steps will look familiar, as we have to repeat some things that we also did on the CA server. Let’s get started.
- First, create the
easy-rsadirectory as we did before, and create a symbolic link it to the installed files.$ mkdir ~/easy-rsa $ ln -s /usr/share/easy-rsa/* ~/easy-rsa/ $ cd ~/easy-rsa
- Create a
varsfile, but this time we do not need to fill out all of the info that we did on the CA.$ nano vars
- Paste the following lines into the file, and save it:
set_var EASYRSA_ALGO "ec"
set_var EASYRSA_DIGEST "sha512"
These are the recommended security settings for both maximum speed and security. You can, of course, change them as you see fit.
- Inside of the
~/easy-rsadirectory, we run the script that initializes it as a PKI directory.$ ./easyrsa init-pki
- Next, we will generate a private key for the VPN server, as well as a Certificate Signing Request (CSR). In later steps, this request will need to be signed by the CA that we configured earlier. Take a look at the following command syntax:
$ ./easyrsa gen-req linuxconfig-server nopass
Here, we are passing the
gen-reqoption to theeasyrsascript. Then, we pass a name for our VPN server, which will belinuxconfig-server. Lastly, thenopassoption will get rid of password protection on the request file, which simplifies the entire process.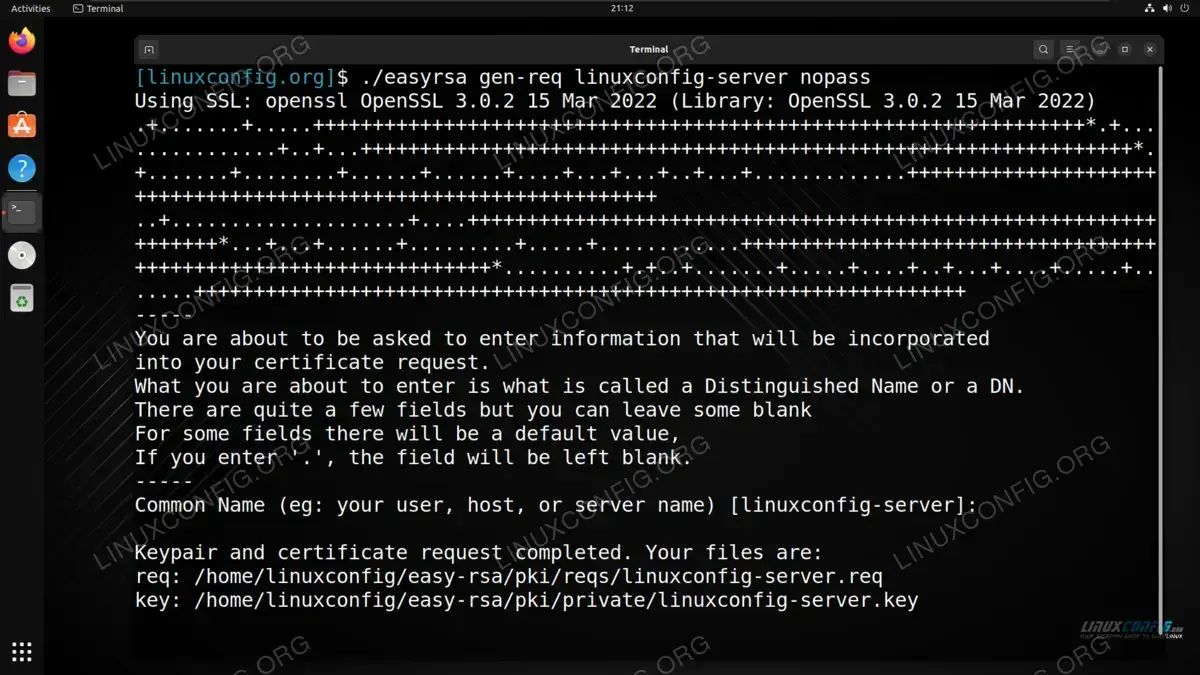
Generating a private key and CSR on VPN server - Now we need to copy the VPN server’s private key to the OpenVPN directory. The output from the previous command should tell you the full path to your private key. In our case, the following command is used:
$ sudo cp ~/easy-rsa/pki/private/linuxconfig-server.key /etc/openvpn/server/
You would need to replace
linuxconfig-server.keywith the name of your own private key. - The next step is to transfer the CSR over to the CA server for it to be signed. You can transfer the file over however you would like, for example with the
scpcommand.$ scp ~/easy-rsa/pki/reqs/linuxconfig-server.req linuxconfig@ca_server:/tmp
- Switching to the CA server now. Now that the
.reqfile is transferred over to the CA server, we will import it and then sign the request:$ cd ~/easy-rsa $ ./easyrsa import-req /tmp/linuxconfig-server.req linuxconfig-server $ ./easyrsa sign-req server linuxconfig-server
Make sure you substitute your own common names where necessary. Ours is simply
linuxconfig-server. You will also be prompted for the password that we configured earlier on the CA server.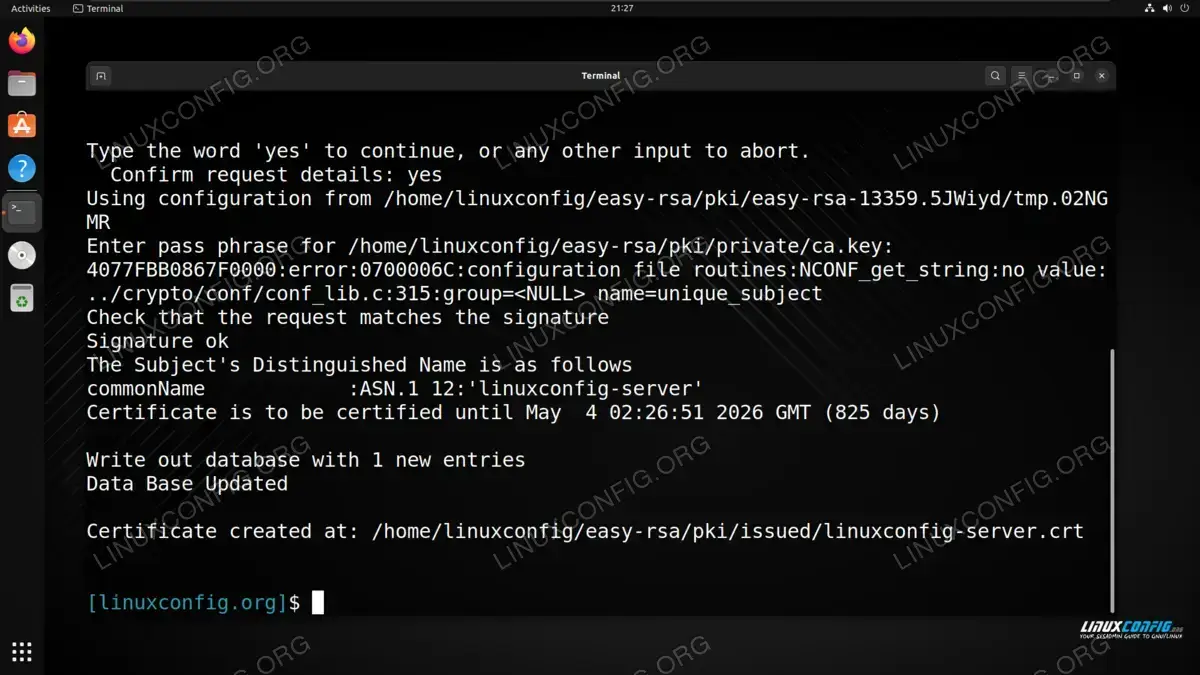
Importing and signing the CSR with the CA server - Now we need to transfer the
ca.keyandlinuxconfig-server.crtfiles from the CA server back to the VPN server. Usescpor your preferred method to do so:$ scp ~/easy-rsa/pki/issued/linuxconfig-server.crt linuxconfig@vpn_server:/tmp $ scp ~/easy-rsa/pki/ca.crt linuxconfig@vpn_server:/tmp
- Switching back to the VPN Server now. On the VPN server, take the files out of the
/tmpdirectory that we just transferred and place them in the/etc/openvpn/serverdirectory. You will need root permissions to move them:$ sudo mv /tmp/{linuxconfig-server.crt,ca.crt} /etc/openvpn/server - As a final security measure, we can generate a
tls-cryptpre shared key. This boosts the security for the OpenVPN server and makes it easier to process incoming traffic.$ cd ~/easy-rsa $ openvpn --genkey secret ta.key
- Copy the generated
ta.keyfile over to the/etc/openvpn/server/directory:$ sudo cp ta.key /etc/openvpn/server
Now we are ready to move on to generating certificates and keys for each client that will be connecting to the VPN.
Generate Certificates and Keys for Clients
These steps will be performed on the VPN server, until we eventually switch over to the CA server, which will be clearly indicated. You will need to repeat these steps for each VPN client. This is where some Bash scripting might come in handy, in case you want to help automate the process in the future.
- First, let’s create a directory where we will be storing the keys for the clients.
$ mkdir ~/client-keys
- Navigate to the Easy-RSA directory, and then use the
easyrsascript to generate a request for a client. In this example, our client will be namedlinuxconfig-client. Change yours as needed:$ cd ~/easy-rsa $ ./easyrsa gen-req linuxconfig-client nopass
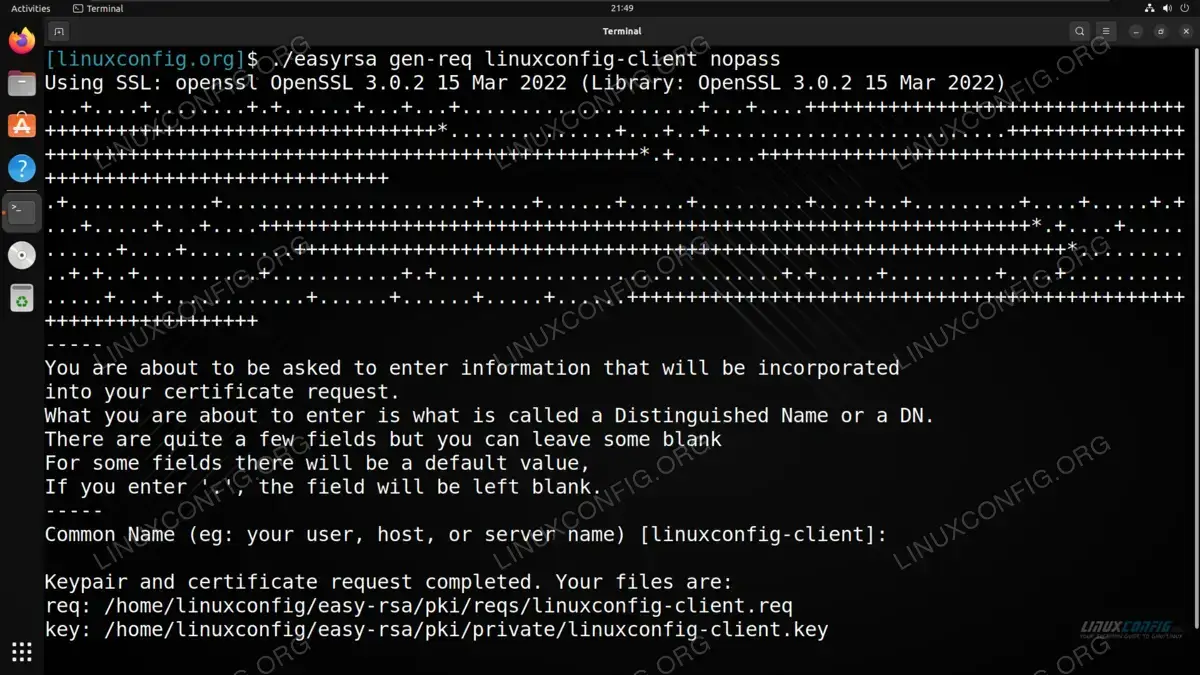
Generating a key pair and certificate request for a VPN client - Copy the newly created
linuxconfig-client.keyfile over to the~/client-keysdirectory that we created earlier:
$ cp ~/easy-rsa/pki/private/linuxconfig-client.key ~/client-keys
- We will also need to transfer the
linuxconfig-client.reqfile over to the CA server to be signed. Usescpor some other method to do so:$ scp ~/easy-rsa/pki/reqs/linuxconfig-client.req linuxconfig@ca_server:/tmp
- Switching to the CA server now. Import and sign the certificate request for the VPN client on the CA server:
$ cd ~/easy-rsa
$ ./easyrsa import-req /tmp/linuxconfig-client.req linuxconfig-client
$ ./easyrsa sign-req client linuxconfig-client
You will be prompted for the CA password that was configured in earlier steps. This should all look familiar, as the process is pretty much the same as when we signed the CSR for the VPN server.
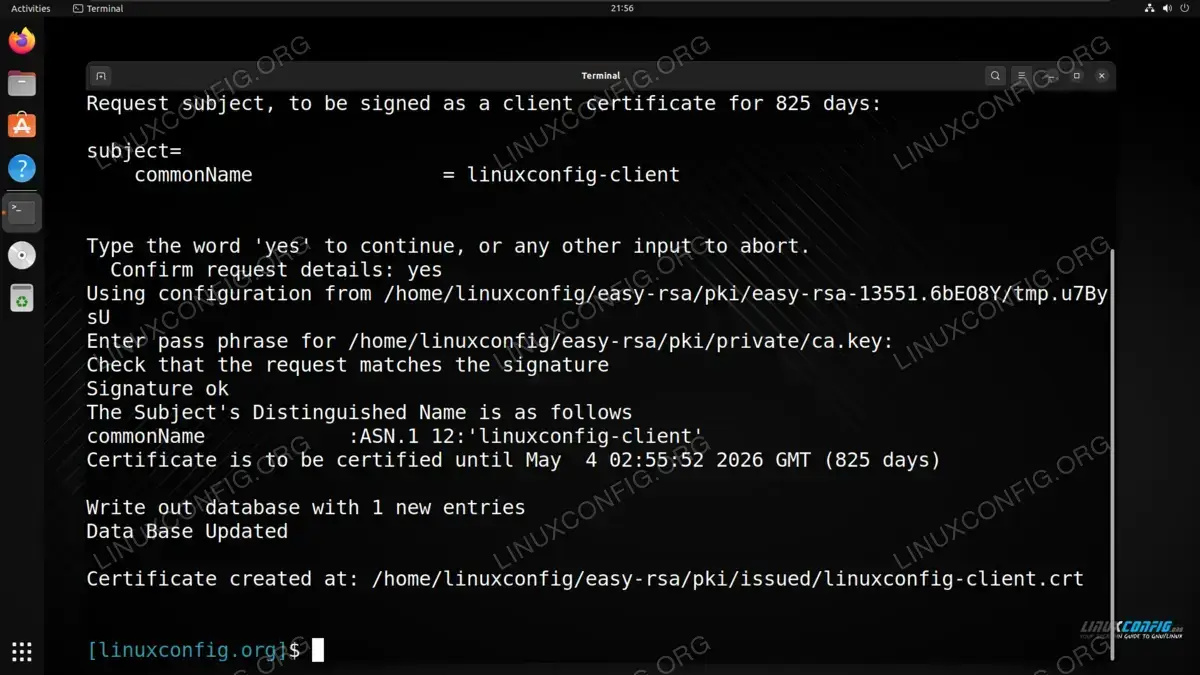
Signing the certificate request for the VPN client - Let’s transfer the
linuxconfig-client.crtfile to the VPN server:$ scp ~/easy-rsa/pki/issued/linuxconfig-client.crt linuxconfig@vpn_server:/tmp
- Switching back to the VPN Server now. On the VPN server, copy the
linuxconfig-client.crtto the directory we made earlier,~/client-keys:$ cp /tmp/linuxconfig-client.crt ~/client-keys
We will also need to copy the
ta.keyandca.crtfiles over to that directory:$ cp ~/easy-rsa/ta.key ~/client-keys $ sudo cp /etc/openvpn/server/ca.crt ~/client-keys
OpenVPN Configuration
OpenVPN has various example files that can be used to get a jumpstart with your own VPN server configurations. We will use one of these files and begin to customize it for our needs. You can also apply your own customizations along the way, but some of the suggestions seen below will be necessary to apply in order to work with the previous configuration we have set up.
Note that the following steps are to be performed on the VPN server.
- We will start by taking the
server.confexample file from the OpenVPN documentation and copying it over to the/etc/openvpn/serverdirectory.$ sudo cp /usr/share/doc/openvpn/examples/sample-config-files/server.conf /etc/openvpn/server/
- Open the newly copied file to start editing it:
$ sudo nano /etc/openvpn/server/server.conf
- We will need to configure this file to use the TLS certificate that we made earlier. Locate the following line and comment it out by adding a
;character in front of it:tls-auth ta.key 0 # This file is secret
Below that, add the following line:
tls-crypt ta.key
The final result should look like:
;tls-auth ta.key 0 # This file is secret
tls-crypt ta.key
- Next, locate the following
cipherline and comment it out:cipher AES-256-CBC
Right below it, add the following two lines:
cipher AES-256-GCM
auth SHA256
The final result should look like:
;cipher AES-256-CBC
cipher AES-256-GCM
auth SHA256
This will force our VPN connection to use better encryption than the default config.
- Since we have configured our VPN server to use ECC (Elliptic Curve Cryptography) instead of DH (Diffie-Hellman), we will need to locate the following
dhline and comment it out:dh dh2048.pem
Right below that, add the following line:
dh none
The final result should look like this:
;dh dh2048.pem
dh none
- To reduce the OpenVPN daemon’s privileges when it is initialized, and therefore reduce its potential attack surface, locate and uncomment the following lines:
;user nobody
;group nobody
Remove the;in front of them, so that it reads:user nobody group nobody
- If you want to reroute all client traffic through the VPN, then you can locate the following line and uncomment it:
;push "redirect-gateway def1 bypass-dhcp"
Be sure to remove the preceding
;to uncomment it.This is not strictly necessary but it is the behavior that most VPNs use, so it is what clients will expect.
- Uncomment the following lines that give the VPN clients some DNS servers to use for name resolution. These are the IPs to OpenDNS servers, but you can put any DNS server IPs you want:
;push "dhcp-option DNS 208.67.222.222"
;push "dhcp-option DNS 208.67.220.220"
Be sure to remove the two preceding
;characters to uncomment these lines. - Lastly, locate the following lines:
cert server.crt
key server.key
We will need to edit these to point to the files that we generated earlier. In our example, we used
linuxconfig-serveras the common name, so we will change these to:cert linuxconfig-server.crt key linuxconfig-server.key
All set, so save your changes to this file and exit it.
Configure IP Forwarding
On the OpenVPN server, we will need to change the IP forwarding kernel paramater in order to make sure that VPN clients can forward requests to the OpenVPN server, which can then forward them on towards a final destination.
- Edit the following file with root permissions:
$ sudo nano /etc/sysctl.conf
- At the bottom of the file, add the following line:
net.ipv4.ip_forward = 1
Save your changes and exit the file.
- Then, for the changes to take effect, execute:
$ sudo sysctl -p
Start OpenVPN Service
Now that OpenVPN has been configured, we can start the service.
The following command will start the OpenVPN service:
$ sudo systemctl start openvpn-server@server.service
If you want OpenVPN to start up automatically whenever the server turns on, then we can use systemctl enable as follows:
$ sudo systemctl -f enable openvpn-server@server.service
To check the status of the service at any time, use the following command:
$ systemctl status openvpn.service
Create Client Configuration File
The last step is to create a configuration file for your VPN client. This file, along with the .crt files and .key files can then be sent to the VPN clients in order to initiate a connection with the VPN server.
- First, copy the
client.confexample file to the~/client-keysdirectory that we created earlier:$ cp /usr/share/doc/openvpn/examples/sample-config-files/client.conf ~/client-keysclient.conf
- This is only a template file and we will need to make several changes to it. Open the file to begin editing it:
$ nano ~/client-keys/client.conf
- Locate the following line:
remote my-server-1 1194
This is where we need to specify the IP of our VPN server. The
1194is just the port that OpenVPN is running on, so only change this part if necessary. Replace themy-server-1with the IP address of your OpenVPN server. - Just as we did in the server config file, uncomment the following two lines:
;user nobody
;group nobody
- Locate the following lines and comment them out:
ca ca.crt
cert client.crt
key client.key
These will be irrelevant for us, since we are going to use in-line configuration.
- Locate the following line and comment it out:
tls-auth ta.key 1
This is an irrelevant line and we will be using an in-line configuration anyway.
- Locate the following line and comment it out:
cipher AES-256-CBC
Replace it with the following two lines:
cipher AES-256-GCM
auth SHA256
The final result becomes:
;cipher AES-256-CBC
cipher AES-256-GCM
auth SHA256
- At the bottom of this file, add the following line:
key-direction 1
Save and close the file when finished.
- We will now combine all of these certificates, config, and key files into a single
.ovpnfile that can be sent to the client for easy connecting.$ cd ~/client-keys $ cat client.conf > linuxconfig-client.ovpn $ echo '<CA>' >> linuxconfig-client.ovpn $ cat ca.crt >> linuxconfig-client.ovpn $ echo '</CA>' >> linuxconfig-client.ovpn $ echo '<cert>' >> linuxconfig-client.ovpn $ cat linuxconfig-client.crt >> linuxconfig-client.ovpn $ echo '</cert>' >> linuxconfig-client.ovpn $ echo '<key>' >> linuxconfig-client.ovpn $ cat linuxconfig-client.key >> linuxconfig-client.ovpn $ echo '</key>' >> linuxconfig-client.ovpn $ echo '<tls-crypt>' >> linuxconfig-client.ovpn $ cat ta.key >> linuxconfig-client.ovpn $ echo '</tls-crypt>'
This is a bit cumbersome to do, especially at scale, which is why some Bash scripting is recommended if you plan to do this often. At any rate, the final result is a complete
linuxconfig-client.ovpnfile that can be sent to the OpenVPN client.
Connecting to OpenVPN Server
Connecting to the VPN server is the easiest part. Once you have received all of the files that were generated on the OpenVPN server, use the following command syntax to connect:
$ sudo openvpn --config linuxconfig-client.ovpn
The instructions will of course vary across different operating systems like MacOS and Windows, but essentially the process is nearly the same – just provide the .ovpn file to the OpenVPN client program.
Closing Thoughts
In this tutorial, we saw how to set up an OpenVPN server on a Linux system. This also included the setup of a separate Certificate Authority server using Easy-RSA. The process is quite long, but allows us to self host a VPN server with the best security measures. Now you know how to generate key pairs and configurations for future client connections and can distribute them out in the form of
.opvn files.