Installing Ubuntu 26.04 Desktop on a ZFS root filesystem gives you access to powerful features like snapshots, data integrity verification, and easy system rollbacks. While ZFS has been available as an experimental option in the Ubuntu installer since version 19.10, the option is hidden behind an “Advanced options” menu that many users overlook. This guide shows you exactly how to find and enable ZFS root ubuntu 26.04 during a standard desktop installation.
- How to locate the hidden ZFS option in the Ubuntu installer
- The difference between ZFS with and without encryption
- What partition layout the installer creates for ZFS
- How to verify your ZFS pools and datasets after installation
- Understanding Ubuntu’s ZFS dataset structure
Software Requirements
| Category | Requirements, Conventions or Software Version Used |
|---|---|
| System | Ubuntu 26.04 Resolute Raccoon |
| Software | Ubuntu 26.04 Desktop installation ISO |
| Other | UEFI-capable system recommended. Minimum 4 GB RAM (8 GB recommended for ZFS). Dedicated disk for installation (all data will be erased). |
| Conventions | # – requires given linux commands to be executed with root privileges either directly as a root user or by use of sudo command$ – requires given linux commands to be executed as a regular non-privileged user |
| Step | Action |
|---|---|
| 1. Select installation type | Choose “Erase disk and install Ubuntu” |
| 2. Expand advanced options | Click “Show advanced options…” button |
| 3. Select ZFS | Choose “Use ZFS without encryption” |
| 4. Complete installation | Proceed with standard installation steps |
Prerequisites
Before installing Ubuntu 26.04 on a ZFS root filesystem, ensure your system meets these requirements. ZFS is more memory-intensive than traditional filesystems like ext4. While Ubuntu will install with 4 GB of RAM, 8 GB or more is recommended for comfortable desktop use with ZFS. Additionally, UEFI boot mode is recommended for modern installations, though legacy BIOS boot is supported.
Download the Ubuntu 26.04 Desktop ISO from the official Ubuntu website and create a bootable USB drive. The ZFS installation option is only available in the Desktop installer, not the Server installer. If you need ZFS on Ubuntu Server, you will need to follow a manual installation process covered in a separate guide.
IMPORTANT
The ZFS option is marked as “Experimental” in the Ubuntu installer. While ZFS itself is mature and stable, Ubuntu’s automated ZFS installation has some limitations compared to manual setup, such as no support for mirror or RAIDZ configurations.
Select Installation Type
Boot from your Ubuntu 26.04 installation media and proceed through the initial screens (language selection, accessibility options, keyboard layout, and network configuration). When you reach the “How do you want to install Ubuntu?” screen, select Erase disk and install Ubuntu.
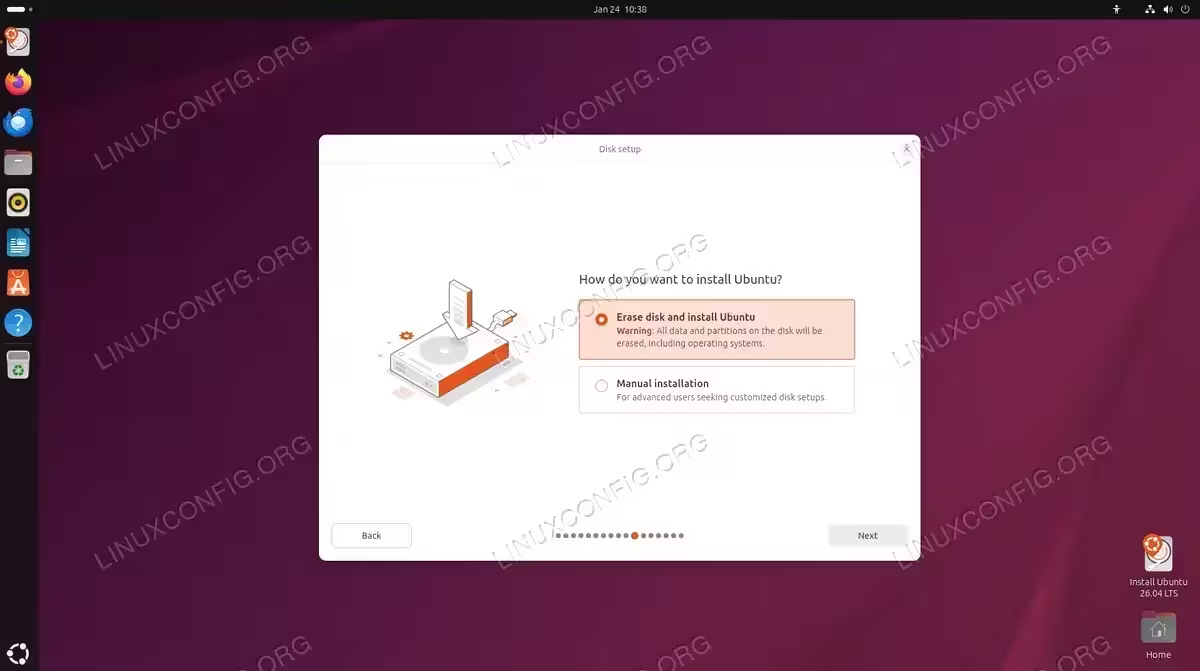
This option is required for the ZFS installation, as the installer needs full control over disk partitioning to create the proper ZFS pool layout. The “Manual installation” option does not provide ZFS configuration through the GUI.
WARNING
Selecting “Erase disk and install Ubuntu” will delete all existing data on the target disk. Ensure you have backed up any important data before proceeding.
Enable ZFS Filesystem on Ubuntu 26.04
After selecting the disk installation type, you will reach the “Encryption and file system” screen. By default, “No encryption” is selected, which uses the standard ext4 filesystem. The ZFS option is hidden and requires an extra step to reveal.
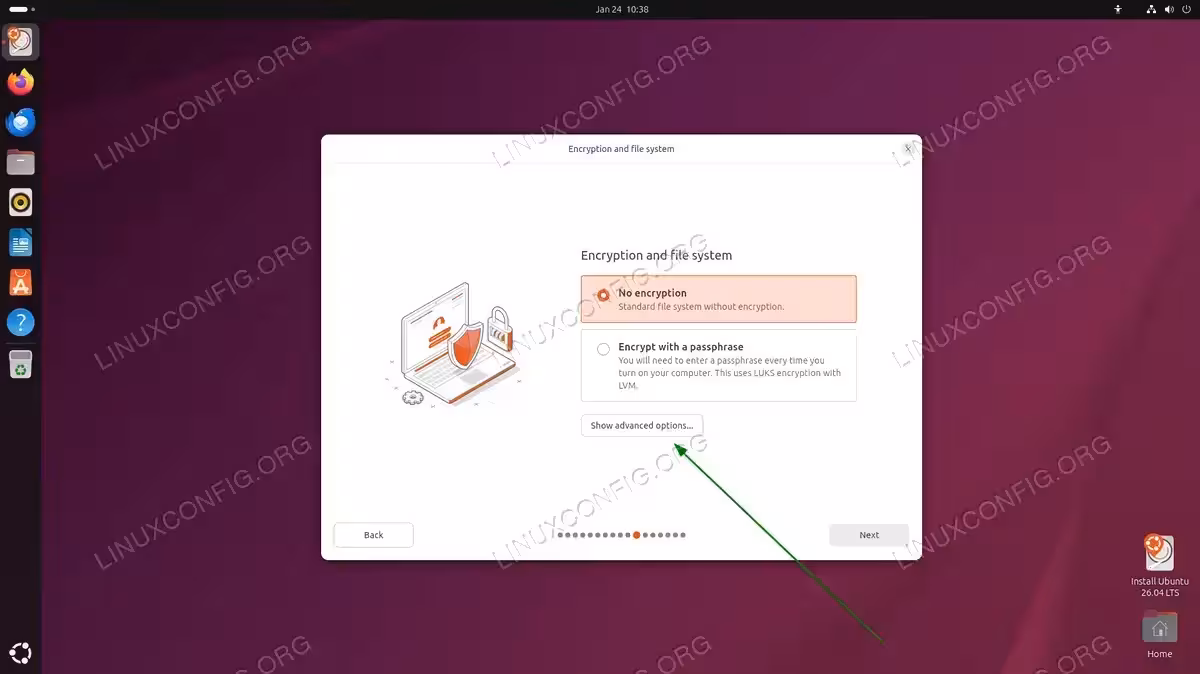
Click the Show advanced options… button to reveal additional filesystem choices. The screen will expand to show all available options:
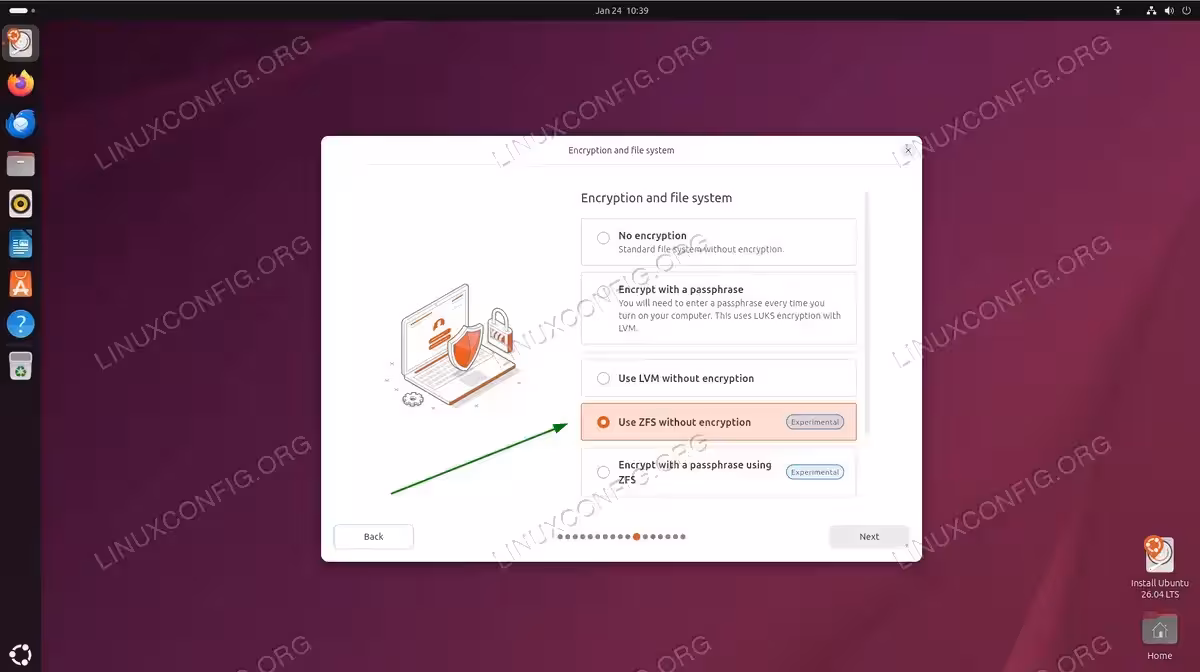
You will see five options:
- No encryption – Standard ext4 filesystem (default)
- Encrypt with a passphrase – LUKS encryption with LVM
- Use LVM without encryption – LVM with ext4
- Use ZFS without encryption – ZFS root filesystem (Experimental)
- Encrypt with a passphrase using ZFS – ZFS with native encryption (Experimental)
Select Use ZFS without encryption to install Ubuntu 26.04 on a ZFS root filesystem. If you require encryption, you can select the ZFS encryption option, which uses ZFS native encryption rather than LUKS.
Review ZFS Partition Layout
After selecting the ZFS option and proceeding through the remaining installation screens (timezone, user account creation), you will reach the summary screen. Review the partition layout that the installer will create:
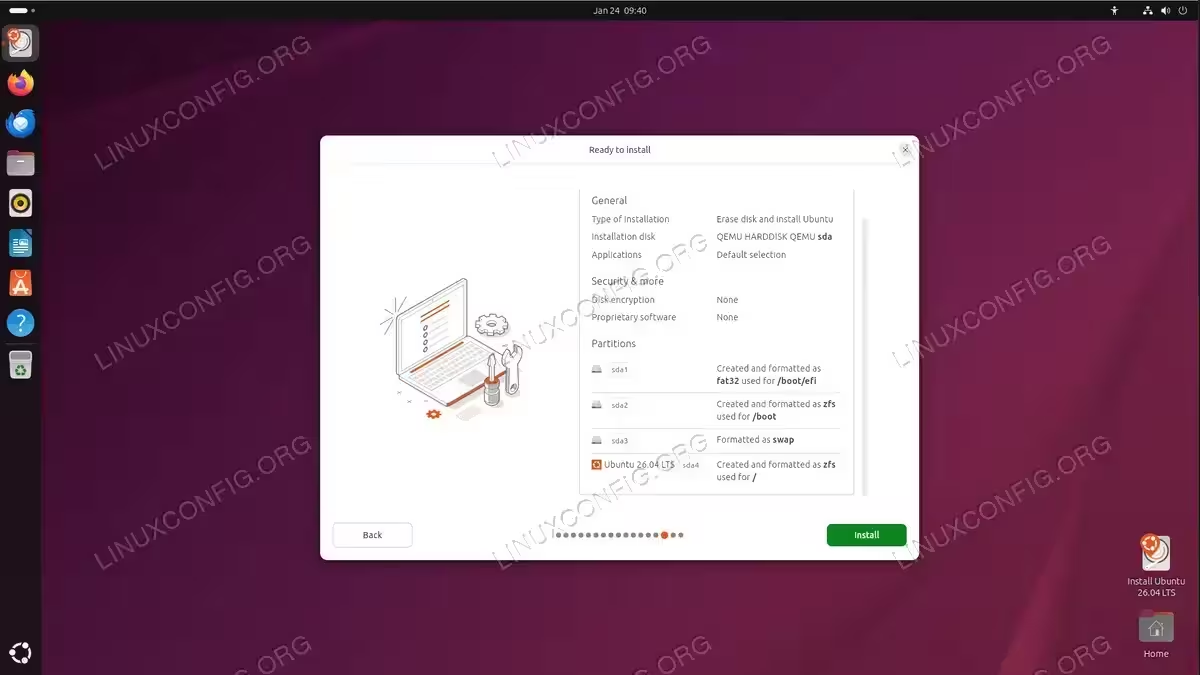
The Ubuntu installer creates four partitions for a ZFS installation:
| Partition | Filesystem | Purpose |
|---|---|---|
| sda1 | FAT32 | /boot/efi – EFI System Partition |
| sda2 | ZFS (bpool) | /boot – Boot pool with GRUB-compatible features |
| sda3 | swap | Swap partition |
| sda4 | ZFS (rpool) | / – Root pool for system and user data |
The installer creates two separate ZFS pools: bpool for /boot (with features limited to what GRUB supports) and rpool for the root filesystem. This separation ensures boot compatibility while allowing the root pool to use all ZFS features.
Click Install to begin the installation. The process takes approximately 10-20 minutes depending on your hardware.
Verify ZFS Installation
After the installation completes and you boot into your new Ubuntu 26.04 system, verify that ZFS is properly configured by opening a terminal and running:
$ zpool list && echo && zfs list
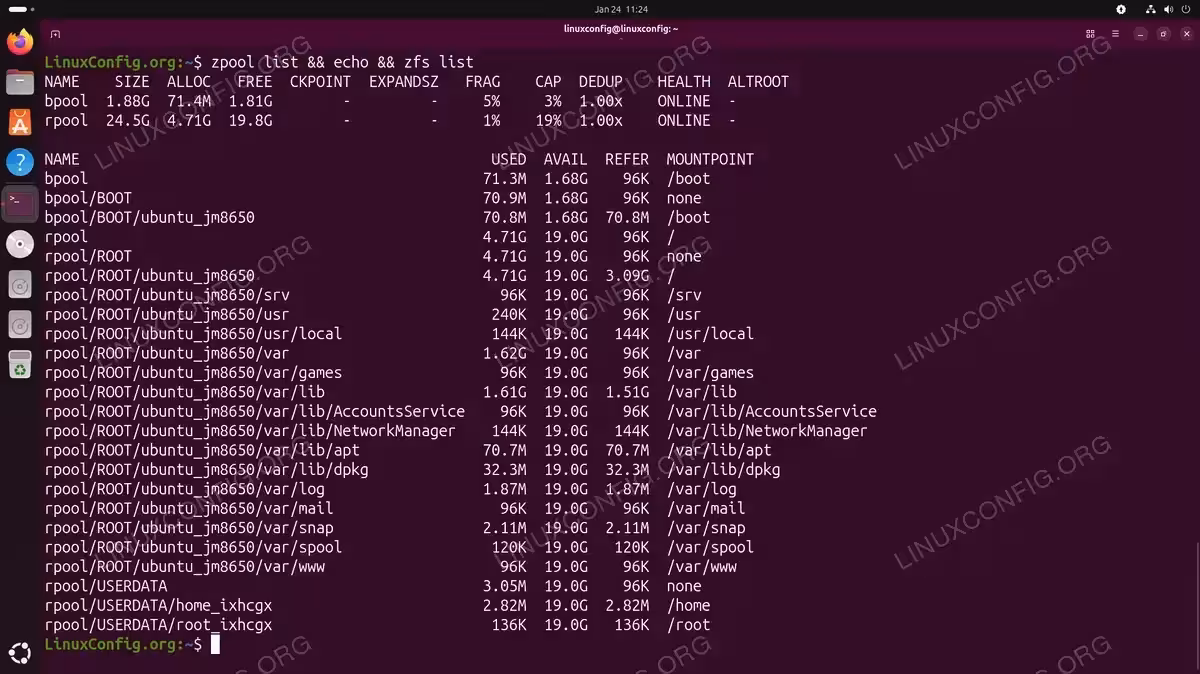
Both pools should show ONLINE status under the HEALTH column, indicating a successful ZFS installation.
You can also verify the partition layout with:
$ lsblk -f
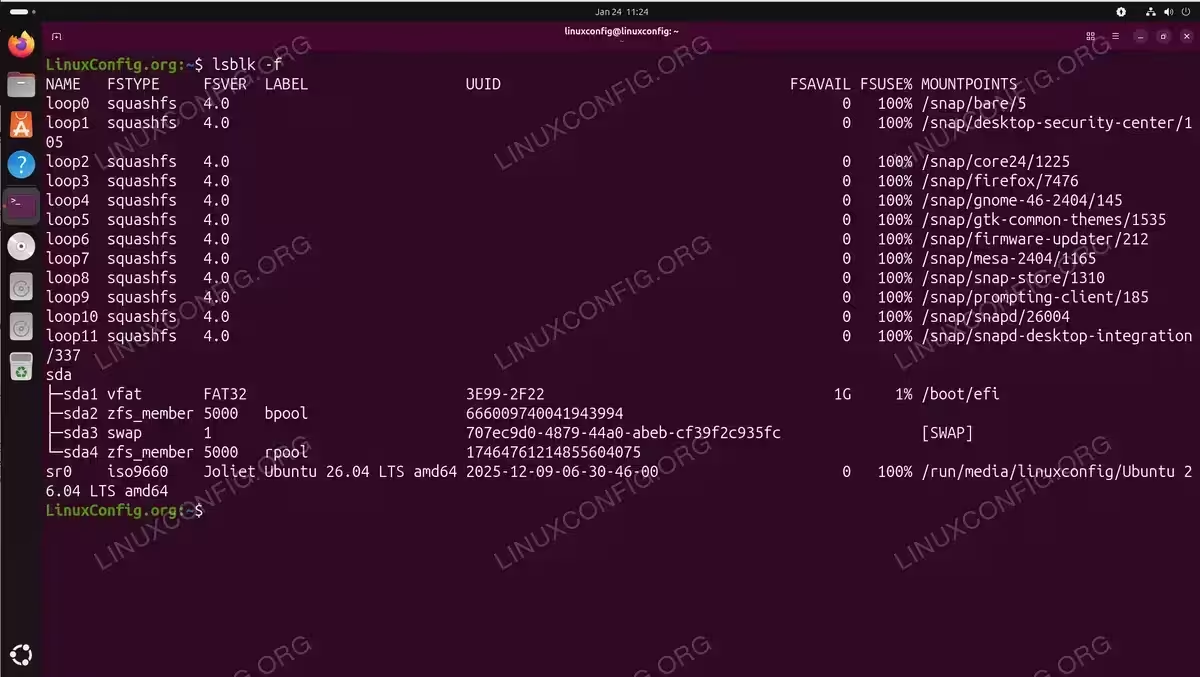
This displays the disk structure showing the EFI (FAT32), bpool (zfs_member), swap, and rpool (zfs_member) partitions.
Understanding the Dataset Structure
Ubuntu’s ZFS installer creates a sophisticated dataset layout designed to support system snapshots and rollbacks. The structure separates system data from user data, allowing you to roll back the operating system without affecting your personal files.
Key datasets include:
- rpool/ROOT/ubuntu_XXXXX – Main root filesystem mounted at /
- rpool/ROOT/ubuntu_XXXXX/var – Variable data with subdatasets for logs, apt cache, and dpkg
- rpool/USERDATA – User home directories, preserved during system rollback
- bpool/BOOT/ubuntu_XXXXX – Boot files including kernel and initramfs
The random suffix (like ubuntu_jm8650) allows for multiple boot environments. This is part of Ubuntu’s ZFS integration that enables creating snapshots before system updates and rolling back if something goes wrong.
COMPLETED
Your Ubuntu 26.04 Desktop is now running on a ZFS root filesystem. You can take advantage of ZFS features like snapshots, compression, and data integrity verification.
Conclusion
Installing Ubuntu 26.04 Desktop on a ZFS root filesystem is straightforward once you know where to find the hidden option. By clicking “Show advanced options” on the encryption screen, you can access ZFS installation with just a few clicks. While the feature remains marked as experimental, ZFS provides significant advantages for desktop users who want snapshot capabilities and data integrity features.
For more advanced ZFS configurations such as mirror setups, RAIDZ, or custom dataset layouts, you will need to perform a manual installation. Additionally, if you need ZFS on Ubuntu Server, a manual installation process is required since the Server installer does not include the ZFS GUI option.
Frequently Asked Questions
- Why is the ZFS option marked as Experimental? While ZFS itself is a mature and stable filesystem, Ubuntu’s automated installer implementation is still considered experimental. The main limitations are the lack of support for advanced configurations like mirrors or RAIDZ through the GUI. For production systems requiring these features, a manual installation is recommended.
- Can I install Ubuntu Server on ZFS using the installer? No, the Ubuntu Server installer (Subiquity) does not currently include a ZFS root option in its GUI. To install Ubuntu Server on ZFS, you need to use either autoinstall configuration or follow the manual installation process using the Desktop live environment and debootstrap.
- How much RAM do I need for ZFS? ZFS uses RAM for its Adaptive Replacement Cache (ARC). While Ubuntu will install and run with 4 GB of RAM, 8 GB or more is recommended for comfortable desktop use. If you plan to use ZFS deduplication (not enabled by default), you will need significantly more RAM.
- What is the difference between the two ZFS pools (bpool and rpool)? The installer creates two pools because GRUB (the bootloader) only supports a subset of ZFS features. The bpool (boot pool) uses only GRUB-compatible features for /boot, while rpool (root pool) can use all ZFS features for the main system. This ensures your system remains bootable while benefiting from advanced ZFS capabilities.
- Can I create ZFS snapshots after installation? Yes, once installed you have full access to ZFS snapshot capabilities. You can create manual snapshots with
sudo zfs snapshot rpool/ROOT/ubuntu_XXXXX@snapshot-nameor use tools like zsys for automated snapshot management during system updates.