Ubuntu 26.04 ships with OpenJDK 25 as its default Java version. However, many applications and frameworks require a specific older version such as OpenJDK 8, 11, 17, or 21. In this guide, you will learn how to install a specific Java version on Ubuntu 26.04, manage multiple Java installations side by side, and switch between them using the update-alternatives system. Whether you need to java install Ubuntu 26.04 with a particular version for legacy software or development compatibility, this tutorial covers the complete process.
Table of Contents
In this tutorial you will learn:
- How to list all available OpenJDK versions in the Ubuntu 26.04 repositories
- How to install a specific OpenJDK version (8, 11, 17, 21, or 25)
- How to switch between multiple installed Java versions using
update-alternatives - How to update
JAVA_HOMEto match the active Java version - How to remove an unwanted Java version from your system
Software Requirements
| Category | Requirements, Conventions or Software Version Used |
|---|---|
| System | Ubuntu 26.04 Resolute Raccoon |
| Software | OpenJDK 8, 11, 17, 21, or 25 |
| Other | Privileged access to your Linux system as root or via the sudo command. |
| Conventions | # – requires given linux commands to be executed with root privileges either directly as a root user or by use of sudo command$ – requires given linux commands to be executed as a regular non-privileged user |
update-alternatives to switch between them.
| Step | Command/Action |
|---|---|
| 1. Install specific version | $ sudo apt install openjdk-17-jdk |
| 2. Switch Java version | $ sudo update-alternatives --config java |
| 3. Verify active version | $ java -version |
Check Available Java Versions on Ubuntu 26.04
Before installing a specific Java version, it is useful to check which OpenJDK packages are available in the Ubuntu 26.04 repositories. This ensures you are installing a version that is officially supported and maintained.
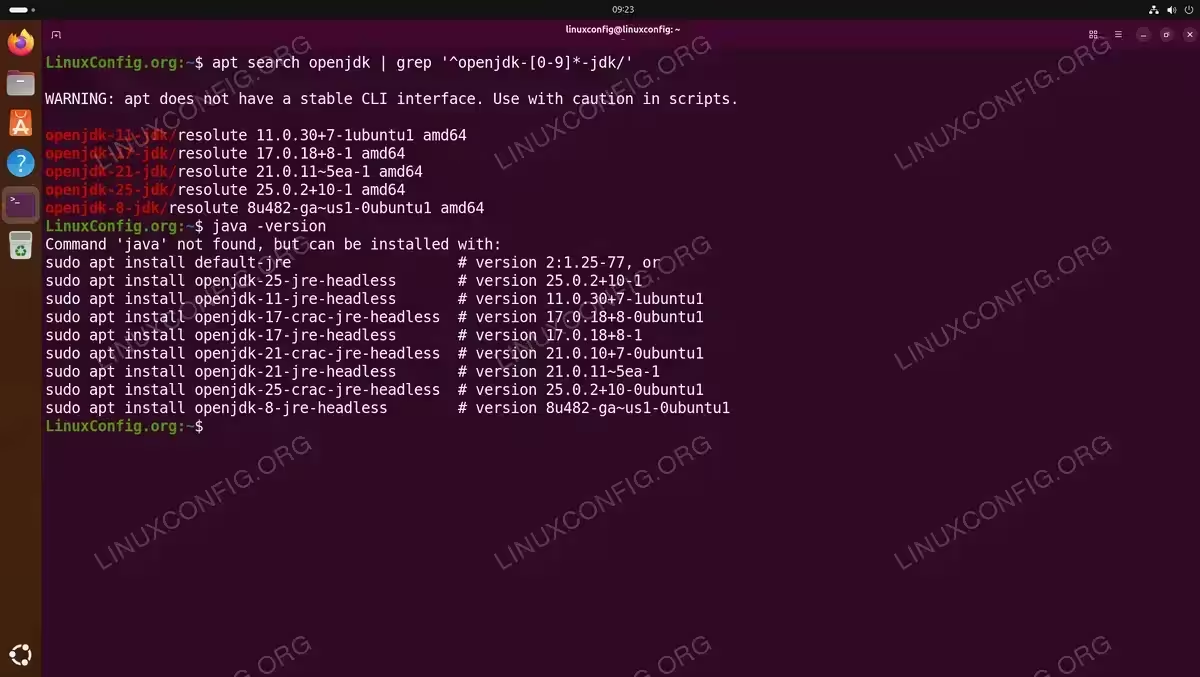
- List available OpenJDK packages: Use
apt searchto find all available OpenJDK packages in the repositories.$ apt search openjdk | grep '^openjdk-[0-9]*-jdk/'
On Ubuntu 26.04, you will see packages for OpenJDK 8, 11, 17, 21, and 25.
- Check currently installed Java: If you have already installed Java on Ubuntu 26.04 using the default packages, verify which version is currently active.
$ java -version
Install a Specific Java Version on Ubuntu 26.04
To java install Ubuntu 26.04 with a particular OpenJDK version, use the version-specific package name. The naming convention follows the pattern openjdk-{version}-jdk for the full development kit or openjdk-{version}-jre for the runtime only.
- Update the package index:
$ sudo apt update
- Install the desired version: Replace the version number with the one you need. For example, to install OpenJDK 17:
$ sudo apt install openjdk-17-jdk
Similarly, for other versions:
$ sudo apt install openjdk-8-jdk
$ sudo apt install openjdk-11-jdk
$ sudo apt install openjdk-21-jdk
- Verify the installation: After the installation completes, confirm that the new version is available on your system.
$ /usr/lib/jvm/java-17-openjdk-amd64/bin/java -version
This calls the specific binary directly rather than the system default.
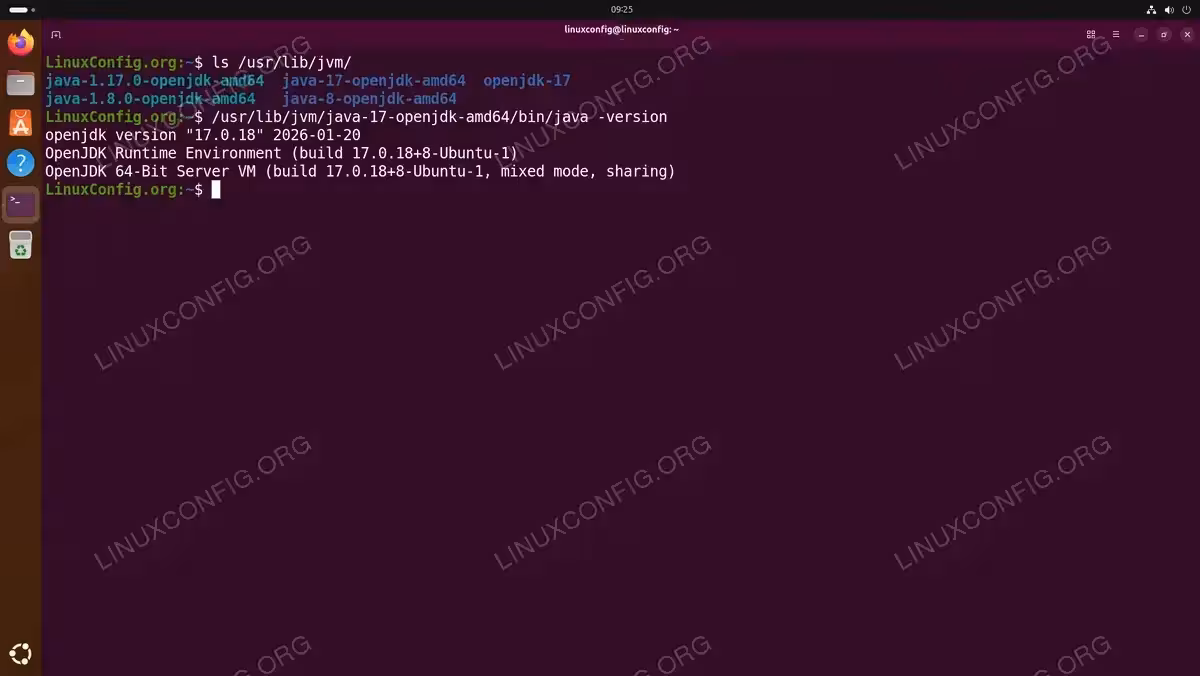
Verifying an installed OpenJDK 17 version by calling the binary directly
IMPORTANT
Installing a new Java version does not automatically make it the system default. If you already have another version installed, you will need to switch to it using update-alternatives as described in the next section.
IMPORTANT
Ubuntu 26.04 also provides CRaC (Coordinated Restore at Checkpoint) variants for OpenJDK 17, 21, and 25. CRaC allows you to snapshot a running JVM and restore it near-instantly, significantly reducing application startup time. To install a CRaC-enabled version, use the openjdk-{version}-crac-jdk package, for example sudo apt install openjdk-21-crac-jdk.
Switch Between Java Versions on Ubuntu 26.04
When multiple Java versions are installed, Ubuntu uses the update-alternatives system to manage which one is active. This system controls the /usr/bin/java and /usr/bin/javac symlinks, so you do not need to modify your PATH. Consequently, switching versions is simply a matter of running a single command.
- Select the default Java runtime: Run the following command and choose the version you want to use.
$ sudo update-alternatives --config java
You will see a numbered list of all installed Java versions. Enter the selection number corresponding to the version you want to activate.
- Select the default Java compiler: If you installed the JDK, you should also switch the compiler to match.
$ sudo update-alternatives --config javac
- Verify the switch: Confirm that the system now uses the selected version.
$ java -version
$ javac -version

INSTALLATION TIPS
Always switch both java and javac to the same version. Mixing different runtime and compiler versions can lead to unexpected build errors.
Update JAVA_HOME for the Active Version
While update-alternatives handles the /usr/bin/java and /usr/bin/javac symlinks automatically, the JAVA_HOME environment variable is not updated by the system. Many build tools and frameworks such as Maven, Gradle, and Apache Spark rely on this variable to locate the Java installation. Therefore, you need to ensure it points to the correct version after switching.
The recommended approach is to set JAVA_HOME dynamically so it always follows the active version selected by update-alternatives:
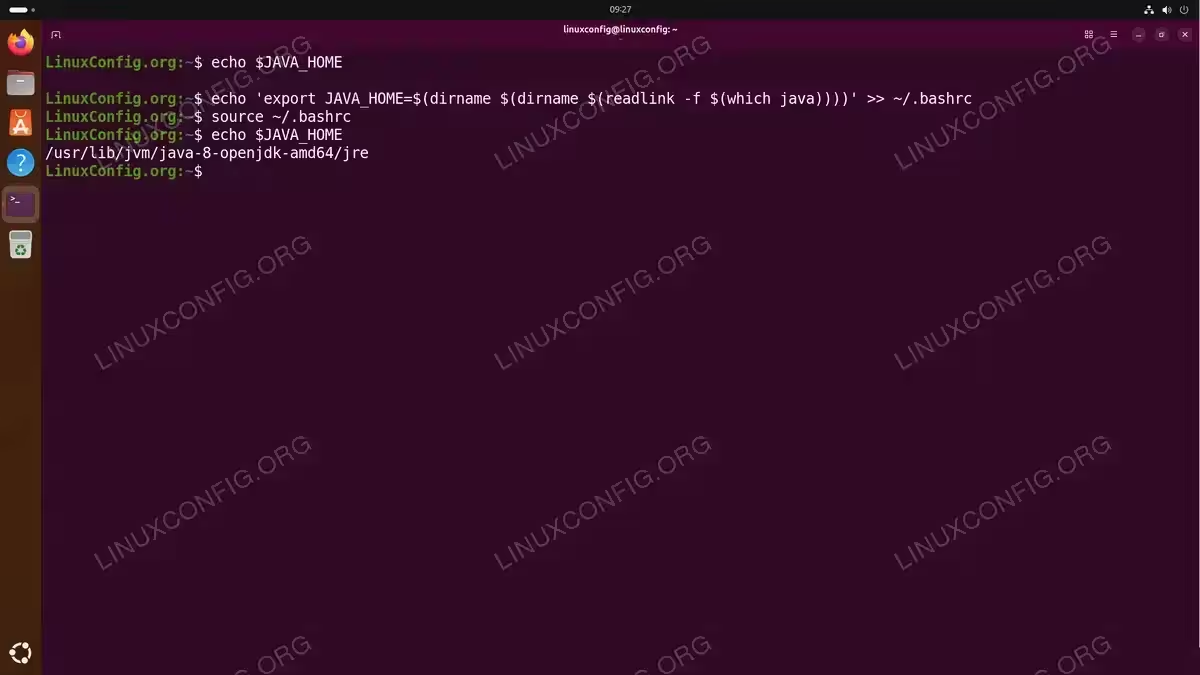
- Set dynamic JAVA_HOME: Add the following line to your
~/.bashrcfile. This resolves the activejavabinary path and derives the JDK root directory automatically.$ echo 'export JAVA_HOME=$(dirname $(dirname $(readlink -f $(which java))))' >> ~/.bashrc $ source ~/.bashrc
With this in place, every time you switch versions using
update-alternatives,JAVA_HOMEwill reflect the change after opening a new terminal session. - Verify JAVA_HOME:
$ echo $JAVA_HOME
Alternatively, if you prefer to set JAVA_HOME to a specific path manually, you can use sed to update it in your ~/.bashrc each time you switch:
$ sed -i 's|export JAVA_HOME=.*|export JAVA_HOME=/usr/lib/jvm/java-17-openjdk-amd64|' ~/.bashrc
$ source ~/.bashrc
Remove a Java Version from Ubuntu 26.04
If you no longer need a particular Java version, you can remove it to free up disk space. The update-alternatives system will automatically adjust the default to the next available version.
- Remove the unwanted version: For example, to remove OpenJDK 8:
$ sudo apt remove openjdk-8-jdk openjdk-8-jre
- Clean up unused dependencies:
$ sudo apt autoremove
- Confirm the remaining versions: Verify which Java versions are still installed.
$ update-alternatives --list java
Conclusion
You now know how to install a specific Java version on Ubuntu 26.04, manage multiple versions simultaneously, and switch between them using update-alternatives. This flexibility is essential when working with applications that require different Java versions, from legacy software needing OpenJDK 8 to modern frameworks requiring OpenJDK 21 or 25.
For the basic installation of the default Java version, see our guide on how to install Java on Ubuntu 26.04. For additional details on available OpenJDK packages, consult the official Ubuntu Java documentation.
Frequently Asked Questions
- Can I have multiple Java versions installed at the same time on Ubuntu 26.04? Yes. Ubuntu supports installing multiple OpenJDK versions side by side. Each version is installed in its own directory under
/usr/lib/jvm/. You useupdate-alternativesto control which version is the system default. - How do I check all Java versions installed on my system? Run
update-alternatives --list javato see all registered Java installations. This will list the full path to each installed version. - What is the difference between auto and manual mode in update-alternatives? In auto mode, the system automatically selects the highest-priority version. In manual mode, the system uses whichever version you explicitly selected. Running
sudo update-alternatives --config javaand choosing a version sets it to manual mode. - Do I need to switch javac separately from java? Yes. The
javaruntime andjavaccompiler are managed as separate alternatives. After switchingjava, you should also runsudo update-alternatives --config javacto match the compiler version. - Will removing a Java version break other installed versions? No. Each OpenJDK version is packaged independently. Removing one version does not affect others. The
update-alternativessystem will automatically select the next available version as the default.