In this tutorial you will learn how to permanently add a static route on Ubuntu Linux using netplan. Static routes are necessary when you have multiple networks that your computer needs to send traffic to, which is common in offices, schools, and enterprise environments.
In this tutorial you will learn:
- How to add permanent static route with netplan
- How to apply new netplan configuration
- How to verify static routes from command line
- When to use on-link parameter for routes

| Category | Requirements, Conventions or Software Version Used |
|---|---|
| System | Ubuntu 24.04 or higher |
| Software | Netplan (installed by default) |
| Other | Privileged access to your Linux system as root or via the sudo command. |
| Conventions | # – requires given linux commands to be executed with root privileges either directly as a root user or by use of sudo command$ – requires given linux commands to be executed as a regular non-privileged user |
How to add static route with netplan on Ubuntu step by step instructions
- Check current routes: Before making changes, display your currently configured routes. Save this output for reference in case troubleshooting is needed.
$ ip route s
default via 172.16.1.1 dev ens18 proto static
172.16.1.0/24 dev ens18 proto kernel scope link src 172.16.1.240

Terminal displaying routing table with default gateway 172.16.1.1 and local network 172.16.1.0/24 before adding static routes - Open netplan configuration: Use
sudoeditto open the main netplan configuration file with administrative privileges:$ sudoedit /etc/netplan/50-cloud-init.yaml
- Add static route: Find the configuration stanza for your network interface and add the static route. In this example, we add a route to destination network
172.16.2.0/24via gateway172.16.1.254on interfaceens18:PREREQUISITE
This tutorial assumes you already have a static IP address configured. If you’re still using DHCP, first configure a static IP by following our guide: Setting a static IP address in Ubuntu via the command line.network: version: 2 ethernets: ens18: dhcp4: false addresses: - 172.16.1.240/24 routes: - to: default via: 172.16.1.1 - to: 172.16.2.0/24 via: 172.16.1.254 nameservers: addresses: [8.8.8.8, 8.8.4.4]In this configuration, both the default gateway (
172.16.1.1) and the static route gateway (172.16.1.254) are on the same subnet as the interface IP address (172.16.1.240/24). This is the most common scenario. Update the configuration with network settings to fit your needs.IMPORTANT
When configuring static routes, always include your default gateway route (as shown in the example above withto: default) to maintain connectivity to other networks and the internet. - Apply configuration: Save the file and apply the new netplan configuration:
$ sudo netplan apply
- Verify static route: Check that your static route has been added correctly:
$ ip route s
default via 172.16.1.1 dev ens18 proto static
172.16.2.0/24 via 172.16.1.254 dev ens18 proto static
172.16.1.0/24 dev ens18 proto kernel scope link src 172.16.1.240
The static route you configured should now appear in the output, as shown in bold above.
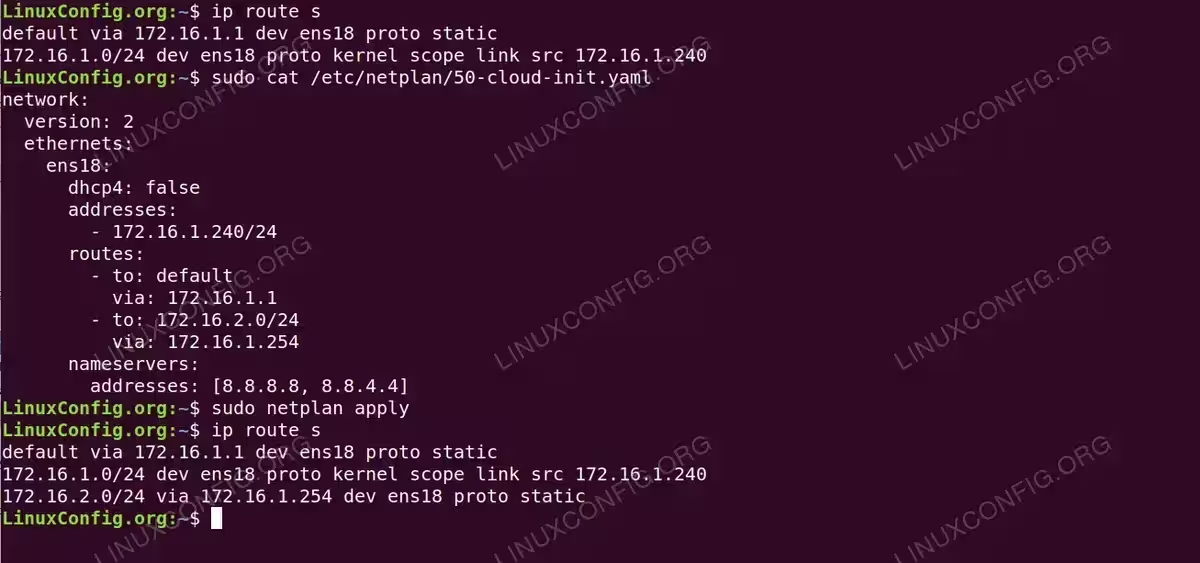
Terminal demonstrating the full workflow of adding a static route using netplan: viewing current routes, editing the configuration file to add route to 172.16.2.0/24 via 172.16.1.254, applying changes, and verifying the new route appears in the routing table
Advanced: Gateway on different subnet
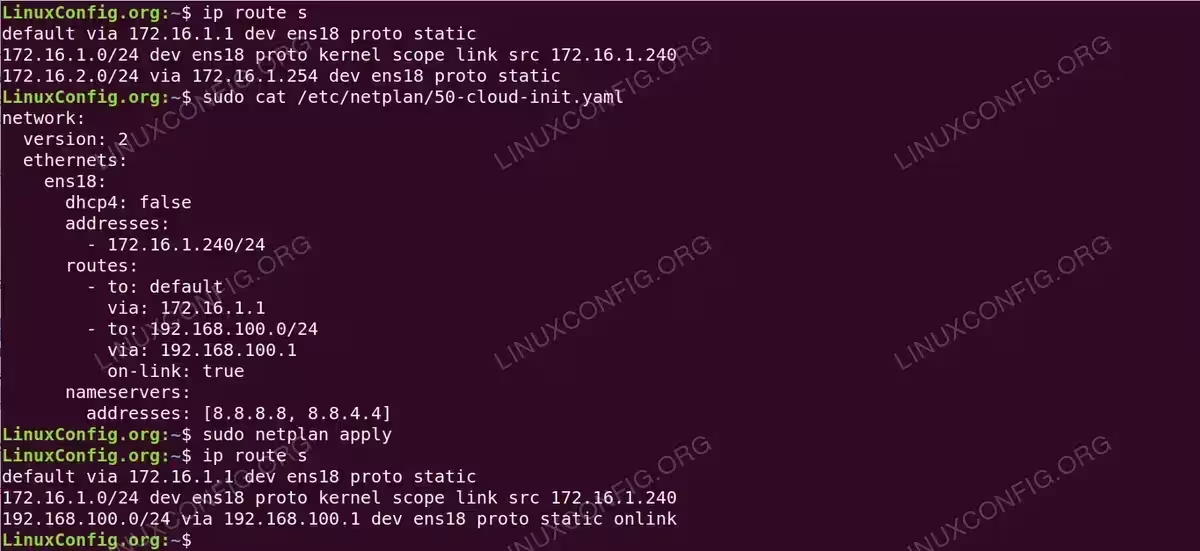
In some scenarios, particularly in virtualized or cloud environments, you may need to route traffic through a gateway that is not on the same subnet as your interface. In this case, you must use the on-link: true parameter to tell the system that the gateway is directly reachable despite being on a different subnet.
Example configuration where interface is on 172.16.1.0/24 but needs to route to 192.168.100.0/24 via gateway 192.168.100.1:
network:
  version: 2
  ethernets:
    ens18:
      dhcp4: false
      addresses:
        - 172.16.1.240/24
      routes:
        - to: default
          via: 172.16.1.1
        - to: 192.168.100.0/24
          via: 192.168.100.1
          on-link: true
      nameservers:
        addresses: [8.8.8.8, 8.8.4.4]
Apply the configuration:
$ sudo netplan apply
NOTE
In some cases, you may need to restart the systemd-networkd service for the route to be properly applied: sudo systemctl restart systemd-networkd
Verify the route:
$ ip route s
default via 172.16.1.1 dev ens18 proto static
172.16.1.0/24 dev ens18 proto kernel scope link src 172.16.1.240
192.168.100.0/24 via 192.168.100.1 dev ens18 proto static onlink
Note the onlink flag in the output, which indicates the route is using the on-link parameter.
Closing Thoughts
In this tutorial, you learned how to add a permanent static route on Ubuntu Linux using netplan. The configuration uses modern netplan syntax with the routes: directive, which works across current Ubuntu versions. For standard networks where the gateway is on the same subnet as your interface, simply define the route with to and via parameters. For advanced scenarios where the gateway is on a different subnet, use the on-link: true parameter to specify that the gateway is directly reachable.