It is possible to resize the root partition in Linux, even if you are actively booted into the installation that resides on the partition. Ordinarily, hard drive partitioning changes should only be carried out on unmounted partitions and hard drive space that is not being actively used. However, in a situation where you need to change the root partition size, and can’t load into a different installation environment to carry out the changes, you may have no other choice but to resize the root partition while it is still mounted and and the computer is booted into it.
In this tutorial, we will go through the step by step instructions of resizing an ext4 root partition on a live system, without unmounting the partition first. This will allow you to extend the size of the root partition onto currently unused hard drive space, or shrink the root partition – for example, to make room for a different partition.
In this tutorial you will learn:
- How to check current hard drive partitioning scheme
- How to resize root partition without using
umount - How to force file system check for root partition
- How to resize ext4 file system
| Category | Requirements, Conventions or Software Version Used |
|---|---|
| System | Any Linux distro |
| Software | N/A |
| Other | Privileged access to your Linux system as root or via the sudo command. |
| Conventions |
# – requires given linux commands to be executed with root privileges either directly as a root user or by use of sudo command$ – requires given linux commands to be executed as a regular non-privileged user |
Video Tutorial
Resizing Live Root Partition Without Unmounting
In the following example, we have a 100 GB hard drive, but our root partition only consumes 60 GB of the available space. Our goal is to expand the size of the root partition to take up the entire available hard drive space, so that our root partition will be nearly 100 GB in size.
WARNING!
Resizing any live partition without unmounting it first comes with a tremendous risk of losing data, thus it is not recommended. The proper method is to unmount the partition and resize it while booted into another partition or live environment. Make backups of all important data before proceeding with the steps below.
Let’s go through the step by step instructions below to resize our root partition:
- Let’s start by checking the current size of our root partition. We can do this by executing the
dfcommand and appending the-hoption to receive human readable numbers in the output. In the command,/represents the root partition:$ df -h /

Output from the df command As seen in the screenshot above, the current size of the root partition is around 60 GB.
- But if we check the disk size with
fdisk, we see that the drive reports 100 GB usable space:$ sudo fdisk -l
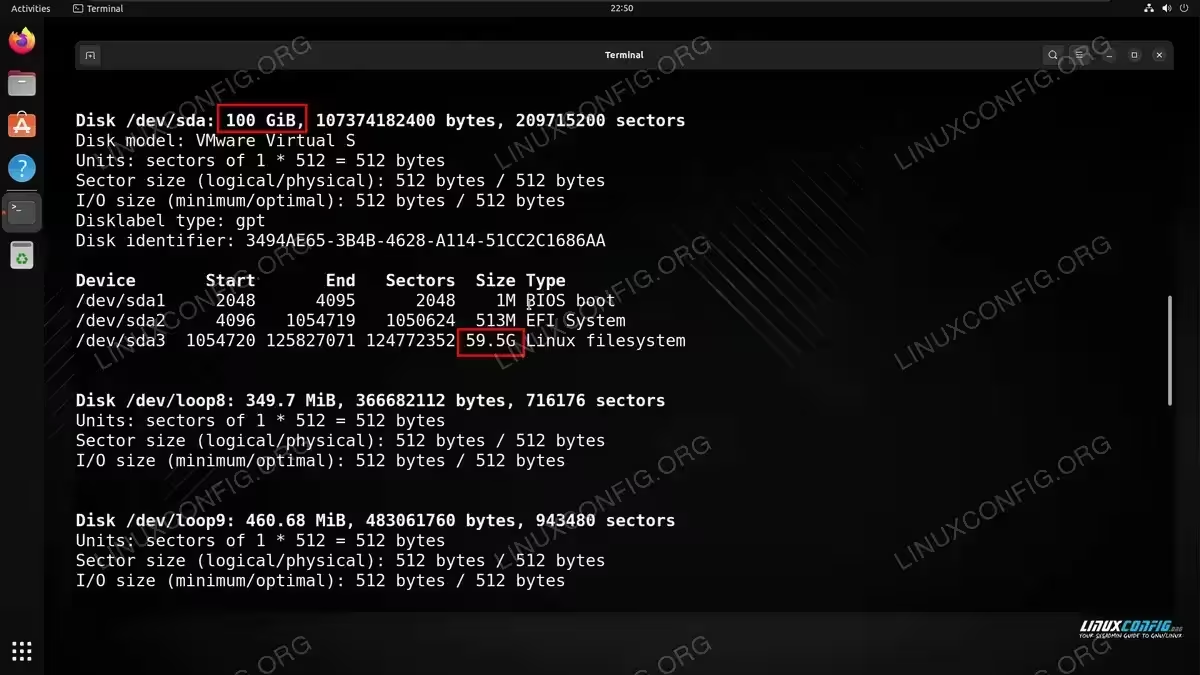
Output from the fdisk command shows disk size The
fdiskcommand output reveals that the actual size of our hard drive is 100 GB, and we are only using about 60 GB of it for the root partition, which is on/dev/sda3in our case. We also have a little space dedicated to the Linux boot loader (partitions 1 and 2), which you may also see on your system, but we should leave those partitions alone.
- Let’s open the
fdiskutility to get started with the resizing process. You will need to specify the device path to the hard drive whose partitioning scheme you wish to change (the one where root resides).$ sudo fdisk /dev/sdX
- Inside the
fdisktool, issue thepcommand to print the current partition table:Command (m for help): p
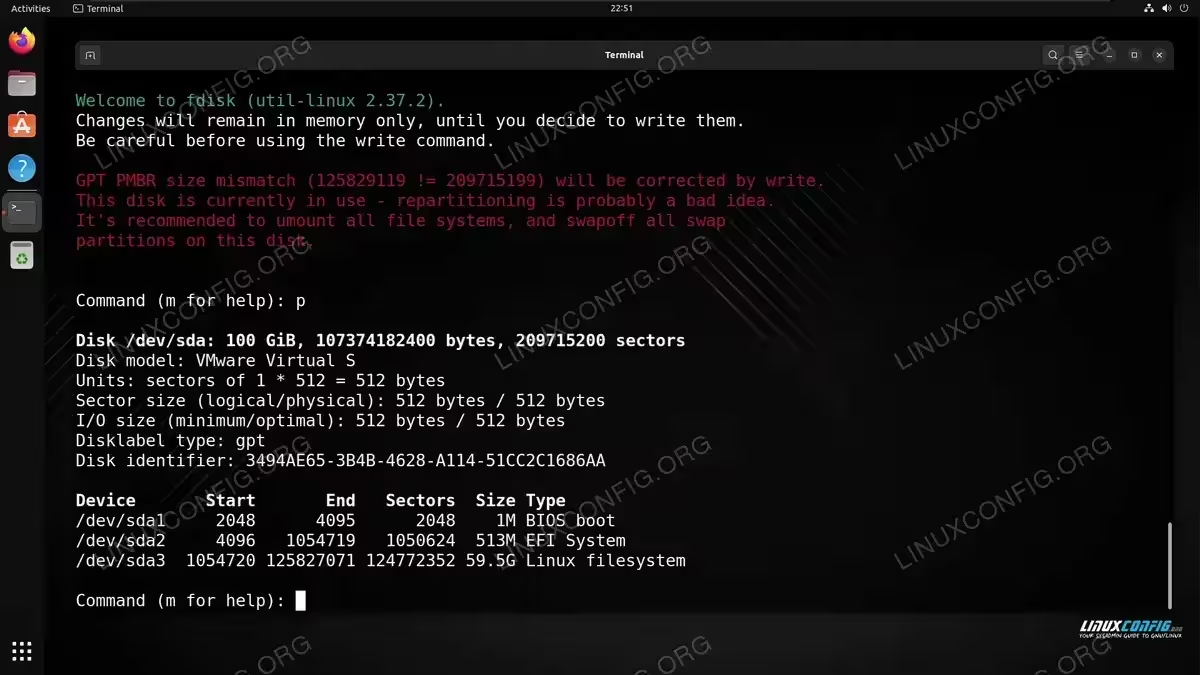
Printing the partition table in the fdisk tool Take note of the starting sector for your root partition, as you will need to make sure that the new partition sizing starts from this same sector – where it ends can change, but the start sector needs to stay the same in order for everything to continue working correctly. In the screenshot above, you can see that our starting sector for the root partition is
1054720. The ending sector is125827071, but this number will end up changing during the resizing process. - We will now delete the root partition and recreate it as the desired size. Execute the
dcommand to delete the partition. NOTE: in our case, we are deleting partition 3, since that is the number of our root partition, make sure you select the right number for your own system.Command (m for help): d Partition number (1-3, deault 3): 3 Partition 3 has been deleted.
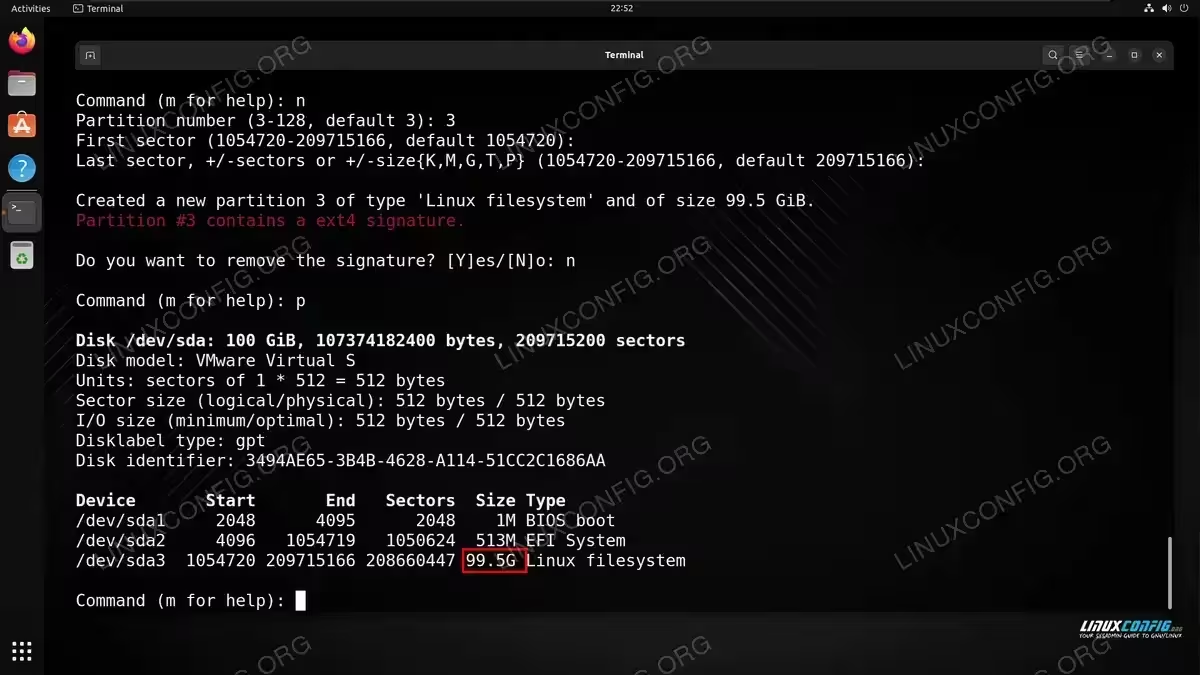
- Next, let’s recreate the partition by issuing the
n(new) command. We will give it the same partition number as before.Command (m for help): n Partition number (3-128, deault 3): 3 First sector (1054720-209715166, default 1054720): [enter the starting sector here! it needs to be the same as before] Last sector, +sectors or +size{K,M,G,T,P} (1054720-209715166, default 209715166): Created a new partition 3 of type 'Linux filesystem' and of size 99.5 GiB.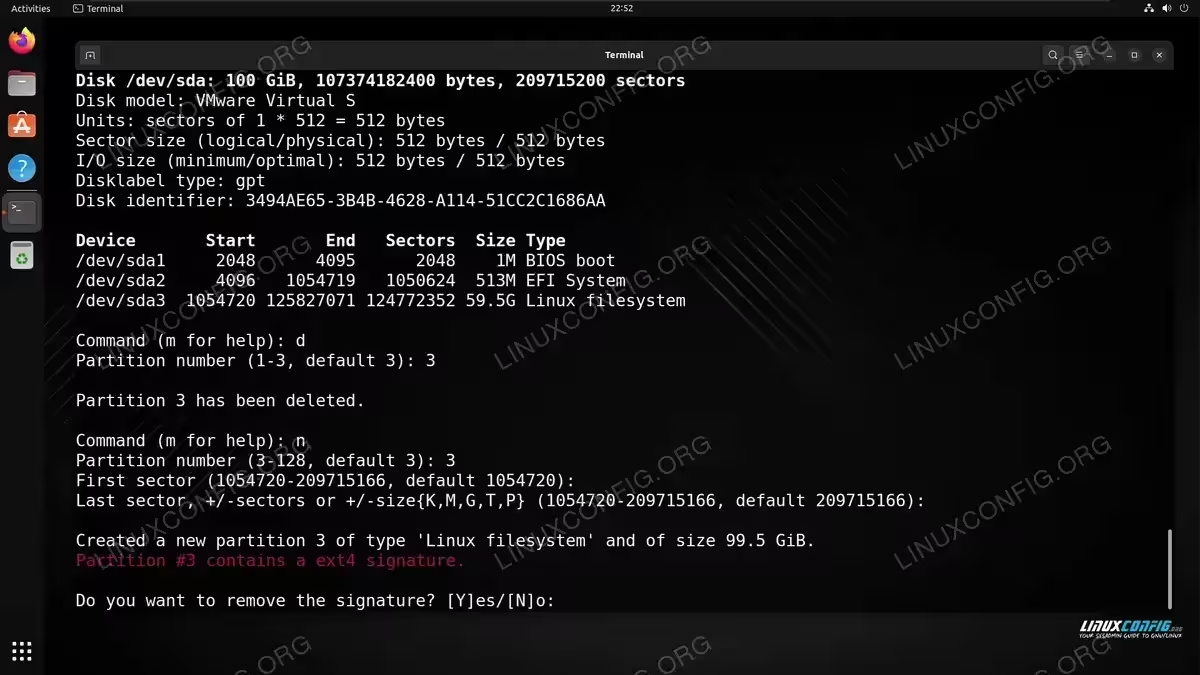
Creating a new root partition with the increased size For the last two questions, we were able to just press
Enterto proceed with the defaults, since they matched our desired settings. In other words, the first sector stayed the same as before, and we accepted the last sector available (as suggested by the default) to ensure that our partition spans the entire size of the available hard drive space. - In case you are prompted with the following question, you should answer
nfor no.Partition #3 contains a ext4 signature. Do you want to remove the signature? [Y]es/[N]o: n
- Let’s print the partition table with
ponce again, and verify that the output now reflects the desired size of the root partition:Command (m for help): p
The partition table shows that our root partition has been resized
- Double check that the output in the above command is what you expected. As long as the change above looks good, use the
wcommand to write the change to the disk:Command (m for help): w
We can now close
fdiskby typingqfor the quit command. - At this point, the system needs to be rebooted in order to remount our root partition with the new size. Force fsck (file system check) on next reboot to ensure that the partition is checked before it is mounted. To do so, just create an empty file called
forcefsckin the root of your/partition:$ sudo touch /forcefsck
And reboot the system:
$ reboot
- When the system comes back up, we need to extend the file system (ext4 in this case) across the space that has just become available to the root partition. To do so, we will execute the
resize2fscommand and specify the device path the root partition (in our case, this is/dev/sda3, but yours might be different.$ sudo resize2fs /dev/sda3

We have successfully resized our file system to span the entire partition size - Executing the
dfcommand should reveal the new and expected size of the root partition:$ df -h /

The df command shows that our usable hard drive space has increased
Closing Thoughts
In this tutorial, we saw how to resize the root partition while being actively booted into it on a Linux system. We completed the resizing process without first unmounting the partition, which is not recommended, but can be done on non-critical systems that do not have important data. It is best to use this method only when a better option–such as using a live environment to perform the process–is not readily available.