Creating an SSH client configuration file allows you to streamline remote server connections by defining connection parameters, authentication methods, and host-specific settings. Instead of typing lengthy SSH commands with multiple options each time you connect, you can store these settings in a configuration file for automatic use.
A well-configured SSH client setup improves security, reduces typing errors, and makes managing multiple server connections significantly more efficient. You can define custom host alias, specify different key files, set connection timeouts, and configure advanced features like port forwarding or proxy jumps.
In this tutorial you will learn:
- How to create and structure SSH client configuration files
- Essential configuration directives and their practical applications
- How to set up host-specific connection parameters and aliases
- Advanced configuration options for security and convenience
- How to test and troubleshoot SSH client configurations
- Best practices for organizing and maintaining SSH configs
QUICK REFERENCE
For experienced users: Create SSH config at ~/.ssh/config with host blocks containing Host alias, HostName server.com, User username, IdentityFile ~/.ssh/keyfile. Set permissions with chmod 600 ~/.ssh/config. Connect using ssh alias. Alternatively, use our SSH config generator.
| Category | Requirements, Conventions or Software Version Used |
|---|---|
| System | Any Linux distribution, macOS, or Windows with WSL |
| Software | OpenSSH client (ssh) version 6.0 or higher |
| Other | Text editor (vim, nano, or gedit), existing SSH key pairs (optional) |
| Conventions | # – requires given linux commands to be executed with root privileges either directly as a root user or by use of sudo command$ – requires given linux commands to be executed as a regular non-privileged user |
Prerequisites
Before creating SSH client configurations, ensure you have the necessary directory structure and understand the configuration hierarchy:
- Verify SSH Client Installation: Confirm OpenSSH client is available on your system
$ ssh -V
This command displays the SSH version. Most modern Linux distributions include OpenSSH by default.

Checking SSH client version. - Create SSH Directory: Ensure the SSH configuration directory exists with proper permissions
$ mkdir -p ~/.ssh
$ chmod 700 ~/.ssh
The
~/.sshdirectory stores SSH configuration files, keys, and known hosts. The 700 permission restricts access to the owner only. - Understand Configuration Hierarchy: SSH reads configurations in this order:
- Command-line options (highest priority)
- User configuration file (
~/.ssh/config) - System-wide configuration file (
/etc/ssh/ssh_config)
Options specified earlier override later ones.
BEST PRACTICE
Always backup existing SSH configurations before making changes. Use cp ~/.ssh/config ~/.ssh/config.backup to create a safe copy.
Basic Configuration
Creating a basic SSH client configuration involves understanding the file structure and essential directives:
- Create Configuration File: Start by creating the main SSH client configuration file
$ touch ~/.ssh/config
$ chmod 600 ~/.ssh/config
The 600 permission ensures only the file owner can read and write the configuration file.
- Basic Host Block Structure: Open the file with your preferred editor and add a basic host configuration
$ nano ~/.ssh/config
Add the following basic structure:
Host devlx
    HostName 192.168.100.3
    User lubos
    Port 22
This creates an alias “devlx” for connecting to IP 192.168.100.3 as user “lubos” on port 22.
- Test Basic Configuration: Verify the configuration works by connecting using the alias
$ ssh devlx
This command is equivalent to running
ssh lubos@192.168.100.3 -p 22but much more convenient.
SSH login using pre-configured host alias
Essential Configuration Directives
Understanding key SSH configuration options helps you create effective and secure client setups:
- Host Identification and Connection: Configure basic connection parameters
Host production-server
    HostName prod.linuxconfig.org
    User deploy
    Port 2222
    IdentityFile ~/.ssh/prod_key
This configuration connects to prod.linuxconfig.org on port 2222 using username “deploy” and a specific SSH key.
- Wildcards and Pattern Matching: Use patterns to apply settings to multiple hosts
Host *.linuxconfig.org
    User admin
    IdentityFile ~/.ssh/company_key

Host dev-*
    User developer
    Port 2222
These patterns apply settings to all hosts matching the specified patterns.
- Global Defaults: Set default options for all connections
Host *
    ServerAliveInterval 60
    ServerAliveCountMax 3
    StrictHostKeyChecking ask
    UserKnownHostsFile ~/.ssh/known_hosts
The wildcard host applies these settings to all connections unless overridden by specific host blocks.
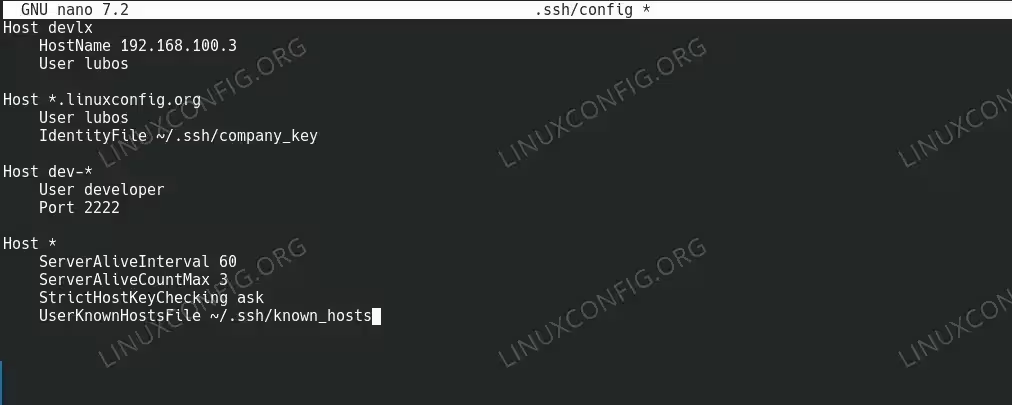
SSH Config Example –
Screenshot of a text editor displaying an SSH config file with multiple host blocks, showing proper indentation and various configuration directives like HostName, User, Port, and IdentityFile
Advanced Configuration
Advanced SSH client configurations enable complex networking scenarios and enhanced security:
- Jump Host Configuration: Configure connections through intermediate hosts
Host jumphost
    HostName bastion.linuxconfig.org
    User admin
    IdentityFile ~/.ssh/bastion_key

Host internal-server
    HostName 10.0.1.50
    User app
    ProxyJump jumphost
    IdentityFile ~/.ssh/internal_key
This setup allows connecting to internal-server through the jumphost as an intermediate step.
- Port Forwarding and Tunneling: Configure automatic port forwarding
Host database-tunnel
    HostName db.linuxconfig.org
    User dbadmin
    LocalForward 5432 localhost:5432
    IdentityFile ~/.ssh/db_key

Host web-dev
    HostName linuxconfig.org
    User developer
    DynamicForward 8080
LocalForward creates a tunnel from local port 5432 to the remote database port. DynamicForward creates a SOCKS proxy.
- Connection Multiplexing: Optimize multiple connections to the same host
Host *
    ControlMaster auto
    ControlPath ~/.ssh/connections/%r@%h:%p
    ControlPersist 10m
This configuration reuses existing connections for faster subsequent connections to the same host.
SECURITY ALERT
Be cautious with ControlMaster settings on shared systems. The control socket allows anyone with access to hijack your SSH sessions.
Authentication Configuration
Configure various authentication methods and security settings for optimal access control:
- SSH Key Management: Configure multiple SSH keys for different purposes
Host github
    HostName github.com
    User git
    IdentityFile ~/.ssh/github_key
    IdentitiesOnly yes

Host work-servers
    HostName *.company.com
    IdentityFile ~/.ssh/work_key
    IdentitiesOnly yes
    PubkeyAuthentication yes
    PasswordAuthentication no
IdentitiesOnly yesprevents SSH from trying default key locations, using only the specified key. - Authentication Preferences: Set preferred authentication methods and security options
Host secure-server
    HostName secure.linuxconfig.org
    User admin
    PreferredAuthentications publickey,keyboard-interactive
    PubkeyAuthentication yes
    PasswordAuthentication no
    ChallengeResponseAuthentication yes
This configuration prioritizes public key authentication and disables password authentication.
Testing and Verification
Verify your SSH client configuration works correctly and troubleshoot common issues:
- Test Configuration Syntax: Use SSH’s built-in configuration testing
$ ssh -F ~/.ssh/config -T git@github.com
The
-Foption specifies the configuration file to test. The-Toption disables pseudo-terminal allocation for testing. - Debug Connection Issues: Enable verbose output to troubleshoot problems
$ ssh -vvv webserver
Triple verbose mode (
-vvv) shows detailed information about connection attempts, authentication, and configuration loading. - Verify Applied Settings: Check which configuration values SSH is using
$ ssh -G webserver
This command shows the final configuration that SSH would use for the specified host without actually connecting.
Practical Examples
Here are common SSH client configuration scenarios you’ll encounter in real-world usage:
- Multi-Environment Development Setup: Configure connections for different development environments
# Development environment
Host dev
    HostName dev.myproject.com
    User developer
    IdentityFile ~/.ssh/dev_key
    ForwardAgent yes

# Staging environment
Host staging
    HostName staging.myproject.com
    User deploy
    IdentityFile ~/.ssh/deploy_key
    StrictHostKeyChecking yes

# Production environment
Host prod
    HostName prod.myproject.com
    User deploy
    IdentityFile ~/.ssh/prod_key
    StrictHostKeyChecking yes
    LogLevel ERROR
This setup provides easy access to different environments with appropriate security settings for each.
- Git Repository Management: Configure SSH for multiple Git hosting services
# Personal GitHub account
Host github-personal
    HostName github.com
    User git
    IdentityFile ~/.ssh/personal_github_key

# Work GitHub account
Host github-work
    HostName github.com
    User git
    IdentityFile ~/.ssh/work_github_key

# GitLab instance
Host gitlab-company
    HostName gitlab.company.com
    User git
    IdentityFile ~/.ssh/company_gitlab_key
    Port 2222
This configuration allows using different SSH keys for different Git repositories and services.
- Complex Network Access: Configure access through multiple jump hosts and networks
# First jump host
Host bastion1
    HostName bastion1.company.com
    User admin
    IdentityFile ~/.ssh/bastion_key

# Second jump host
Host bastion2
    HostName bastion2.internal
    User admin
    ProxyJump bastion1
    IdentityFile ~/.ssh/internal_key

# Final destination
Host app-server
    HostName app.internal
    User appuser
    ProxyJump bastion2
    IdentityFile ~/.ssh/app_key
    LocalForward 8080 localhost:8080
This setup enables accessing internal servers through multiple network layers with automatic port forwarding.
BEST PRACTICE
Organize complex configurations with comments and logical grouping. Use descriptive host aliases that clearly indicate the purpose and environment of each connection.
Troubleshooting
- Permission denied (publickey): Check key file permissions with
chmod 600 ~/.ssh/keyfileand verify key is loaded - Configuration file not read: Ensure
~/.ssh/confighas 600 permissions and proper ownership - Host key verification failed: Remove old key with
ssh-keygen -R hostnameand reconnect - Connection timeout: Add
ServerAliveInterval 60to keep connections alive through firewalls - Wrong user or port: Use
ssh -G hostnameto verify configuration is parsed correctly - ProxyJump not working: Ensure all intermediate hosts are properly configured and accessible
- Multiple identity files tried: Add
IdentitiesOnly yesto use only specified keys
Conclusion
You have successfully learned how to create and configure SSH client configurations that streamline remote server access and improve security. Your SSH config file now serves as a central hub for managing connection parameters, authentication methods, and advanced networking features like jump hosts and port forwarding.
The configuration skills you’ve developed enable efficient management of multiple server environments, from simple alias creation to complex multi-hop connections through bastion hosts. By implementing proper authentication settings and security practices, you’ve enhanced both convenience and protection for your remote connections.
Consider exploring SSH key management techniques and SSH agent configuration to further optimize your SSH workflow. For production environments, review SSH security hardening practices to ensure your configurations meet enterprise security requirements.