This comprehensive Arch Linux installation guide walks you through the complete process of installing Arch Linux from scratch, including disk partitioning, system configuration, bootloader setup, and GNOME desktop environment installation. Follow this Arch Linux installation guide to build a fully functional system with a graphical interface.
Table of Contents
- → Pre-Installation Preparation
- → Disk Partitioning for Arch Linux
- → Format and Mount Partitions
- → Install Base Arch Linux System
- → Arch Linux System Configuration
- → Bootloader Installation for Arch Linux
- → Desktop Environment Installation
- → User Account Creation
- → Complete Arch Linux Installation
- → Post-Installation Steps
- → Troubleshooting
In this tutorial you will learn:
- How to partition disks for UEFI systems
- Create EFI and root partitions with cfdisk
- Format partitions with FAT32 and ext4 filesystems
- Install base Arch Linux system with pacstrap
- Configure timezone, locale, and hostname
- Install and configure GRUB bootloader
- Set up GNOME desktop environment
- Create user accounts with sudo privileges
- Enable NetworkManager for network connectivity
- Troubleshoot common installation issues
| Category | Requirements, Conventions or Software Version Used |
|---|---|
| System | x86_64 (64-bit) compatible system with UEFI firmware, minimum 512 MB RAM (2 GB recommended), minimum 2 GB disk space (20 GB recommended for desktop environment) |
| Software | Arch Linux ISO (latest version) |
| Other | Active internet connection required for installation |
| Conventions | # – requires given linux commands to be executed with root privileges either directly as a root user or by use of sudo command$ – requires given linux commands to be executed as a regular non-privileged user |
cfdisk, format and mount partitions, then install the base system with pacstrap. Configure system settings, install GRUB bootloader, and optionally add GNOME desktop.
| Step | Command/Action |
|---|---|
| 1. Partition disk | cfdisk /dev/sda (create EFI + root) |
| 2. Format & mount | mkfs.fat -F32 /dev/sda1 && mkfs.ext4 /dev/sda2 && mount /dev/sda2 /mnt |
| 3. Install base system | pacstrap -K /mnt base linux linux-firmware |
| 4. Install bootloader | arch-chroot /mnt && pacman -S grub efibootmgr && grub-install |
Complete Video Guide
Pre-Installation Preparation
- Boot the Arch Linux ISO: After booting from the Arch Linux installation media, you will be presented with a root shell prompt. This Arch Linux installation guide begins by verifying your internet connectivity:
# ping -c 3 archlinux.org
If the ping succeeds, you have internet access and can proceed with the Arch Linux installation guide.
- Identify your target disk: List all available block devices to identify which disk you want to install Arch Linux on:
# lsblk
Note the device name of your target disk (e.g.,
/dev/sda,/dev/nvme0n1, or/dev/vda). This Arch Linux installation guide uses/dev/sdaas an example.
SSH ACCESS FOR VM INSTALLATIONS
If you’re installing Arch Linux in a virtual machine, you can SSH into the installation environment for easier command entry. First, set a root password with passwd, then find your IP address with ip a. From your host machine, connect using ssh root@IP_ADDRESS. This allows you to copy and paste commands directly into your terminal.
BACKUP WARNING
Before proceeding with this Arch Linux installation guide, ensure you have backed up all important data. The partitioning process will erase all existing data on the target disk.
Disk Partitioning for Arch Linux
- Launch the partition tool: This Arch Linux installation guide uses
cfdiskto create a GPT partition table:# cfdisk /dev/sda
When prompted, select
gptas the label type for UEFI systems. - Create the EFI partition: Select “New” and create the first partition with a size of
512M. Then select “Type” and change it toEFI System.Size: 512M Type: EFI System
This partition will store the bootloader and UEFI boot files required for the Arch Linux installation.
- Create the root partition: Select the remaining free space, choose “New”, and press Enter to use all remaining space as the root partition.
Size: (remaining space)
Type: Linux filesystem
This will be your main Arch Linux system partition.
- Write changes to disk: Select “Write” at the bottom of the screen, type
yesto confirm, then select “Quit” to exit cfdisk.Confirm: yes
Your partition table has now been written to the disk.

Confirmation prompt in cfdisk showing the partition layout with 512M EFI System partition and 49.5G Linux filesystem partition before writing changes to disk
SWAP PARTITION OPTIONAL
This Arch Linux installation guide does not create a swap partition for simplicity. You can add a swap file later if needed using the fallocate and mkswap commands.
Format and Mount Partitions
- Format the EFI partition: Create a FAT32 filesystem on the EFI partition as required by this Arch Linux installation guide:
# mkfs.fat -F32 /dev/sda1
The EFI partition must use FAT32 format for UEFI compatibility in any Arch Linux installation.
- Format the root partition: Create an ext4 filesystem on the root partition:
# mkfs.ext4 /dev/sda2
Ext4 is the standard Linux filesystem providing excellent performance and reliability for Arch Linux.
- Mount the root partition: Mount the root partition to
/mnt:# mount /dev/sda2 /mnt
This makes the root filesystem accessible for the Arch Linux installation.
- Mount the EFI partition: Create and mount the boot directory:
# mount --mkdir /dev/sda1 /mnt/boot
The
--mkdirflag automatically creates the boot directory if it doesn’t exist during this Arch Linux installation guide.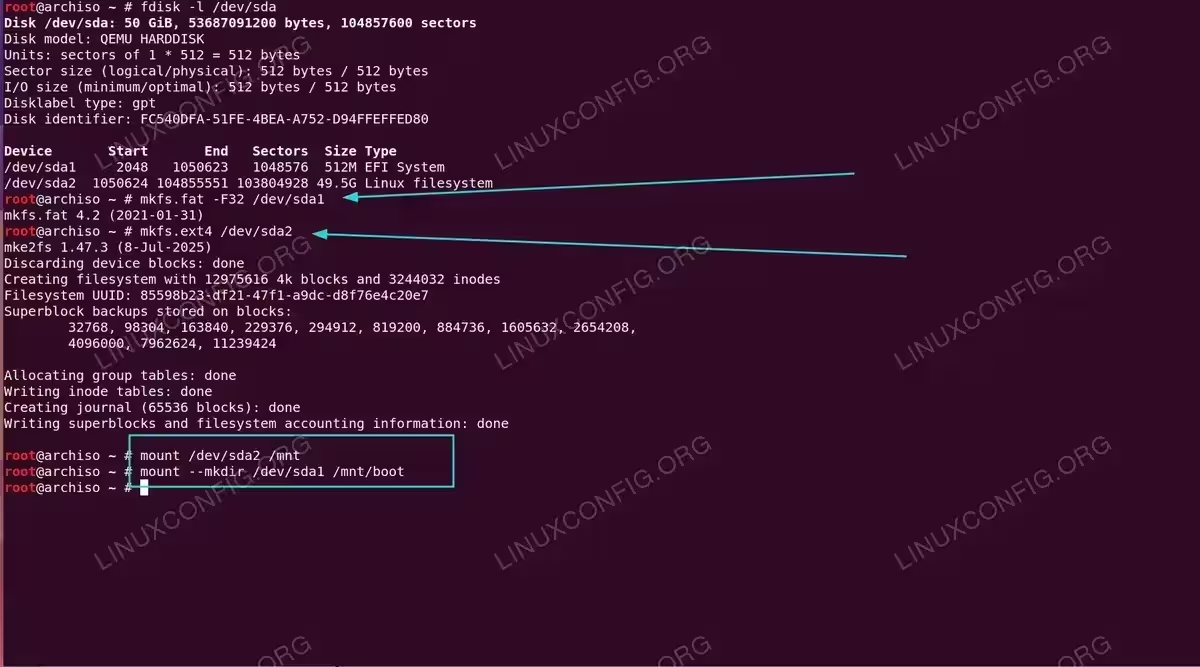
Terminal output showing fdisk verification of the GPT partition table, formatting /dev/sda1 as FAT32 and /dev/sda2 as ext4, followed by mounting both partitions to /mnt
Install Base Arch Linux System
- Install essential packages: Use
pacstrapto install the base Arch Linux system, Linux kernel, and firmware:# pacstrap -K /mnt base linux linux-firmware
This command installs the minimal packages required for a functional Arch Linux system. The process typically takes several minutes depending on your internet connection. This is the core step of any Arch Linux installation guide.
- Generate fstab: Create the filesystem table that defines how partitions are mounted at boot in your Arch Linux installation:
# genfstab -U /mnt >> /mnt/etc/fstab
The
-Uflag uses UUIDs to identify partitions, making the Arch Linux system more resilient to device name changes.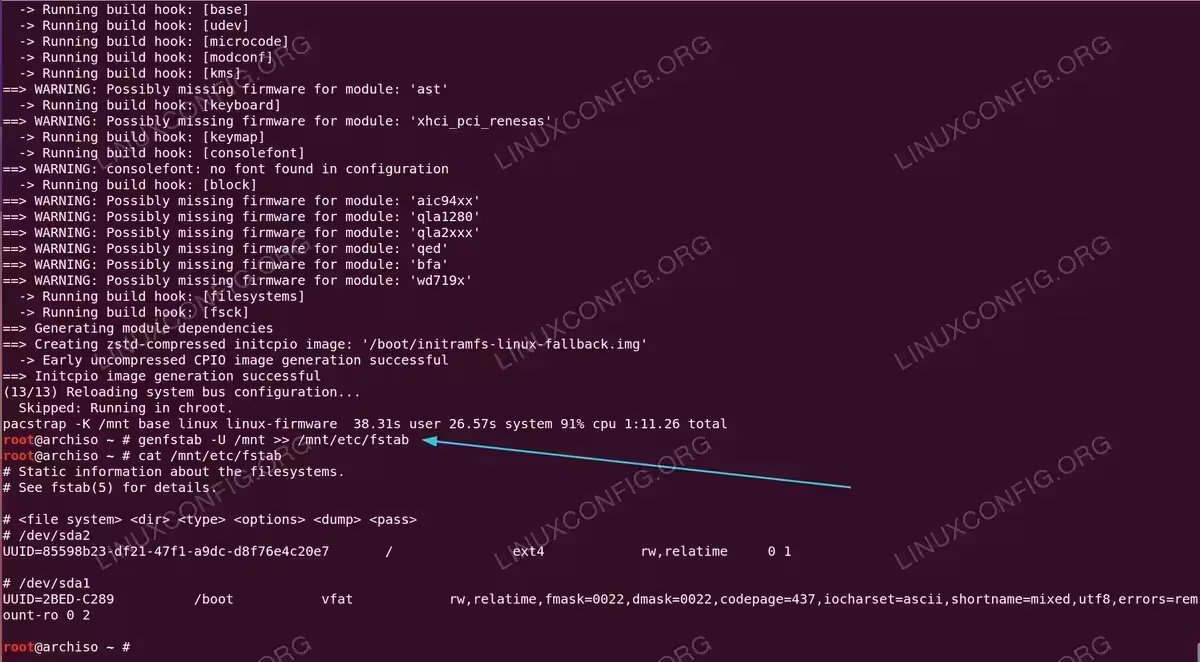
Terminal output showing the pacstrap installation process completing with initramfs generation, followed by genfstab creating the filesystem table with UUID entries for both partitions
INSTALLATION TIME
The base system installation in this Arch Linux installation guide typically takes 5-10 minutes depending on your internet connection speed. Do not interrupt the process.
Arch Linux System Configuration
- Enter the new system: Change root into the newly installed Arch Linux system:
# arch-chroot /mnt
You are now operating within your new Arch Linux installation.
- Set timezone: Create a symbolic link to your timezone. This Arch Linux installation guide uses Warsaw as an example, but you can adjust for your location:
# ln -sf /usr/share/zoneinfo/Europe/Bratislava /etc/localtime
Then synchronize the hardware clock:
# hwclock --systohc
This ensures your Arch Linux system time is correctly configured.
- Configure locale: Generate the locale configuration for your Arch Linux system:
# echo "en_US.UTF-8 UTF-8" >> /etc/locale.gen
# locale-gen
Then set the system locale:
# echo "LANG=en_US.UTF-8" > /etc/locale.conf
These commands enable UTF-8 encoding for proper character support in Arch Linux.
- Set hostname: Choose a name for your Arch Linux computer. This Arch Linux installation guide uses
linuxconfigas an example:# echo "linuxconfig" > /etc/hostname
You can replace
linuxconfigwith any hostname you prefer, such asarchbox,myarch, orworkstation. - Set root password: Create a secure password for the root account on your Arch Linux system:
# passwd
Enter and confirm your password when prompted. Choose a strong password for security.
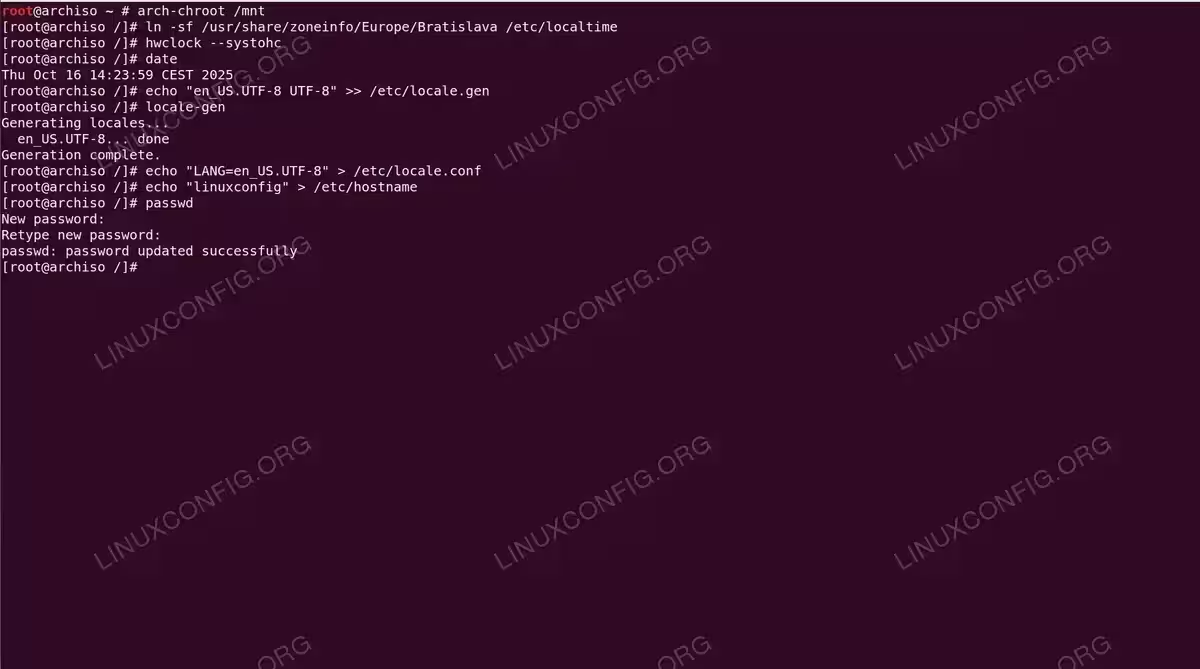
Terminal session showing arch-chroot execution followed by timezone setup for Europe/Bratislava, locale generation for en_US.UTF-8, hostname configuration as linuxconfig, and root password creation
Bootloader Installation for Arch Linux
- Install required packages: Install the bootloader and network management tools for Arch Linux:
# pacman -S grub efibootmgr networkmanager
Press Enter to accept default selections. NetworkManager will handle network connectivity after your Arch Linux installation is complete.
- Install GRUB bootloader: For UEFI systems, install GRUB to the EFI partition:
# grub-install --target=x86_64-efi --efi-directory=/boot --bootloader-id=GRUB
This installs GRUB as the bootloader for your Arch Linux system. You may see warnings about EFI variables in virtual machine or chroot environments, which can be safely ignored.
- Generate GRUB configuration: Create the GRUB configuration file that defines boot options:
# grub-mkconfig -o /boot/grub/grub.cfg
GRUB will automatically detect your Linux kernel and create the appropriate boot entries for your Arch Linux installation.
UEFI BOOT FIX FOR VIRTUAL MACHINES
If you are installing Arch Linux in a virtual machine and the system fails to boot after a complete power off (but works after reboot), you need to create a fallback UEFI boot entry. After the GRUB installation step, run these additional commands:mkdir -p /boot/EFI/BOOTandcp /boot/EFI/GRUB/grubx64.efi /boot/EFI/BOOT/BOOTX64.EFI. This copies GRUB to the default UEFI fallback path that firmware always checks, ensuring the system boots even after a complete shutdown. - Enable NetworkManager: Ensure network connectivity after your Arch Linux installation is complete:
# systemctl enable NetworkManager
This configures NetworkManager to start automatically when you boot into Arch Linux.
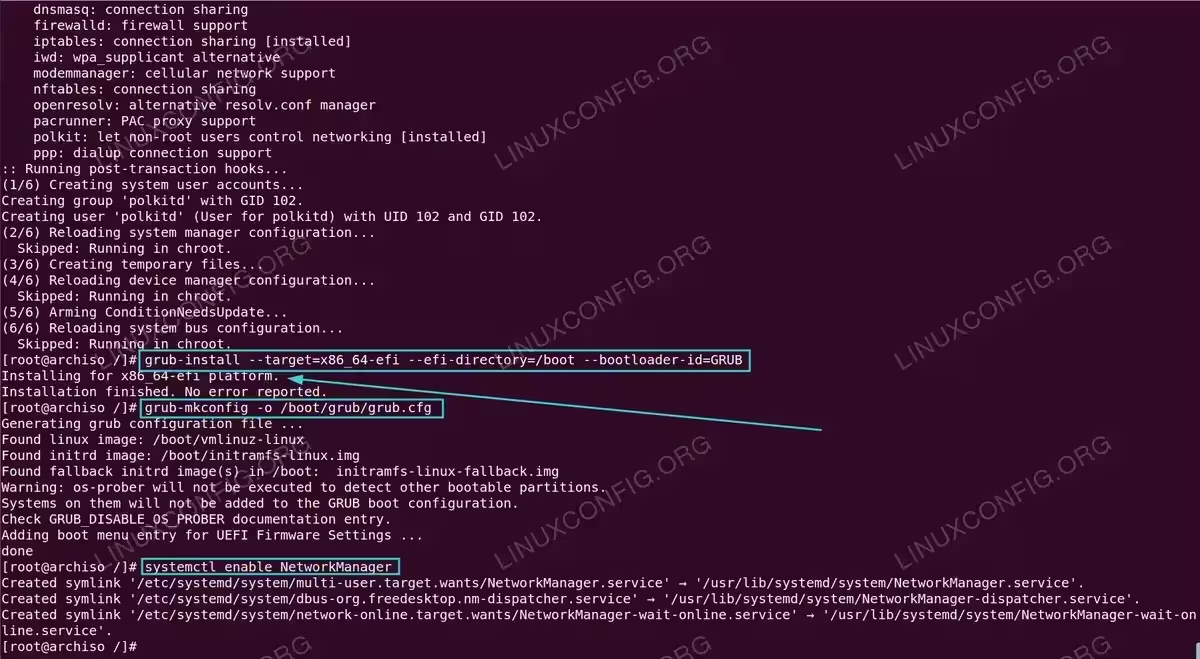
Terminal output displaying GRUB installation to EFI partition, grub-mkconfig generating boot configuration with detected Linux images, and systemctl enabling NetworkManager service for automatic network connectivity
ALTERNATIVE BOOTLOADER
If GRUB installation fails or you prefer a simpler bootloader, you can use systemd-boot instead. Install it with bootctl install and manually create boot entries in /boot/loader/entries/. Consult the Arch Wiki for systemd-boot configuration details.
Desktop Environment Installation on Arch Linux
- Install GNOME: Install the complete GNOME desktop environment on your Arch Linux system:
# pacman -S gnome
You will be prompted with several selections during the GNOME installation:
- GNOME group packages: When asked to select from 58 members in group gnome, press Enter to install all packages (default=all). This includes essential components like gdm, gnome-shell, nautilus, and various GNOME applications.
- Font provider: When asked to choose from 11 ttf-font providers, press Enter to accept the default (gnu-free-fonts). All options provide adequate font support for your Arch Linux installation.
- Audio system: When asked to choose between jack2 and pipewire-jack, press Enter to accept the default (jack2). Both options work well with GNOME on Arch Linux.
The installation process takes several minutes to download and install all packages.
- Enable display manager: Configure GDM (GNOME Display Manager) to start at boot on your Arch Linux system:
# systemctl enable gdm
GDM provides the graphical login screen for your Arch Linux installation.
GNOME INSTALLATION SIZE
The complete GNOME desktop environment requires approximately 2GB of disk space. Ensure you have sufficient space available before proceeding with this step of the Arch Linux installation guide.
User Account Creation on Arch Linux
- Create a user account: Add a new user with home directory and wheel group membership. This Arch Linux installation guide uses
linuxconfigas the username:# useradd -m -G wheel linuxconfig
You can replace
linuxconfigwith your preferred username, such asjohn,admin, or any name you choose. The-mflag creates a home directory, and-G wheeladds the user to the wheel group for sudo privileges on your Arch Linux system. - Set user password: Assign a password to the new user in your Arch Linux installation:
# passwd linuxconfig
Replace
linuxconfigwith the username you created. Enter and confirm the password when prompted. - Install and configure sudo: Install sudo for privilege elevation on Arch Linux:
# pacman -S sudo
Then enable sudo access for wheel group members by editing the sudoers file:
# EDITOR=nano visudo
If nano is not available, you can install it first with
pacman -S nano. Uncomment (remove the#) from the line:%wheel ALL=(ALL:ALL) ALL
Save and exit. Users in the wheel group can now use sudo on your Arch Linux system.

Nano text editor displaying the /etc/sudoers.tmp file with the wheel group line uncommented to grant sudo privileges to users in the wheel group during Arch Linux installation
USER CREATION IMPORTANT
Creating a regular user account is essential for security in this Arch Linux installation guide. Avoid using the root account for daily tasks. Always create at least one regular user with sudo privileges.
Complete Arch Linux Installation
- Exit chroot environment: Return to the live environment:
# exit
You are now back in the installation media environment, having completed the core steps of this Arch Linux installation guide.
- Unmount partitions: Safely unmount all partitions:
# umount -R /mnt
This ensures all data is written to disk before rebooting your new Arch Linux system.
- Reboot system: Restart into your new Arch Linux installation:
# reboot
Remove or disconnect the installation media when prompted. Your Arch Linux system should boot to the GNOME login screen.
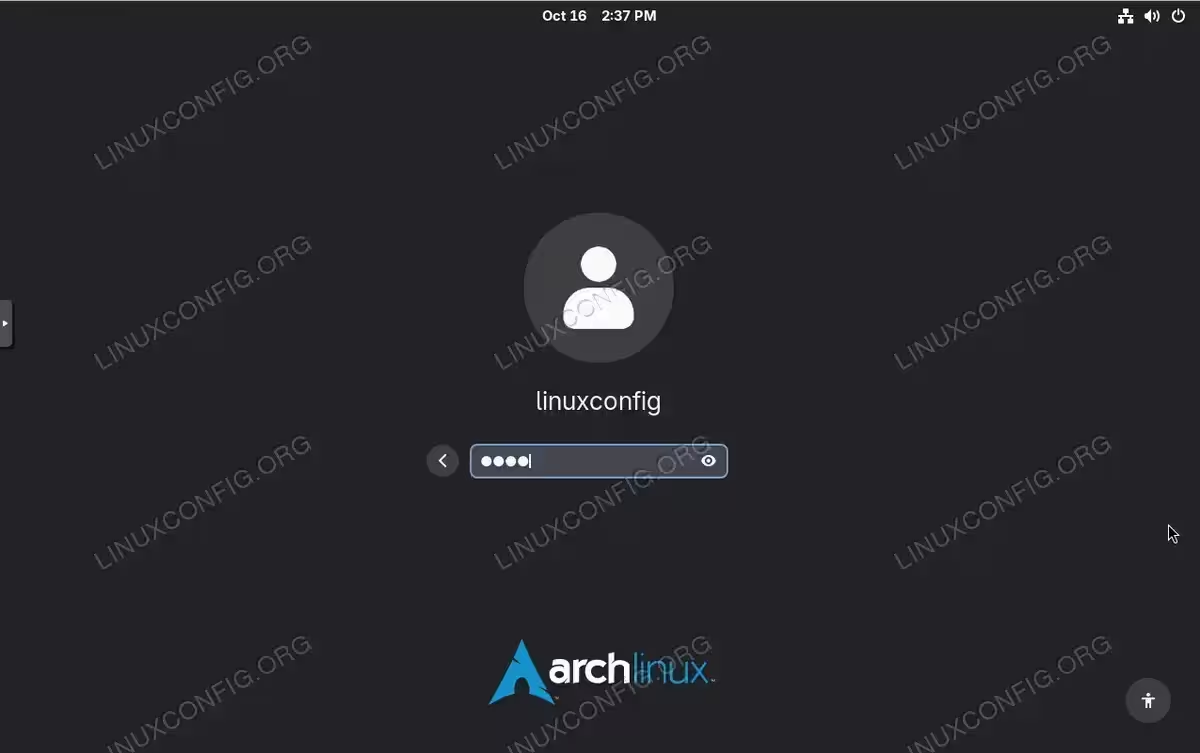
GDM login screen displaying the linuxconfig user account with password field, confirming successful completion of the Arch Linux installation with GNOME desktop environment 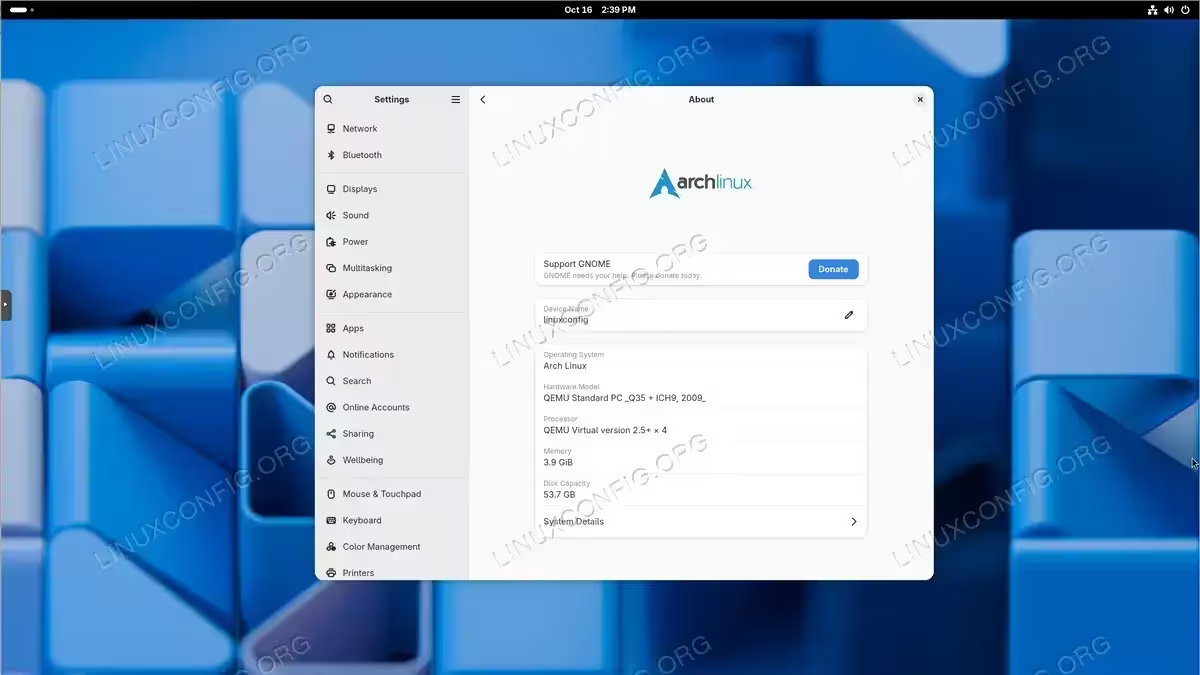
GNOME Settings About dialog showing successful Arch Linux installation with hostname “linuxconfig”, operating system “Arch Linux”, hardware model “QEMU Standard PC”, and system details including 1.9 GiB memory and 53.7 GB disk capacity
INSTALLATION COMPLETE
Congratulations! You have successfully completed this Arch Linux installation guide. Your Arch Linux system with GNOME desktop environment is now ready for use. Log in with the user account you created.
Post-Installation Steps for Arch Linux
After logging in with your user account, you can begin customizing your Arch Linux system. Consider installing additional software using pacman, configuring your desktop environment preferences, and setting up any development tools or applications you need. This Arch Linux installation guide provides a solid foundation for building your ideal system.
SYSTEM UPDATES
After completing this Arch Linux installation guide, run sudo pacman -Syu to update your system to the latest packages. Arch Linux is a rolling release distribution, so regular updates are essential for security and stability.
Troubleshooting Common Arch Linux Installation Issues
If your Arch Linux system doesn’t boot after following this Arch Linux installation guide, verify that your system firmware is set to UEFI mode, not legacy BIOS. Also confirm that the UUID in your bootloader configuration matches your root partition. You can boot back into the Arch Linux installation media and use arch-chroot to fix configuration issues.
UEFI FIRMWARE REQUIREMENT
This Arch Linux installation guide assumes your system uses UEFI firmware. For older BIOS systems, you’ll need to use MBR partitioning and GRUB with different installation steps not covered in this guide.
Conclusion
You have successfully completed this comprehensive Arch Linux installation guide with the GNOME desktop environment. This minimal Arch Linux installation provides a solid foundation for building your ideal Linux system. Arch Linux’s rolling release model ensures you’ll always have access to the latest software packages through this installation, while its simplicity and flexibility allow complete customization to match your needs. This Arch Linux installation guide gives you a fully functional system ready for customization and daily use.
Frequently Asked Questions
- What if my Arch Linux system doesn’t boot after installation? First, verify your BIOS/UEFI is set to boot in UEFI mode, not legacy BIOS. Boot from the Arch Linux ISO again, mount your partitions with
mount /dev/sda2 /mntandmount /dev/sda1 /mnt/boot, then enter chroot witharch-chroot /mnt. Reinstall GRUB and regenerate the configuration withgrub-install --target=x86_64-efi --efi-directory=/boot --bootloader-id=GRUBfollowed bygrub-mkconfig -o /boot/grub/grub.cfg. For virtual machines, ensure you’ve created the fallback boot entry as described in the troubleshooting section. - Can I install Arch Linux alongside Windows or another Linux distribution? Yes, dual-booting is possible but requires careful partitioning. Do not format the existing EFI partition if one exists from Windows. Instead, mount the existing EFI partition to
/mnt/bootand install GRUB there. GRUB’sos-proberpackage can detect other operating systems. Install it withpacman -S os-prober, enable it in/etc/default/grubby addingGRUB_DISABLE_OS_PROBER=false, then regenerate the GRUB configuration. - How do I partition my disk for Arch Linux installation? For UEFI systems, create a GPT partition table using
cfdisk /dev/sda. You need at minimum two partitions: a 512MB EFI System partition formatted as FAT32, and a root partition using the remaining space formatted as ext4. Optionally, create a separate home partition for user data or a swap partition for hibernation support. The EFI partition stores bootloader files while the root partition contains the entire Arch Linux system. - How do I install Arch Linux without UEFI (legacy BIOS)? This guide covers UEFI installation only. For legacy BIOS systems, use MBR partitioning instead of GPT by selecting
doslabel type in cfdisk. You won’t need an EFI partition. Install GRUB differently withgrub-install --target=i386-pc /dev/sda(note: use the disk, not a partition). The rest of the installation process remains similar. Consult the official Arch Wiki installation guide for detailed BIOS-specific instructions.