Redis is a powerful, open-source, in-memory data structure store widely used as a database, cache, message broker, and streaming engine. If you are looking to redis install Ubuntu 26.04, this guide walks you through every step, from installation and security hardening to persistence configuration and basic usage with redis-cli. By the end, you will have a fully functional and secure Redis instance running on your Ubuntu 26.04 Resolute Raccoon system.
Table of Contents
In this tutorial you will learn:
- How to install Redis server from the Ubuntu 26.04 repository
- How to configure Redis bind address, password, and memory limits
- How to secure Redis with authentication and firewall rules
- How to test Redis using the redis-cli command line tool
- How to enable RDB and AOF persistence for data durability
- How to manage the Redis service with systemd

Software Requirements
| Category | Requirements, Conventions or Software Version Used |
|---|---|
| System | Ubuntu 26.04 Resolute Raccoon |
| Software | Redis 8.0.5 (from Ubuntu repository) |
| Other | Privileged access to your Linux system as root or via the sudo command. |
| Conventions | # – requires given linux commands to be executed with root privileges either directly as a root user or by use of sudo command$ – requires given linux commands to be executed as a regular non-privileged user |
| Step | Command/Action |
|---|---|
| 1. Install Redis | $ sudo apt install redis-server |
| 2. Set a password | Edit /etc/redis/redis.conf and set requirepass LinuxConfig_passwd_2026 |
| 3. Restart Redis | $ sudo systemctl restart redis-server |
| 4. Test connection | $ redis-cli PING |
Understanding Redis
Redis (Remote Dictionary Server) is an open-source, in-memory data structure store that operates at extremely high speeds because it keeps all data in RAM. Unlike traditional disk-based databases, Redis can handle millions of requests per second, making it an ideal choice for scenarios where performance is critical.
Common use cases for Redis include:
- Caching: Store frequently accessed data in memory to reduce database load and speed up application response times.
- Session management: Maintain user session data for web applications with fast read and write access.
- Message broker: Use Redis Pub/Sub or Streams for real-time messaging between application components.
- Rate limiting: Track and limit API requests using Redis counters with automatic expiration.
- Leaderboards and counters: Leverage sorted sets for real-time rankings and atomic increment operations.
Redis supports a variety of data structures including strings, hashes, lists, sets, sorted sets, bitmaps, and streams. This versatility, combined with its speed, makes it one of the most popular choices for modern application architectures. For a comprehensive overview, consult the official Redis installation documentation.
Installing Redis on Ubuntu 26.04
The redis install Ubuntu 26.04 process is straightforward because the redis-server package is available directly from the default Ubuntu repository. Therefore, there is no need to add third-party sources.
- Update your package index: Before installing any new software, refresh the local package cache to ensure you get the latest available version:
$ sudo apt update
- Install the Redis server package: Install Redis along with its command-line client tool:
$ sudo apt install redis-server
This installs the
redis-serverdaemon and theredis-cliutility. The installation automatically creates the Redis configuration file at/etc/redis/redis.confand sets up the systemd service unit. - Verify the Redis version: Confirm the installed version:
$ redis-server --version
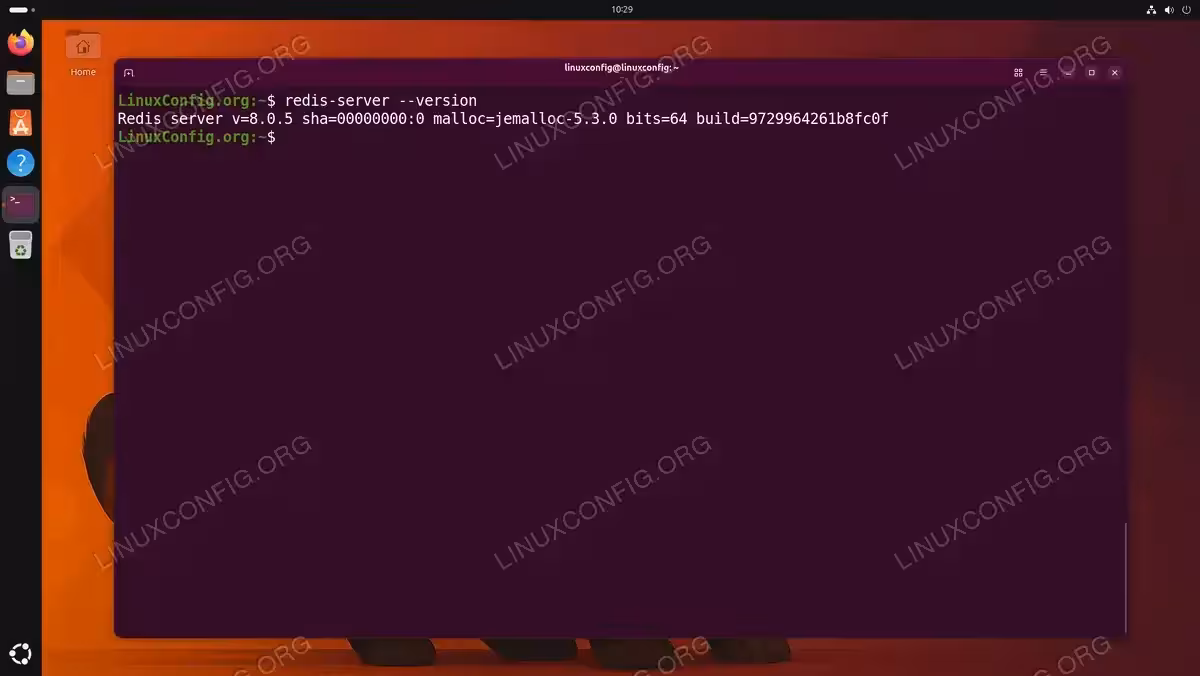
Verifying the installed Redis server version 8.0.5 on Ubuntu 26.04 - Check the service status: Redis should start automatically after installation. Verify it is running:
$ sudo systemctl status redis-server
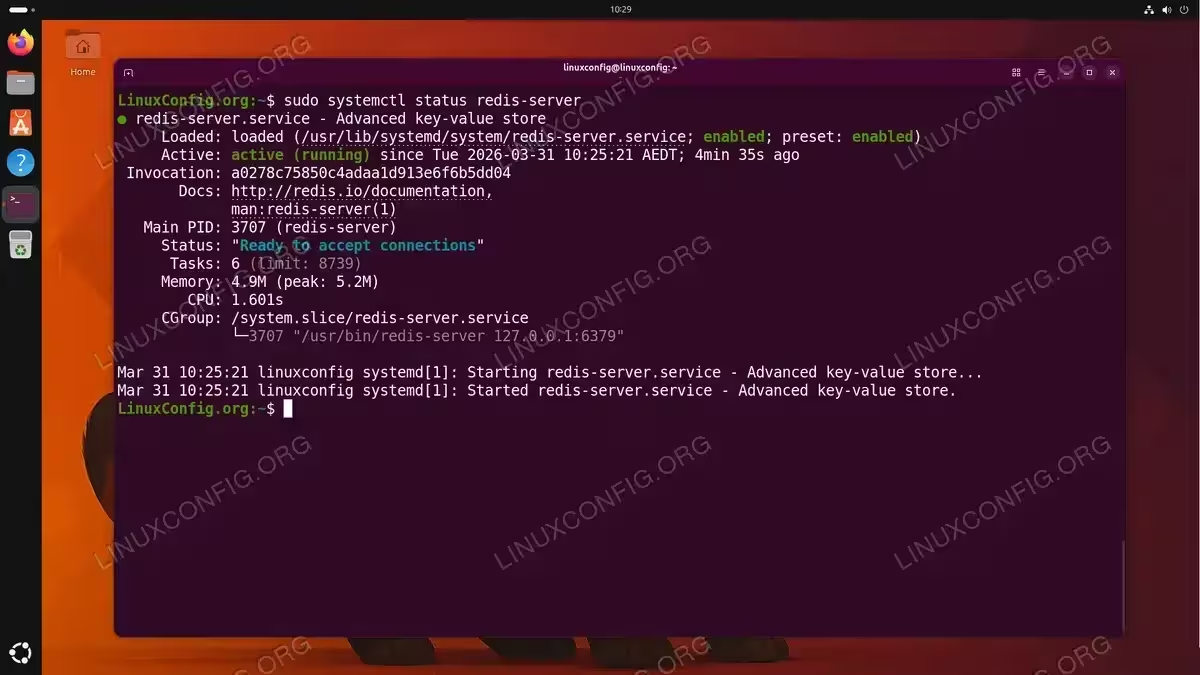
Confirming the Redis server service is active and running on Ubuntu 26.04
At this point, Redis is installed and running on your Ubuntu 26.04 system with its default configuration. The next step is to adjust the configuration to match your requirements.
Configuring Redis on Ubuntu 26.04
The main Redis configuration file is located at /etc/redis/redis.conf. This section covers the most important settings you should review and adjust after a fresh installation.
- Open the configuration file: Use your preferred text editor to modify the Redis configuration:
$ sudo nano /etc/redis/redis.conf
- Configure the bind address: By default, Redis binds to
127.0.0.1 -::1, meaning it only accepts connections from the local machine. If you need Redis to accept connections from specific network interfaces, modify thebinddirective. For local-only access (recommended for most setups), keep the default:bind 127.0.0.1 -::1
If you need to allow connections from a specific IP on your network, add it:
bind 127.0.0.1 192.168.1.100
- Set a memory limit: To prevent Redis from consuming all available system memory, set a maximum memory limit using the
maxmemorydirective. For example, to limit Redis to 256 MB:maxmemory 256mb
Additionally, configure an eviction policy that determines how Redis handles new writes when the memory limit is reached:
maxmemory-policy allkeys-lru
The
allkeys-lrupolicy removes the least recently used keys first, which is suitable for most caching use cases. - Save and restart Redis: After making your changes, save the file and restart the Redis service to apply the new configuration:
$ sudo systemctl restart redis-server
Securing Redis Installation
Redis is designed for use in trusted environments; however, it is essential to apply proper security measures to prevent unauthorized access. This section covers the critical steps to harden your Redis installation on Ubuntu 26.04.
Setting Password Authentication
- Open the Redis configuration file:
$ sudo nano /etc/redis/redis.conf
- Set a strong password: Locate the
requirepassdirective (commented out by default), uncomment it, and set a strong password:requirepass LinuxConfig_passwd_2026
Choose a long, complex password because Redis is extremely fast and can process a large number of password attempts per second.
- Restart Redis to apply the change:
$ sudo systemctl restart redis-server
- Verify password authentication is active: Attempt to connect without a password and confirm that Redis rejects unauthenticated commands:
$ redis-cli PING
(error) NOAUTH Authentication required.
Then authenticate and verify access:
$ redis-cli -a LinuxConfig_passwd_2026 PING
PONG
IMPORTANT
When using the-aflag withredis-cli, you will see a warning: “Using a password with ‘-a’ or ‘-u’ option on the command line interface may not be safe.” This is expected behavior. For interactive sessions, connect withredis-clifirst and then use theAUTHcommand to authenticate.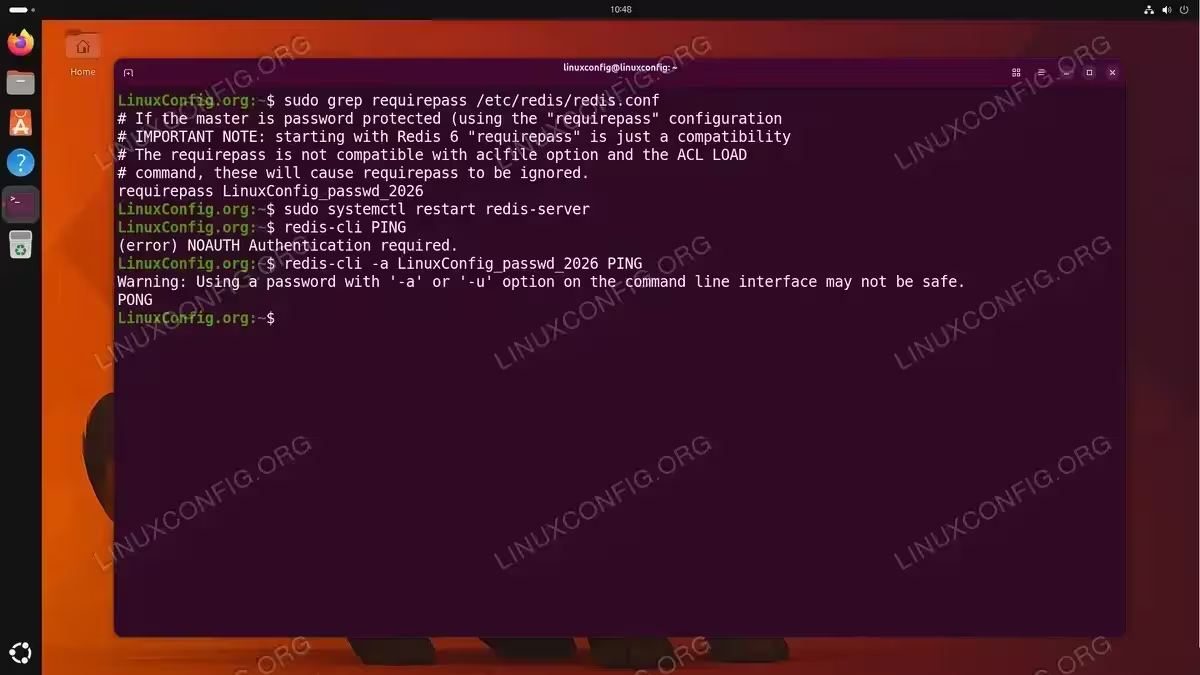
Testing Redis password authentication by verifying unauthenticated access is denied and authenticated PING returns PONG
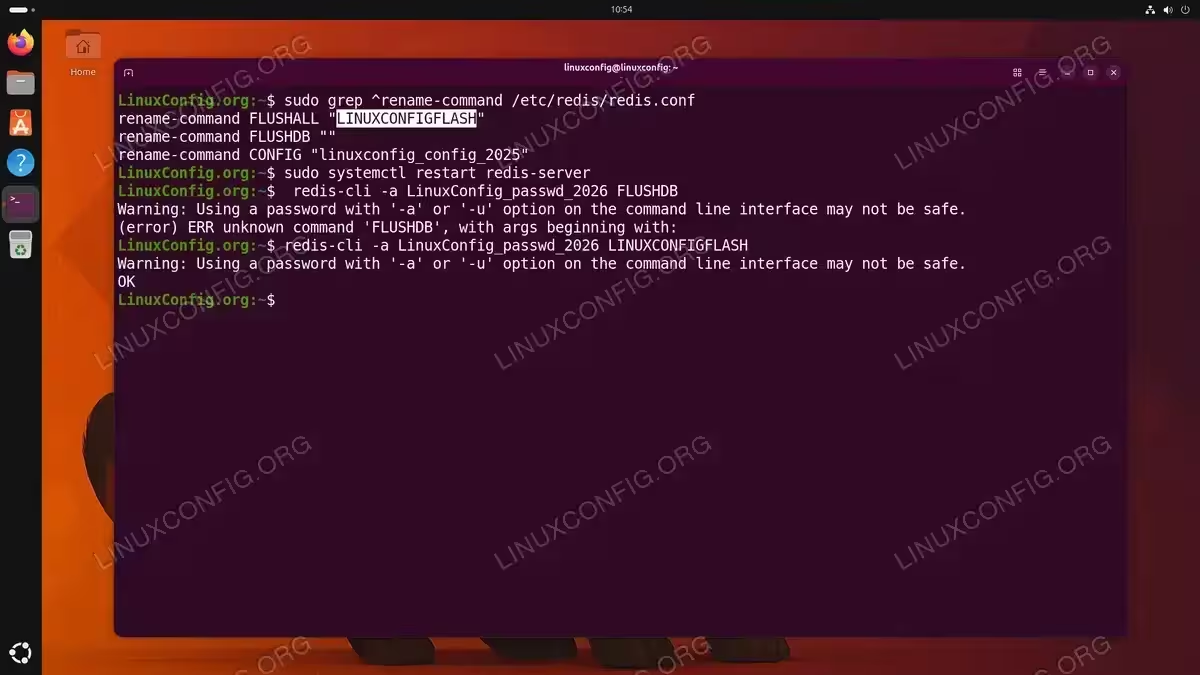
Disabling Dangerous Commands
Redis includes commands such as FLUSHALL, FLUSHDB, CONFIG, and KEYS that can be destructive or expose sensitive information. You can rename or disable these commands in /etc/redis/redis.conf:
rename-command FLUSHALL "LINUXCONFIGFLASH"
rename-command FLUSHDB ""
rename-command CONFIG "linuxconfig_config_2025"
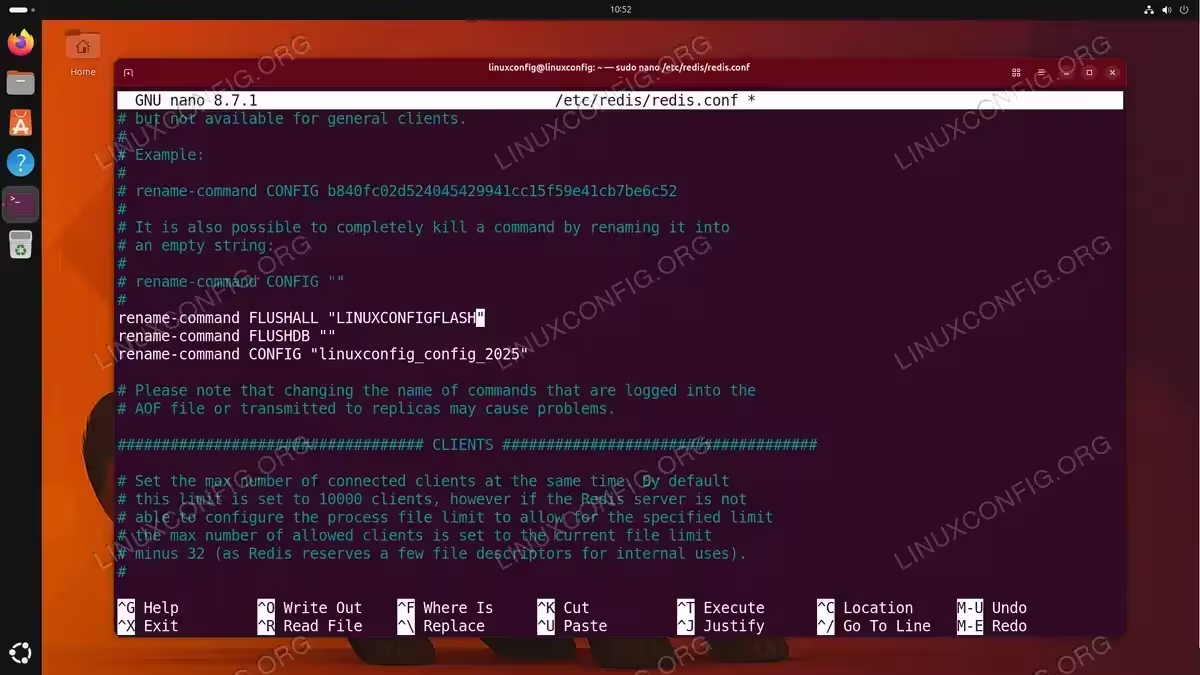
Setting a command to an empty string ("") disables it entirely. Alternatively, renaming it to a hard-to-guess string allows restricted access for administrators who know the renamed command. After adding these directives, restart Redis and verify:
$ sudo systemctl restart redis-server
$ redis-cli -a LinuxConfig_passwd_2026 FLUSHDB
(error) ERR unknown command 'FLUSHDB', with args beginning with:
The disabled FLUSHDB command is rejected, while the renamed FLUSHALL remains accessible through its new alias LINUXCONFIGFLASH:
$ redis-cli -a LinuxConfig_passwd_2026 LINUXCONFIGFLASH
OK
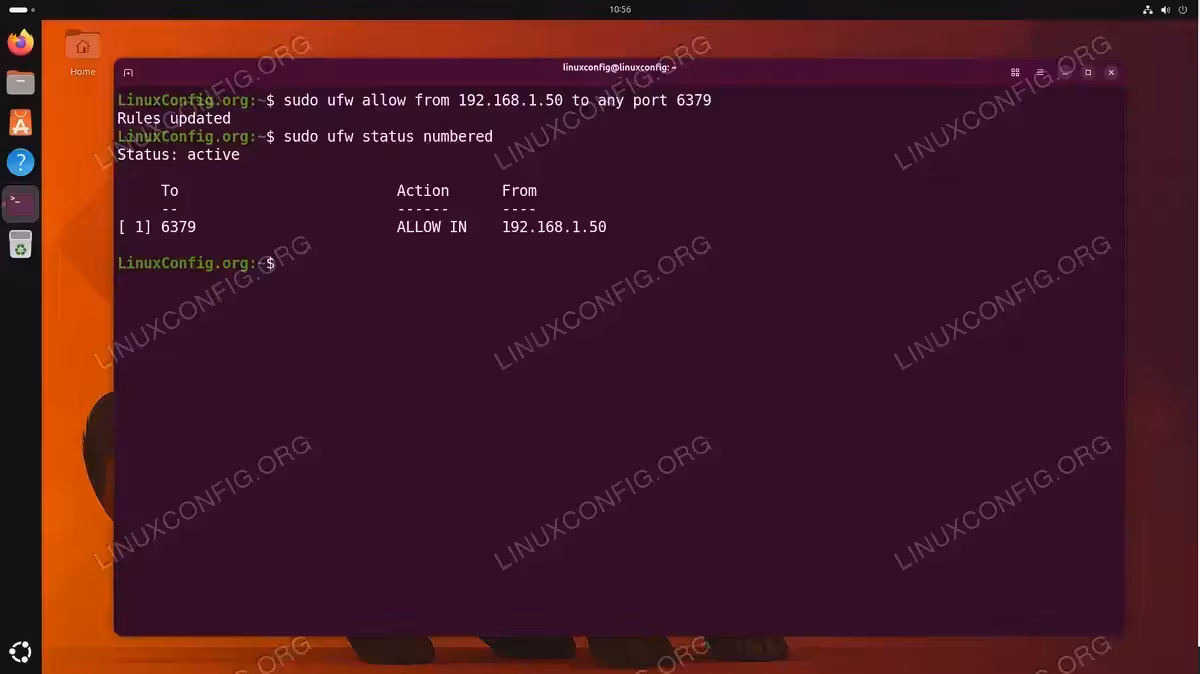
Configuring Firewall Rules
If your Redis instance needs to accept remote connections, you should restrict access using UFW (Uncomplicated Firewall). For example, to allow connections only from a specific application server at 192.168.1.50:
$ sudo ufw allow from 192.168.1.50 to any port 6379
Moreover, if Redis should only be accessible locally, ensure the bind address is set to 127.0.0.1 and no firewall rule opens port 6379 to external networks. For more details on managing firewall rules, see how to allow ports with UFW on Ubuntu 26.04.
SECURITY ALERT
Never expose Redis to the public internet without authentication and firewall restrictions. An unprotected Redis instance can be compromised within minutes by automated scanning tools.
Testing Redis with redis-cli
The redis-cli tool is the standard command-line interface for interacting with a Redis server. Use it to verify that your installation and configuration are working correctly.
- Connect to Redis: Launch the Redis CLI:
$ redis-cli
If you configured password authentication, you will need to authenticate before running any commands.
- Authenticate with your password: Use the
AUTHcommand:127.0.0.1:6379> AUTH LinuxConfig_passwd_2026 OK
Alternatively, you can pass the password directly when connecting:
$ redis-cli -a LinuxConfig_passwd_2026
- Test the connection with PING: The
PINGcommand verifies that the server is responsive:127.0.0.1:6379> PING PONG
A
PONGresponse confirms that Redis is running and accepting commands. - Store and retrieve a test value: Use
SETandGETto write and read a key-value pair:127.0.0.1:6379> SET greeting "Hello from LinuxConfig.org" OK 127.0.0.1:6379> GET greeting "Hello from LinuxConfig.org"
- Explore additional data types: Redis supports multiple data structures. Here are a few examples:
127.0.0.1:6379> LPUSH linuxconfig_tasks "Deploy app" "Update docs" "Run tests"
(integer) 3
127.0.0.1:6379> LRANGE linuxconfig_tasks 0 -1
1) "Run tests"
2) "Update docs"
3) "Deploy app"
127.0.0.1:6379> HSET linuxconfig_server hostname "linuxconfig-server" os "Ubuntu 26.04"
(integer) 2
127.0.0.1:6379> HGETALL linuxconfig_server
1) "hostname"
2) "linuxconfig-server"
3) "os"
4) "Ubuntu 26.04"
- Check server information: The
INFOcommand provides detailed server statistics:127.0.0.1:6379> INFO server
This outputs version information, uptime, configuration details, and more.
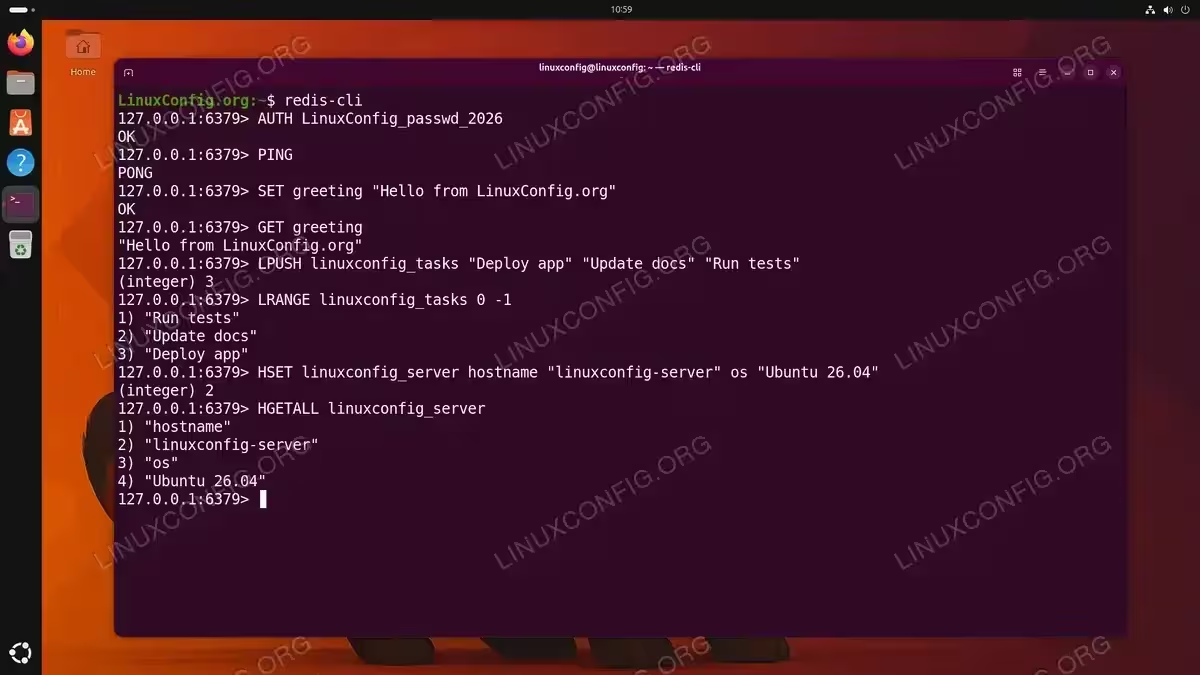
COMPLETED
If you received a PONG response and successfully stored and retrieved data, your Redis installation on Ubuntu 26.04 is fully operational.
Enabling Redis Persistence
Since Redis stores data in memory, all data would be lost on a server restart without persistence enabled. Redis offers two persistence mechanisms that can be used independently or together for maximum data durability.
RDB Snapshots (Point-in-Time Snapshots)
RDB persistence creates snapshots of the dataset at specified intervals. This is the default persistence method and is already enabled in a fresh Redis 8.0.5 installation on Ubuntu 26.04. Although the save directives do not appear explicitly in /etc/redis/redis.conf, Redis applies compiled-in defaults that you can verify with:
$ redis-cli CONFIG GET save
1) "save"
2) "3600 1 300 100 60 10000"
These defaults instruct Redis to save a snapshot if at least 1 key changed within 3600 seconds (1 hour), 100 keys changed within 300 seconds (5 minutes), or 10,000 keys changed within 60 seconds. You can override these values by adding explicit save directives to /etc/redis/redis.conf. The snapshot file is stored at the path defined by the dbfilename and dir directives:
dbfilename dump.rdb
dir /var/lib/redis
AOF (Append Only File)
AOF persistence logs every write operation received by the server, providing a more durable (but slightly slower) persistence mechanism. To enable AOF, edit /etc/redis/redis.conf:
appendonly yes
appendfilename "appendonly.aof"
Additionally, configure the fsync policy to control how often data is flushed to disk:
appendfsync everysec
The everysec option offers a good balance between performance and durability by flushing data to disk once every second. Other options include always (safest, slowest) and no (fastest, relies on OS).
After making changes, restart Redis:
$ sudo systemctl restart redis-server
[IMAGE PLACEHOLDER: Terminal showing Redis persistence configuration in redis.conf]
IMPORTANT
For production environments, enabling both RDB and AOF persistence provides the best combination of fast recovery (RDB) and minimal data loss (AOF). Redis will use the AOF file for recovery on startup when both are enabled, as it is typically more complete.
Managing Redis with systemd
Redis on Ubuntu 26.04 runs as a systemd service, which provides convenient commands for managing the server lifecycle. Here are the essential service management commands:
- Check service status:
$ sudo systemctl status redis-server
- Stop Redis:
$ sudo systemctl stop redis-server
- Start Redis:
$ sudo systemctl start redis-server
- Restart Redis (apply configuration changes):
$ sudo systemctl restart redis-server
- Enable Redis to start on boot (enabled by default after installation):
$ sudo systemctl enable redis-server
- Disable Redis from starting on boot:
$ sudo systemctl disable redis-server
- View Redis logs: Use
journalctlto inspect Redis log output:$ sudo journalctl -u redis-server -f
The
-fflag follows the log in real time, which is useful for monitoring and troubleshooting.
[IMAGE PLACEHOLDER: Terminal showing systemctl commands for Redis service management]
Conclusion
You have successfully completed the Redis install on Ubuntu 26.04 Resolute Raccoon. Throughout this guide, you installed the Redis server from the Ubuntu repository, configured essential settings including bind address and memory limits, secured the installation with password authentication and firewall rules, tested the server with redis-cli, and enabled persistence to protect your data. Redis is now ready to serve as a high-performance cache, session store, or message broker for your applications.
Frequently Asked Questions
- What is the default port for Redis on Ubuntu 26.04? Redis listens on port
6379by default. You can change this by modifying theportdirective in/etc/redis/redis.confand restarting the service. - How do I check if Redis is running on Ubuntu 26.04? Run
sudo systemctl status redis-serverto see whether the service is active. Alternatively, executeredis-cli PINGand expect aPONGresponse to confirm the server is responsive. - Can I use Redis alongside MySQL or PostgreSQL? Yes. Redis is commonly used as a complementary caching layer in front of relational databases. Your application reads frequently accessed data from Redis (fast, in-memory) and falls back to the relational database for cache misses, significantly reducing database load.
- How do I completely uninstall Redis from Ubuntu 26.04? Run
sudo apt purge redis-server redis-toolsto remove the packages and their configuration files. Additionally, delete the data directory withsudo rm -rf /var/lib/redisif you want to remove all stored data. - Should I use RDB or AOF persistence? For most production environments, enabling both is recommended. RDB provides fast restarts with periodic snapshots, while AOF minimizes data loss by logging every write operation. When both are enabled, Redis uses the AOF file for recovery because it is typically more complete.