Xfce is a lightweight, fast, and visually appealing desktop environment that provides an excellent alternative to Ubuntu’s default GNOME desktop. This guide will show you how to install Xfce ubuntu 26.04, configure it for optimal performance, and switch between desktop environments. Whether you’re looking to reduce system resource usage or simply prefer Xfce’s traditional desktop layout, this tutorial covers everything you need to know.
- How to install the complete Xfce desktop environment on Ubuntu 26.04
- Methods to switch between GNOME and Xfce at the login screen
- Basic Xfce configuration and customization options
- How to set Xfce as your default desktop environment
- How to completely remove Xfce if needed

Software Requirements
| Category | Requirements, Conventions or Software Version Used |
|---|---|
| System | Ubuntu 26.04 Resolute Raccoon |
| Software | Xfce 4.18 or later (version available in Ubuntu 26.04 repositories) |
| Other | Privileged access to your Linux system as root or via the sudo command. |
| Conventions | # – requires given linux commands to be executed with root privileges either directly as a root user or by use of sudo command$ – requires given linux commands to be executed as a regular non-privileged user |
apt. After installation, log out and select Xfce from the login screen session menu.
| Step | Command/Action |
|---|---|
| 1. Update system packages | sudo apt update && sudo apt upgrade -y |
| 2. Install Xfce desktop | sudo apt install xfce4 xfce4-goodies -y |
| 3. Log out and select Xfce | Click username, select “Xfce Session” |
| 4. Verify installation | echo $XDG_CURRENT_DESKTOP |
Installing Xfce Desktop Environment
There are two primary methods to install Xfce ubuntu 26.04: using the standard APT package manager or the tasksel utility. Both methods are reliable and produce the same result, with tasksel providing a slightly more streamlined approach for those familiar with Ubuntu’s task-based installation system.
Method 1: Installation Using APT
The APT method gives you precise control over which Xfce packages to install. This approach is recommended for most users as it allows you to choose between a minimal Xfce installation or the complete desktop environment with additional utilities.
- Update the package repository cache: Before installing any new software, ensure your system has the latest package information. This step prevents version conflicts and ensures you get the most recent stable packages.
$ sudo apt update
This command refreshes the local package index with the latest changes from Ubuntu’s repositories. Additionally, you should upgrade existing packages to maintain system stability:
$ sudo apt upgrade -y
- Install the Xfce desktop environment: The
xfce4package provides the core desktop environment, whilexfce4-goodiesincludes additional plugins and utilities that enhance functionality.$ sudo apt install xfce4 xfce4-goodies -y
This installation includes the Xfwm window manager, Thunar file manager, Xfce panel, terminal emulator, and various desktop utilities. The
xfce4-goodiespackage adds useful plugins like the system monitor, weather plugin, and clipboard manager. The installation process typically takes 3-5 minutes depending on your internet connection speed.
PACKAGE SIZE
The complete Xfce installation requires approximately 250-300 MB of disk space, making it significantly lighter than GNOME which requires around 600-700 MB. - Verify the installation: Confirm that Xfce packages were installed successfully by checking the installed package version.
$ dpkg -l | grep xfce4
This command lists all installed packages containing “xfce4” in their name. You should see multiple packages including
xfce4-panel,xfce4-session, and others, confirming a successful installation.
[IMAGE PLACEHOLDER: Terminal screenshot showing the successful installation output of xfce4 and xfce4-goodies packages with installation progress]
Method 2: Installation Using Tasksel
Tasksel simplifies the installation process by bundling related packages into a single task. This method is particularly useful if you’re setting up multiple Ubuntu systems or prefer a more automated installation approach.
- Install tasksel if not already present: Tasksel may not be installed by default on Ubuntu 26.04 desktop installations.
$ sudo apt install tasksel -y
Tasksel is a Debian/Ubuntu tool that installs groups of packages in a single operation, making it ideal for installing complete desktop environments.
- Launch tasksel and select Xfce: Run tasksel with elevated privileges to access the interactive package selection interface.
$ sudo tasksel
In the tasksel interface, use the arrow keys to navigate to “Xubuntu desktop” (which installs Xfce), press the spacebar to select it, then press Tab to highlight “OK” and press Enter to begin installation. The tasksel method installs the same Xfce packages as the APT method but handles dependencies automatically.
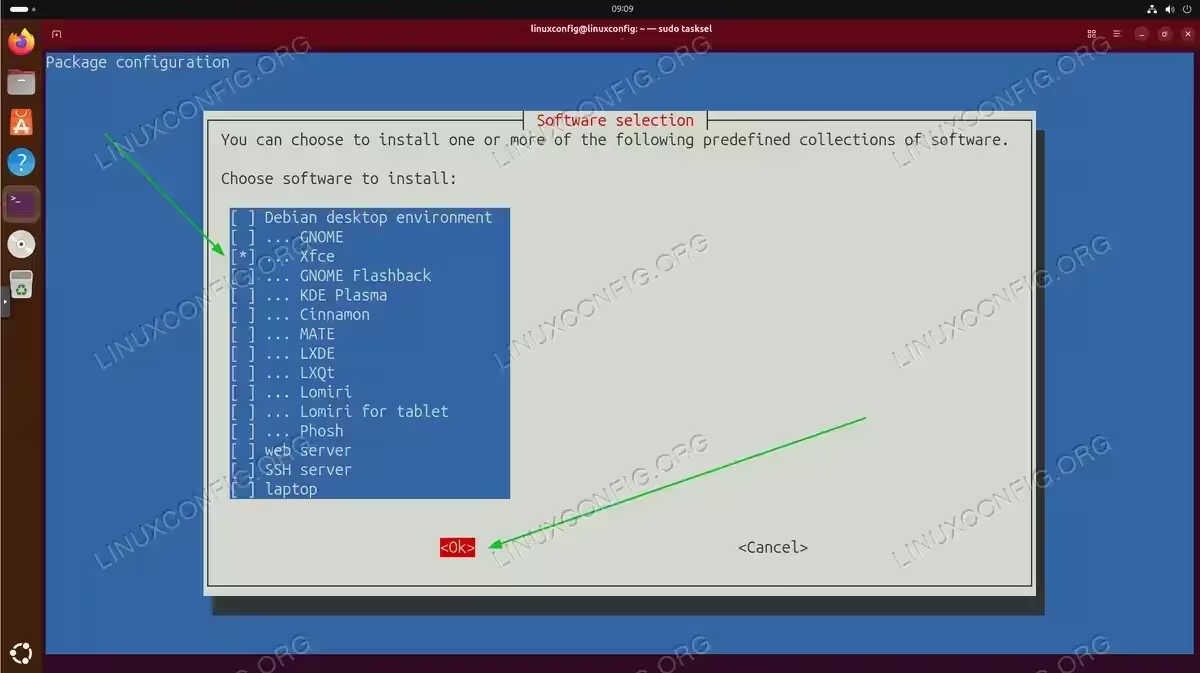
Tasksel interface with Xfce selected for installation. Use arrow keys to navigate, spacebar to select, and Tab to reach the OK button.
Switching Between Desktop Environments
After you install Xfce ubuntu 26.04, you can easily switch between desktop environments without uninstalling either one. Ubuntu’s display manager (GDM3 for GNOME or LightDM for Xfce) provides a session selector at the login screen.
- Log out of your current session: Save all your work and close running applications, then log out from your current desktop environment.
$ gnome-session-quit --no-prompt
This command logs you out of GNOME immediately without displaying a confirmation dialog. Alternatively, you can use the system menu to log out normally.
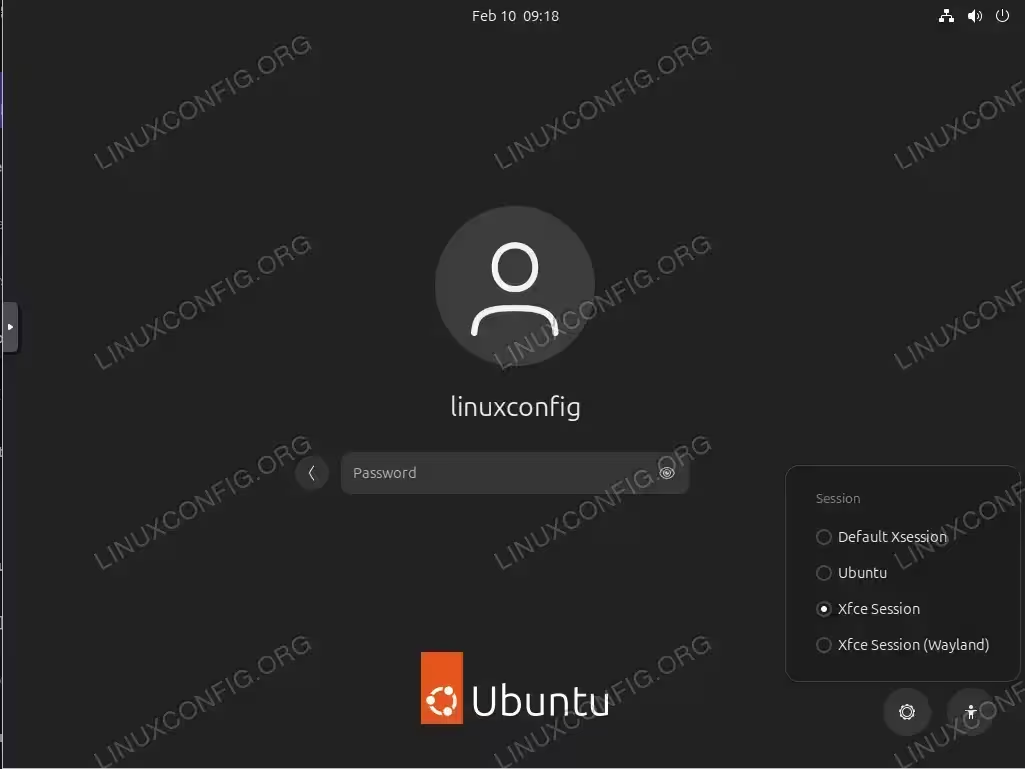
- Select Xfce session at login: At the login screen, click on your username. Before entering your password, look for a gear icon or session selector (typically located in the bottom-right corner of the screen). Click this icon to reveal available desktop sessions.Select “Xfce Session” from the dropdown menu, then enter your password and log in. The system will remember your selection for future logins unless you change it again.
SESSION PERSISTENCE
Your desktop session choice is stored in~/.dmrcor handled by AccountsService in/var/lib/AccountsService/users/, ensuring your preference persists across reboots. - Verify you’re running Xfce: Once logged in, confirm that Xfce is the active desktop environment.
$ echo $XDG_CURRENT_DESKTOP
This should output
XFCE, confirming you’re running the Xfce desktop environment.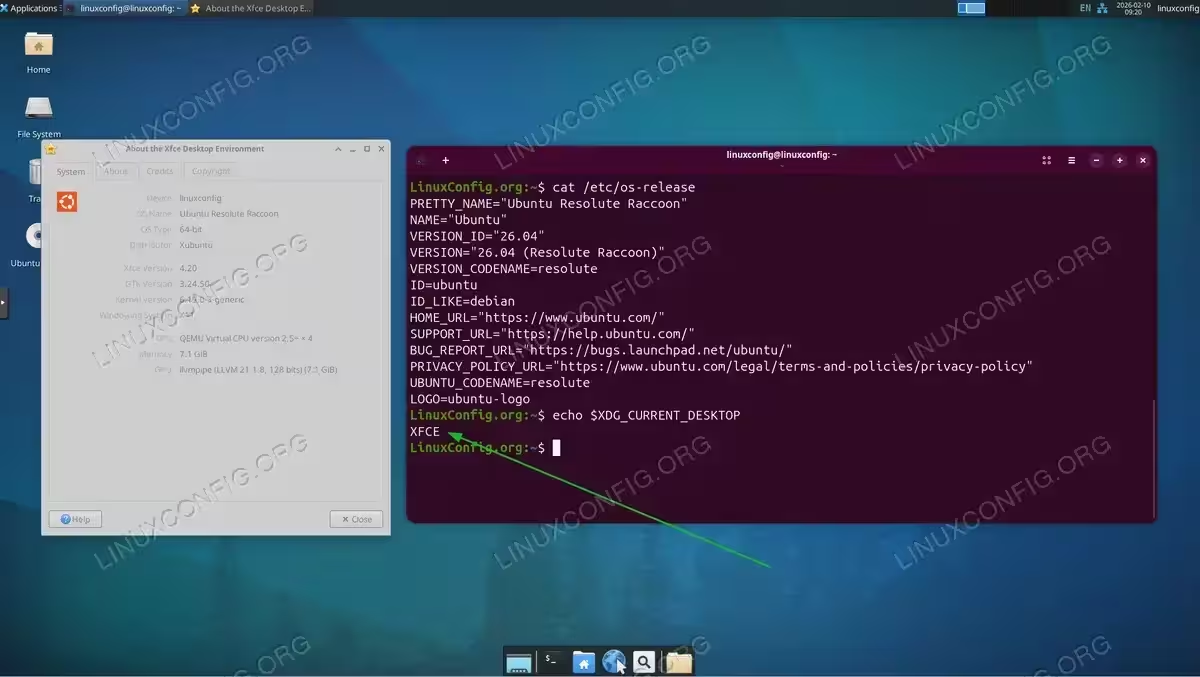
Xfce desktop successfully installed on Ubuntu 26.04. The terminal confirms XFCE as the active desktop environment. You can also check the active window manager:
$ wmctrl -m
Configuring Xfce Settings
Xfce provides extensive customization options through its Settings Manager. After you install Xfce ubuntu 26.04, you’ll want to adjust various settings to personalize your desktop experience.
Accessing the Settings Manager
The Xfce Settings Manager centralizes all configuration options in one interface. You can access it through the application menu or via command line:
$ xfce4-settings-manager
This opens a window with icons for different configuration categories including Appearance, Desktop, Display, Keyboard, Mouse, Panel, Power Manager, and Window Manager. Each category provides detailed options for customizing that aspect of your desktop.
Common Configuration Tasks
- Customizing the panel: Right-click on the panel and select “Panel” → “Panel Preferences” to modify panel position, size, and behavior. You can add or remove panel items, create multiple panels, and adjust auto-hide settings.The Xfce panel is highly configurable compared to other desktop environments. You can position launchers, system tray icons, workspace switchers, and various plugins according to your workflow preferences.
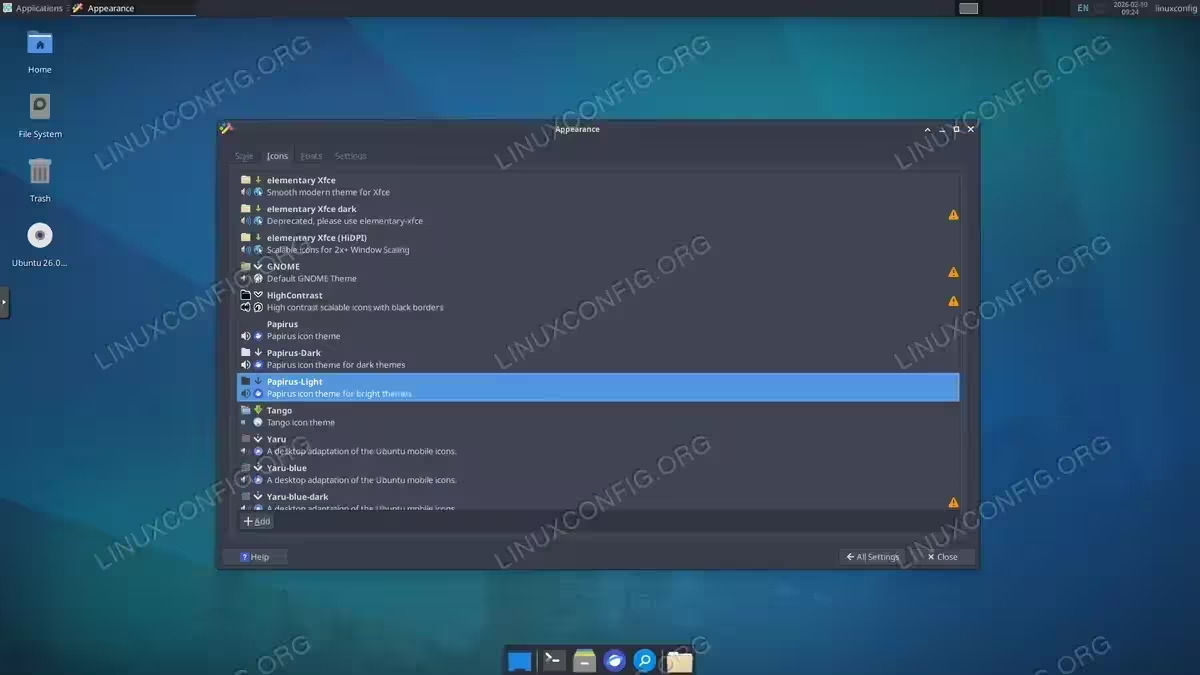
- Changing themes and appearance: Navigate to Settings Manager → Appearance to select themes for window decorations, controls, and icons. Xfce includes several built-in themes, and you can install additional themes from xfce-look.org.
$ sudo apt install arc-theme papirus-icon-theme -y
This installs popular Arc theme and Papirus icons, which provide a modern, clean aesthetic that works well with Xfce.
- Configuring keyboard shortcuts: Access Settings Manager → Keyboard → Application Shortcuts to define custom keyboard shortcuts for frequently used applications and actions.Xfce allows you to create shortcuts for launching applications, controlling window behavior, and executing custom commands. This feature significantly improves productivity for power users who prefer keyboard-driven workflows.
Setting Xfce as Default Desktop
If you want Xfce to be your permanent default desktop environment after you install Xfce ubuntu 26.04, you can configure this preference system-wide or per-user. This ensures Xfce loads automatically without requiring manual selection at each login.
- Set default for current user: The easiest method is to select Xfce at the login screen as described earlier. The display manager remembers your choice automatically. However, if you want to explicitly set it, you can modify your user account settings.For systems using AccountsService, your session preference is stored in
/var/lib/AccountsService/users/your-username. You can verify the current setting:$ cat /var/lib/AccountsService/users/$USER | grep Session
- Configure system-wide default: To set Xfce as the default for all new users, modify the display manager configuration. For LightDM (commonly used with Xfce):
$ sudo nano /etc/lightdm/lightdm.conf
Add or modify this line under the
[Seat:*]section:user-session=xfce
Save the file and exit. This configuration ensures that any new user account defaults to Xfce unless they manually change it.
Removing Xfce (Optional)
If you later decide to remove Xfce from your Ubuntu 26.04 system, you can uninstall it cleanly without affecting your primary desktop environment. Before removing Xfce, ensure you’re logged into a different desktop environment such as GNOME.
- Remove Xfce packages: Use apt to remove the Xfce desktop environment and its associated packages.
$ sudo apt remove xfce4 xfce4-goodies -y
This removes the Xfce packages but preserves configuration files in case you want to reinstall later.
- Remove configuration files and dependencies: For a complete removal including configuration files and unused dependencies:
$ sudo apt purge xfce4 xfce4-goodies -y
Then clean up orphaned dependencies:
$ sudo apt autoremove -y
This removes any packages that were installed as dependencies for Xfce but are no longer needed by any installed software.
CONFIGURATION BACKUP
User-specific Xfce configuration files in~/.config/xfce4/are not removed by these commands. Delete this directory manually if you want a complete cleanup.
Conclusion
Installing Xfce on Ubuntu 26.04 provides a lightweight, efficient alternative to the default GNOME desktop environment. This tutorial covered how to install Xfce ubuntu 26.04 using both APT and tasksel methods, switch between desktop environments, configure essential settings, and optionally remove Xfce if needed. Xfce’s low resource requirements make it ideal for older hardware, virtual machines, or users who prefer a traditional desktop layout with extensive customization options.
The ability to run multiple desktop environments simultaneously gives you flexibility to choose the best interface for different tasks. While GNOME offers modern design and touch-friendly features, Xfce excels in performance and customizability. You can explore additional desktop environments like GNOME Tweaks for enhanced GNOME customization, or experiment with GNOME extensions to extend functionality. The choice of desktop environment ultimately depends on your specific requirements, hardware capabilities, and personal workflow preferences.
Frequently Asked Questions
- How much RAM does Xfce use compared to GNOME on Ubuntu 26.04? Xfce typically uses 400-600 MB of RAM on a fresh boot, while GNOME consumes 800-1200 MB under similar conditions. This makes Xfce an excellent choice for systems with 4 GB of RAM or less, where GNOME might cause performance issues. The exact memory usage depends on running applications and configured startup programs, but Xfce consistently maintains a smaller memory footprint throughout a typical work session.
- Can I use GNOME applications in Xfce after installation? Yes, you can run GNOME applications in Xfce without any issues. Applications like GNOME Files (Nautilus), GNOME Text Editor, and other GTK-based programs work perfectly in Xfce. However, running GNOME applications will load some GNOME libraries into memory, slightly reducing Xfce’s memory advantage. Most applications are desktop-environment agnostic and function identically regardless of whether you’re using Xfce or GNOME.
- Will installing Xfce affect my existing GNOME configuration and files? No, installing Xfce on Ubuntu 26.04 does not modify or interfere with your GNOME configuration. Each desktop environment maintains separate configuration directories (
~/.config/xfce4/for Xfce and~/.config/gnome/for GNOME). Your personal files, application settings, and GNOME preferences remain completely intact. You can switch between desktop environments freely without losing any customizations in either environment. - How do I completely switch from GDM to LightDM after installing Xfce? While not required, you can replace GDM (GNOME Display Manager) with LightDM for a lighter-weight login experience. Install LightDM with
sudo apt install lightdm. During installation, you’ll be prompted to choose your default display manager. Select LightDM and press Enter. To change it later, runsudo dpkg-reconfigure lightdm. LightDM uses less memory than GDM and provides a simpler login interface that matches Xfce’s minimalist philosophy. - Does Xfce support HiDPI displays on Ubuntu 26.04? Yes, Xfce 4.18 (available in Ubuntu 26.04) includes improved HiDPI support. You can enable scaling in Settings Manager → Appearance → Settings → Window Scaling or adjust DPI settings in Settings Manager → Appearance → Fonts → DPI. For fractional scaling, you might need to adjust individual application settings. While Xfce’s HiDPI support has improved significantly, GNOME still offers more sophisticated fractional scaling options for 4K and higher resolution displays.