Multipass is a lightweight virtual machine manager developed by Canonical for Ubuntu and other operating systems. This tool makes it easy to launch and manage Ubuntu instances on your Ubuntu 26.04 system, providing an efficient way to test applications, create development environments, or run isolated workloads. In this guide, you’ll learn how to use multipass ubuntu 26.04 for common tasks including launching instances, managing virtual machines, and executing commands inside instances.
Table of Contents
In this tutorial you will learn:
- How to install and configure Multipass on Ubuntu 26.04
- How to launch and manage Ubuntu instances
- How to execute commands inside virtual machines
- How to transfer files between host and instances
- How to configure networking for instances
Software Requirements
| Category | Requirements, Conventions or Software Version Used |
|---|---|
| System | Ubuntu 26.04 Resolute Raccoon |
| Software | Multipass 1.14.0 or newer |
| Other | Privileged access to your Linux system as root or via the sudo command. |
| Conventions | # – requires given linux commands to be executed with root privileges either directly as a root user or by use of sudo command$ – requires given linux commands to be executed as a regular non-privileged user |
sudo snap install multipass, launch an instance with multipass launch --name linuxconfig, and access it using multipass shell linuxconfig.
| Step | Command/Action |
|---|---|
| 1. Install Multipass | sudo snap install multipass |
| 2. Launch instance | multipass launch --name linuxconfig |
| 3. Access instance | multipass shell linuxconfig |
| 4. List instances | multipass list |
Installing Multipass
Multipass is available as a snap package on Ubuntu 26.04, which ensures you get the latest stable version with automatic updates. The installation process is straightforward and requires only a single command.
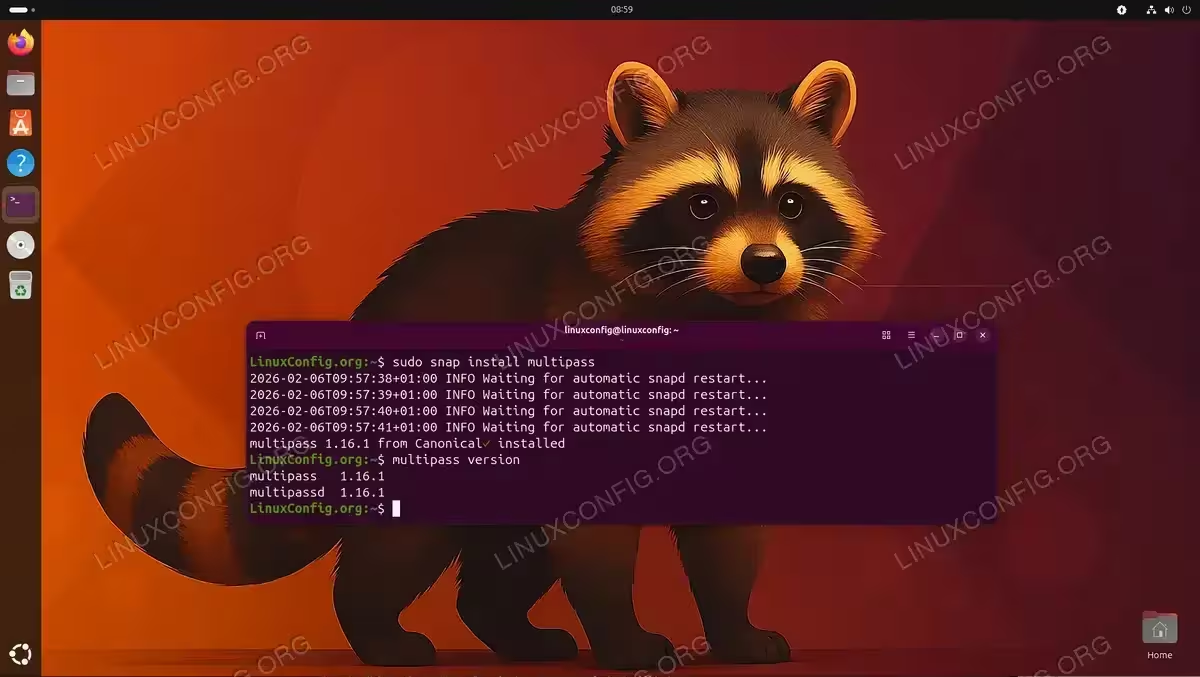
- Install Multipass using snap: Execute the following command to install Multipass on your Ubuntu 26.04 system
$ sudo snap install multipass
The snap package manager will download and install Multipass along with all required dependencies. This process typically takes 1-2 minutes depending on your internet connection.
- Verify installation: Check that Multipass is correctly installed by viewing its version
$ multipass version
The output will display the installed Multipass version, confirming successful installation. You should see version information for both the multipass client and multipassd daemon.
INSTALLATION COMPLETE
Multipass is now installed and ready to use on your Ubuntu 26.04 system.
Launching Instances
Creating new virtual machine instances with Multipass is the core functionality you’ll use most frequently. Multipass provides flexible options for customizing your instances during launch.
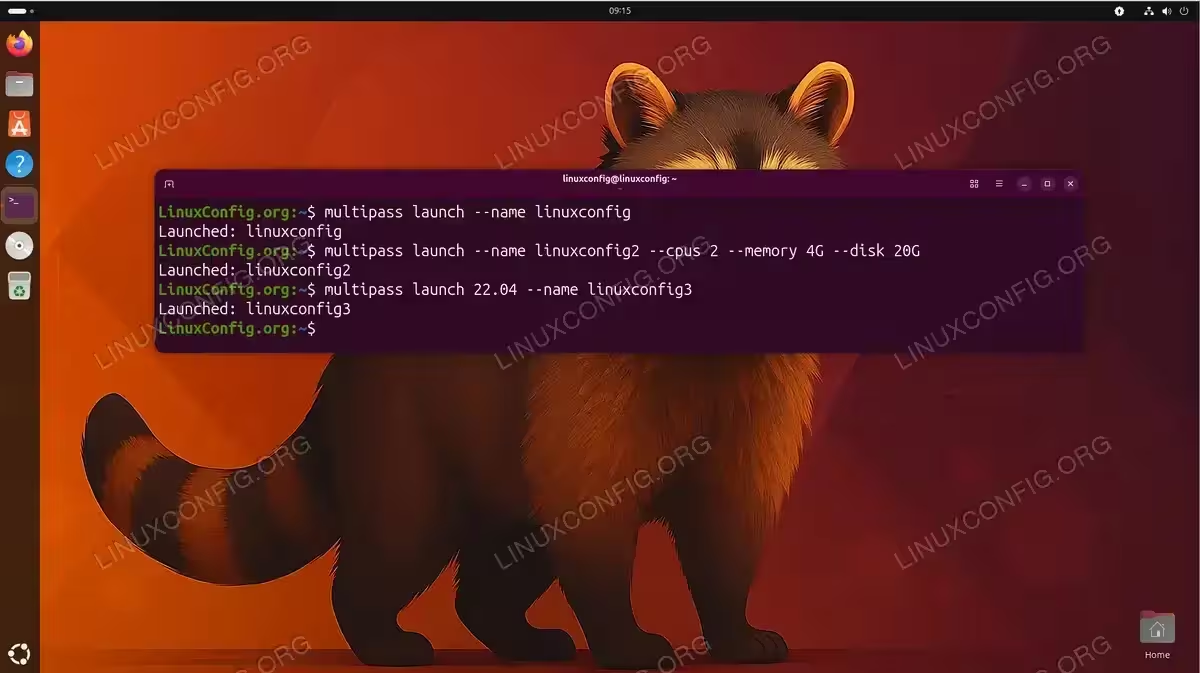
- Launch a default instance: Create a basic Ubuntu instance with default specifications
$ multipass launch --name linuxconfig
This command creates a new virtual machine named “linuxconfig” using the latest Ubuntu LTS release with default resource allocation (1 CPU, 1GB RAM, 5GB disk space). The launch process downloads the Ubuntu image if not already cached and initializes the instance.
- Launch with custom resources: Specify CPU, memory, and disk space for your instance
$ multipass launch --name linuxconfig2 --cpus 2 --memory 4G --disk 20G
This creates an instance with 2 CPU cores, 4GB RAM, and 20GB disk space. Adjust these values based on your workload requirements and available system resources.
- Launch specific Ubuntu version: Create an instance with a particular Ubuntu release
$ multipass launch 22.04 --name linuxconfig3
You can specify different Ubuntu versions by using their release number. To see available images, use
multipass find. - View available images: List all downloadable Ubuntu images
$ multipass find
This command displays available Ubuntu releases and other supported images that you can launch with multipass ubuntu 26.04.
RESOURCE ALLOCATION
When allocating resources, ensure your host system has sufficient available RAM and CPU cores to prevent performance degradation. Multipass instances share resources with your host system.
Managing Instances
Multipass provides comprehensive commands for managing the lifecycle of your virtual machine instances. Understanding these management operations is essential for effective use of multipass ubuntu 26.04.
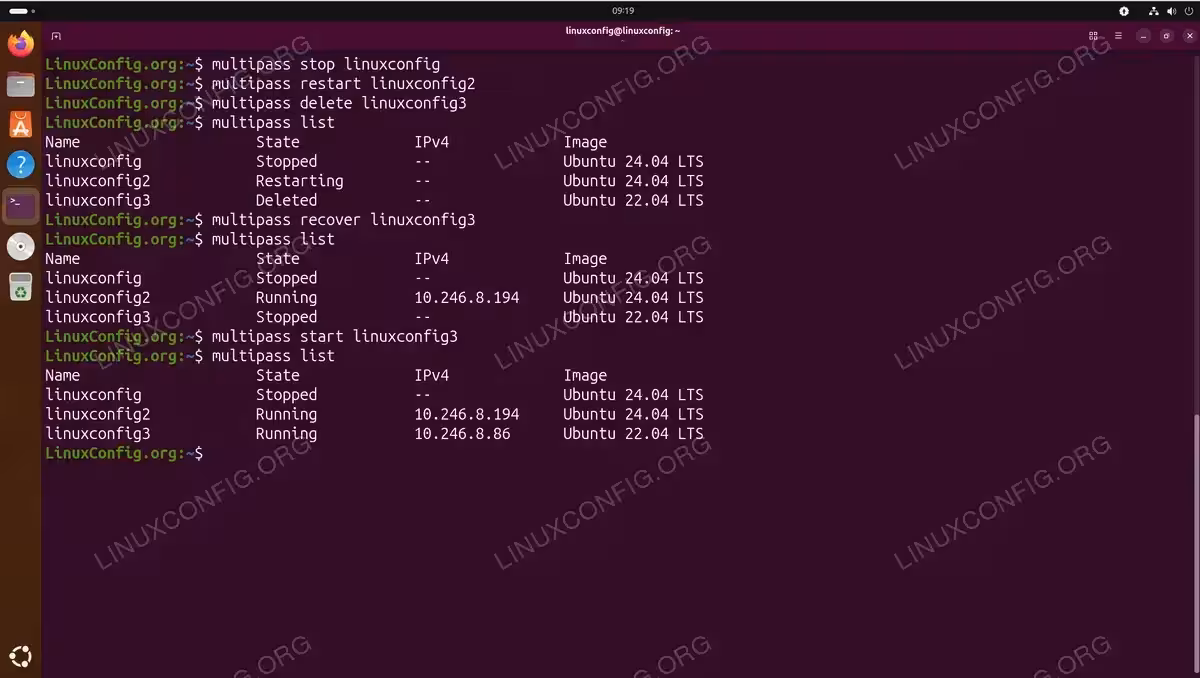
- List all instances: Display information about all Multipass instances
$ multipass list
The output shows instance names, states (Running, Stopped, Deleted), IPv4 addresses, and release information. This is your primary command for checking instance status.
- View instance details: Get comprehensive information about a specific instance
$ multipass info linuxconfig
This command provides detailed information including CPU count, memory allocation, disk usage, mount points, and network configuration for the specified instance.
- Start a stopped instance: Boot an instance that was previously stopped
$ multipass start linuxconfig
Starting an instance restores it to running state, allowing you to connect and use it again. This is faster than launching a new instance.
- Stop a running instance: Shut down an instance gracefully
$ multipass stop linuxconfig
Stopping an instance frees up system resources while preserving the instance state and data. The instance remains available for future use.
- Restart an instance: Reboot an instance
$ multipass restart linuxconfig
This performs a graceful restart of the instance, which is useful after configuration changes or software updates.
- Delete an instance: Remove an instance (moves to trash)
$ multipass delete linuxconfig
Deleted instances move to a trash state where they can be recovered. The instance no longer consumes resources but disk space is not immediately freed.
- Permanently remove instances: Purge deleted instances from trash
$ multipass purge
This command permanently deletes all instances in trash state and frees up their disk space. This action cannot be undone.
- Recover deleted instance: Restore an instance from trash
$ multipass recover linuxconfig
If you deleted an instance by mistake, use this command before running purge to restore it to stopped state.
MULTIPASS VS DOCKER
Multipass may feel similar to Docker with commands like multipass launch (docker run) and multipass exec (docker exec), but they serve different purposes. Docker containers share the host kernel and provide process isolation, while Multipass creates full virtual machines with their own kernels using QEMU/KVM. This means Multipass instances are heavier (GB vs MB) but provide true OS isolation, allowing you to run different kernel versions and access full systemd functionality. Use Docker for lightweight application containers, and Multipass when you need complete Ubuntu systems for testing OS-level features, kernel modules, or scenarios requiring true hardware virtualization.
Executing Commands
Multipass provides multiple methods for executing commands inside your virtual machine instances, making it easy to interact with your Ubuntu instances directly from your host system.
- Interactive shell access: Open an interactive shell inside an instance
$ multipass shell linuxconfig
This command provides direct terminal access to your instance, allowing you to work as if you were logged in locally. You’ll see the instance’s command prompt and can execute any commands as the default ubuntu user.
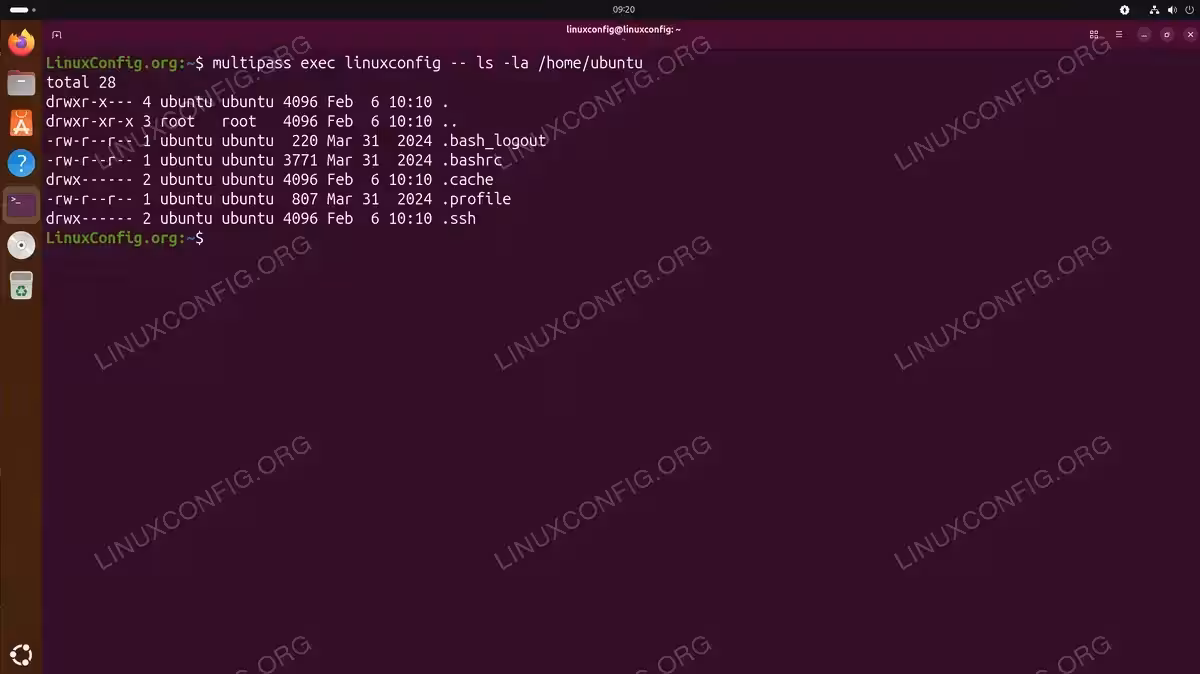
- Execute single command: Run a command without entering interactive mode
$ multipass exec linuxconfig -- ls -la /home/ubuntu
This executes a single command inside the instance and returns the output to your host terminal. The double dash (–) separates Multipass options from the command to execute. This method is particularly useful for scripting and automation.
- Run commands with sudo: Execute commands with elevated privileges
$ multipass exec linuxconfig -- sudo apt update
The default ubuntu user has passwordless sudo access, making it convenient to run administrative commands. This is essential for system updates and software installation.
- Execute multi-line commands: Run complex commands or scripts
$ multipass exec linuxconfig -- bash -c 'echo "Hello from $(hostname)" && uptime'
Using bash -c allows you to execute multiple commands or complex shell syntax. The commands are executed in a single shell session inside the instance.
COMMAND EXECUTION
When using multipass exec, remember that the command runs in a non-interactive shell. For commands requiring user interaction, use multipass shell instead.
File Transfer
Multipass provides efficient methods for transferring files between your host system and virtual machine instances, which is crucial for development workflows and data management.
- Copy files to instance: Transfer files from host to instance
$ multipass transfer /path/on/host/file.txt linuxconfig:/home/ubuntu/
This command copies a file from your host system to the specified path inside the instance. The transfer method is efficient and works with both files and directories.
- Copy files from instance: Transfer files from instance to host
$ multipass transfer linuxconfig:/home/ubuntu/result.txt /path/on/host/
Retrieve files from your instance to your host system using the same transfer command with reversed source and destination paths.
- Transfer directories recursively: Copy entire directories with their contents
$ multipass transfer -r /path/to/directory linuxconfig:/home/ubuntu/
The -r flag enables recursive copying, transferring directories and all their contents. This is useful for transferring project directories or multiple files at once.
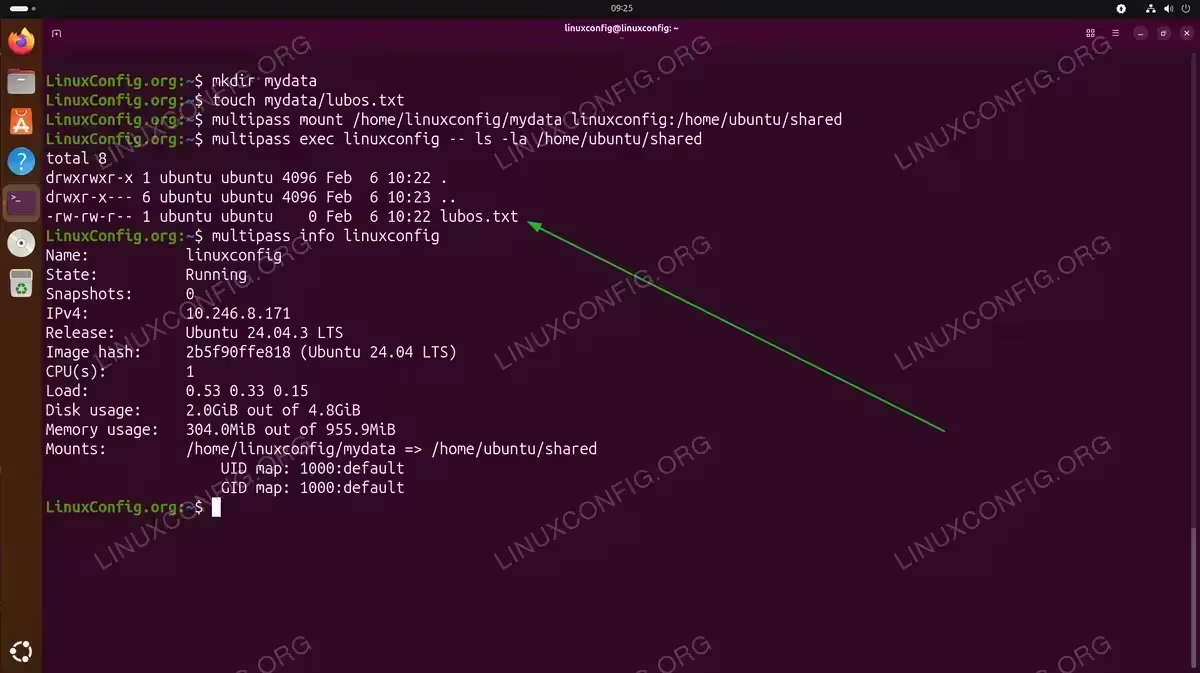
- Mount host directory: Create persistent mount from host to instance
$ multipass mount /path/on/host linuxconfig:/home/ubuntu/shared
Mounting creates a live connection between a host directory and an instance path. Changes made on either side are immediately visible on the other. This is ideal for development workflows where you edit files on the host but run them in the instance.
- Unmount directory: Remove a mounted directory
$ multipass unmount linuxconfig:/home/ubuntu/shared
When you no longer need the mount, unmount it to clean up the connection. The files remain on both sides, but the live synchronization stops.
- List mounts: View all active mounts for an instance
$ multipass info linuxconfig
The info command displays active mounts in the instance details, showing both source and target paths.
MOUNT PERFORMANCE
Mounts use SSHFS under the hood, which provides good performance for most use cases. For very large files or intensive I/O operations, consider using the transfer command instead.
Networking and Connectivity
Understanding networking in Multipass is essential for accessing services running in your instances and for instance-to-instance communication. Multipass instances are automatically configured with network connectivity.
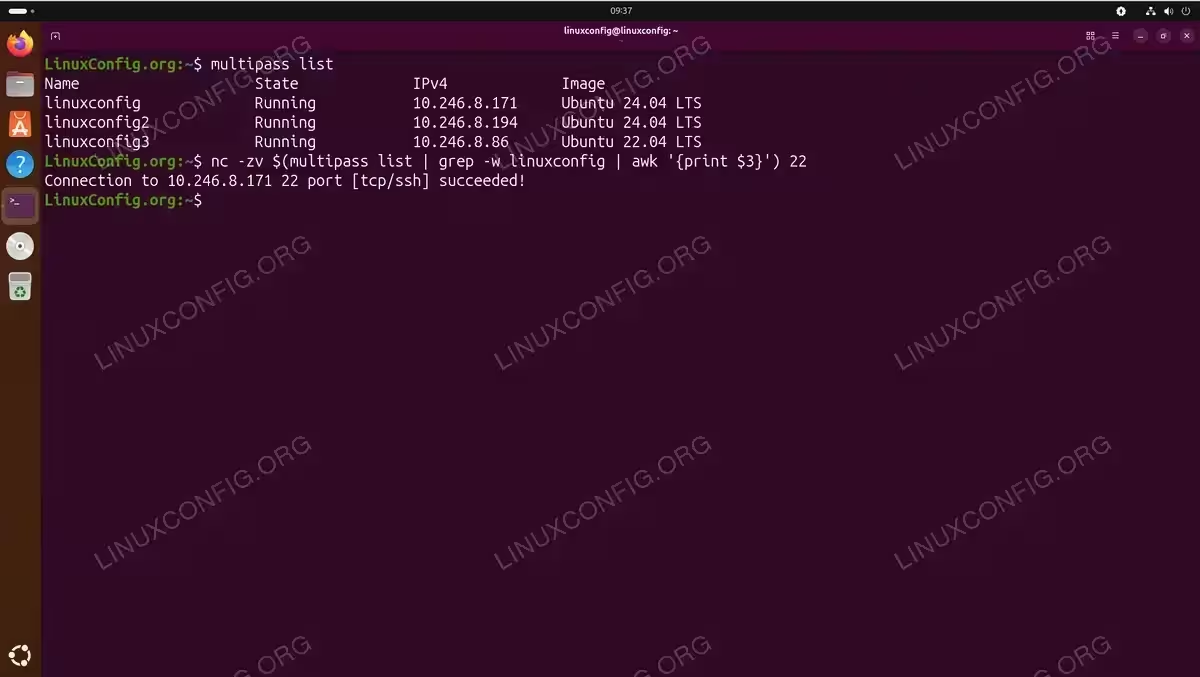
- View instance IP address: Check the assigned IP address for an instance
$ multipass list
The list command displays IPv4 addresses for all running instances. Each instance receives an IP address from Multipass’s private network range, typically in the 10.x.x.x range.
- Test connectivity to instance: Verify network access to your instance
$ nc -zv $(multipass list | grep -w linuxconfig | awk '{print $3}') 22This command tests TCP connectivity to the SSH port (22) on the instance. A successful connection confirms network access between host and instance. The output will show “Connection succeeded!” if the instance is reachable.
- Access instance services: Connect to services running inside instances
$ curl http://$(multipass list | grep -w linuxconfig | awk '{print $3}'):8080Services running inside instances are accessible from the host using the instance’s IP address. For example, if you run a web server on port 8080 inside the instance, you can access it from your host browser or command line.
- SSH directly to instance: Use SSH for manual connections
$ ssh ubuntu@$(multipass list | grep -w linuxconfig | awk '{print $3}')Multipass automatically configures SSH keys, allowing direct SSH access to instances using the default ubuntu user. This is useful for tools and scripts that require SSH connections. Note that Multipass manages authentication automatically, so no password is required.
NETWORK ISOLATION
Multipass instances are on a private network by default, meaning they can communicate with the host and each other, but are not directly accessible from other machines on your network. Note that ICMP ping may be blocked by Multipass’s iptables rules, but TCP connectivity (SSH, HTTP, etc.) works normally. For external access, you’ll need to configure port forwarding or bridging.
For more advanced virtualization needs, you might want to install KVM on your Ubuntu 26.04 system. While Multipass is excellent for quick Ubuntu instances, KVM provides more control over virtualization and supports a wider range of operating systems.
Conclusion
Multipass provides an efficient and streamlined way to manage Ubuntu virtual machines on Ubuntu 26.04. Throughout this guide, you’ve learned how to install Multipass, launch and manage instances with custom resources, execute commands inside virtual machines, transfer files between host and instances, and understand networking basics. These skills enable you to quickly create isolated development environments, test applications, and run workloads without affecting your host system.
The power of multipass ubuntu 26.04 lies in its simplicity and speed compared to traditional virtualization solutions. Whether you’re testing software, developing applications, or learning new technologies, Multipass gives you lightweight Ubuntu instances in seconds. For comprehensive details about advanced features and configuration options, consult the official Multipass documentation.
Frequently Asked Questions
- What virtualization backend does Multipass use on Ubuntu 26.04? On Ubuntu 26.04, Multipass uses QEMU with KVM acceleration by default when KVM is available. This provides near-native performance for your virtual machine instances. If KVM is not available or not enabled in your BIOS, Multipass falls back to QEMU without acceleration, which has reduced performance. You can check your current driver with
multipass get local.driver. - Why doesn’t ping work to Multipass instances? Multipass’s default iptables rules on the bridge network (mpqemubr0) block ICMP traffic for security reasons. While ICMP ping may not work, all TCP-based connectivity functions normally including SSH, HTTP, and other services. You can test connectivity using
nc -zv $(multipass list | grep -w linuxconfig | awk '{print $3}') 22to verify the instance is reachable via TCP. - How much disk space do Multipass instances consume? The default instance uses approximately 5GB of disk space, but only the space actually used inside the instance counts against your host storage. Images are stored in /var/snap/multipass/common/cache/vault/instances/ and use QCOW2 format, which grows dynamically as you add data to the instance. You can specify custom disk sizes at launch time using the –disk parameter.
- Can I run Docker inside Multipass instances? Yes, you can install and run Docker inside Multipass instances just like on a regular Ubuntu system. Install Docker using
multipass exec linuxconfig -- sudo apt install docker.ioand it will work normally. This is useful for testing containerized applications in isolated environments without affecting your host system’s Docker installation. - How do I increase resources for an existing instance? Unfortunately, Multipass does not support resizing existing instances. To change CPU, memory, or disk allocations, you need to launch a new instance with the desired specifications, transfer your data using
multipass transfer, and then delete the old instance. Plan your resource allocation carefully when launching instances. - Can Multipass instances survive system reboots? Yes, stopped instances remain configured and can be started after system reboots using
multipass start. However, instances that were running when the system shut down do not automatically restart. You need to manually start them after boot. Instance data persists across reboots, so your work is never lost.