In this tutorial, we will show you how to install Rayhunter on a Verizon Orbic Speed RC400L mobile hotspot using Kali GNU/Linux on a x86_64 architecture computer. This article will also detail accessing the Rayhunter web interface, maintaining your Rayhunter, and [optionally] reporting Cell Site Simulator (also known as IMSI-catcher or “Stingray”) detection data to the Electronic Frontier Foundation (EFF) for further analyzation. Rayhunter setup is cheap (~$20) and user-friendly – a project for technical and less-technical users alike!
NOTE
Although not covered in this tutorial, Rayhunter is also able to be installed using Operating Systems other than GNU/Linux such as MacOS and Windows, and computer architectures other than x86_64, such as ARM64, and ARMv7/v8 32-bit.
In this tutorial you will learn:
- How to install Rayhunter on a Verizon Orbic Speed RC400L mobile hotspot [with a SIM card inserted] using a Debian/Ubuntu machine
- How to access the Rayhunter Graphical User Interface (GUI) and Command Line Interface (CLI)
- How to report potential Stingray detection data to the EFF
- How to maintain, update, and uninstall Rayhunter
- What additional resources are available for continued education, community involvement, and technical support

| Category | Requirements, Conventions or Software Version Used |
|---|---|
| System | Kali GNU/Linux, Ubuntu, or any other x86_64 distribution |
| Software | Rayhunter (latest release/version) and Android Debug Bridge (ADB) |
| Hardware | Verizon Orbic Speed RC400L mobile hotspot. SIM card (required). NOTE: SIM card does not need to be activated nor Verizon brand for Rayhunter to function. |
| Other | Internet access to download the most recent Rayhunter release Privileged access to your Debian/Ubuntu machine as root or the sudo command. |
| Conventions | # – requires given GNU/Linux commands to be executed with root privileges either directly as a root user or by use of the sudo command $ – requires given GNU/Linux commands to be executed as a regular non-privileged user |
Understanding Rayhunter and Cell Site Simulators
Rayhunter is a Free/Libre GPLv3-licensed project developed by the Electronic Frontier Foundation (EFF) that transforms compatible mobile hotspots into devices used to detect Cell Site Simulators (CSSs). CSSs, also known as IMSI-catchers, or “Stingrays”, are portable surveillance machines often used by law enforcement and other entities (see Slide 8 of this presentation for more information) to mimic nearby cellular towers in order to intercept mobile device location, communications, etc. without citizen/user consent. Rayhunter scans for potential Stingray activity by analyzing the network traffic between the mobile hotspot that Rayhunter and the cellular tower that Rayhunter is connected to at that time. By using tools like Rayhunter, common citizens regardless of technical ability can help to identify and document the use of invasive surveillance technologies in their community, at protests, border crossings, and other sensitive areas. Rayhunter data, if reported to the EFF (and other civil liberty organizations) contributes valuable insight to help preserve digital freedom, privacy, and security around the world. You can learn more about CSSs here.
The Verizon Orbic Speed RC400L is the first-ever device to be officially supported to run Rayhunter, and therefore has the strongest documentation and community support at the time of this tutorial. Please note that this device is designed to work in North and South America and may not use the proper frequency for countries outside of this area. If you live outside of North and South America, you may consider the TP-Link M7350, which is widely used to strongly supported to run Rayhunter in Africa, Europe, and the Middle East. You can also run Rayhunter on other supported devices.
LEGAL DISCLAIMER
Use this program at your own risk. We believe running this program does not currently violate any laws or regulations in the United States. However, we are not responsible for civil or criminal liability resulting from the use of this software. If you are located outside of the US please consult with an attorney in your country to help you assess the legal risks of running this program.
Install Rayhunter
In this tutorial, we will be installing the most recent release/version (as of March 18th 2026) of Rayhunter to a Verizon Orbic Speed RC400L mobile hotspot using Kali GNU/Linux on a x86_64 architecture computer.
IMPORTANT
Your device must have a SIM card inserted before installing Rayhunter – the SIM card provides essential cellular network information that Rayhunter uses for detection algorithms.
The SIM card does not need to be activated nor Verizon brand for Rayhunter to function, although, the effectiveness of Rayhunter with an inactive SIM card versus active SIM card is still under investigation – more information here. If you can afford to activate your SIM card, please do so as this will help the community better understand the effectiveness of an activated versus inactivated SIM card. You can find more information on how to activate your SIM card in the Frequently Asked Questions (FAQ) located at the bottom of this tutorial.
Preparation Steps
- Insert your SIM Card into the Orbic: With the device unplugged and powered off, remove the plastic back cover, remove the battery pack, lift the SIM tray, place your SIM card, close the SIM tray, replace the battery pack, and replace the plastic back cover. You can find supplemental instructions on Page 11 of the Orbic Speed RC400L User Manual.
- Prepare your Debian/Ubuntu machine: The following command updates package lists, installs available upgrades, removes unnecessary packages, and cleans the package cache to free up disk space on your Debian/Ubuntu machine.
# apt update && apt upgrade && apt autoremove && apt autoclean && apt clean
Download and Verify Rayhunter
- Download the latest release of Rayhunter: First, navigate to the Downloads directory on your Debian/Ubuntu machine. Next, navigate to the official Rayhunter releases page and download both the latest release of Rayhunter and corresponding SHA256 hash file.
$ cd ~/Downloads
$ wget https://github.com/EFForg/rayhunter/releases/download/v0.10.2/rayhunter-v0.10.2-linux-x64.zip
$ wget https://github.com/EFForg/rayhunter/releases/download/v0.10.2/rayhunter-v0.10.2-linux-x64.zip.sha256
NOTE: Always download from the official GitHub repository to ensure you receive authentic, unmodified software.
- Verify File Integrity: Use the
sha256sumcommand to check the file integrity of the zip file.$ sha256sum -c rayhunter-v0.10.2-linux-x64.zip.sha256
- Extract Installation Files: Unzip the Rayhunter package and navigate to the installation directory
$ unzip rayhunter-v0.10.2-linux-x64.zip
$ cd rayhunter-v0.10.2-linux-x64
The extracted directory contains the installer script and necessary components for initial setup.
Install Rayhunter on the Orbic
Rayhunter can be installed using a Wifi/wireless connection or USB/wired connection. Installing via Wifi connection is the default and recommended installation method. However, installing via USB connection will provide you with Rayhunter Command Line Interface (CLI) and rootshell access. Additionally, a USB connection will provide you with backup access to the Rayhunter web interface in the event that you are not able to connect via wifi.
Method 1 (RECOMMENDED): Wifi :
- Power on the Orbic: Turn on the device by holding the power button for 3-5 seconds until the device display screen powers on. Wait for the device to fully boot before proceeding with installation. NOTE: The power button is located to the right of the display screen.
- Locate the Orbic Wifi Credentials: Access the device wifi information through the settings menu
- Press the MENU button (located on the top right side of the device) until you see the “2.4 GHz wifi Info”
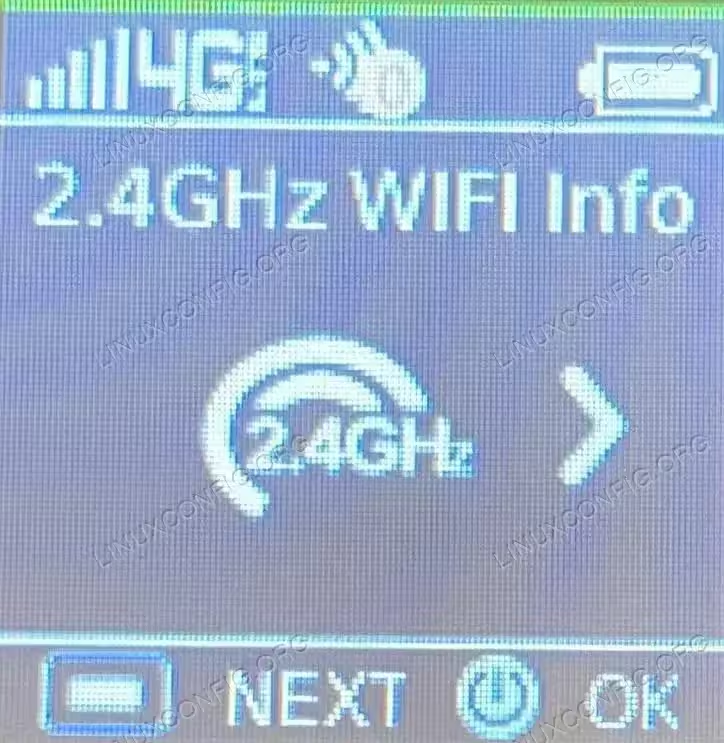
Orbic Wifi Settings - Press the power button to select this option
- Take note of the Wifi name/SSID (typically “Verizon-RC400L-XX”) and the 8-character wifi password consisting of random numbers and lower case letters, located to the right of the lock icon.
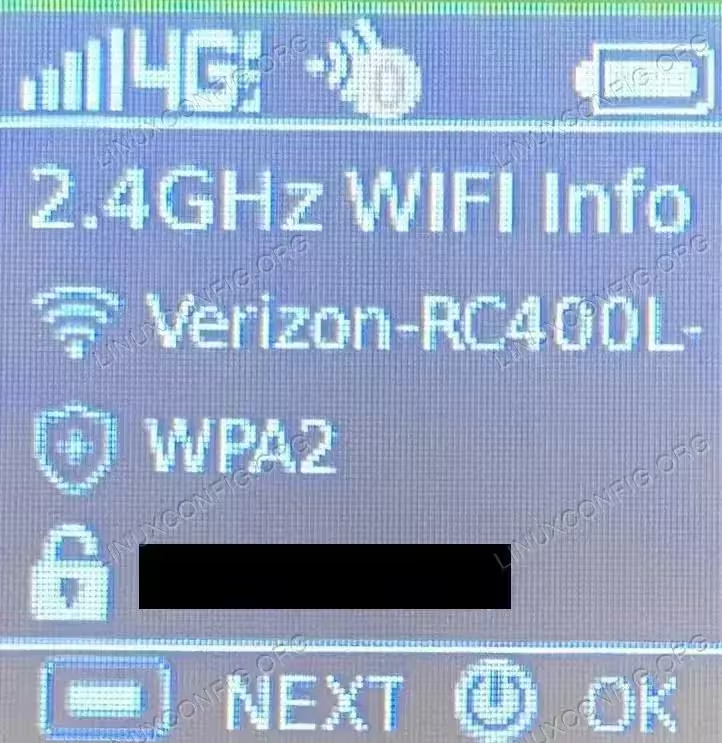
Orbic Wifi Credentials
- Press the MENU button (located on the top right side of the device) until you see the “2.4 GHz wifi Info”
- Connect your Debian/Ubuntu machine to the Orbic Wifi: Keep your device powered on. Navigate to your Debian/Ubuntu machine wifi settings, select the device wifi name/SSID from the list of available wifi networks, and enter the device wifi password.
- Navigate to the Rayhunter directory: From your Debian/Ubuntu machine, navigate to the Rayhunter directory.
$ cd ~/Downloads/rayhunter-v0.10.2-linux-x64
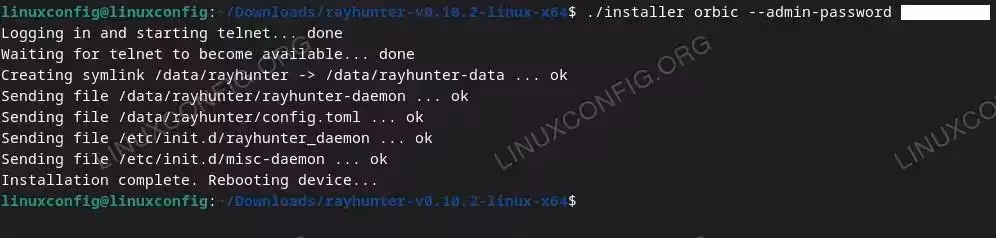
- Run Rayhunter Installer: Execute the installation script.
$ ./installer orbic --admin-password "ADMIN_PASSWORD"
NOTE: the ADMIN_PASSWORD is the device Wifi password from Step 2 above.
The device will automatically reboot one time during the installation process. If you experience a Rayhunter installation error, feel free to open a Github Issue, ask for help in the #rayhunter community channel, or post in the Linux Config Forum.
INSTALLATION SUCCESS INDICATOR
Your Orbic is now a Rayhunter! The device should now show a green line at the top of the display screen, which indicates that Rayhunter is actively monitoring for potential Cell Site Simulators (CSS). A red line indicates a potential CSS detection. Please consider reporting detections to the EFF – more information in the “Be a Citizen Scientist!” section below.
Method 2: USB:
- Install ADB: The following command installs Android Debug Bridge (ADB) for Rayhunter web interface and command line access via USB/wired connection.
# apt update && apt install adb
- Power on the Orbic: Turn on the device by holding the power button for 3-5 seconds until the device display screen powers on. Wait for the device to fully boot before proceeding with installation. NOTE: The power button is located to the right of the display screen.
- Connect the Orbic: With a SIM card inserted into your device, plug it into your Debian/Ubuntu machine via USB connection. The device should be recognized on your Debian/Ubuntu machine as “Android MDM9207-MTP_SN” or something similar.
NOTE: We do not recommend using a Virtual Machine (VM) to install Rayhunter via USB/wired connection at this time – we have experienced issues with the installation script and rootshell access when testing Rayhunter installation on the following VMs: Debian 12, Ubuntu 24.04.3 LTS, and Ubuntu 25.04. If you must use a VM to install Rayhunter via USB/wired connection, please use Kali GNU/Linux as this Operating System did not produce any errors. If you are installing Rayhunter using a Wifi/wireless connection (as mentioned above in the “Rayhunter Installation” Method 1 section), you should not experience any errors when using any of the above-listed VMs.
NOTE: If you are using a VM to install Rayhunter via a USB/wired connection, you may need to manually re-select the device in your VM USB settings one or more times during the installation process. If you do not quickly re-select the device after each reboot, the installation might fail and you may need to uninstall Rayhunter (as mentioned below in the “Maintenance and Updates” section) and restart the process. - Kill the ADB server: Ensure that the ADB server is not running prior to Rayhunter installation.
$ adb kill-server
NOTE: If the ADB server is not running, you will see the output “cannot connect to daemon at tcp:5037: Connection refused”. This is not an error or cause for concern. Please continue with Rayhunter installation.
- Navigate to the Rayhunter directory: From your Debian/Ubuntu machine, navigate to the Rayhunter directory.
$ cd ~/Downloads/rayhunter-v0.10.2-linux-x64
- Run Rayhunter Installer: Execute the installation script.
$ ./installer orbic-usb
The device will reboot one or more times during the installation process. If you experience a Rayhunter installation error, feel free to open a Github Issue, ask for help in the #rayhunter community channel, or post in the Linux Config Forum.
INSTALLATION SUCCESS INDICATOR
Your Orbic is now a Rayhunter! The device should now show a green line at the top of the display screen, which indicates that Rayhunter is actively monitoring for potential Cell Site Simulators (CSS). A red line indicates a potential CSS detection – please consider reporting detections to the EFF – more information in the “Be a Citizen Scientist!” section below.
Access the Rayhunter Graphical User Interface (GUI)
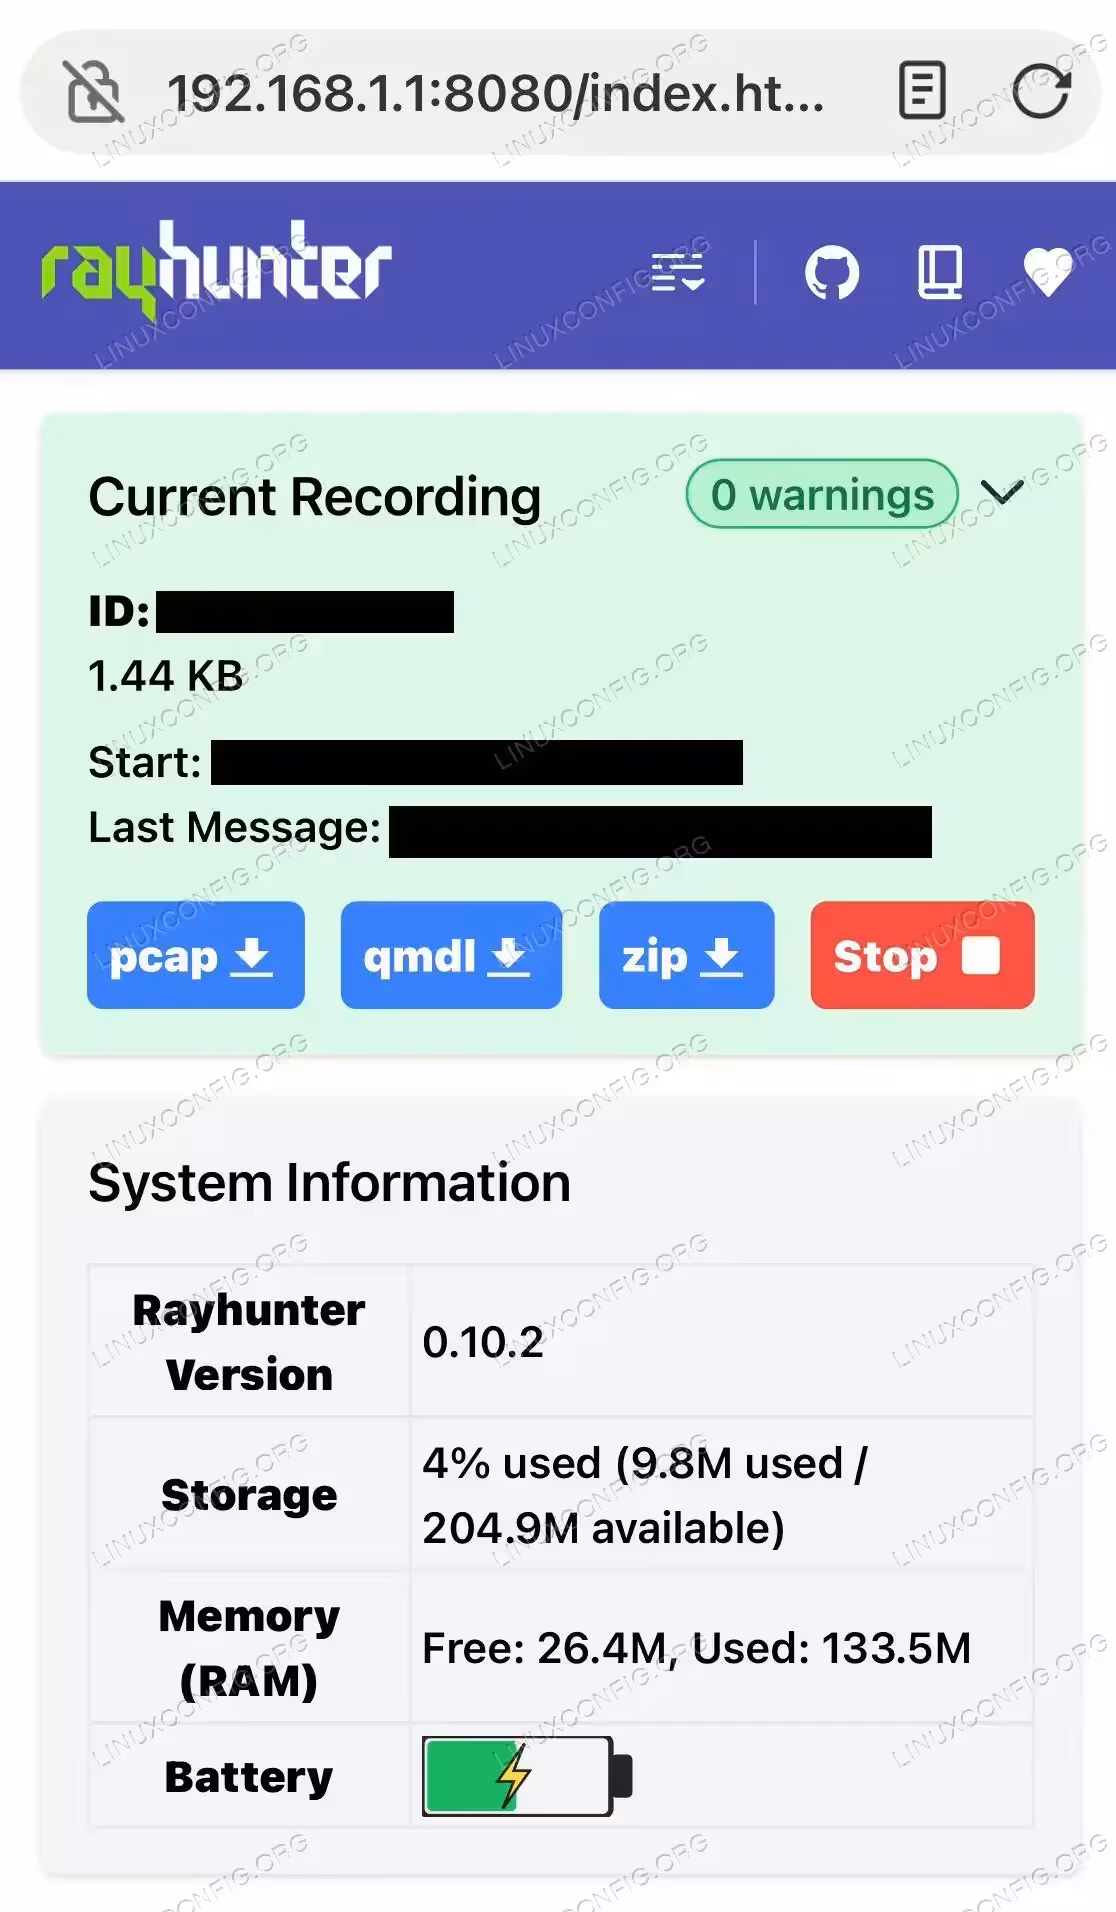
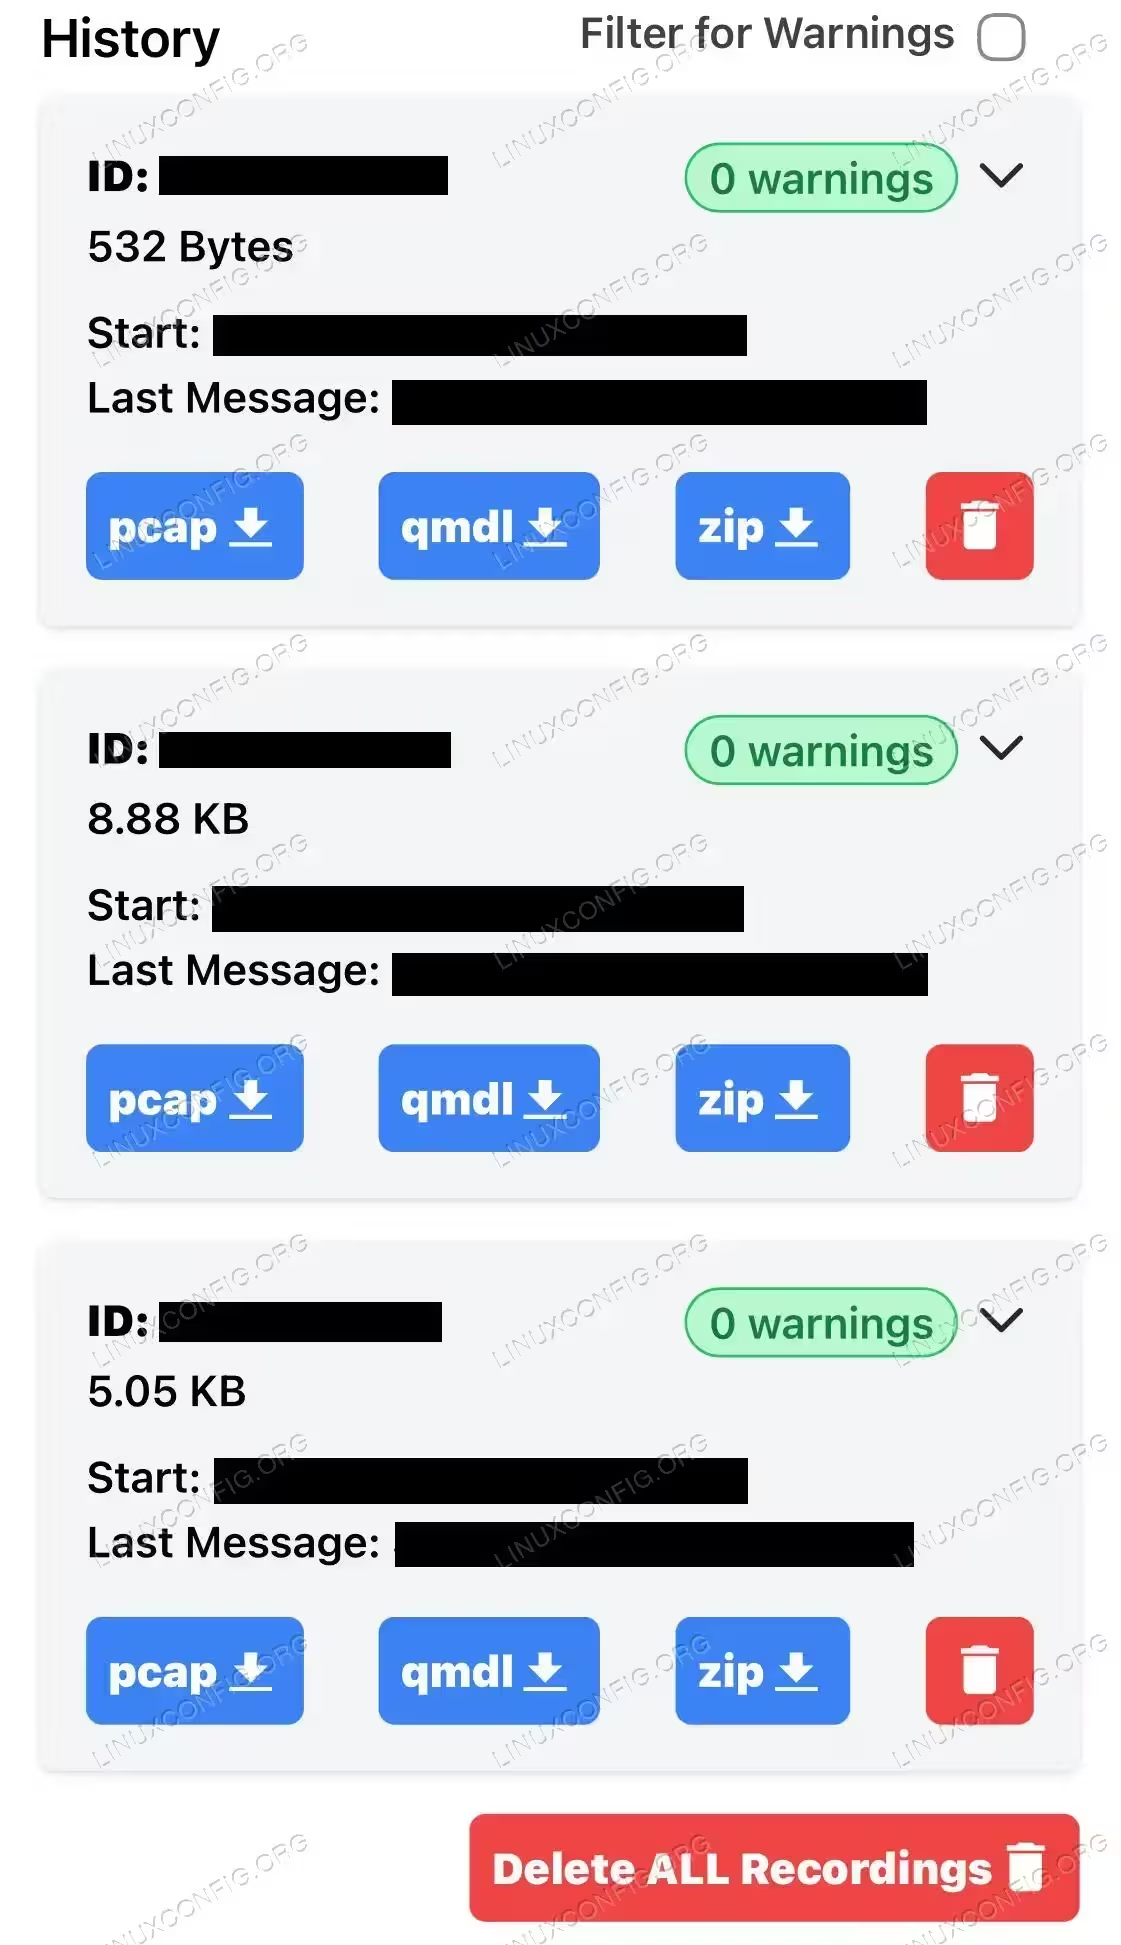
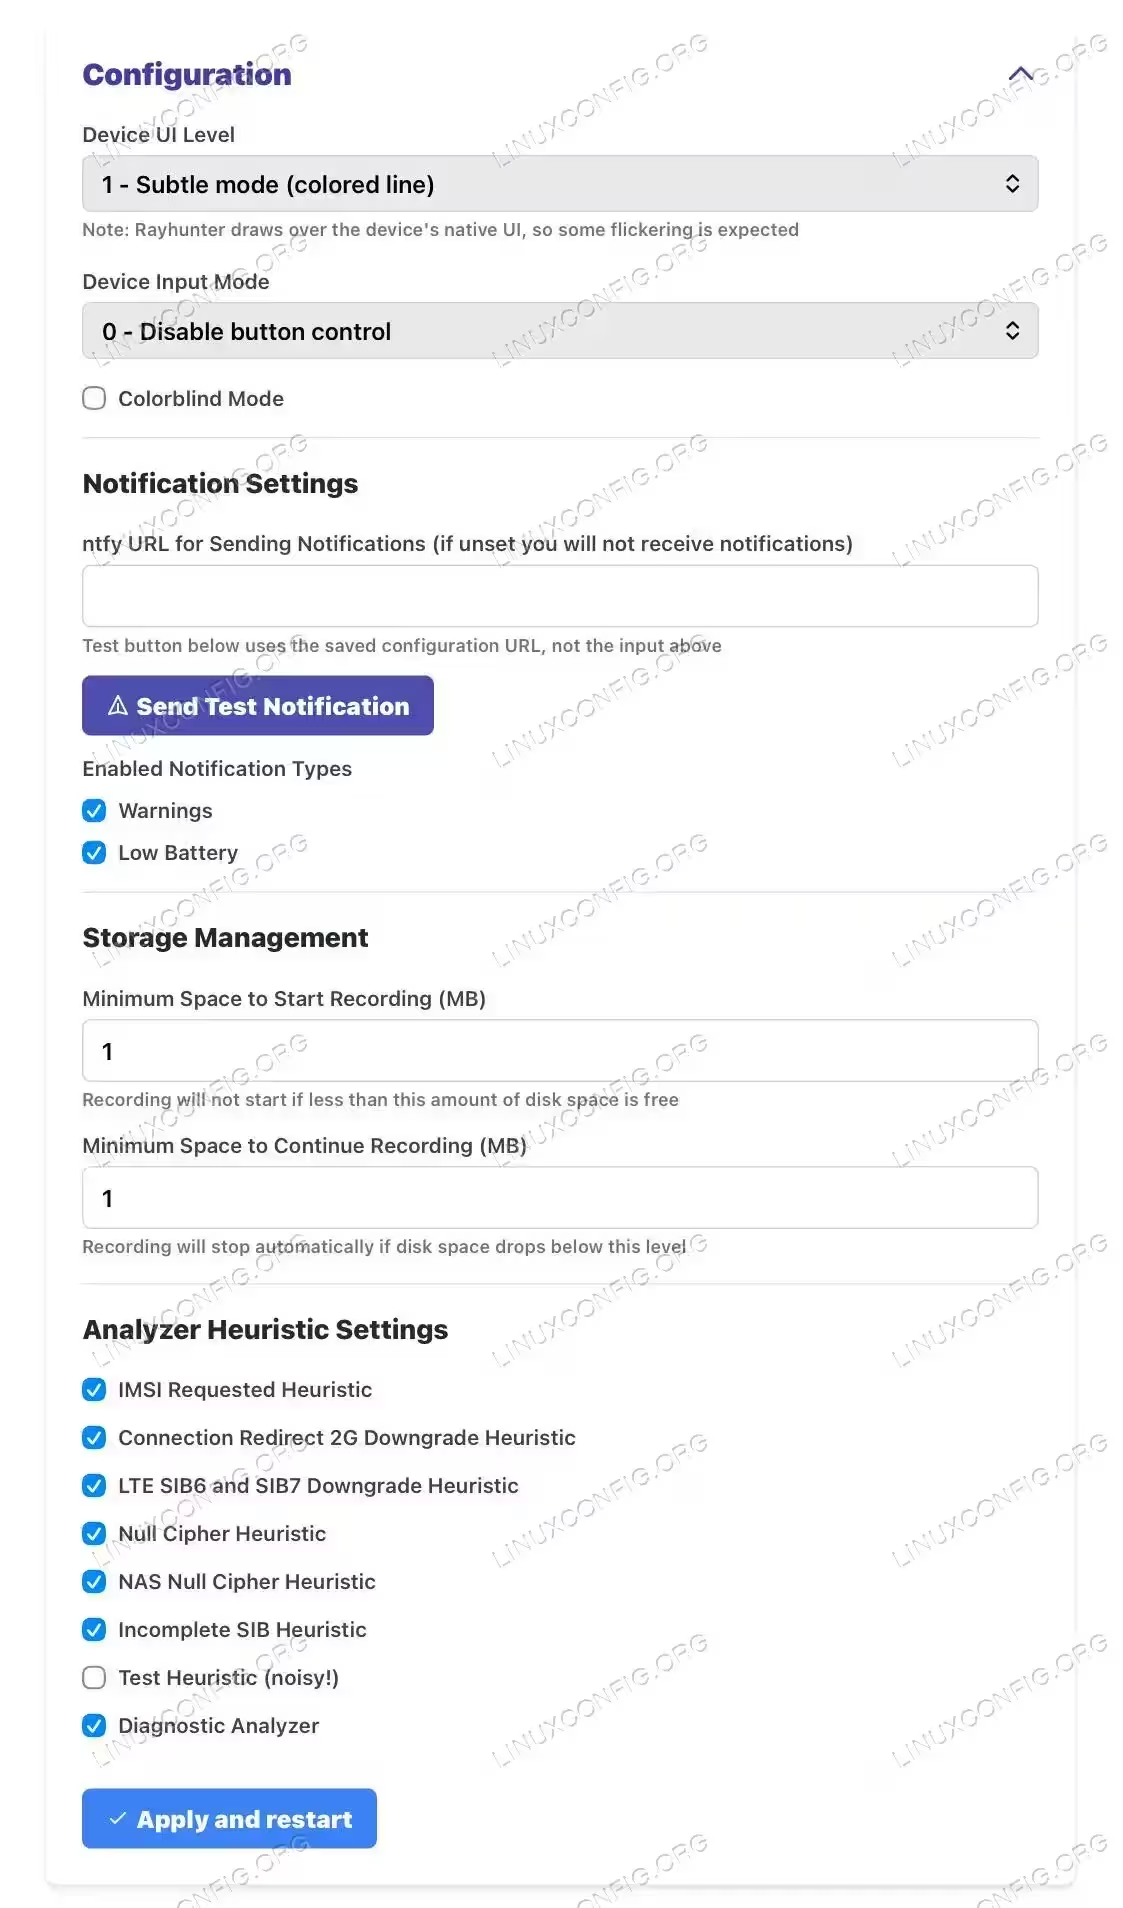
The Rayhunter GUI provides a very user-friendly web interface for starting/stopping Rayhunter, monitoring system information (Rayhunter version, storage used, memory (RAM) used), viewing/downloading/removing log files, and applying additional configurations (colorblind mode, etc.).
The Rayhunter GUI can be accessed using a Wifi/wireless connection (RECOMMENDED) or USB/wired connection. NOTE: The USB/wired GUI access method will work only if you installed Rayhunter via a USB/wired connection.
Method 1: Wifi (RECOMMENDED): This method is ideal for discrete Rayhunter monitoring and web interface access via mobile phone without requiring a wired connection or additional software (ADB).
-
-
- Locate the Orbic Wifi Credentials: Access the device wifi information through the settings menu
- Press the MENU button (located on the top right side of the device) until you see the “2.4 GHz wifi Info”
Orbic Wifi Settings - Press the power button to select this option
- Take note of the Wifi name/SSID (typically “Verizon-RC400L-XX”) and the 8-character password consisting of random numbers and lower case letters, located to the right of the lock icon.
Orbic Wifi Credentials
- Press the MENU button (located on the top right side of the device) until you see the “2.4 GHz wifi Info”
- Connect to the Orbic Wifi: Keep your device powered on. Using your mobile phone [or any other device that you wish to view the Rayhunter web interface], navigate to your phone wifi settings, select the device wifi name/SSID from the list of available wifi networks, and enter the device wifi password.
- Access the Rayhunter Web Interface: Once your phone is connected to the device wifi, open your phone web browser and visit
http://192.168.1.1:8080/
NOTE: You should have no issues accessing the Rayhunter web interface with a VPN enabled on your phone, laptop,etc.. If you are having issues, try temporarily disabling your VPN prior to accessing the Rayhunter web interface.
- Locate the Orbic Wifi Credentials: Access the device wifi information through the settings menu
-
Method 2: USB: This method is ideal for situations requiring Rayhunter web interface access when wifi access is not available. NOTE: The USB/wired access method will work only if you installed Rayhunter via a USB/wired connection (as mentioned above in the “Rayhunter Installation” Method 2 section).
-
- Install Android Debug Bridge (ADB): The ADB tool suite enables your Debian/Ubuntu machine to communicate with Rayhunter via wired/USB connection.
You may need to restart your Debian/Ubuntu machine for ADB to recognize your device after installation.
- Install Android Debug Bridge (ADB): The ADB tool suite enables your Debian/Ubuntu machine to communicate with Rayhunter via wired/USB connection.
# apt update && apt install adb
- Plug the Orbic into your Debian/Ubuntu machine via USB connection: The device should be recognized on your Debian/Ubuntu machine as “Android MDM9207-MTP_SN” or something similar.
- Configure ADB Port Forwarding: Set up port forwarding to access the Rayhunter web interface.
$ adb forward tcp:8080 tcp:8080
- Access the Rayhunter Web Interface: Open your phone web browser and visit
http://localhost:8080
Access the Rayhunter Command Line Interface (CLI)
The Rayhunter CLI provides advanced access to software on your Orbic device, including Rayhunter. NOTE: The Rayhunter CLI is only accessible if you installed Rayhunter via a USB/wired connection.
- Plug the Orbic into your Debian/Ubuntu machine via USB connection: The device should be recognized on your Debian/Ubuntu machine as “Android MDM9207-MTP_SN” or something similar.
- Establish an ADB Shell Connection: This command opens a “shell” on the device with limited user privileges.
$ adb shell
NOTE: If you see a “user in plugdev group; are your udev rules wrong?” error when attempting adb shell connection, refer to Solution 1 of this article.
- Gain Root Access: Elevate to root privileges for full system access.
$ rootshell
PERMISSIONS ERROR
If you getting a permissions error when attempting to gain rootshell access, try the following commands. WARNING: The following commands will restart your Debian/Ubuntu machine – please save your any work before executing the commands. First, exit the ADB shell connection with theexitcommand, then execute:./installer util serial 'AT+SYSCMD=chown root:root /bin/rootshell' $ ./installer util serial 'AT+SYSCMD=chmod 4755 /bin/rootshell' $ reboot
Only modify a file if you know what you are doing! For help, visit the #rayhunter community channel, open a Rayhunter Github Issue (recommended for technical support), or post in the Linux Config Forum.
- Navigate System Directories: Access Rayhunter Files.
$ cd /data/rayhunter
$ ls -lah
Be a Citizen Scientist! Report detections to the EFF
In order to help the EFF better understand Stingray activity, you can optionally report potential detections to their end-to-end-encrypted Signal chat.
NOTE: If you are not familiar with Signal, feel free to review our Signal tutorial and/or the EFF Security Self-Defense (SSD) Signal guide.
- Gather Stingray Detection Data: A detection is indicated by a red line on the display screen. If you have detected something, please collect the following information:
- QMDL log specific to the capture that contains the detection – located in the Rayhunter web interface > History section
- PCAP log specific to the capture that contains the detection – located in the Rayhunter web interface > History section
- Capture Date – located in the Rayhunter web interface > History section
- Capture Location – where and/or what event was the Rayhunter located when the detection happened? Please be as specific as possible.
- Device Model – “RC400L”. The Model is also indicated in the device MENU settings > Device Info section. The Model can also be found on the device after removing the plastic back cover and battery pack.
- Rayhunter version – located in the Rayhunter web interface > System Information section
- Is your device SIM Card activated? Yes or no.
- Contact EFF via Signal: Please send this information to the EFF Signal username: ElectronicFrontierFoundation.90
Maintenance and Updates
Update Rayhunter
You DO NOT need to uninstall Rayhunter from your device prior to updating to the latest Rayhunter version. Simply install the newest release/version of Rayhunter by following the steps mentioned in the “Install Rayhunter” section above or see the official documentation for more information.
IMPORTANT: Please keep your Rayhunter updated – the latest release is built to contain fine-tuned IMSI request heuristics and other anomaly-detecting code, which helps to increase your chance of detecting surveillance technology!
Uninstall Rayhunter
- Power on the Orbic: Turn on the device by holding the power button for 3-5 seconds until the device display screen powers on. Wait for the device to fully boot.
- Connect your Debian/Ubuntu machine to the Orbic Wifi: Keep your device powered on. Navigate to your Debian/Ubuntu machine wifi settings, select the device wifi name/SSID from the list of available wifi networks, and enter the device wifi password.NOTE: If you installed via a Wired/USB connection, plug the Orbic into your Debian/Ubuntu machine via USB connection. The device should be recognized on your Debian/Ubuntu machine as “Android MDM9207-MTP_SN” or something similar.
- Navigate to the Rayhunter directory: From your Debian/Ubuntu machine, navigate to the Rayhunter directory.
$ cd ~/Downloads/rayhunter-v0.10.2-linux-x64
- Establish a shell connection:
This command opens a shell on the device with limited user privileges.$ ./installer util orbic-shell --admin-password "ADMIN_PASSWORD"
NOTE: if you see a “user in plugdev group; are your udev rules wrong?” error when attempting adb shell connection, refer to Solution 1 of
this article. - Delete Rayhunter from the Orbic:
    $ echo 3 > /usrdata/mode.cfg
    $ rm -rf /data/rayhunter /etc/init.d/rayhunter_daemon /bin/rootshell
    $ reboot
    $ quit
    # you can now press and hold Ctrl + C to quit orbic-shell
Rayhunter Uninstall Output
FACTORY RESET OPTION
For more in-depth Orbic restoration, consult this Verizon support article or page 36 of the Verizon Orbic Speed RC400L Mobile Hotspot User Guide (Official).
Conclusion
In this tutorial, you learned how to use a Debian/Ubuntu machine to install Rayhunter onto a Verizon Orbic Speed RC400L mobile hotspot. We covered multiple access methods for the Rayhunter graphical/web and command line interfaces as options to safely and effectively run Rayhunter. We emphasized the importance of maintaining/updating your Rayhunter to more effectively detect potential Stingrays.
We also covered how to make a strong impact by reporting detection data to the EFF.
By using devices such as Rayhunter to surveil those who wish to surveil us, we as citizens and activists directly advocate for physical and digital freedom. Furthermore, Rayhunter activists who choose to report detection data (mentioned in the Citizen Scientist section above) will have a strong impact in helping the EFF and other human rights organizations to reinforce ethical rules and guidelines in our societies.
Additional Resources
-
-
- Official Rayhunter Documentation – Comprehensive guide covering all aspects of Rayhunter operation, including setup for other supported devices.
- Rayhunter GitHub Releases – Download the latest Rayhunter version/release
- Rayhunter: What We Have Found So Far – Official discussion of Rayhunter findings as of September 10th 2025
- See the following for more information on Cell Site Simulators (CSSs), also known as IMSI-catchers, or “Stingrays”:
- Learn how to use Signal using our Signal tutorial and/or the EFF Security Self-Defense (SSD) Signal guide.
- Interested in learning more Android Debug Bridge (ADB)? Check out our ADB Tutorial
- Looking to upgrade your Orbic? Check out these suggestions from the Rayhunter community:
- If you are looking to physically protect your Rayhunter [and/or help to ensure that device buttons are not pressed while stowed away], try ones of these DIY 3D-printed full or partial cases
- The Verizon Orbic Speed RC400L standard battery has a 3000mAh capacity – try this 4,500mAh battery upgrade if you would like your device to run longer on a single charge.
- Curious about how to improve your personal digital and security regardless of running Rayhunter? See the EFF Surveillance Self-Defense – Security and Privacy Guide for Activists, Protesters, etc..
-
Frequently Asked Questions (FAQ)
Installation and Support
Q: I am not able to successfully install Rayhunter – where can I go for support?
A: If you encounter installation or other setup issues, you can open a Github Issue, post in the Linux Config Forum, or chat with other Rayhunter users in the #rayhunter community channel.
Q: I want to connect with other people around the world who use Rayhunter – where is this community?
A: The primary community hub for Rayhunter users is the #rayhunter community channel. This platform allows you to connect with other Rayhunter users, share experiences, and discuss findings. For technical support, the Rayhunter core developers recommend that you open a Github Issue as this helps to better document and track issues.
SIM Card and Rayhunter Compatibility
Q: I would like to contribute to testing Rayhunter with an activated SIM card – how can I activate my SIM card?
A: Your SIM card does not need to be pre-paid or activated for Rayhunter to function. Although, the effectiveness of Rayhunter with an inactive SIM card versus active SIM card is still under investigation – more information here. If you would like to activate your SIM card, please visit Verizon’s activation page.
Q: Does my SIM card need to be from Verizon?
A: No. Your SIM card can be from any provider. However, if you plan on activating your SIM card now or in the future, you may want to use a Verizon SIM card to ensure no internet service issues.
Q: Can I install Rayhunter on a device other than an Orbic?
A: Yes! If, for example, you live outside of North and South America you may consider the TP-Link M7350 which is widely used to run Rayhunter in Africa, Europe, and the Middle East. You can also run Rayhunter on other supported devices. Each supported device may have slightly different installation procedures.
Status Indicators and Monitoring
Q: My Rayhunter has a green line at the top of the display screen – what does this mean?
A: A green line indicates that your Rayhunter is currently monitoring for Stingray/CSS/IMSI-Catcher activities. This is the normal operating state – Rayhunter is actively scanning for Stingray interference.
Q: My Rayhunter has a red line at the top of the screen! What does this mean?
A: A red line means that your Rayhunter detected a potential Stingray/CSS/IMSI-Catcher. Visit the Rayhunter web interface [as mentioned in the “Access the Rayhunter Graphical User Interface (GUI)” section of this tutorial] to explore this detection and gather information to be reported to the EFF [as mentioned in the “Be a Citizen Scientist!” section of this tutorial].
Storage and Maintenance
Q: My Rayhunter storage is full – how do I clear my Rayhunter capture history?
A: You can remove or download all log files from Rayhunter using the Rayhunter web interface [as mentioned in the “Access the Rayhunter Graphical User Interface (GUI)” section of this tutorial]. You can also use the Rayhunter CLI [as mentioned in the “Access the Rayhunter Command Line Interface (CLI)” section of this tutorial]. The GUI provides a more user-friendly interface for managing your Rayhunter, while the CLI offers more advanced, granular Rayhunter control.
Q: How do I perform a factory reset on my Orbic?
A: Prior to performing a Factory Reset, please follow the uninstallation instructions mentioned in the “Maintenance and Updates” section of this tutorial. For Factory Reset instructions, see this Verizon support article or page 36 of the Verizon Orbic Speed RC400L Mobile Hotspot User Guide (Official).