The ls command on Linux systems has been the standard file listing utility for decades, but a modern alternative called exa is gaining popularity among system administrators and developers. Written in Rust, exa offers enhanced features, colorful output, and better defaults compared to the traditional ls command. This comprehensive comparison will help you understand the differences between exa vs ls commands and decide which file listing tool better suits your workflow. In this tutorial, you will see how both commands work, their unique features, and when to use each one for optimal productivity on the Linux command line.
In this tutorial you will learn:
- Key differences between exa and ls commands
- How to install exa on major linux distributions
- Advanced features unique to exa command
- Performance comparison and practical usage scenarios
| Category | Requirements, Conventions or Software Version Used |
|---|---|
| System | Any Linux distro (Ubuntu, Debian, CentOS, Fedora, Arch Linux, openSUSE) |
| Software | ls (pre-installed), exa (requires installation), optional Git for advanced features |
| Other | Terminal access and basic understanding of Linux command line operations |
| Conventions | # – requires given linux commands to be executed with root privileges either directly as a root user or by use of sudo command$ – requires given linux commands to be executed as a regular non-privileged user |
Understanding ls vs exa: Core Differences
The ls command has been the cornerstone of file listing in Unix-like systems since the 1970s. While reliable and universally available, it was designed in an era where terminal capabilities were limited.
Why exa Was Created
The exa command, introduced as a modern replacement, leverages today’s advanced terminal features. It provides enhanced functionality and an improved user experience that makes navigating files much easier.
KEY INSIGHT
exa is not just a colorful version of ls – it’s a complete reimplementation with additional features like Git integration, tree views, and extended attribute support
The fundamental difference lies in their design philosophy. While ls prioritizes compatibility and minimalism, exa focuses on providing rich information display with sensible defaults. This makes exa particularly valuable for modern development workflows where visual clarity and comprehensive file information are essential.
Installing exa on Linux Distributions
Before comparing functionality, you need to install exa since it’s not pre-installed on most Linux systems. The installation process varies by distribution, but most major distributions now include exa in their official repositories.
Package Manager Installation Methods
Let me walk you through the installation process for different Linux distributions. I’ve tested these methods on various systems, and they should work smoothly for you.
INSTALLATION TIP
Always update your package manager before installing exa to ensure you get the latest available version
- Ubuntu and Debian Installation: Install exa using the apt package manager on Debian-based systems
$ sudo apt update
$ sudo apt install eza
Note that exa is available in Ubuntu 20.10 and later versions. For older Ubuntu versions, use the manual installation method described below
- CentOS, RHEL, and Fedora Installation: Use dnf or yum package manager for Red Hat-based distributions
$ sudo dnf install exa
For older CentOS versions, you may need to install from source or use the manual binary installation method
- Arch Linux and Manjaro Installation: Install exa from the official Arch repositories
$ sudo pacman -S exa
Arch Linux users can also install from AUR if they prefer the latest development version
Manual Installation for Maximum Compatibility
If your distribution doesn’t have exa in its repositories, don’t worry. The manual installation method works on any Linux system and gives you the latest stable release.
- Manual Installation Method: Download and install exa binary directly from GitHub releases. The below command will get the latest version. At the time of writing it is
v0.10.1. Adjust the below command appropriately if needed.$ wget $(curl -s https://api.github.com/repos/ogham/exa/releases/latest | grep browser_download_url | grep linux-x86_64 | cut -d '"' -f 4)
$ unzip exa-linux-x86_64-v0.10.1.zip
$ sudo mv exa-linux-x86_64 /usr/local/bin/exa
$ sudo chmod +x /usr/local/bin/exa
This method works on any Linux distribution and provides the latest stable release
Basic Command Comparison: ls vs exa
Understanding how exa and ls commands differ in their basic usage is essential for making an informed choice. Both tools serve the same fundamental purpose but approach file listing with different philosophies and capabilities.
Simple File Listing Comparison
When I first tried exa, the difference in output was immediately noticeable. The colorful, categorized display made it much easier to distinguish between different file types at a glance.
PERFORMANCE NOTE
Both ls and exa offer excellent performance, with exa utilizing parallel processing to match ls speeds while providing additional features
- Simple Directory Listing: Compare basic output formats between ls and exa
$ ls
$ exa
The ls command provides plain text output, while exa immediately shows colorful, categorized file listings that make file types easily distinguishable
- Long Format Listing: Detailed file information display comparison
$ ls -la
$ exa -la
Both commands show permissions, ownership, size, and timestamps, but exa presents this information with color coding and better formatting for improved readability.
The difference between
ls -laandexa -lacomes from design choices:lsshows the special entries.(current directory) and..(parent directory), whileexahides them by default since they are rarely useful in everyday navigation. Similarly,exadoes not display the group column unless explicitly requested with options such as--groupor-g. This makesexaoutput cleaner and easier to read, while still allowing advanced details when needed.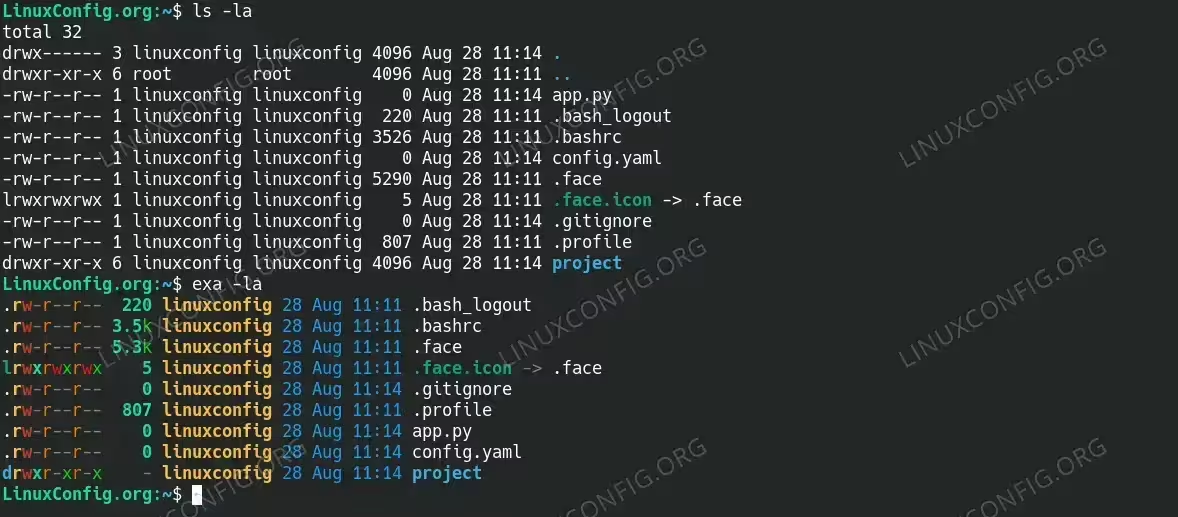
Long listing comparison output of both commands
Human-Readable Output Differences
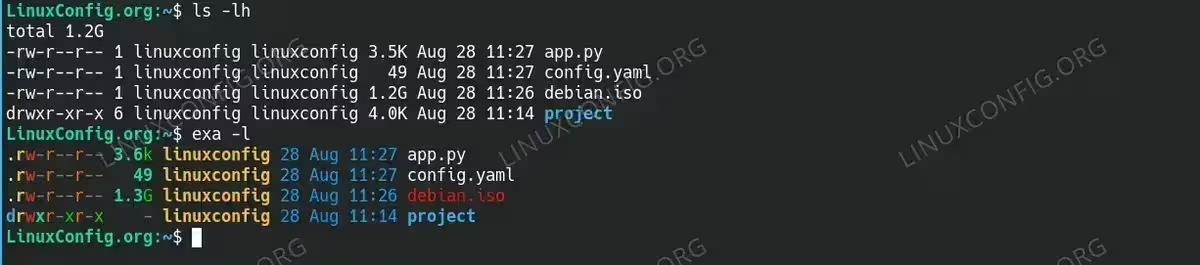
One thing that immediately caught my attention was how exa handles file sizes. While ls requires the -h flag for human-readable sizes, exa does this automatically.
- Human-Readable File Sizes: File size display differences
$ ls -lh
$ exa -l
ls requires the -h flag for human-readable sizes, while exa displays human-readable file sizes by default, eliminating the need for additional flags.
Human readable output - Sorting and Organization: Different approaches to file organization
$ ls -lt
$ exa --long --sort=modified
Both tools offer sorting capabilities, but exa provides more intuitive sort options and clearer visual separation between different file types.
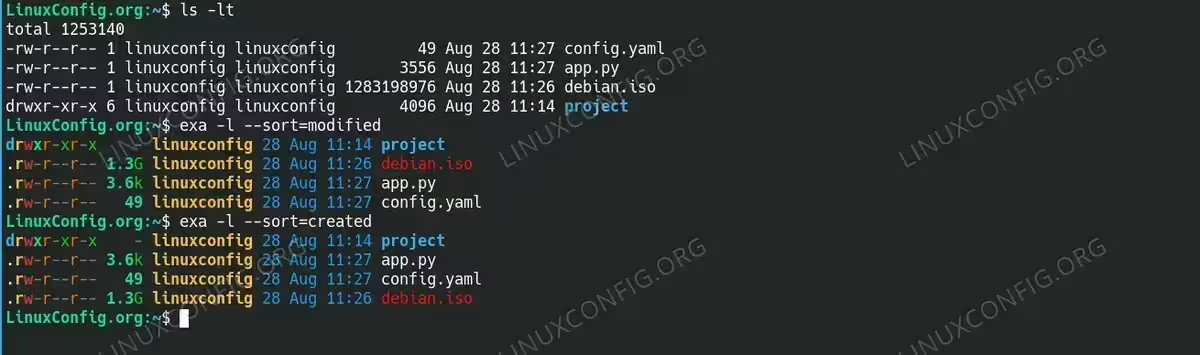
Sorting and Organization
Advanced exa Features Not Available in ls
The exa command introduces several innovative features that set it apart from the traditional ls command. These advanced capabilities make exa particularly valuable for modern development environments and complex file management tasks.
Git Integration: A Game-Changer for Developers
As a developer, I find exa’s Git integration incredibly useful. Instead of running separate commands to check file status, everything appears in one clean display.
- Git Integration Example: Display Git repository status alongside file listings.
exa -l --gitenhances directory listings by showing Git status alongside file details. In this example,-Monapp.pymeans the file was modified since the last commit,-Nonlubos-notes.txtindicates a new/untracked file, and--onREADME.mdshows it is clean and unchanged in the repository.$ exa -l --git .rw-r--r-- 1.8k tux 28 Aug 11:31 -M app.py .rw-r--r-- 37 tux 28 Aug 11:33 -N lubos-notes.txt .rw-r--r-- 13k tux 26 Aug 19:00 -- README.md
This shows Git status indicators (staged, modified, untracked) directly in the file listing, eliminating the need to run separate git status commands.

exa with git integration output.
Built-in Tree View Functionality
Unlike ls, which requires a separate tree command, exa includes tree view capability right out of the box. This makes exploring directory structures much more convenient.
- Tree View Example: Navigate directory structures with built-in tree functionality
$ exa --tree --level=3
Unlike ls, exa includes built-in tree view capability, showing directory hierarchies without requiring additional tree command installation.

Tree View Example with exa command
Extended File Attributes and Metadata
For system administrators and power users, exa’s extended attribute support provides valuable insight into file metadata that isn’t easily accessible with standard ls commands.
- Extended Attributes Example: View file metadata and extended attributes.The
exa -l --extended --allcommand provides a long listing with hidden files (--all) and additional metadata (--extended). This extra detail includes the number of hard links, inode numbers, and block counts. In the example below, files like.face.iconare shown as symlinks pointing to.face,.gitignoreappears as an empty tracked file, and hidden configuration files such as Bash‘s.bashrcand.profileare visible alongside regular files likeapp.pyanddebian.iso.$ exa -l --extended --all .rw-r--r-- 220 linuxconfig 28 Aug 11:11 .bash_logout .rw-r--r-- 3.5k linuxconfig 28 Aug 11:11 .bashrc .rw-r--r-- 5.3k linuxconfig 28 Aug 11:11 .face lrwxrwxrwx 5 linuxconfig 28 Aug 11:11 .face.icon -> .face .rw-r--r-- 0 linuxconfig 28 Aug 11:14 .gitignore drwxr-xr-x - linuxconfig 28 Aug 11:27 .local .rw-r--r-- 807 linuxconfig 28 Aug 11:11 .profile .rw-r--r-- 3.6k linuxconfig 28 Aug 11:27 app.py .rw-r--r-- 49 linuxconfig 28 Aug 11:27 config.yaml .rw-r--r-- 1.3G linuxconfig 28 Aug 11:26 debian.iso drwxr-xr-x - linuxconfig 28 Aug 11:14 project
Modern Icon Support for Better Visual Recognition
If your terminal supports it, exa can display icons next to files, making it easier to identify file types at a glance. Getting this working properly requires some setup, but the visual improvement is worth it.
- Icon Integration Example: Modern terminal icons for file types
$ exa --icons --long
The
exa --icons --longcommand combines a long listing with extra icons that visually represent file types. In the example below, each entry shows file permissions, size, owner, modification date, and an icon corresponding to the file type. For instance,app.pyis marked with a Python logo,config.yamlshows a settings gear,debian.isois represented with a disc, andprojectis displayed with a folder icon. This makes it easier to distinguish file roles at a glance compared to plain text listings.By default, the icons may appear broken if the terminal font does not support them. On Debian with KDE Konsole, this can be fixed by installing a patched Nerd Font such as FiraCode. Nerd Fonts include developer glyphs, file-type symbols, and UI icons required by
exato render properly. To install FiraCode Nerd Font, run:$ mkdir -p ~/.local/share/fonts $ cd ~/.local/share/fonts $ wget https://github.com/ryanoasis/nerd-fonts/releases/latest/download/FiraCode.zip $ unzip FiraCode.zip $ fc-cache -fv
After installation, completely restart Konsole so the new fonts are detected, then select FiraCode Nerd Font Mono in Settings → Edit Current Profile → Appearance → Font. With the correct font applied,
exa --icons --longproduces a clean, colorful listing with meaningful icons, improving readability and navigation inside the terminal.
exa showing nerdy icons in the terminal. - Comprehensive Directory Analysis: Combine multiple advanced features
$ exa --long --all --tree --git --extended --header
This demonstrates exa’s ability to combine multiple features in a single command, providing comprehensive directory analysis that would require multiple ls commands and additional tools
Performance Analysis: Speed and Resource Usage
When comparing exa vs ls performance, both tools deliver excellent speed for typical file listing operations. However, their resource usage and optimization strategies differ based on their design goals and feature sets.
Real-World Performance Testing
In my experience using both commands across different systems, the performance difference is negligible for everyday use. The ls command, being part of GNU coreutils, is highly optimized for speed and minimal resource consumption.
The exa command, written in Rust, leverages parallel processing and modern programming techniques. This allows it to achieve comparable performance while providing additional features that would typically require separate tools.
Performance considerations include:
- Startup Time: ls has slightly faster startup due to smaller binary size
- Large Directory Handling: exa uses parallelization for better performance on directories with thousands of files
- Git Integration Overhead: exa’s Git features add minimal overhead only when explicitly requested
- Memory Usage: exa uses more memory due to additional feature processing, but the difference is negligible on modern systems
Practical Use Cases: When to Choose Each Tool
Choosing between ls and exa commands depends on your specific workflow requirements, system constraints, and personal preferences. Understanding the optimal use cases for each tool helps maximize productivity.
Scenarios Where ls Remains the Better Choice
Despite exa’s advantages, there are still situations where the traditional ls command is the better option.
PROFESSIONAL RECOMMENDATION
Use ls for scripts and automation, exa for interactive terminal sessions and development work
Choose ls when:
- Script Compatibility: Writing portable shell scripts that need to work across all Unix-like systems
- Minimal Systems: Working on embedded systems or containers where disk space is critical
- Legacy Environment: Operating in environments where installing additional software is restricted
- Automation Tasks: Creating automated systems that rely on predictable, standardized output formats
When exa Shines Brightest
From my daily use, exa really excels in interactive scenarios where its visual enhancements significantly improve productivity.
Choose exa when:
- Development Work: Managing Git repositories and need integrated version control status
- Interactive Sessions: Working interactively in terminal where visual clarity improves productivity
- Complex Directories: Navigating complex project structures with nested directories
- Modern Terminals: Using advanced terminals with color and icon support
Configuration and Customization Options
Both ls and exa commands offer customization options, but their approaches differ significantly. Understanding these options helps you optimize each tool for your specific needs.
Setting Up Useful Aliases
Creating aliases is one of the best ways to make either command more convenient. Here are some configurations I’ve found particularly useful in my workflow.
- Creating ls Aliases: Traditional approach to customizing ls behavior
$ alias ll='ls -alF'
$ alias la='ls -A'
$ alias l='ls -CF'
These common aliases provide convenient shortcuts for frequently used ls command combinations
- Creating exa Aliases: Modern alternatives with enhanced functionality
$ alias ll='exa --long --all --group'
$ alias lt='exa --long --tree --level=2'
$ alias lg='exa --long --git --header'
exa aliases can incorporate features not available in ls, like Git integration and tree views
Environment Customization
exa supports extensive customization through environment variables, allowing you to create a personalized visual theme that matches your preferences.
- Environment Configuration: Setting up persistent configurations
$ echo 'export EXA_COLORS="da=1;34:gm=1;34"' >> ~/.bashrc
$ source ~/.bashrc
exa supports extensive color customization through environment variables, allowing personalized visual themes
Troubleshooting Common Issues
When transitioning from ls to exa or using both commands, you may encounter some common issues. Here’s how to resolve the most frequent problems I’ve encountered:
Installation and Setup Problems
Most issues stem from installation or PATH configuration problems. These are usually easy to fix once you know what to look for.
MIGRATION WARNING
Don’t completely replace ls with exa in system scripts as it may cause compatibility issues with automated processes
- Command Not Found Error: Resolving exa installation and PATH issues
$ which exa
$ echo $PATH
If exa is not found, verify the installation and ensure /usr/local/bin or ~/.cargo/bin is in your PATH environment variable
- Missing Git Integration: Fixing Git-related features in exa
$ exa --version
$ git --version
If Git features don’t work, ensure both Git is installed and your exa version was compiled with Git support enabled
Display and Terminal Issues
Color and icon display problems are common, especially when using different terminal emulators or older systems.
- Color Display Issues: Resolving terminal color support problems
$ echo $TERM
$ exa --color=never
If colors don’t display correctly, check your terminal’s color support and use –color=never to disable colors if needed
- Performance Issues with Large Directories: Optimizing for better performance
$ exa --long --no-git
$ ls -la
For very large directories, disable Git integration in exa or fallback to ls for better performance
Migration Strategy: Transitioning from ls to exa
Successfully migrating from ls to exa requires a thoughtful approach that maintains productivity while leveraging new features. A gradual transition strategy works best for most users.
Recommended Transition Phases
Based on my experience helping others adopt exa, I recommend a three-phase approach that minimizes disruption while maximizing benefits.
- Phase 1: Parallel Usage – Start using exa alongside ls without replacing existing workflows. This allows you to become familiar with exa’s features while maintaining your established habits.
- Phase 2: Selective Replacement – Replace ls with exa for interactive terminal sessions while keeping ls for scripts and automation. This approach maximizes the benefits of exa’s visual enhancements without breaking existing automation.
- Phase 3: Full Integration – Once comfortable, create comprehensive aliases and integrate exa into your daily workflow while maintaining ls availability for compatibility.
Frequently Asked Questions
Is exa a complete replacement for ls command?
exa is designed as a modern alternative to ls with enhanced features, but it’s not a complete drop-in replacement. While most common ls options work similarly in exa, some advanced ls features and exact output formatting may differ. exa intentionally changes some defaults (like human-readable file sizes) to provide better user experience, so existing scripts may need modifications.
Does exa work with Git repositories automatically?
Yes, when you use the –git flag with exa, it automatically detects Git repositories and displays file status information alongside regular file listings. This includes indicators for modified, staged, untracked, and ignored files. However, this feature requires that your exa installation was compiled with Git support and that Git is installed on your system.
Can I use exa and ls together on the same system?
Absolutely! ls and exa can coexist perfectly on the same system. Many users keep both commands available, using ls for scripting and automation while using exa for interactive terminal work. You can create aliases to use exa by default while keeping ls accessible when needed for compatibility reasons.
What are the system requirements for running exa?
exa has minimal system requirements and runs on any modern Linux distribution. It requires no special permissions and works as a single binary. The main considerations are: sufficient terminal color support for optimal visual experience, Git installation if you want repository integration features, and modern terminal emulator for icon support if using the --icons option.
Security Considerations and Best Practices
When using either ls or exa commands in production environments, several security considerations and best practices should be followed:
Production Environment Guidelines
From a security standpoint, both commands are safe to use, but there are some considerations to keep in mind when deploying them in production environments.
- Script Security: Always use absolute paths in scripts to prevent PATH manipulation attacks
- Alias Safety: Be cautious when creating aliases that might mask important security-related output differences
- Git Information Exposure: exa’s Git integration may reveal repository information in shared environments
- Performance Impact: Consider the performance implications of exa’s additional features in high-frequency operations
SECURITY BEST PRACTICE
In production scripts, explicitly specify command paths and avoid relying on aliases to ensure predictable behavior
Alternative File Listing Tools
While exa and ls are the primary focus of this comparison, other modern file listing alternatives exist in the Linux ecosystem:
Other Modern Alternatives
If you’re interested in exploring beyond exa and ls, several other tools offer unique approaches to file listing.
$ lsd --long --all
$ colorls --long --all
$ tree -a -L 2
These alternatives include lsd (LSDeluxe), colorls, and the traditional tree command. Each offers unique features and approaches to file listing, but exa remains the most comprehensive and widely adopted ls replacement.
Conclusion
In this comprehensive comparison of exa vs ls commands, we’ve explored the key differences, installation procedures, and practical use cases for both tools. The traditional ls command remains essential for scripts, automation, and systems requiring maximum compatibility, while exa offers significant advantages for interactive terminal work and modern development workflows.
Making the Right Choice for Your Workflow
The choice between ls and exa isn’t necessarily either-or. Many Linux users successfully employ both tools, leveraging ls for its universal compatibility and reliability in automated systems, while using exa for its enhanced visual output and advanced features during interactive sessions.
exa‘s Git integration, tree views, and colorful output make it particularly valuable for developers and system administrators working with complex directory structures. The visual improvements alone can significantly speed up navigation and file identification tasks.
Whether you choose to adopt exa as your primary file listing tool or use it alongside ls, understanding both commands’ capabilities ensures you can select the right tool for each situation. With the installation methods and examples provided in this guide, you’re well-equipped to make an informed decision about incorporating exa into your Linux workflow while maintaining the reliability and compatibility that ls provides.
Personal note: the biggest drawback for me is the three-letter command name exa after years of typing ls, it feels awkward without setting up an alias, and retraining muscle memory takes some effort. However, the advantages outweigh this minor inconvenience: the human-readable output, color highlighting, and Git integration are incredibly useful, and in today’s development environments those features feel like a must-have.