In This Tutorial, You Will Learn:
- How to define a network in your
docker-compose.ymlfile - How to connect multiple services to the same network
- The benefits of using Docker networks for container communication

Software Requirements and Linux Command Line Conventions
| Category | Requirements, Conventions, or Software Version Used |
|---|---|
| System | Linux (Ubuntu, CentOS, etc.) or MacOS |
| Software | Docker version 20.10 or higher, Docker Compose version 1.27 or higher |
| Other | Basic familiarity with containers and command-line interface |
| Conventions | # – Requires commands to be executed with root privileges, either directly as root or using sudo.$ – Requires commands to be executed as a regular non-privileged user. |
How to Connect Two Containers With Docker-Compose
UNDERSTANDING DOCKER NETWORKING
Properly defining networks in Docker Compose is crucial for container communication. Containers on the same network can communicate using just their service names.
Connecting containers in Docker Compose involves creating a docker-compose.yml file that specifies the services and the network they will communicate through. Let’s dive into the setup.
Step-by-Step Instructions
- Create a docker-compose.yml File: Start by creating a new directory and a
docker-compose.ymlfile within it.$ mkdir my_project && cd my_project
$ touch docker-compose.yml
This file will define the services and networks for your application.
- Define Your Services: Open the
docker-compose.ymlfile and define the services that you want to connect. You have two options for networking: using an explicit network or allowing Docker to create a default network.
Option 1: Explicit Network
This method gives you more control over networking by explicitly defining a custom network named
my_network.version: '3' services: web: image: nginx networks: - my_network db: image: mysql:5.7 environment: MYSQL_ROOT_PASSWORD: example networks: - my_network networks: my_network:In this setup:
- A custom network
my_networkis explicitly created. - The
webanddbservices are both attached tomy_network. - This isolates services from other containers unless they are manually added to the same network.
Option 2: Default Network (Automatically Created)
If you do not define a network, Docker Compose automatically creates a network named
your_project_default. Containers can still communicate using service names.version: '3' services: web: image: nginx db: image: mysql:5.7 environment: MYSQL_ROOT_PASSWORD: exampleIn this setup:
- Docker Compose automatically creates a network named
your_project_default. - Both
webanddbare attached to this default network. - Containers can still communicate using service names (e.g.,
db).
Key Differences Between Explicit and Default Networks
Feature Explicit Network Default Network Network Name User-defined (e.g., my_network)Automatically created ( your_project_default)Service Name Resolution Yes Yes Multiple Networks Yes (can assign services to multiple networks) No (all services are in one default network) Isolation Yes (only containers in the same custom network can communicate) Yes (only containers in the same project communicate) Manual Cleanup Required? Yes (network is removed when containers stop) Yes (default network is removed when containers stop) Which Option Should You Choose?
- Use the explicit network if you need better network management, multiple networks, or service isolation.
- Use the default network if all services should communicate automatically within the same project, without extra configuration.
- A custom network
- Run Your Docker Compose Setup: With the
docker-compose.ymlfile in place, launch your services using the following command.$ docker-compose up -d
This command starts your services in detached mode, allowing them to run in the background.
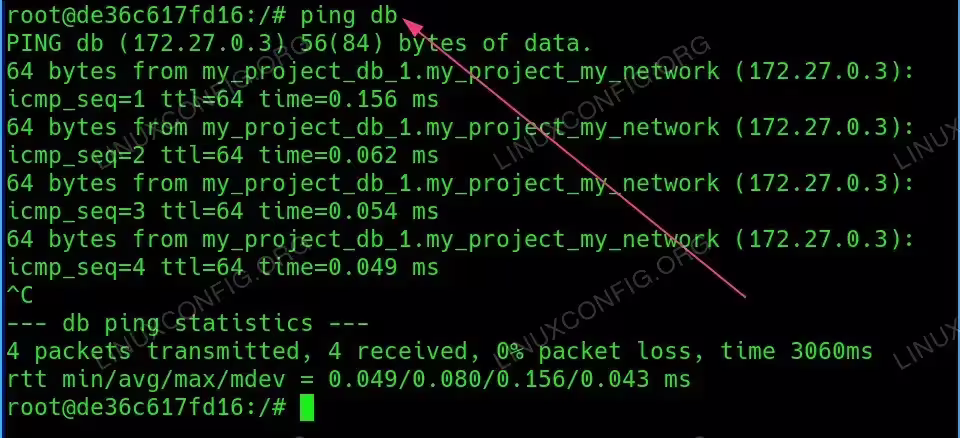
- Test Container Communication: To see if the containers can communicate, you can enter the web container and ping the database container using its service name.
$ docker exec -it my_project_web_1 /bin/bash
Then Inside the docker container run:
root@container:/# apt update && apt install -y iputils-ping
root@container:/# ping db

Successful pings indicate that your containers are correctly networked.
COMMON BEST PRACTICE
Always use specific service names to ensure clarity in your configurations and avoid potential conflicts.
Conclusion
Connecting containers with Docker Compose is a straightforward process that enhances the communication between services in your applications. By using Docker networks, you can ensure that your services are logically grouped and can communicate effectively with one another. This tutorial provided a practical example of setting up a basic web and database service connection. As you build more complex applications, understanding these networking concepts will be vital.
Frequently Asked Questions (FAQ)
-
What is Docker Compose?
Docker Compose is a tool for defining and running multi-container Docker applications. It allows you to configure your application’s services in a single file.
-
How do I access a service from another container?
You can access a service from another container using the service name defined in your
docker-compose.ymlfile as the hostname. -
Can I connect a container to multiple networks?
Yes, you can connect a single container to multiple networks by specifying additional networks in your service definition.
-
What happens if I don’t define a network?
If you don’t define a network, Docker will create a default bridge network for your containers, but it’s