ZFS (Zettabyte File System) is a robust file system designed to manage large amounts of data while ensuring integrity, scalability, and advanced features like snapshots, compression, and data deduplication. This guide will take you through the steps required to install and enable ZFS on Debian or Ubuntu.
In this tutorial you will learn:
- How to install and enable ZFS on Debian/Ubuntu
- How to verify ZFS installation and modules

| Category | Requirements, Conventions or Software Version Used |
|---|---|
| System | Debian-based distributions (Debian, Ubuntu) |
| Software | ZFS utilities and kernel modules |
| Other | Ensure your system is up to date and has sufficient storage space |
| Conventions | # – requires given linux commands to be executed with root privileges either directly as a root user or by use of sudo command$ – requires given linux commands to be executed as a regular non-privileged user |
WARNING
Installing or configuring ZFS on an existing system without proper precautions can lead to data loss. Never attempt to create or modify ZFS pools on a live disk containing important data unless you have a full backup. ZFS may overwrite partitions, making data recovery impossible. Always test configurations on a non-production system before deploying them.
Video
Installing and Enabling ZFS on Debian/Ubuntu
Follow these steps to install and configure ZFS on your system.
- Add the contrib repository: Debian and Ubuntu provide ZFS support through the contrib repository, which must be enabled.
$ sudo add-apt-repository contrib
This step ensures that ZFS packages are available for installation.
- Update and upgrade the system: Before installing ZFS, update the package list and upgrade existing packages to prevent conflicts.
$ sudo apt update && sudo apt upgrade -y
This command ensures that your system is fully updated before proceeding.
- Install ZFS: The following command will install ZFS on your system:
$ sudo apt install -y zfs-dkms zfsutils-linux
- Enable ZFS system services: Several systemd services must be enabled for ZFS to function correctly.
# sudo systemctl enable zfs-import-cache
# sudo systemctl enable zfs-import-scan
# sudo systemctl enable zfs-mount
# sudo systemctl enable zfs.target
- zfs-import-cache: This service imports known ZFS pools based on previously stored configuration cache.
- zfs-import-scan: This service scans available devices for ZFS pools that were not explicitly cached.
- zfs-mount: This service mounts all automatically mountable ZFS datasets.
- zfs.target: This is a systemd target that ensures all ZFS-related services are properly started at boot.
These services handle automatic mounting and import of ZFS pools during boot.
- Reboot the system: Restart your system to apply changes and load the necessary ZFS kernel modules.
$ sudo reboot
DID YOU KNOW?
ZFS has a built-in self-healing mechanism that automatically detects and corrects silent data corruption. When data is read, ZFS checks it against stored checksums, and if an error is detected, it automatically retrieves the correct data from a redundant copy ensuring your data remains intact and reliable even in the face of hardware failures! - Verify ZFS installation: After rebooting, verify that ZFS is installed and running correctly.
$ lsmod | grep zfs
$ zpool --version
The first command checks whether ZFS kernel modules are loaded, and the second confirms the installed ZFS version.
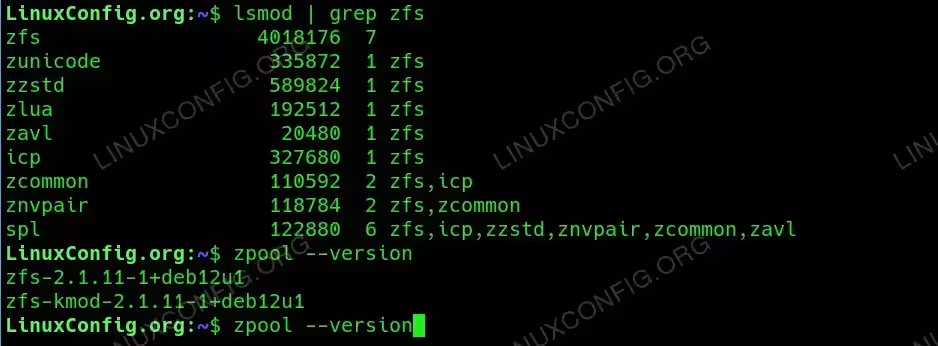
Verify ZFS installation
Conclusion
You have successfully installed and enabled ZFS on Debian/Ubuntu. Ensure your system is configured properly before creating and managing ZFS pools. Always test ZFS on a non-production system to familiarize yourself with its features.