Elasticsearch is a powerful, open-source search and analytics engine designed for handling large-scale data. It is commonly used in log analysis, full-text search, and real-time analytics. This tutorial will guide you through installing and configuring Elasticsearch on Ubuntu/Debian.
In this tutorial you will learn:
- How to install Elasticsearch on Ubuntu/Debian
- How to obtain the default Elasticsearch password
- How to enable and test Elasticsearch

| Category | Requirements, Conventions or Software Version Used |
|---|---|
| System | Ubuntu 24.04+ or Debian 12+ |
| Software | Elasticsearch 8.x |
| Other | Internet access required for package installation |
| Conventions | $ – requires given Linux commands to be executed with root privileges using sudo |
Installing Elasticsearch
Follow these steps to successfully install and configure Elasticsearch on Ubuntu or Debian.
- Update System Packages: Before installing Elasticsearch, update your system repositories to ensure that you have the latest package versions and security updates.
$ sudo apt update && sudo apt upgrade -y
- Install Java (Required for Elasticsearch): Elasticsearch requires Java to run. Installing the default Java package ensures that you get the latest stable version.
$ sudo apt install -y default-jdk
After installation, verify that Java is correctly installed by checking the version:
$ java -version
- Import Elasticsearch GPG Key and Repository: Since Elasticsearch is not available in the default package repositories, you need to add its official repository. First, import the GPG key for package verification:
$ wget -qO - https://artifacts.elastic.co/GPG-KEY-elasticsearch | sudo tee /usr/share/keyrings/elasticsearch-keyring.asc
Next, add the repository to your system:
$ echo "deb [signed-by=/usr/share/keyrings/elasticsearch-keyring.asc] https://artifacts.elastic.co/packages/8.x/apt stable main" | sudo tee /etc/apt/sources.list.d/elastic-8.x.list
Finally, update the package lists to recognize the new repository:
$ sudo apt update
- Install Elasticsearch: Now, install Elasticsearch using the package manager:
$ sudo apt install -y elasticsearch
This will download and install the latest available version of Elasticsearch.
DID YOU KNOW?
Elasticsearch is designed to handle massive amounts of data in real-time, making it a popular choice for search engines, log analysis, and security monitoring. It powers search capabilities for major platforms like Wikipedia, Uber, and Netflix, enabling fast and scalable searches across billions of records. Built on Apache Lucene, it supports full-text search, structured queries, and analytics, all while being highly distributed and fault-tolerant. - Start and Enable Elasticsearch: To ensure that Elasticsearch starts automatically with the system, enable and start the service:
$ sudo systemctl enable --now elasticsearch
You can check the service status with:
$ sudo systemctl status elasticsearch
If everything is running correctly, you should see an `active (running)` status.
- Obtain the Default Elasticsearch Password: Since security is enabled by default in Elasticsearch 8.x, the `elastic` user requires a password. If you do not have the password, you can reset it by running:
$ sudo /usr/share/elasticsearch/bin/elasticsearch-reset-password -u elastic
Follow the on-screen instructions to get the new password.
- Verify Elasticsearch Installation: Once Elasticsearch is running, test it by sending a request to its REST API. Use the following command, replacing “ with the actual password of the `elastic` user:
$ curl -k -u elastic: -X GET "https://localhost:9200"
This should return a JSON response containing cluster details and version information, confirming that Elasticsearch is working correctly.
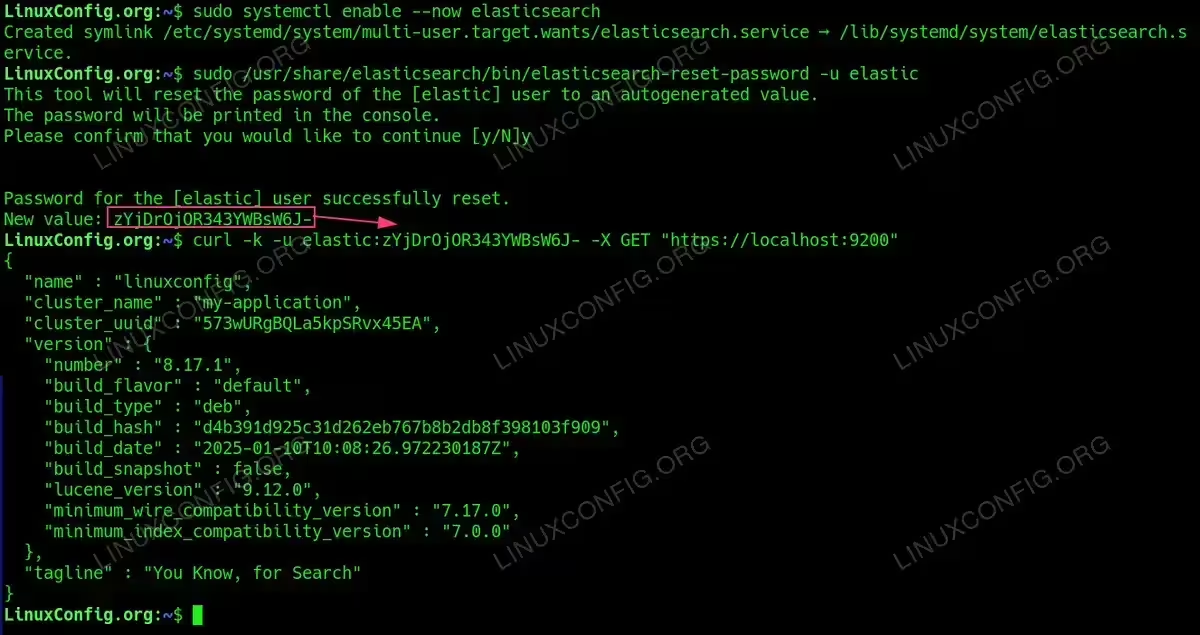
Verify Elasticsearch Installation
Conclusion
You have successfully installed and configured Elasticsearch on Ubuntu/Debian. You can now use it for full-text search, log analysis, or as part of the ELK stack. For further enhancements, consider installing Kibana for visualization.
Troubleshooting Elasticsearch Installation
While installing and setting up Elasticsearch, you may encounter some common issues. Below are the most frequent problems and their solutions.
1. Elasticsearch Service Fails to Start
Possible Causes:
- Insufficient memory or disk space
- Incorrect Java version
- Configuration file errors
Solution:
$ sudo journalctl -u elasticsearch --no-pager | tail -n 50
Check the logs for errors and ensure that you have at least 2GB of free memory. If necessary, adjust JVM heap settings in /etc/elasticsearch/jvm.options.
2. Curl Request to Port 9200 Returns Empty Response
Possible Causes:
- Elasticsearch is not running
- Security settings require HTTPS and authentication
Solution:
$ sudo systemctl status elasticsearch
$ curl -k -u elastic: -X GET "https://localhost:9200"
If security is enabled, ensure you authenticate using the elastic user.
3. “Missing Authentication Credentials” Error (401)
Cause: Elasticsearch 8.x requires authentication by default.
Solution:
$ sudo /usr/share/elasticsearch/bin/elasticsearch-reset-password -u elastic
Then use the new password to authenticate.
4. “SSL Certificate Problem” When Using Curl
Cause: Elasticsearch enforces HTTPS with self-signed certificates.
Solution: Use the -k flag with curl to ignore SSL verification:
$ curl -k -u elastic: -X GET "https://localhost:9200"
5. Port 9200 Is Not Listening
Possible Causes:
- Elasticsearch is not running
- Firewall or SELinux blocking access
Solution:
$ sudo ss -tulnp | grep 9200
$ sudo ufw allow 9200/tcp
Ensure that Elasticsearch is bound to the correct interface in /etc/elasticsearch/elasticsearch.yml.
6. High Memory Usage or Performance Issues
Solution:
- Limit JVM heap size in
/etc/elasticsearch/jvm.options(e.g., set-Xms1gand-Xmx1g). - Disable unneeded modules such as Machine Learning in
elasticsearch.yml.
By following these troubleshooting steps, you can resolve most common Elasticsearch installation issues and ensure a smooth setup.