With databases such as PostgreSQL, the need may arise to scale and provide high availability. If the database does not have a backup which can take its place in case of failure, then all of your operations that depend on the database can be affected from just a single point of failure. Even with virtual systems, there may be a time when you can’t add more resources to a single machine to cope with the ever-increasing load.
There also may be a need to have an additional copy of the database contents that can be queried for long-running analytics, that are not fit to be run on the highly transaction-intensive production database. This copy could be a simple restore from the most recent backup on another machine, but the data would be outdated as soon as it is restored. We can create a hot standby by making a copy of the primary database and configure it to constantly replicate its contents to the standby.
For these reasons, having a hot standby for your PostgreSQL database is beneficial. In case of failure on the master database, the standby (or slave) database can take over the role of the primary, stop the synchronization, and accept read and write requests, so operations can proceed, and the failed master can be returned to life (maybe as standby by switching the way of synchronization). When both primary and standby are running, queries that do not attempt to modify database content can be offloaded to the standby, so the overall system will be able to handle a greater load. Note however, that there will be some delay – the standby will be behind the master, to the amount of the time it takes to synchronize changes. This delay may vary depending on the setup.
There are many ways to build a master-slave (or even master-master) synchronization with PostgreSQL, but in this guide we’ll focus on streaming replication. In this tutorial, we will go through the step by step instructions of setting up a hot standby PostgreSQL database. The databases will be configured on two different servers, such that the hot standby server could easily be swapped out for the primary server in case of failure.
In this tutorial you will learn:
- How to install PostgreSQL server
- How to configure a replication user in PostgreSQL
- How to create a hot standby setup
- How to test database replication for PostgreSQL

| Category | Requirements, Conventions or Software Version Used |
|---|---|
| System | Two servers running Debian based or Red Hat based Linux distributions |
| Software | PostgreSQL Server |
| Other | Privileged access to your Linux system as root or via the sudo command. |
| Conventions |
# – requires given linux commands to be executed with root privileges either directly as a root user or by use of sudo command$ – requires given linux commands to be executed as a regular non-privileged user |
PostgreSQL Configuration for Master Server
We will start off with configuring PostgreSQL on the master server. This should be the system which provides database services to your applications and users. It will need particular settings applied in order to replicate its contents to a secondary database, which we will configure after this.
WARNING!
If you are working with a production database, it is generally a good idea to backup any configuration files before we make changes. They don’t take up space worth mentioning, and if something goes wrong, the backup of a working configuration file can be a lifesaver.
The steps below will cover Debian based (such as Ubuntu) and Red Hat based (Fedora, almalinux, etc) distributions.
- We will begin by installing PostgreSQL server on our Linux system. This process will take place on both systems, if you do not already have PosteSQL installed. Debian based users can use the
aptcommand:$ sudo apt install postgresql
And Red Hat based users can use the
dnfcommand:$ sudo dnf install postgresql-server
Note that you will need to run the following command on Red Hat based distros after installation:
$ sudo postgresql-setup initdb
- Next, run the following command on both servers to make sure that the PostgreSQL databases start up automatically:
$ sudo systemctl enable postgresql
- On the primary (master) server, we need to edit the
pg_hba.conffile to apply the replication settings. Open this file in your preferred text editor and with root privileges:Debian based systems: $ sudo nano /etc/postgresql/16/main/pg_hba.conf Red Hat based systems: $ sudo nano /var/lib/pgsql/data/pg_hba.conf
- Inside of this file, we need to add a rule that will allow the database user from the standby to access the primary. This is the server side setting, the user does not exist yet within the database. You can find examples at the end of the file commented out that are related to the replication database:
# Allow replication connections from localhost, by a user with the
# replication privilege.
local   replication     all                                     peer
host    replication     all             127.0.0.1/32            scram-sha-256
host    replication     all             ::1/128                 scram-sha-256
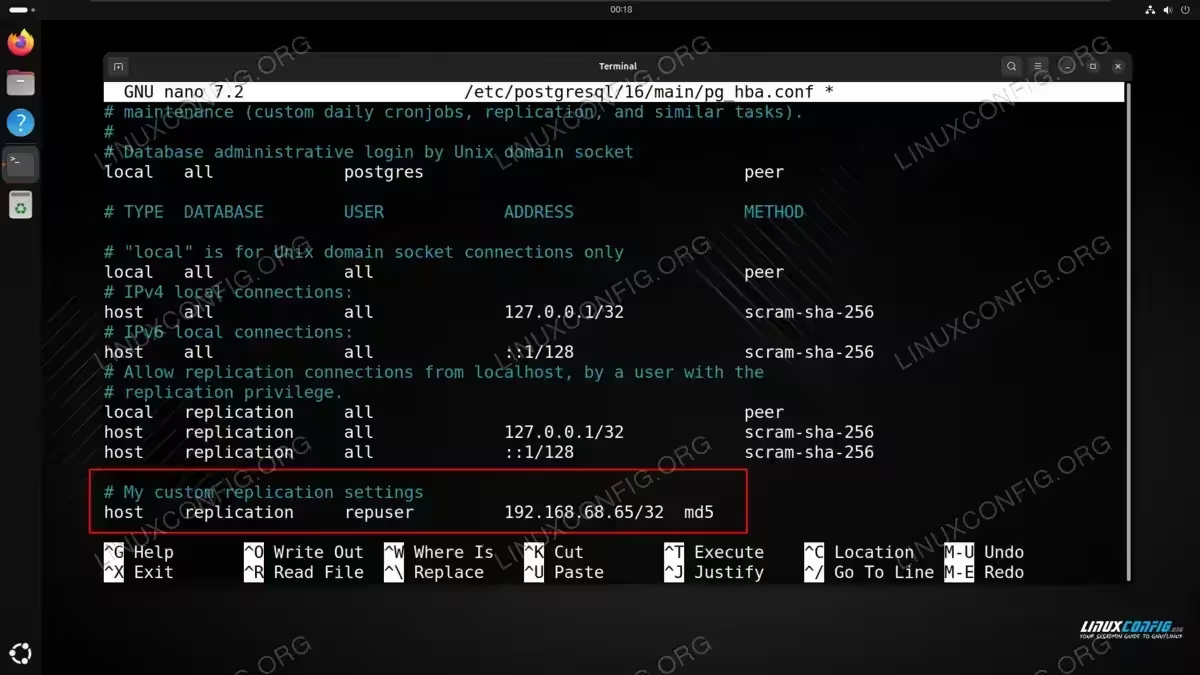
Let’s add another line to the end of the file, and mark it with a comment so it can be easily seen what is changed from the defaults:
# My custom replication settings
host    replication     repuser         192.168.68.65/32  md5
Note that
192.168.68.65is the IP address of our secondary server. The/32subnet mask just makes it so that only our particular host will be able to access the primary database from this setting. Your file should look something like the screenshot below:
PostgreSQL server replication settings on the master server Save your changes to this file and exit it.
- We also need to make changes to the database server’s main configuration file,
postgresql.conf, which is located in the same directory we found thepg_hba.conffile. We will need to apply the following settings:listen_addresses = '*' wal_level = 'replica' archive_mode = on archive_command = 'cp %p /etc/postgresql/16/main/%f' max_wal_senders = 3 wal_keep_size = 64
All of these settings already exist inside of the file, but they are commented out. Rather than finding each one and applying the settings one by one, it is easier and just as effective to simply paste all of the lines at the bottom of the file:
- Now that we have all of the necessary settings configured, let’s start up the primary server:
$ sudo systemctl start postgresql
- Lastly, we need to create the database user which will be handling the replication:
$ sudo -u postgres psql

postgres=# CREATE ROLE repuser WITH REPLICATION PASSWORD 'secretPassword' LOGIN;
CREATE ROLE
Take note of the password you give to the
repuseruser, because we will need it on the standby side. TheCREATE ROLEoutput confirms that we have created the user successfully. - Before shifting over to the secondary server, we will need to restart PostgreSQL for our changes to take effect:
$ sudo systemctl restart postgresql
PostgreSQL Configuration for Slave Server
At this point, we can move over to the secondary (slave) server. Follow along with the steps below to get this server set up as the hot standby for the master server that we have already configured above:
- By following the section above, you should already have the slave server set up with PostgreSQL. Next, we’ll work as the
postgresuser, who is superuser in the context of the database. We’ll need an initial copy of the primary database, and we’ll get that with thepg_basebackupcommand. First, we wipe the data directory on standby of most files (make a copy beforehand if you wish, but it’s only an empty database). We will leave two files in tact:Debian based systems: $ sudo find /etc/postgresql/16/main ! -name 'pg_hba.conf' ! -name 'pg_ident.conf' -exec rm -f {} + Red Hat based systems: $ sudo find /var/lib/pgsql/data ! -name 'pg_hba.conf' ! -name 'pg_ident.conf' -exec rm -f {} +This will delete all files except for
pg_hba.confandpg_ident.conf, which we need to keep on the system. - Now we are ready to make a consistent copy of the primary database to the standby database:
Debian based systems:
$ sudo pg_basebackup -h 192.168.68.64 -U repuser -D /etc/postgresql/16/main/

Red Hat based systems:
$ sudo pg_basebackup -h 192.168.68.64 -U repuser -D /var/lib/pgsql/data/
Note that in this example,
192.168.68.64is the IP address of our master server.repuseris the name of the user we configured earlier. You should be prompted for your password when running the command.NOTE
As the primary is empty besides this user we created, thepg_basebackupshould complete in seconds (depending on network bandwidth). If something goes wrong, check thehbarules on the primary server, the correctness of the IP address given to thepg_basebackupcommand, and that port 5432 on primary is reachable from standby (for example, with telnet). - When the backup finishes, you’ll notice that the data directory is populated on the slave, including configuration files (remember, we had previously deleted everything from this directory):
Debian based systems:
$ sudo ls /etc/postgresql/16/main

Red Hat based systems:
$ sudo ls /var/lib/pgsql/data
Output:
backup_label.old  pg_commit_ts	 pg_logical    pg_serial     pg_subtrans  pg_wal		postmaster.opts
backup_manifest   pg_dynshmem	 pg_multixact  pg_snapshots  pg_tblspc	  pg_xact		postmaster.pid
base		  pg_hba.conf	 pg_notify     pg_stat	     pg_twophase  postgresql.auto.conf	standby.signal
global		  pg_ident.conf  pg_replslot   pg_stat_tmp   PG_VERSION   postgresql.conf
- Now we need to make some adjustments to the standby’s configuration. The IP address enabled for the
repuserto connect from needs to be the master server’s address in thepg_hba.conffile. Add the following line to the bottom of the file, where you substitute your own master’s IP address for the one we have configured below:File location: Debian based: $ sudo nano /etc/postgresql/16/main/pg_hba.conf Red Hat based: $ sudo nano /var/lib/pgsql/data/pg_hba.conf
Copy and paste the following line to the bottom:
# My custom replication settings
host    replication     repuser         192.168.68.64/32         md5
Note: Replace
192.168.68.64above with the IP address of your master server. - We have everything in place, so we can start up the standby, and see if everything works as it should:
$ sudo systemctl start postgresql
It might take a bit more time than usual to get the prompt back. The reason is that the database performs the recovery to a consistent state in the background.
- Check the log file to check if your database has entered standby mode and begun making a copy of the primary database:
Debian based systems:
$ tail -f /var/log/postgresql/postgresql-16-main.log

Red Hat based systems:
$ tail -f /var/lib/pgsql/data/log/postgresql-Sun.log
(the name of this log file will change depending on the day of the week)
Expected output should look something like this:
2024-09-01 22:59:50.068 GMT [4350] LOG:  entering standby mode
2024-09-01 22:59:50.069 GMT [4350] LOG:  starting backup recovery with redo LSN 0/6000028, checkpoint LSN 0/6000060, on timeline ID 1
2024-09-01 22:59:50.087 GMT [4350] LOG:  redo starts at 0/6000028
2024-09-01 22:59:50.088 GMT [4350] LOG:  completed backup recovery with redo LSN 0/6000028 and end LSN 0/6000100
2024-09-01 22:59:50.088 GMT [4350] LOG:  consistent recovery state reached at 0/6000100
2024-09-01 22:59:50.088 GMT [4347] LOG:  database system is ready to accept read-only connections
2024-09-01 22:59:50.127 GMT [4351] LOG:  started streaming WAL from primary at 0/7000000 on timeline 1
Closing Thoughts
In this tutorial, we saw how to set up a hot standby for a PostgreSQL database on a Linux system. After the configuration, our secondary server is standing by with a 1:1 copy of the primary database in case of failure. It is an easy and straightforward process to swap out the databases in case the primary goes down. Furthermore, we can run tests and queries against the secondary server in order to not interfere with the operations of the primary server.