When talking about backup solutions, on Linux we are spoiled for choice: in the previous tutorials, for example, we talked about creating encrypted and efficient backups with Borg and Restic. Kopia is another free and open source alternative to those applications: it is written in Go, and it is able to create secure backups, both to local filesystems and to cloud-based storage services like Amazon S3, Azure Blob Storage, Backblaze B2 and Google Cloud Storage. Unlike Borg and Restic, Kopia comes also with an officially supported GUI interface: KopiaUI.
In this tutorial, we learn how to install Kopia on the most used Linux distributions, and how to use it to create and restore secure and efficient backups.
In this tutorial you will learn:
- How to install Kopia on the most used Linux distributions
- How to create secure and efficient backups with Kopia
| Category | Requirements, Conventions or Software Version Used |
|---|---|
| System | Distribution-agnostic |
| Software | Kopia |
| Other | Root permissions required |
| Conventions | # – requires given linux-commands to be executed with root privileges either directly as a root user or by use of sudo command $ – requires given linux-commands to be executed as a regular non-privileged user |
Installation
At the moment of writing, Kopia is not yet included in any of the major Linux distributions official repositories, therefore, before we can install it, we must add its repository to our own system software sources. Let’s see how to do it.
Debian-based distributions
As a first thing, we need to add the GPG key used to sign Kopia packages to our package manager keyring. On Debian, and Debian-based distributions which use the apt package manager, we can do it by running the command below, which downloads the signing key, de-armors it, and stores it under the /etc/apt/keyrings directory, as kopia-keyring.gpg:
$ curl -s https://kopia.io/signing-key | sudo gpg --dearmor -o /etc/apt/keyrings/kopia-keyring.gpg
After we installed the key, we can add the Kopia repository as a software source. All we have to do, is to add the appropriate line in the
/etc/apt/sources.list.d/kopia.list file:
$ echo "deb [signed-by=/etc/apt/keyrings/kopia-keyring.gpg] http://packages.kopia.io/apt/ stable main" | sudo tee /etc/apt/sources.list.d/kopia.list
At this point, we can synchronize our software sources and install the kopia and kopia-ui packages. The latter provides the desktop graphical application:
$ sudo apt-get update && sudo apt-get install kopia kopia-ui
Fedora-based distributions
On distributions which using the rpm package manager, such as Fedora, Rocky Linux and Red Hat Enterprise Linux, we have to perform the same steps, just differently. To add the Kopia signing key to our system, we can use the rpmkeys utility, which is specifically designed to add and remove keys from the RPM keyring. To import a key, we use the --import option. We run:
$ sudo rpmkeys --import https://kopia.io/signing-key
The next step consists into creating and populating the /etc/yum.repos.list/kopia.repo repository file:
cat <<EOF | sudo tee /etc/yum.repos.d/kopia.repo
[Kopia]
name=Kopia
baseurl=http://packages.kopia.io/rpm/stable/\$basearch/
gpgcheck=1
enabled=1
gpgkey=https://kopia.io/signing-key
EOF
With the repository file in place, to install Kopia and KopiaUI, we run:
$ sudo dnf install kopia kopia-ui
Using Kopia from the command line
Before we can create a backup with Kopia, we must create the repository which will host our snapshots. For the sake of this tutorial, to keep things simple, we will create a local repository.
To create a local Kopia repository, we run the command below:
$ kopia repository create filesystem --path ~/kopia-repo
We will be prompted to provide and verify a password for the repository. Once the repository is ready, Kopia will automatically connect to it, so it will not be necassary to provide the password each time we perform a command. If, for some reason, we want to disconnect from the repository, we can use the
repository disconnect command:
$ kopia repository disconnect
To explicitly connect to an existing repository, instead, we use repository connect. To connect to the local repository we created in this tutorial, for example, we would run:
$ kopia repository connect filesystem --path ~/kopia-repo
Creating a snapshot
To create our first snapshot, we run Kopia with the snapshot create command, passing the directory we want to back up (the snapshot root), as argument. Notice that if we pass multiple directories as arguments, they will not be included in the same snapshot; Kopia instead, will create a separate snapshot for each of them:
$ kopia snapshot create ~/.config ~/Documents
Listing the available snapshots and the files contained in a snapshot
To list the available snapshots, we use the snapshot list command:
$ kopia snapshot list
In this case, two snapshots have been created, since we provided two targets: ~/.config and ~/Documents:
doc@hllpt0:/home/doc/.config
  2025-04-04 18:13:40 CEST kc4d9a4afa23d33ca3a04d5710485866d 108.1 MB drwx------ files:1094 dirs:309 (latest-1,hourly-1,daily-1,weekly-1,monthly-1,annual-1)

doc@hllpt0:/home/doc/Documents
  2025-04-04 18:13:40 CEST k9ac19915adf29498e657457283f1e2e9 3.6 GB drwxr-xr-x files:85404 dirs:13403 (latest-1,hourly-1,daily-1,weekly-1,monthly-1,annual-1)
To actually list the file and directories contained in a snapshot, instead, we use the Kopia ls command (optionally with the -l flag, to obtain more details about each file), and pass the ID of the snapshot as argument:
$ kopia ls -l kc4d9a4afa23d33ca3a04d5710485866d
Mounting the whole repository or a specific snapshot on the local filesystem
By using the Kopia mount command, we can mount an entire repository, or a specific snapshot, on the local filesystem. To mount the whole repository, we pass the “all” keyword as first argument. We can optionally specify a mountpoint as the second argument. If we omit it, Kopia will mount the repository on a temporary directory created on the fly.
In the example below, we mount the whole repository on the ~/Public directory:
$ kopia mount all ~/Public
If the command is successful, we will be able to browse the repository content just as any other directory in the filesystem. To mount a single snapshot, instead, we pass its ID as first argument to the command, e.g:
$ kopia mount kc4d9a4afa23d33ca3a04d5710485866d ~/Public
Restoring a snapshot
To restore a snapshot, we use the snapshot restore command. To restore the entire content of a snapshot, we simply pass the snapshot ID as the first argument, and the target directory as the second one. The target directory will be created, if it doesn’t already exist. In the example below, we restore the content of the kc4d9a4afa23d33ca3a04d5710485866d snapshot to the ~/restore-target directory:
$ kopia snapshot restore kc4d9a4afa23d33ca3a04d5710485866d ~/restore-target
To restore the content of a specific subdirectory, instead, we simply append its path after the snapshot ID. To restore the content of the “autostart” subdirectory only (not the directory itself), for example, we would run:
$ kopia snapshot restore kc4d9a4afa23d33ca3a04d5710485866d/autostart ~/restore-target
Deleting a snapshot
To remove a snapshot, we use the Kopia snapshot delete command, and pass the ID of the snapshot we want to remove as argument. By default, the command just displays the action that would be performed (dry-run). To actually perform it, we need to pass the --delete option:
$ kopia snapshot delete --delete kc4d9a4afa23d33ca3a04d5710485866d
Using KopiaUI
Kopia comes with an officially supported graphical user interface, KopiaUI. After installing the “kopia-ui” package, we should find KopiaUI desktop launcher in the application menu of our favorite desktop environment. Launching the application, it’s just a matter of clicking on it.
If it’s the first time we use Kopia, and we don’t have any repository available, the application allows us to create one, by selecting the storage type:
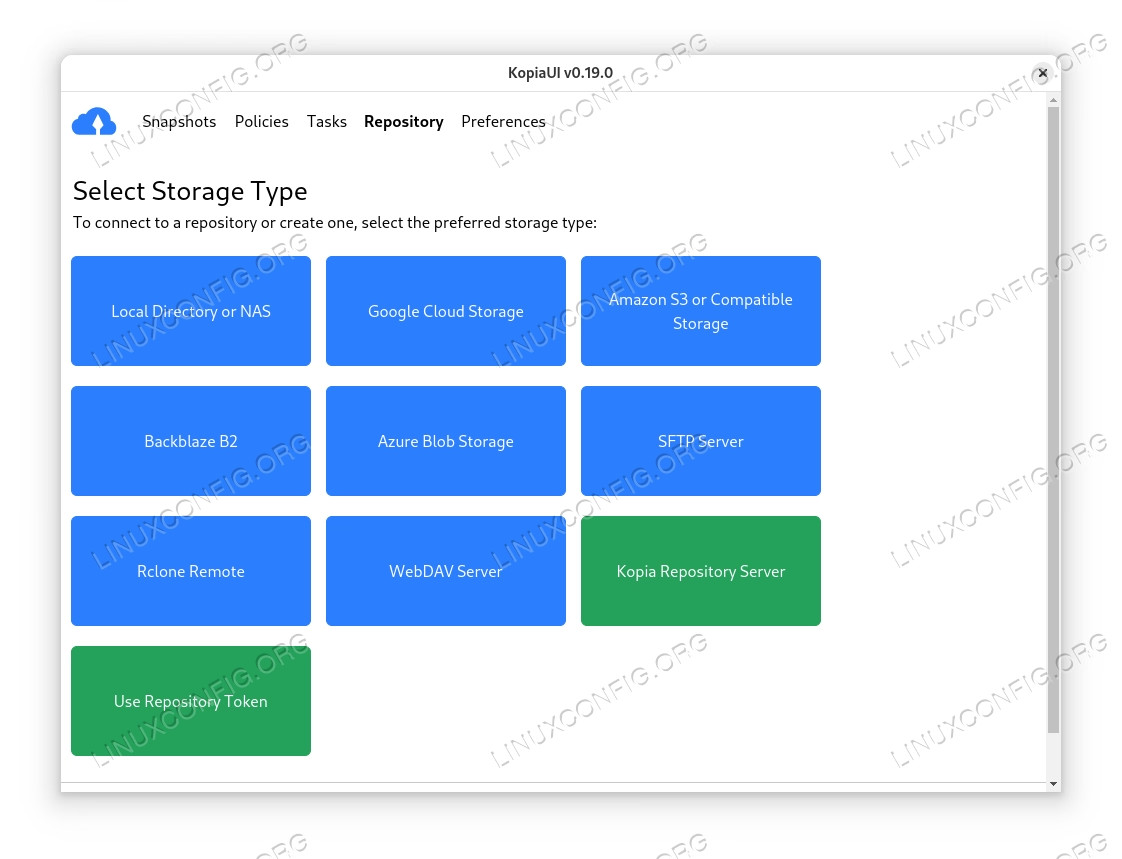
To create a local repository, we click on the first button: “Local Directory or NAS”, and enter the repository path:
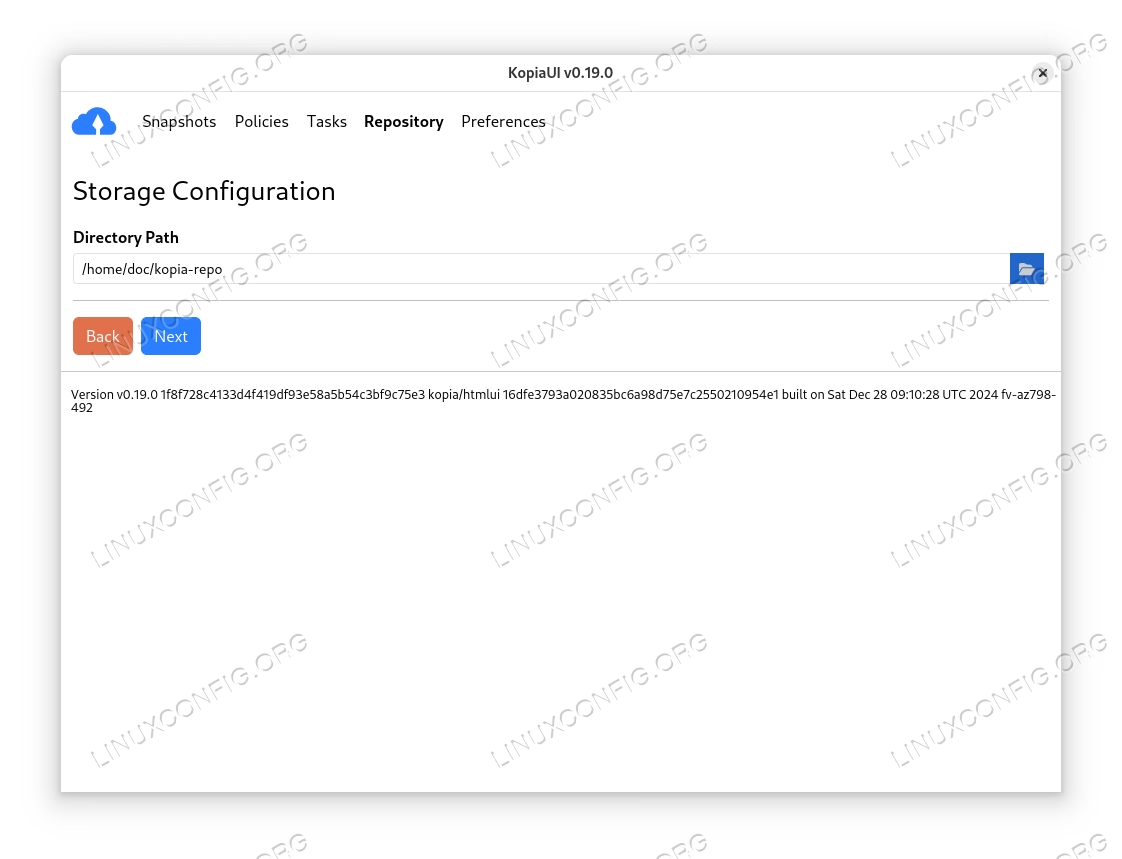
When ready, we click on the “Next” button, and provide a password for the repository:

By clicking on the “Show Advanced Options” button, we also have the chance to change other repository parameters, such as the encryption type and the hash algorithm (default values are sane, only change them if you know what you are doing).
Once ready, we click on the “Create Repository” button. The repository will be created, and we will be redirected to the “Snapshots” section, from which we will be able to create new snapshots, and visualize the existing ones, grouped by path.
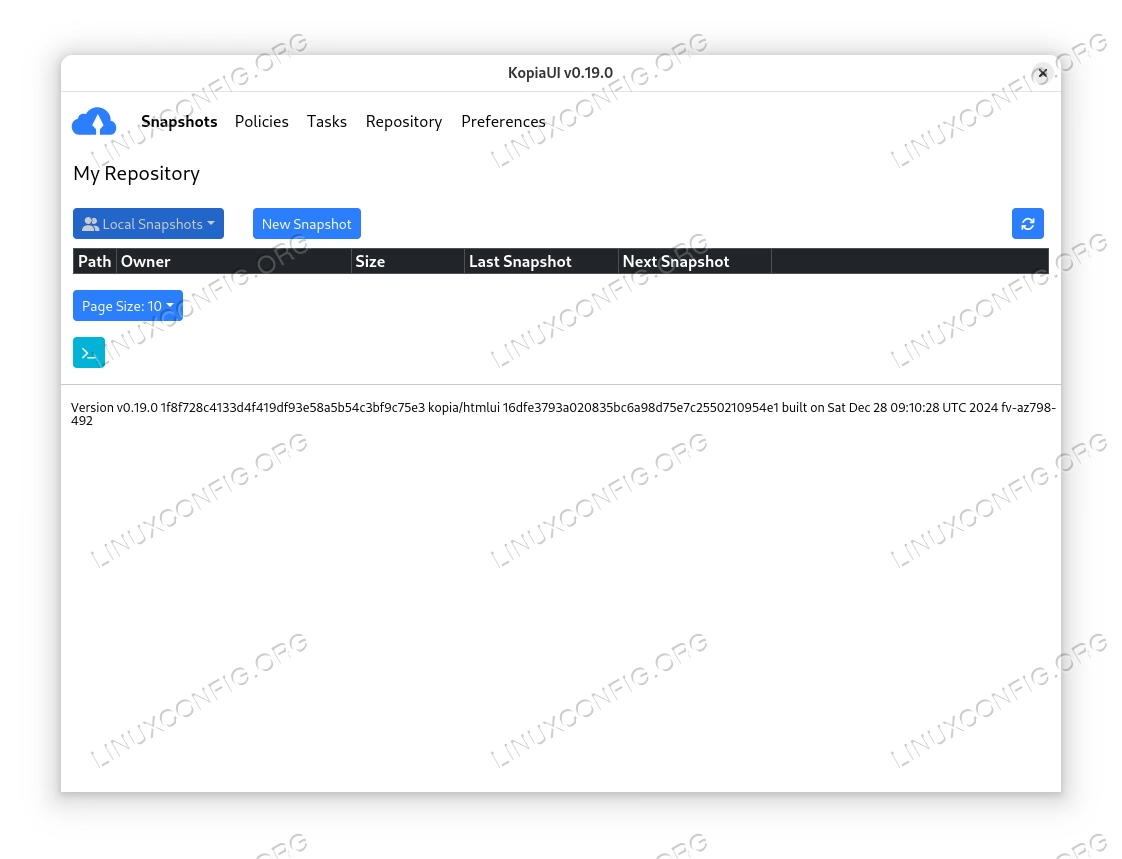
To create a new snapshot, we click on the “New Snapshot” button and, in the dedicated widget, we specify the snapshot root:
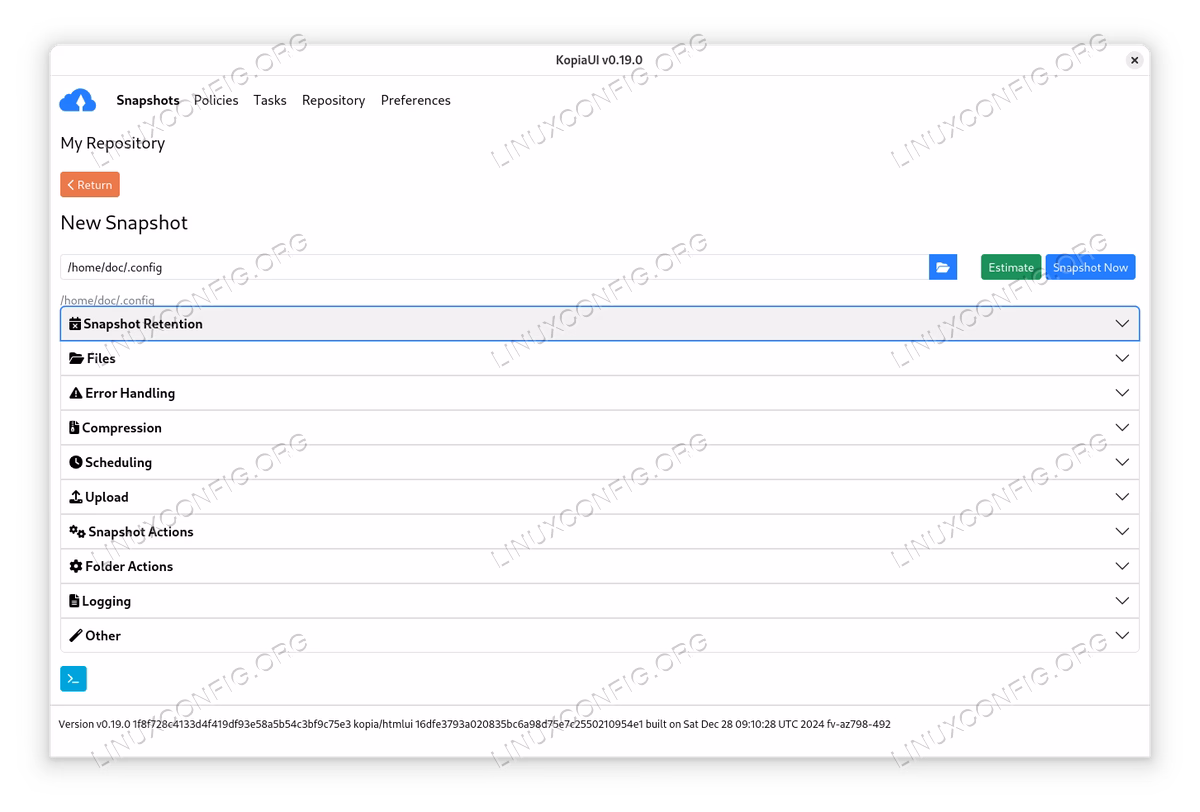
From the same interface, we can specify a path-specific retention policy, the exclusion paths, and fine-tune some advanced parameters such as the compression algorithm. Finally, to create the snapshot, we click on the “Snapshot Now” button.
Conclusions
In this tutorial, we learned how to install Kopia on some of the most used Linux distributions, and how to create, manage and restore Kopia repositories and snapshots, using both the command line and the official KopiaUI graphical interface.