When working with bash scripts, it is essential to manage files efficiently, and one of the most common tasks is removing files or directories. The rm command in Linux is designed specifically for this purpose. Incorporating rm into a bash script enables you to automate file deletion, either for cleanup purposes or as part of a larger process. However, it’s important to handle this command with caution, especially when using it in scripts that may delete critical files. In this article, we will discuss how to add rm to bash scripts, explore its options, and provide several practical examples for different scenarios.
In this tutorial you will learn:
- How to add
rmto a bash script - Various options available with
rmcommand in bash scripts - Different examples of using
rmfor specific use cases

| Category | Requirements, Conventions, or Software Version Used |
|---|---|
| System | Linux-based operating system |
| Software | Bash shell (version 4.0 or later) |
| Other | Basic understanding of bash scripting |
| Conventions | # – requires given Linux commands to be executed with root privileges either directly as a root user or by using the sudo command.$ – requires given Linux commands to be executed as a regular non-privileged user. |
Adding rm to Bash Scripts
The rm command is a powerful tool to remove files and directories in Linux. When adding rm to a bash script, it’s important to understand the options available and the safety measures you should take. Below are five examples of how to incorporate the rm command in bash scripts with various use cases.
- Basic File Deletion: In this example, you will learn how to remove a single file using
rmin a bash script.#!/bin/bash rm /path/to/file.txt echo "File removed successfully"This script removes the specified file
file.txtand prints a confirmation message. You can replace the file path with any file you want to delete. - Using
rmwith Wildcards: Sometimes, you might want to delete multiple files that follow a pattern. Wildcards allow you to delete many files at once.#!/bin/bash rm /path/to/files/*.txt echo "All .txt files removed"This script deletes all
.txtfiles in a specific directory. Be cautious when using wildcards to avoid unintentional deletion.DID YOU KNOW?
Many users are unaware of the--no-preserve-rootoption in thermcommand. By default, Linux prevents you from runningrm -rf /to protect your root directory from being deleted, which would break your entire system. However, using--no-preserve-rootoverrides this safeguard, allowing even the root directory to be deleted. This option is extremely risky and should only be used in highly controlled environments, like during system testing. Always handle thermcommand with care! - Recursive Directory Deletion: The
-roption allows you to remove directories and their contents recursively.#!/bin/bash rm -r /path/to/directory echo "Directory and its contents removed"In this script, the
-rflag is used to remove a directory and all files within it. This option is useful for cleaning up large folders. - Force Deletion with
-fOption: The-foption forces file removal without prompting for confirmation, which is useful for scripts that require automated execution.#!/bin/bash rm -f /path/to/file.txt echo "File removed without confirmation"The
-foption is handy when dealing with protected or write-protected files, as it forces their removal without requiring user input. - Combining
rmwith Conditional Statements: To make your script smarter, you can combinermwith conditionals likeifstatements.#!/bin/bash if [ -f /path/to/file.txt ]; then rm /path/to/file.txt echo "File exists and was removed" else echo "File does not exist" fiThis script checks if a file exists before attempting to remove it, which helps avoid errors when the file is not present.
- Using
rmwith Find Command: For more advanced file deletion, you can combinermwith thefindcommand to selectively remove files based on criteria such as age or size.#!/bin/bash find /path/to/directory -name "*.log" -type f -mtime +30 -exec rm {} \; echo "All log files older than 30 days removed"This script uses the
findcommand to search for log files older than 30 days and deletes them. The-exec rm {} \;portion executes thermcommand on the files found byfind. This is particularly useful for automating the removal of old or unused files. - Secure Deletion with
shredandrm: For sensitive data, you might want to ensure files are unrecoverable by usingshredbefore deletion.#!/bin/bash shred -u /path/to/file.txt rm /path/to/file.txt echo "File securely shredded and removed"This example first uses the
shredcommand, which overwrites the file multiple times to prevent data recovery, and then removes it withrm. This is ideal when you need to delete sensitive information in a secure manner. - Using
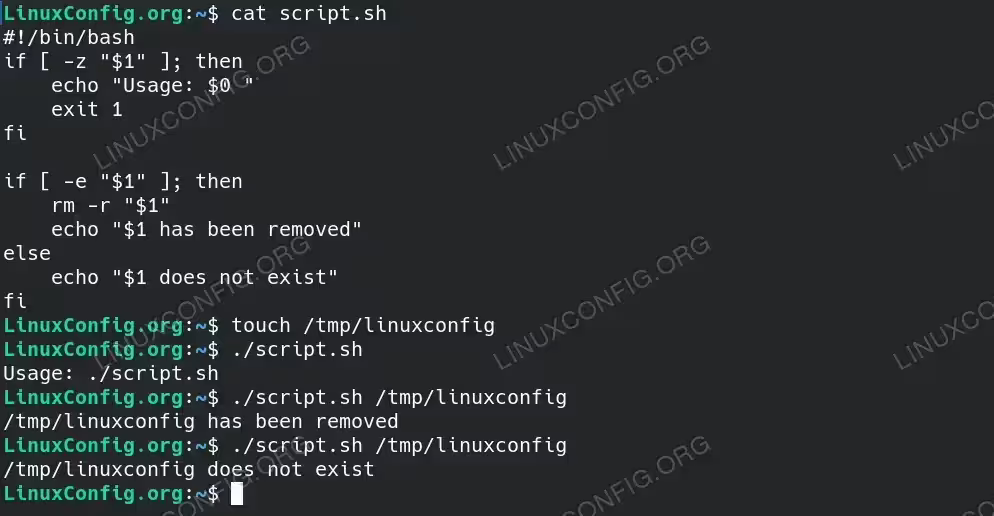
rmwith Command Line Arguments and Existence Check: This example demonstrates how to use command-line arguments to specify the file or directory to remove, while also checking if the file or directory exists before attempting to delete it.#!/bin/bash if [ -z "$1" ]; then echo "Usage: $0 " exit 1 fi if [ -e "$1" ]; then rm -r "$1" echo "$1 has been removed" else echo "$1 does not exist" fiIn this script, the argument passed via
$1is checked for existence using the-eflag before attempting to remove it. If the file or directory exists, it is removed, and a success message is displayed. If it does not exist, the script informs the user that the target could not be found.
This script will first check if the file/directory exists before using rm command in the script to remove files or directories based on the command line argument
Conclusion
Incorporating the rm command into your bash scripts can significantly streamline file management and automate tasks such as cleanup operations. However, it’s crucial to understand and carefully use the options provided by rm, such as -r and -f, to prevent accidental file or directory deletion. By following the examples in this guide, you will be able to add rm to your bash scripts effectively and safely.