Repackaging an Ubuntu ISO image for automated installation (autoinstall) can significantly streamline the process of setting up multiple systems, especially for environments that require consistent configurations. By creating an autoinstall.yaml file, you can define parameters such as partitions, users, and preinstalled packages, enabling you to deploy Ubuntu efficiently with minimal manual intervention. This guide will walk you through the process of repackaging an Ubuntu ISO image for an autoinstall setup using YAML.
In this tutorial you will learn:
- How to create and mount an Ubuntu ISO image
- How to extract the ISO contents for modification
- How to create an autoinstall YAML configuration
- How to repackage the modified ISO image

| Category | Requirements, Conventions or Software Version Used |
|---|---|
| System | Ubuntu 24.04 or later, Linux command line |
| Software | rsync, xorriso, nano |
| Other | ISO image of Ubuntu 24.04 or higher |
| Conventions | # – requires given linux commands to be executed with root privileges either directly as a root user or by use of sudo command$ – requires given linux commands to be executed as a regular non-privileged user |
Step-by-Step Guide to Repackage Ubuntu ISO for Autoinstall
To automate the installation of Ubuntu with a custom configuration, you need to repackage an existing ISO file to include an autoinstall YAML file. Follow these steps to create your customized Ubuntu ISO.
- Download the ISO Image and Set Up Working Directory: Begin by downloading the latest Ubuntu ISO and setting up a directory to work in.
$ mkdir myiso
$ cp Downloads/ubuntu-24.04.1-desktop-amd64.iso myiso/
In this step, you create a directory named
myisoand copy the downloaded ISO image to it for modification. - Mount the ISO Image: Mount the Ubuntu ISO image to a directory to access its contents.
$ cd myiso/
$ mkdir isomount
$ sudo mount -o loop ubuntu-24.04.1-desktop-amd64.iso isomount
Here, you create a directory called
isomountand mount the ISO image to this directory using themountcommand. - Extract the ISO Contents: Use
rsyncto extract the contents of the mounted ISO image to a new directory.$ rsync -a isomount/ extracted
This step copies all the files from the mounted ISO to a directory named
extracted, which will be used to make modifications. - Create and Edit the Autoinstall YAML File: Create an autoinstall YAML file to define the installation parameters.
Starting from Ubuntu 24.04 (Noble), a top-levelautoinstall:keyword is required. You can create or edit the autoinstall.yaml file as shown below:$ cd extracted/ $ sudo nano autoinstall.yaml
Generate a password hash with:
$ openssl passwd -6
Enter your password to obtain password hash for your user.
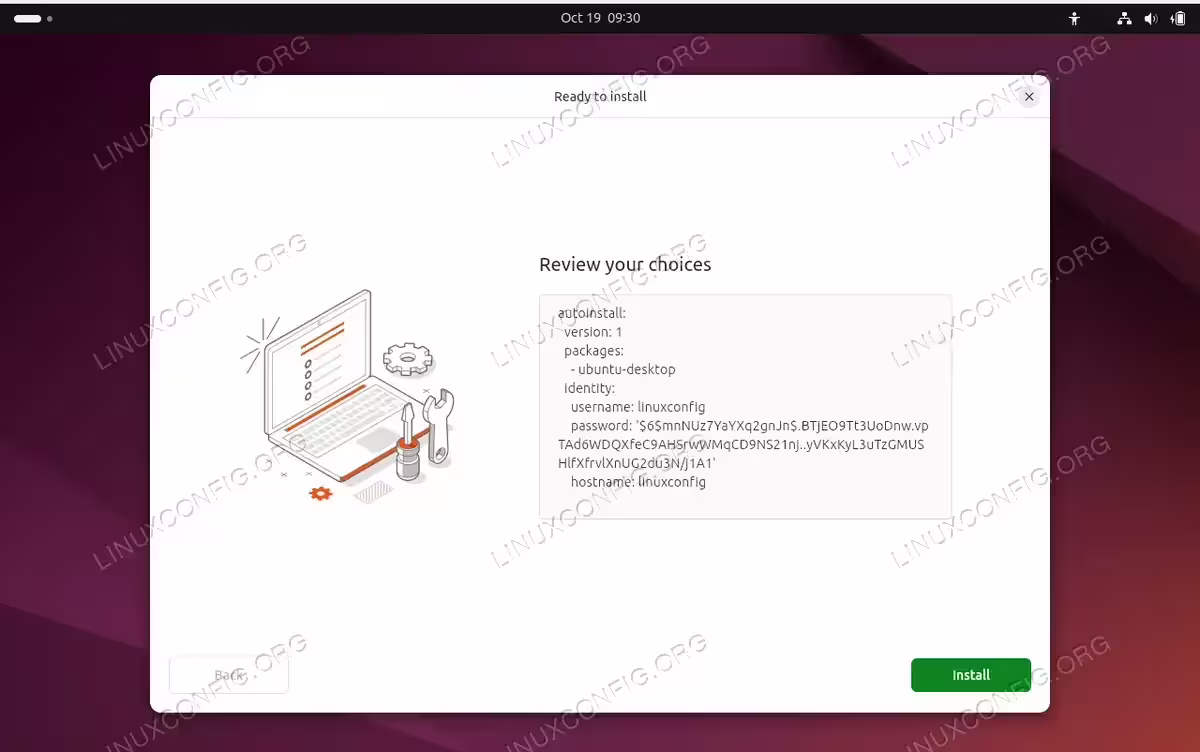
autoinstall:
  version: 1
  packages:
    - ubuntu-desktop
  identity:
    username: linuxconfig
    password: '$6$mnNUz7YaYXq2gnJn$.BTjEO9Tt3UoDnw.vpTAd6WDQXfeC9AHSrwWMqCD9NS21nj..yVKxKyL3uTzGMUSHlfXfrvlXnUG2du3N/j1A1'
    hostname: linuxconfig
In this basic YAML file, you specify the version, packages to install, and user identity settings (such as username, password, and hostname). Feel free to add more configuration settings to fit your needs. Make sure the file is placed in the
extracteddirectory, which will be included in the repackaged ISO.
Include Ubuntu Autoinstall YAML - Repackage the Modified ISO: After making the necessary modifications, repackage the ISO image using
xorriso.$ sudo xorriso -as mkisofs -r -V "My AutoInstall Ubuntu Image" -o ../custom-ubuntu24.iso \ -J -l -b boot/grub/i386-pc/eltorito.img -c boot.catalog -no-emul-boot -boot-load-size 4 -boot-info-table .
This command uses
xorrisoto create a new ISO namedcustom-ubuntu24.isothat includes the modifications you made, such as the autoinstall.yaml file. The various flags ensure that the new ISO is bootable. - Boot the Modified ISO: As a last step simply boot from your new custom Ubuntu autoinstall image.
Boot the Modified ISO. You should see your autoinstall configuration options when proceeding with the Ubuntu installation.
Conclusion
By following the steps outlined in this guide, you can create a customized Ubuntu ISO image for automated installation, which can save time and effort, especially when setting up multiple systems. The process involves mounting, extracting, modifying, and repackaging an existing Ubuntu ISO to include an autoinstall.yaml configuration file. With these steps, you can deploy Ubuntu consistently across your environment, avoiding repetitive manual setup tasks.